The Raspberry Pi Foundation recently released an interchangeable lens camera module based on the Sony IMX477, a 1/2.3″ back side illuminated sensor with 3040×4056 pixels of 1.55um pitch. In this somewhat technical article we will unpack the 12-bit raw still data that it produces and render it in a convenient color space.

My First Open Source ILC
When the HQ module was announced a couple of weeks ago I was excited to discover that it came with a CS standard mount, opening the possibility of using any lens ever made with it – as long as it respected back flange limits and an adapter were available. Finally an inexpensive open source ‘camera’ with a decent sensor and interchangeable lenses of potentially photographic quality.
Mine arrived a few days ago. The CS mount affixed to the board has V1.0 2018 markings and it came with a CS-C adapter, which was promptly used to attach the 16mm f/1.4-16 C ‘kit’ lens. The lens is from CGL Electronic Co. LTD, a Chinese company specialized “in the R&D, production and sale of accessories for smartphones, as well as Bluetooth products”. One of their lines is Megapixel CCTV lenses, and this one is spec’d at 10 MP, as printed on the box. What size P that refers to, we are not told. Its field of view is about 27.6 degrees on the diagonal, equivalent to roughly 88mm on Full Frame.
The Sensor
The IMX477 was released in December 2016 by Sony. It is a 1/2.3″ 4:3 Back Side Illuminated, Stacked Exmor CMOS sensor designed for “consumer use camcorder” applications, though in this article I will evaluate its ability to capture still images, thus ignoring Sony’s stated use case. Given its tinkering potential, I am sure I will not be the first or last to do so.
There are 3040×4056 pixels usable for imaging, with a 1.55um pitch. This portends a sensor active area of 4.712 x 6.287 mm with a 7.857mm diagonal, implying a 5.51x multiplier compared to, say, a Full Frame Nikon Z7 with 5520×8288 4.35um pixels.
It sports a Bayer Color Filter Array in the BGGR configuration. If the figure reported in the MakerNote is to be trusted, its fully electronic shutter has a minimum exposure time of 1/8771.9 of a second and it has been clocked at a maximum of 239 s. It is capable of producing 12-bit raw data when in still Mode 3. You can read more about its specs and performance in the next article.
Unpacking the 12-bit Raw Data
When the -r or –raw switch is used with the Pi’s still image command raspistill -md 3 (see the post scriptum at bottom for raspiraw), 12-bit raw CFA data is appended to the resulting 8 bit jpg file, in a block starting with the characters ‘BRCM’. The first part of the block is a 2^15 byte header, which I ignore, followed by the (3040+16)x(4056+28B) sensor array data written row-wise. The key is realizing that there are 3056 total rows and formatting the data accordingly.
Each row consists of 4056 12-bit elements (4056*12/8 bytes), followed by 12 bytes of zeros and 16 bytes of non-imaging data. The 12 bytes of zeros mark the end of the active area all the way down to the 3040th row. After that there are 16 additional rows of full length system data. In the past this non-imaging system data included optical black pixels that helped determine BlackLevels dynamically, but recent sensors tend not to have clearly demarcated such patches and I was not able to identify them. Should you know more about these service rows and columns I would be interested in the details.
From the start of every row to the twelve zeros, pixel raw values are packed in triplets: three 8-bit bytes are written for every two 12-bit pixels in the following format
AAAAAAAA BBBBBBBB BBBBAAAA
The first two bytes represent the 8 individual high bits while the third one contains the 4×2 respective low bits as shown. Unpacking them is easily accomplished in Matlab [and with a bit of adaptation Octave or your interpreter of choice, see the comments for some Python code][1] as follows, vector ‘bin’ holds pixel data row-wise:

The full function used in this page can be downloaded from the link at the end of the article. So now we have the Pi HQ Camera’s 12-bit raw CFA data in 16-bit integer format.
Exif and MakerNotes
There is very little information in the jpeg Exif tags and some of it is incorrect unless explicitly set by the user. For instance any information related to the lens, like focal length or f-number, because the module and the lens don’t speak to each other. The goodies are instead in the MakerNotes, where we can find white balance multipliers, a compromise color matrix and more. The field is made up of a few hundred characters, here is the one from the capture in Figure 3 below:
ev=-1 mlux=-1
exp=900 ag=256 focus=255
gain_r=3.238 gain_b=1.515 greenness=0 ccm=8466,-3816,-550,-476,6390,-1816,302,-1790,5588,0,0,0 md=0 tg=247 247 oth=247 216 b=0 f=247 247 fi=0
ISP Build Date: Feb 12 2020, 12:39:13 VC_BUILD_ID_VERSION: 53a54c770c493957d99bf49762dfabc4eee00e45 (clean) VC_BUILD_ID_USER: dom VC_BUILD_ID_BRANCH: master
Ignore ev (EC) and mlux, which appear fixed. Then:
- exp is Exposure Time in microseconds
- ag divided by 256 is Analog Gain, related to ISO, so in this case it had a value of 1 (the range is 1 to 16)
- gain_r and gain_b are the white balance multipliers; greenness has so far always been zero in my experience
- ccm is the Compromise Color Matrix, divide by 4096 and drop the last row of offsets that in my tests has always been zero.
I don’t know what the rest of the entries are but I suspect they are related to automatic exposure because they all turn to zero when that mode is turned off (-ex off, undocumented but all I use).
Decoding the Matrix
The matrix in the MakerNote looks like this:

It changes with the lighting, so I would guess that the module interpolates it based on the estimated illuminant. Where does this matrix take us? It looks very much like a demosaiced, white-balanced data to sRGB matrix.
To find out I took my setup to the balcony in a veiled, sunny, city afternoon to capture a purposely slightly defocused ColorChecker 24 target. Here is the image produced by the Pi’s GPU-accelerated on-board engine, straight Out Of Camera:

It looks a bit desaturated. Extracting the raw values of the 24 CC patches as described in the article on determining the Forward Matrix we obtain the following fit against BabelColor’s 30 database, assuming about a 5800K D illuminant, as suggested by the color meter:
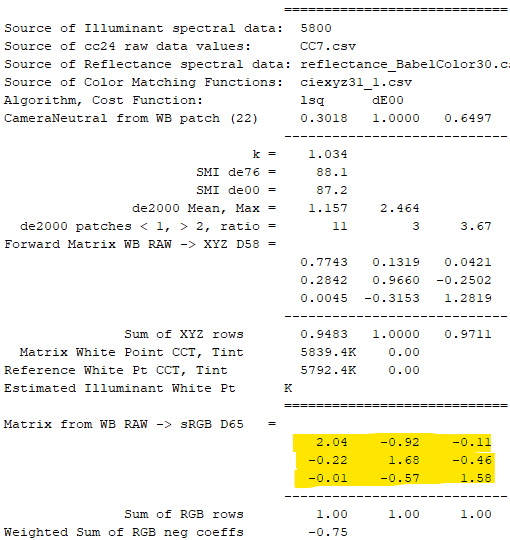
The white-balanced data to sRGB matrix looks fairly similar to the one in the HQ Camera’s MakerNotes, suggesting that its purpose is indeed the same, something I have since confirmed with subsequent captures. A Sensitivity Metamerism Index (SMI) of 88 indicates a pretty good fit – thus colorimetrically friendly CFA dies, well done! These are the dE2000 errors for the target under the current D5800 illuminant and the white balanced ‘raw’ to XYZ Forward Matrix above:
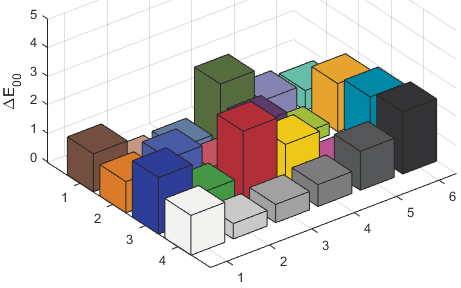
Very good results. Using the D5800 Forward Matrix so discovered we can easily calculate matrices for any of the standard color spaces around this color temperature, as described in the linked article.
Rendering 12-bit Raw Data to sRGB
We now have the raw data, white balance multipliers and matrix necessary to render the captured raw image to a final color space. I used simplified demosaicing that results in a half height image with every final pixel corresponding to a BGGR quartet in the CFA, similar to dcraw -h. Each color channel within a pixel maintains the relative BlackLevel subtracted ‘raw’ R and B values while the two G values are averaged, as described in the article on rendering:

The Black Level is about 256.3 at base gain/ISO in my unit at room temperature, as we will see in the next article. Applying that script to the captured raw CFA data results in the following ‘final’ sRGB image:

Much better, though we know from previous posts that this linear rendition probably still needs to be mapped into the smaller Contrast Ratio of typical display devices with the help of a Tone Mapping Operator or, at the very least, a bit of contrast.
And Full-Rez to Adobe RGB
Of course after doing all that it becomes apparent that the small size of the HQ’s pixels bump against their physical limitations. Images from this sensor are bound to look a bit fuzzy and noisy compared to those produced by larger cousins of similar resolution when demosaiced to full size and shown at 100%: there are only so many photoelectrons to be captured and diffraction to be oversampled when you are 1.55 microns on the side.
With mixed lighting and an estimated color temperature of 3400K, the compromise color matrix from black subtracted, white balanced camera space to Adobe RGB came out as follows:


Full-size demosaicing reveals that focus is a little forward of where I had intended. Manual focusing is a time consuming exercise with this setup unless one has a monitor plugged into the Pi’s HDMI output and can look at it interactively when doing so.[2] It’s the same raw file as in Figure 1, whose rendition I tend to prefer: viewed at 100% on a monitor, the half height resolution seems to be a better match for this capture, sweeping some small-pixel weaknesses under the rug.
Conclusions
In its DIY, Open Source context this little module shines and is a major improvement over previous iterations. The new interchangeable lens CS standard mount opens up brilliant new possibilities. Good work Foundation!
In the next article we will further characterize the sensor for still photography use.
P.S. raspiraw
There exists another routine called raspiraw designed for fastest possible frames per second. It just reads the raw data out to file as quickly as it can, without any of the usual processing performed by raspistill. For instance it does not generate an OOC Jpeg or collect metadata. Nevertheless it seems that nobody has been able to get more than about 11 fps out of full resolution 12-bit Mode 3, and I am no exception.
I installed it following the procedure outlined in this very helpful post and ran it by just specifying shutter speed in microseconds (-eus) and output file name (-o). It produces a file containing raw data in the same format as that produced by raspistill, without the header required by the pi-specific version of dcraw (the header can be added with the -hd switch).
The file contains just 3040 rows, each with the output of the 4056 pixels followed by 12 bytes of zeros and 16 bytes of unknown information as before. One would assume that the additional 16 rows seen earlier are therefore assembled by raspistill from ‘shadow’ metadata frames. Reading the linked thread, one discovers that the camera needs memory equivalent to 6 full raw images: 3 actual images and three piggy-backed ‘metadata’ images. One suspects the metadata images to be for on the fly Automatic Lens Shading Corrections and the like.[3] If you know more about what information they contain or why there are three for single image captures drop me a line.
One also discovers that the sensor has an RGGB CFA layout, which only becomes BGGR once the image is flipped to the correct orientation for the 16mm lens I used.
The gain switch (-g) has a working range of 0 to 1023 but its effect appears to be non-linear in the range. raspiraw files can be opened in Matlab / Octave or your interpreter of choice by following the script below.
Notes and References
1. * The Matlab/Octave function used in this page to open, unpack and render full resolution Raspberry Pi HQ Camera 12-bit raw stills created by raspistill -r -md 3 and raspiraw can be downloaded from here.
2. To control the HQ Cam when on the go, one can use a phone or tablet running RealVNC while connected to the same network as the headless Pi via hotspot or a battery powered wi-fi ‘puck’ as follows: ssh to the Pi and 1) vncserver -randr=1600×1200 (chosen VNC window size) ; then start RealVNC on the tablet and 2) right click on the VNC icon above the Pi’s desktop, RealVNC Viewer > Menu > Options > Troubleshooting > Optimize screen capture – select ‘Enable direct capture mode’; 3) raspistill -T 20000 -r -o test.jpg –Focus and maximize the figure of merit for best focus in the shown region of interest during the 20 second preview.
3. The libcamera driver manual and relative Sony IMX477 json file provide a wealth of insights into the low-level workings of this and other sensors.