March 05, 2024
Introduction
Kubernetes has become the de facto standard for deploying microservices, owing to its autoscaling and self-healing capabilities. By default, it provides HPA and VPA for scaling applications based on CPU and RAM metrics.
Using these components is a great starting point and works well for applications under uniform load. However, in today’s cloud-native ecosystem, scaling solely on CPU and memory utilization against dynamic traffic patterns and fluctuating workloads is inadequate. This is where the native autoscaling features of Kubernetes fall short.
To accommodate such unpredictable behavior, we require metrics that adjust in real-time and closely reflect application behavior. For example
- Event-Driven Applications: Consider a AWS SQS driven setup. While CPU usage might remain stable, a surge in incoming AWS SQS messages is the real metric that determines load. In such a case, autoscaling should ideally respond to the rate of incoming events or the message backlog.
- E-Commerce Transactions: In an e-commerce framework, special sale events might see a spike in order checkouts. The CPU might be unperturbed, but the genuine load can be accumulating unprocessed orders in a database queue.
These metrics offer a more responsive approach to autoscaling compared to just CPU and RAM. In this blog, we’ll explore configuring autoscaling for event-driven applications using AWS SQS with KEDA, and also checkout various authentication techniques and additional AWS metrics supported by KEDA for autoscaling.
For foundational understanding about KEDA, refer to this blog post.
Pre Requisites
Introduction To Application

Imagine a video streaming application like Netflix where each video has to be encoded into multiple formats: 480p, 720p, 1080p, 4K, etc. The encoding process is time-consuming and takes between 1 to 3 hours, depending on the requested quality. This video data, along with quality specifications, is available as a message in AWS SQS.
A simple workflow for an application that encodes videos from AWS SQS would be:
-
Read the message from the queue.
-
Encode the video as per specification.
-
Store the result and process the next message.
However, this naive implementation has scaling limitations as it processes only one message at a time. Here are some possible improvements:
1. Introduce Concurrent Processing: One can modify the application to process multiple messages concurrently, but with a single replica, this will eventually hit node resource limits, and you need to scale vertically.
2. Fixed Number of Kubernetes Replicas: One can start the application with a fixed number of replicas, regardless of the application execution type (synchronous or concurrent). It will face scaling issues when a large number of messages are produced.
3. Using Kubernetes HPA: One can configure Kubernetes HPA to scale based on the CPU and RAM utilization of the application. But as discussed in our previous post, this is ineffective in the modern cloud era.
A more effective metric for scaling would be to use AWS SQS queue size, i.e., creating pod replicas based on the queue’s length. But Kubernetes can scale only based on CPU and memory usage.
This is where KEDA comes in. KEDA addresses this limitation by enabling scaling based on various external events, one of which is AWS SQS queue size. Now you can simplify your application to process only one message at a time and offload scaling decisions to KEDA.
To get started, KEDA provides ScaledObject![]() and ScaledJob
and ScaledJob![]() CRD that enables event-driven autoscaling of Kubernetes workloads. Refer to this blog post to learn more about it.
CRD that enables event-driven autoscaling of Kubernetes workloads. Refer to this blog post to learn more about it.
We will be using ScaledJob CRD for configuring event driven autoscaling based on SQS queue size, as it protects applications from scale down action of autoscaler. For details on choosing between ScaledObject and ScaledJob, see our prior article.
Implementing Scaled Job: A Step-by-Step Guide
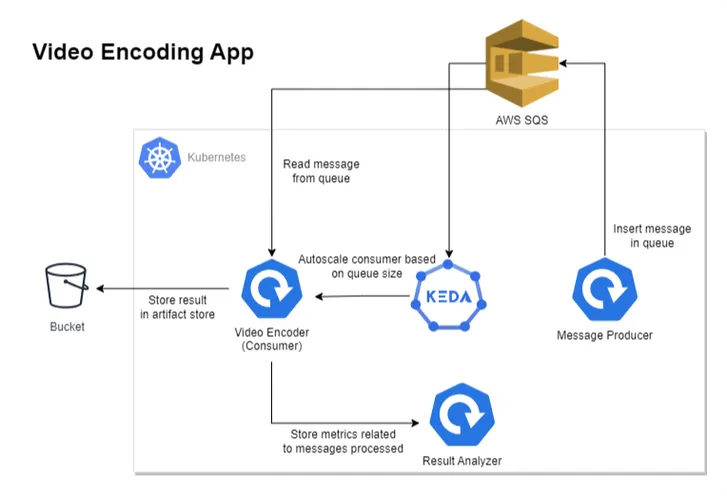
The above diagram depicts our revised architecture for the video encoding application, which contains four components.
1. Message Producer: Produces messages in AWS SQS, containing video and encoding quality information.
2. Video Encoder/Consumer: Reads the message from AWS SQS, processes it, and stores the result in an artifact store like the S3 Bucket.
3. KEDA: Handles the autoscaling of consumer applications on the basis of AWS SQS queue size.
4. Result Analyzer: To understand the autoscaling behavior, this component exposes some REST APIs that are consumed by the Video Encoder application. It essentially keeps track of events that occurred while processing the message.
Instructions
1. Clone the Example Repository
git clone https://github.com/kedify/examples.git
cd examples/blogs/keda_aws_sqs
2. Create AWS SQS Queue
Execute the below command to create a queue named test-queue, note down the QueueUrl ( ![]() ) from the command output.
) from the command output.
aws sqs create-queue --queue-name test-queue
3. Create IAM Role with Trust Policy for KEDA Operator
Open the keda-operator-trust-policy.json file, it should have the below content
{
"Version": "2012-10-17",
"Statement": [
{
"Sid": "",
"Effect": "Allow",
"Principal": {
"Federated": "arn:aws:iam:replace-with-your-aws-account-id:oidc-provider/replace-with-your-eks-open-idc"
},
"Action": "sts:AssumeRoleWithWebIdentity",
"Condition": {
"StringEquals": {
"replace-with-your-eks-open-idc:sub": "system:serviceaccount:keda:keda-operator"
}
}
}
]
}
Replace replace-with-your-aws-account-id (e.g. 123123123123) & replace-with-your-eks-open-idc (e.g. oidc.eks.ap-south-1.amazonaws.com/id/123AB12332123CEE5C7123FF9D3123) keys in the file with its corresponding values obtained from AWS console.
Execute the below command to create a role named keda-operator, note down the RoleARN ( e.g. arn:aws:iam::123123123123:role/keda-operator) from the command output.
aws iam create-role --role-name keda-operator --assume-role-policy-document file://keda-operator-trust-policy.json
4. Install KEDA
Execute the below command and replace replace-with-keda-operator-role-arn key with RoleARN value obtained from previous step.
helm repo add kedacore https://kedacore.github.io/charts
helm repo update
helm upgrade -i keda kedacore/keda --namespace keda --create-namespace --set "serviceAccount.annotations.eks\.amazonaws\.com/role-arn=replace-with-keda-operator-role-arn"
KEDA & AWS Authentication
To scale based on AWS SQS queue size, KEDA requires authentication credentials of an AWS account which has appropriate permissions to operate on SQS queue.
KEDA provides a few secure patterns to manage authentication flows:
1. Directly Configure authentication per ScaledObject or ScaledJob using ConfigMap or Secret
2. Re-use per-namespace credentials with TriggerAuthentication
TriggerAuthentication allows you to describe authentication parameters separate from the ScaledObject and the deployment containers. It also enables more advanced methods of authentication like “pod identity”, external secrets, authentication re-use or allowing IT to configure the authentication.
3. Re-use global credentials with ClusterTriggerAuthentication
Each TriggerAuthentication is defined in one namespace and can only be used by a ScaledObject in that same namespace. For cases where you want to share a single set of credentials between scalers in many namespaces, you can instead create a ClusterTriggerAuthentication. As a global object, this can be used from any namespace.
In our case we will be using TriggerAuthentication at namespace level. The authentication provider to use with TriggerAuthentication depends where the application is running.
Application location
1. Application is running outside of AWS network
In this condition, we can use Secret provider![]() to store aws credentials such as access-key or secret-key in a Kubernetes Secret.
to store aws credentials such as access-key or secret-key in a Kubernetes Secret.
2. Application is running inside of AWS network
We can use the Secret provider approach as mentioned earlier, but when your applications are running inside the AWS network the best practice is to use AWS IAM roles to obtain temporary credentials. In this case, we will be using AWS (IRSA) Pod Identity Webhook![]() .
.
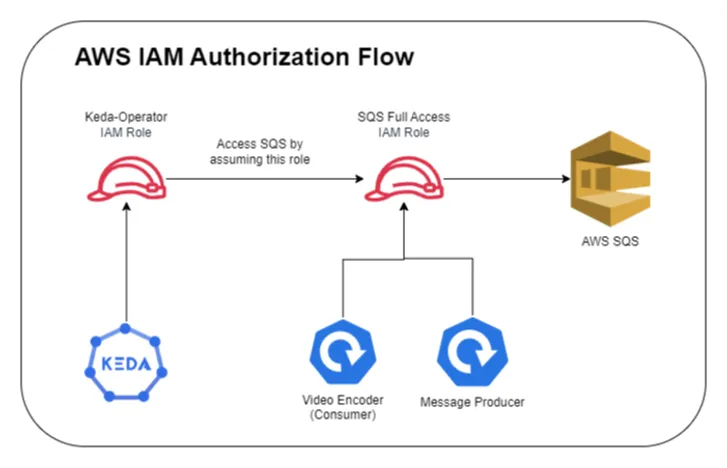
Below diagram depicts, how authorization will work in our case
Instructions
-
Setup AWS Authentication with IRSA for Producer & Consumer Application
- Create SQS Policy: Execute the below command to create a SQS policy named sql-full-access, note down the PolicyARN (e.g. arn:aws:iam::123123123123:policy/sqs-full-access) from the command output
aws iam create-policy --policy-name sqs-full-access --policy-document file://sqs-full-access-policy.json
-
Create SQS Role with Trust Policy As seen from the above image, the sqs role has to be assumed by two entities: kubernetes service account and keda-operator role. To accommodate this, in the trust-policy.json file, we will replace the following keys
-
Replace replace-with-keda-operator-role-arn with RoleARN ( e.g. arn:aws:iam::123123123123:role/keda-operator)
-
Replace replace-with-your-aws-account-id (e.g. 123123123123) & replace-with-your-eks-open-idc (e.g. oidc.eks.ap-south-1.amazonaws.com/id/123AB12332123CEE5C7123FF9D3123) keys in the file with its corresponding values obtained from AWS console.
-
Execute the below command to create a role named sql-full-access, note down the RoleARN (e.g. arn:aws:iam::123123123123:role/sqs-full-access) from the command output.
aws iam create-role --role-name sqs-full-access --assume-role-policy-document file://trust-policy.json
Execute the below command to attach policy to the role.
aws iam attach-role-policy --role-name sqs-full-access --policy-arn replace-with-your-sqs-policy-id-(e.g. arn:aws:iam::123123123123:policy/sqs-full-access)
-
Create Service Account
In the service-account.yaml file, replace replace-with-your-sqs-role-arn key with the RoleARN ( e.g. arn:aws:iam::123123123123:role/sqs-full-access) value obtained from previous step (sqs-full-access role)
Execute the below command to create a service account which will be used by producer and consumer applications.
kubectl apply -f service-account.yaml
-
Provide SQS Assume Role Permission KEDA Operator Role
-
Create a Policy
In the keda-operator-policy.json file replace put-sqs-role-arn-here with the SQS RoleARN (e.g. arn:aws:iam::123123123123:role/sqs-full-access).
aws iam create-policy --policy-name keda-sqs-assume-role --policy-document file://keda-operator-policy.json
-
Attach Policy to KEDA Role
Execute the below command to attach policy (created in above step) to the role (created in step 3).
aws iam attach-role-policy --role-name keda-operator --policy-arn replace-with-your-policy-id
-
-
Create Producer Application
In the producer.yaml replace put-your-sqs-queue-url-her with the queue URL obtained from the previous steps.
Execute the below command to start producing messages, the below jobs produces 10 messages in a queue called test-queue
kubectl create -f producer.yaml
Verify the application by checking application logs using below command
kubectl logs sqs-producer-replace-with-aut-generated-id

Note: The producer must create messages error-free, as depicted above. If you are encountering AWS configuration errors, verify that IRSA is correctly set up in EKS.
- Deploy Result Analyzer
kubectl apply -f result-analyzer.yaml
- Deploy Video Encoder Application
In the scaled-job-consumer.yaml replace put-your-sqs-queue-url-here with the queue URL obtained from the previous steps and put-your-aws-region with your AWS region.
apiVersion: keda.sh/v1alpha1
kind: TriggerAuthentication
metadata:
name: keda-trigger-auth-aws-credentials
namespace: default
spec:
podIdentity:
provider: aws
---
apiVersion: v1
kind: ConfigMap
metadata:
name: sqs-consumer
namespace: default
data:
sqs-consumer.sh: |
#!/bin/bash
apk update && apk add curl jq # Ensure both curl and jq are installed
QUEUE_URL="${QUEUE_URL}"
PROCESS_SLEEP_TIME="${PROCESS_SLEEP_TIME:-60}" # Default to 60 seconds if not set
while true; do
# Receive a message from the SQS queue
RESPONSE=$(aws sqs receive-message --queue-url "$QUEUE_URL" --visibility-timeout 600)
# Check if the response contains a message
if echo "$RESPONSE" | grep -q "MessageId"; then
# Extract the ReceiptHandle for deletion
RECEIPT_HANDLE=$(echo "$RESPONSE" | jq -r ".Messages[0].ReceiptHandle")
# Process the message here
echo "==========================================="
echo "Processing message with id $RECEIPT_HANDLE"
sleep "$PROCESS_SLEEP_TIME"
# Delete the message from the queue to prevent it from being received again
aws sqs delete-message --queue-url "$QUEUE_URL" --receipt-handle "$RECEIPT_HANDLE"
echo "Message processed and deleted"
break # Exit the loop after processing a message
else
echo "No messages found. Waiting..."
sleep 1 # Wait before polling the queue again
fi
done
curl -X POST http://result-analyzer-service:8080/create/count -s
---
apiVersion: keda.sh/v1alpha1
kind: ScaledJob
metadata:
name: video-processor
namespace: default
spec:
jobTargetRef:
template:
spec:
serviceAccountName: aws-sqs
volumes:
- name: script-volume
configMap:
name: sqs-consumer
containers:
- name: sqs-consumer
image: pebbletech/docker-aws-cli:add-jq
volumeMounts:
- name: script-volume
mountPath: '/scripts'
env:
- name: QUEUE_URL
value: put-your-sqs-queue-url-here
- name: PROCESS_SLEEP_TIME
value: '30'
command: ['/bin/sh', '/scripts/sqs-consumer.sh']
restartPolicy: Never
pollingInterval: 10 # How often KEDA will check the AWS SQS queue
successfulJobsHistoryLimit: 100 # Number of successful jobs to keep
failedJobsHistoryLimit: 100 # Number of failed jobs to keep
maxReplicaCount: 100 # Maximum number of jobs that KEDA can create
scalingStrategy:
strategy: 'default' # Scaling strategy (default, custom, or accurate)
triggers:
- type: aws-sqs-queue
authenticationRef:
name: keda-trigger-auth-aws-credentials
metadata:
queueURL: put-your-sqs-queue-url-here
queueLength: '1'
awsRegion: put-your-aws-region
The ScaledJob configuration is defined as follows:
- Job Target Reference: The jobTargetRef section specifies the template for the job that KEDA will create and scale. This application executes a bash script which is configured to read one message at a time from AWS SQS and starts processing. As this is a demo application, instead of actually performing any encoding operation, it sleeps for a configurable duration (defaults to 5m). And after the elapsed time, it exits the process.
- Polling Interval: Set at 10 seconds, this determines how frequently KEDA checks the AWS SQS queue for new messages.
- Jobs History Limits: Both successful and failed jobs history limits are set to 100, providing visibility into the job’s performance while managing resource utilization.
- Max Replica Count: Capped at 100, it defines the maximum number of concurrent jobs.
- Triggers: The trigger is set on AWS SQS
 queue length, with the queueURL value being set as testqueue. A job is triggered for a single message (value: “1”), ensuring that each job processes one message at a time. Example: if one pod can handle 10 messages, set the queue length target to 10. If the actual messages in the SQS Queue is 30, the scaler scales to 3 pods. (default: 5)
For detailed information on configuring ScaledJob in KEDA, refer to the official KEDA documentation![]() .
.
Execute the below command to deploy a consumer (video processor) application.
kubectl apply -f scaled-job-consumer.yaml
- Observing the Result
As there are already some messages in the queue, KEDA will start creating jobs to handle queue messages.
Execute the below command in a separate terminal to monitor how KEDA scales pods
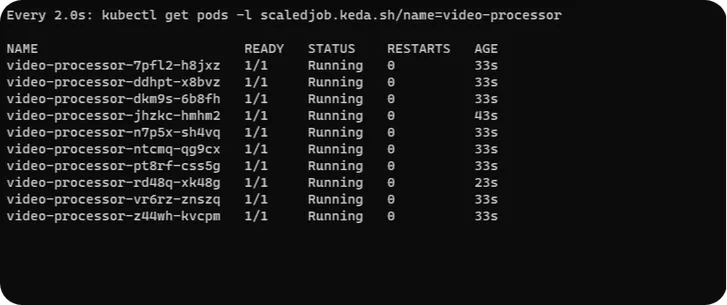
watch kubectl get pods -l scaledjob.keda.sh/name=video-processor
You will observe KEDA created 10 pods corresponding to 10 messages in SQS queue, as we have configured the threshold of SQS trigger to 1.
Wait for 10–15 minutes for some messages to be processed, and then execute the below command. This curl request gets the auto-scaling event data from the result analyzer application.
kubectl exec $(kubectl get pods -l app=result-analyzer -o jsonpath='{.items[0].metadata.name}') -- curl http://localhost:8080/get/count -s | jq
Below is the response to the above curl request. The event with a message kill count indicates that the application was terminated while processing a message. Whereas an event with a message processed count indicated the message was processed successfully.
[
"2024-01-17 05:50:45 - processed count 1",
"2024-01-17 05:50:45 - processed count 2",
"2024-01-17 05:50:45 - processed count 3",
"2024-01-17 05:50:45 - processed count 4",
"2024-01-17 05:50:45 - processed count 5",
"2024-01-17 05:50:45 - processed count 6",
"2024-01-17 05:50:45 - processed count 7",
"2024-01-17 05:50:45 - processed count 8",
"2024-01-17 05:50:45 - processed count 9",
"2024-01-17 05:50:46 - processed count 10"
]
From the above response, we could conclude that all the 10 messages were processed successfully.
- Clean Up
kubectl delete -f scaled-job-consumer.yaml
kubectl delete -f result-analyzer.yaml
kubectl delete -f producer.yaml
kubectl delete -f service-account.yaml
aws sqs delete-queue --queue-url put-your-queue-here
helm uninstall keda -n keda
Exploring Other AWS Scalers with KEDA
Apart from AWS SQS, KEDA has built in scalers for
-
DynamoDB
- This specification describes the AWS DynamoDB scaler. This scaler uses a specified DynamoDB query to determine
if and when to scale a given workload. -
DynamoDB Streams
- This specification describes the aws-dynamodb-streams trigger that scales based on the shard
count of AWS DynamoDB Streams. -
Kinesis Stream
- This specification describes the aws-kinesis-stream trigger that scales based on the shard count of AWS
Kinesis Stream.
If this is not sufficient KEDA also supports CloudWatch![]() scaler, with this integration you can scale your applications based on any AWS metric that is available in CloudWatch
scaler, with this integration you can scale your applications based on any AWS metric that is available in CloudWatch
Conclusion
In conclusion, our exploration into autoscaling for AWS services with KEDA has demonstrated its potential to enhance the responsiveness and efficiency of Kubernetes deployments. By leveraging event-driven metrics, such as AWS SQS queue length, KEDA allows for more precise scaling decisions that traditional CPU and memory-based metrics cannot provide.
Beyond SQS, KEDA also supports a range of other AWS metrics including DynamoDB, DynamoDB Streams, Kinesis Streams, and CloudWatch, offering a versatile toolkit for scaling based on real-time demand and specific application needs.
We encourage you to experiment with KEDA and share your experiences, as your feedback is invaluable in refining and expanding the capabilities of autoscaling solutions.