Things used in this project


Story
I recently stumbled across a dusty old Magic 8 Ball. It was cracked, leaking questionable blue fluid, and calling my name in a raspy whisper: “Build something with me, or I’ll keep haunting your dreams.” Clearly, I had no choice.
In a moment of sheer (wonderfully misguided) inspiration, I decided to fuse this plastic mystic relic with the unstoppable might of modern AI. Because obviously, the one thing missing from a simple random answer toy is an entire ChatGPT pipeline capable of generating more random nonsense. When the universe hands you a broken fortune-teller, you harness it to the internet and see what happens, right?
If you, too, have ever thought “I wish my Magic 8 Ball were more...self-aware, ” then this build is definitely for you.
Step 1: Salvage (or Sacrifice) a Magic 8 Ball
- Raid your hackspace for an old, possibly broken Magic 8 Ball.
If it’s not broken, that’s okay—just do the sensible thing and cut it in half. (Please do this very carefully if it’s still full of inky fluid—nobody wants an accidental cosmic prophecy juice all over their workshop.) I didn’t have to cut the one open that I found, but I found this slightly cringy YouTube Short that describes the process for those who need assistance.
https://www.youtube.com/shorts/NQDaCtwqthg
Tip: Gloves are recommended unless you enjoy Mystery Blue Hands for a week.
Step 2: 3D Print Custom Brackets
- Print out the brackets that will snugly fit inside each half of the 8 Ball.
These brackets should:
- Hold your electronics (ESP32 board, battery, microphone, etc.) in place.
- Offer a way to screw the two halves together (or let you pop them apart) so you can make frantic adjustments when your code inevitably misbehaves.
Step 3: Weigh It Down
I wanted a way to have Magic GPT8 Ball feel similar to the original Magic 8 Balls fluid motions. Wasn't confident enough in the cracked interior to fill it up with water, so decided to use the next best thing - sand.
- Fill one half of the 8 Ball shell with sand—or tiny gravel, or your leftover hopes and dreams—until it’s about 2/3 full.
1 / 2 • Sand + Electronic Containers. What could ever go wrong
Seal it up with hot glue (the universal fix-all of the maker world). This weight makes sure your Magic GPT8 Ball doesn’t float away or feel too flimsy.
Afterwards add more hot glue and place the 3D print ontop of each side
Warning: If you add too much sand, you risk turning your 8 Ball into a rock. Aim for just enough heft to feel solid, and have the sand move around as you rotate it
Step 4: Wire Up the Electronics
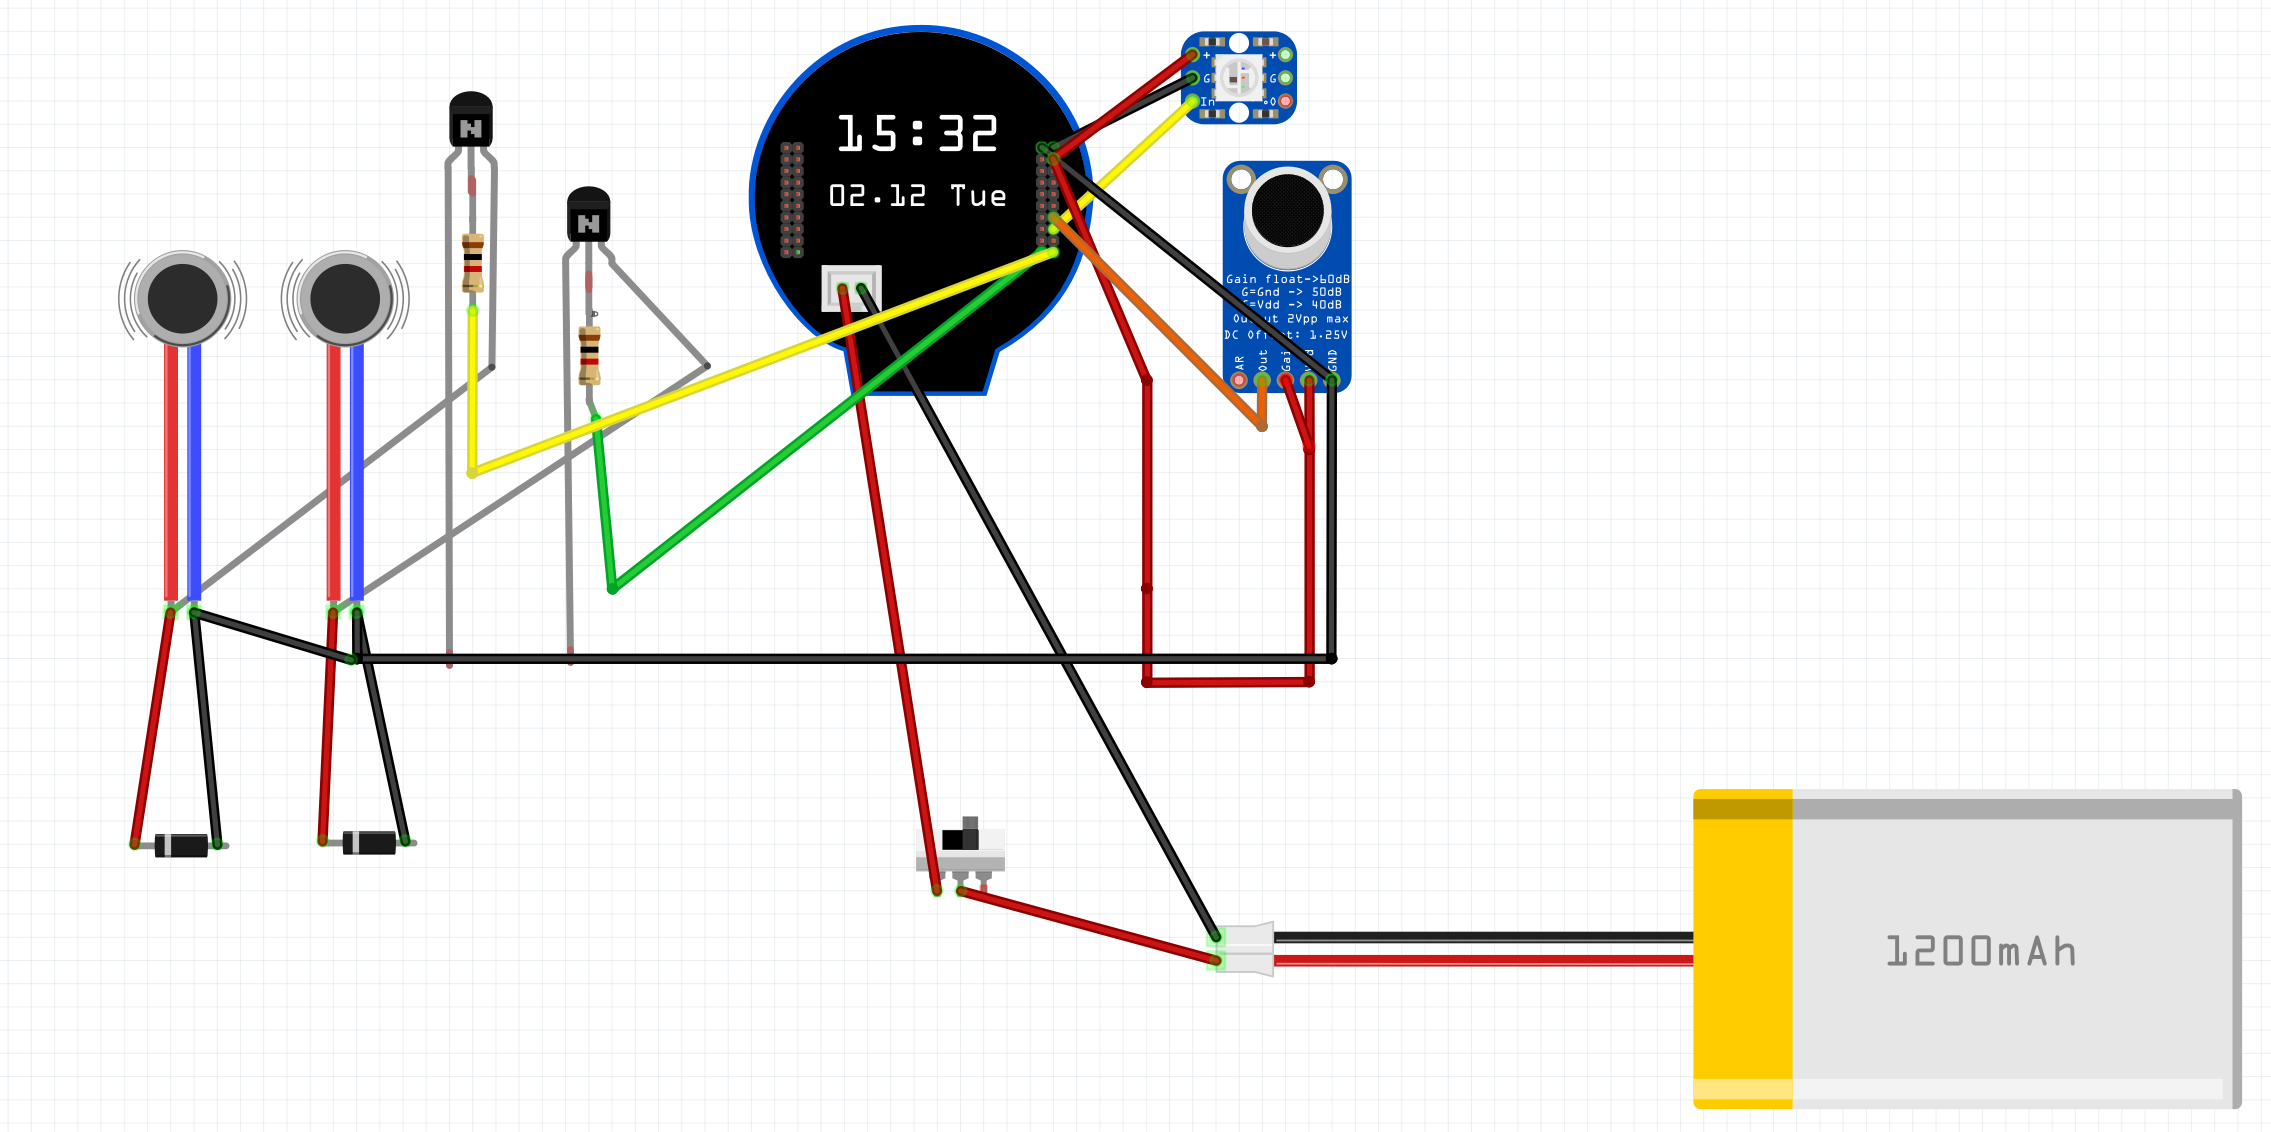
It’s time to combine your neopixel, vibration motors, analog microphone, and power switch into one circuit:
Neopixel (WS2812B):
- Attach the Data pin to your microcontroller (GPIO3 in the provided schematic).
- Hook up VCC and GND accordingly. Watch those polarity markings!
Vibration Motors:
- Two is better than one (like stereo shaking).
- Each motor’s positive lead goes to your motor driver pins (GPIO5 & GPIO13), with common ground to the microcontroller.
- In order to minimize the wires, I created a one layer PCB for the vibration circuit. Milled them out using a desktop CNC. Gerber files are within the repository
1 / 3 • Othermill/Bantam Desktop CNC
Microphone (MAX9814):
- Connect VDD to 3.3V, GND to GND, and the output pin to an analog input (GPIO2 for ADC).
Power Switch:
- Wire it so you can actually turn this contraption off.
Step 5: Seal It All Inside the 8 Ball
So many wires and so much hot glue
- Carefully place everything into the top half.
- Hot glue to secure the components so they don’t rattle around when you shake it for wisdom.
Step 6: Clone the Repository
Fire up your terminal (or Git GUI) and run:
git clone https://github.com/NickEngmann/MagicGPT8Ball.git
cd MagicGPT8Ball
Step 7: Set Up Your val.town Account
- Head over toval.town and create an account.
- Deploy the included
val.town.jsfunction. This will handle your ChatGPT queries in the cloud.
Step 8: Configure Your Environment Variables
Val.town is becoming one of my favorite tools
- OpenAI Credentials: In val.town settings (https://www.val.town/settings/environment-variables), set up your environment with your OPENAI_API_KEY key, OPENAI_ORG_ID, and VALID_DEVICE_TOKEN carefully spelled out.
- Device.env File: Over in your local project, add your new val.town endpoint to
.envalong with your DEVICE_TOKEN. Use the.env.examplewithin the repository as a starter.
DO NOT PUBLISH YOUR DEVICE_TOKEN!
Step 9: Flash the Firmware with PlatformIO
- Open the project in Visual Studio Code with the PlatformIO extension.
- Install dependencies if needed:
pio lib installFlash the env file:
pio run --target uploadfsFlash the firmware:
pio run --target uploadWatch the logs for signs of success… or comedic error messages. If all goes well, you’ll have an AI-infused orb ready to spout questionable wisdom!
Step 10: Turn It On & Shake Like You Mean It
- Power up your brand-new Magic GPT8 Ball.
- Shake, rattle, and roll—the built-in gyroscope will sense your movement and prompt the device to start recording. You will notice it's recording because the device will say “Speak Now…”
"Speak now....." the amount of periods indicate the amount of seconds left
- Speak your question with conviction (and maybe a little flair).
- After speaking your question the device will take roughly 6 seconds to send your query to Val.town and then receive the response back. During this time, the device will transition into the Thinking State
- Finally, Gaze upon the luminous display until ChatGPT delivers your cosmic truth.
LED Status Indicators
The Magic (GPT)8 Ball includes an RGB LED that serves as a quick diagnostic tool. Each color and pattern combination indicates a specific system state or potential issue:
Normal Operation States
Blue Pulse: System starting up
- Normal during power-on
- Should transition to solid green within 30 seconds
- If stuck, check power supply voltage
Solid Green: System ready
- Indicates normal operation
- WiFi connected
- All systems operational
Red Blink: Recording active
- Normal during question recording
- Should last 8 seconds
- If no response after speaking, check microphone connections
Cyan Pulse: Processing
- Normal while generating response
- Typically lasts 5-15 seconds
- If prolonged, check WiFi connection strength
Warning States
Yellow Blink: Offline Mode
- No WiFi connection
- Will provide classic Magic 8 Ball responses
Check:
- WiFi credentials
- Network availability
- Router distance/signal strength
- Reset WiFi configuration if needed
Error States
Purple Blink: Environment Configuration Error
- Missing or invalid.env file
Check:
- .env file exists in filesystem
- Correct ValTown URL
- Valid device token
- Reflash filesystem if needed
Fast Red Blink: Recording System Error
- Microphone or ADC issues
Check:
- Microphone connections
- ADC pin configuration
- Power supply stability
- Ground connections
Alternating Red/Blue: API Communication Error
- Failed to reach ValTown or OpenAI services
Check:
- Internet connectivity
- ValTown endpoint status
- Device token validity
- API rate limits
Debugging Steps
- Note the LED color and pattern
- Check corresponding status in this guide
- If issue persists:
- Check serial output for detailed errors
- Enable debug mode for additional logging
- Verify hardware connections
- Consider system reset
Custom parts and enclosures
Schematics