Running a Dogecoin Full Node on a Raspberry Pi
In this guide, we'll setup a headless (no GUI) Dogecoin full node to run on a Raspberry Pi 4.
Why Run a Dogecoin Node?
There is no monetary incentive for running a Dogecoin node.
However, there are still many benefits to running a Dogecoin node such as:
- Privacy and security. You can transact with the Dogecoin blockchain directly via a full node wallet, or by using a wallet connected to a full node that you own. This allows you to send and receive Dogecoin transactions in a trustless manner and avoids you having to go through third-party nodes.
- Education. Learn Dogecoin development using the most secure Dogecoin interface,
dogecoind. - Support the network. Full nodes keep the Dogecoin blockchain decentralized, and protect the ecosystem from bad actors by reducing the need for trust.1
Build a Custom Raspberry Pi
Here is the custom Raspberry Pi we'll be building to run our Dogecoin node:
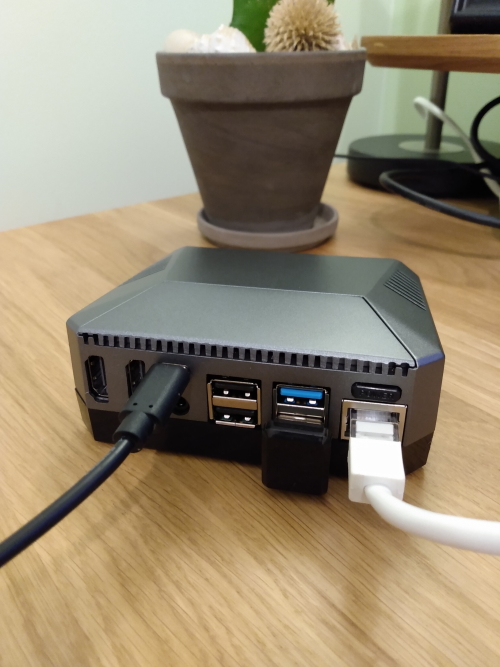
Requirements
To build the Raspberry Pi pictured above you’ll need:
- Raspberry Pi 4 Model B - 8GB
- Argon One M.2 Raspberry Pi 4 Case
- Argon One Pi 4 Power Supply (Raspberry Pi)
- WD Green 240GB M.2 Internal SSD
- Cat6A Shielded Snagless RJ45 Ethernet Cable - 2m
- USB stick
Instructions on how to mount the parts can be found on YouTube.
Issues
There are a few issues I ran into with this setup:
- The case took over a month and a half to arrive from China and upon arrival I had to pay a customs fee. I purchased the case through the official website.
- The female end of the SSD screw snapped in two when I tried to mount the SSD and I ended up having to tape the SSD down. Be gentle while screwing in the SSD!
Raspberry Pi Setup
At this point you should have assembled a custom Raspberry Pi, now it's time to get it running.
Generate SSH Keys
In order to connect to the Raspberry Pi securely via SSH, you will have to generate a public/private key pair.
On Windows:
- Download and install PuTTY.
- Launch PuTTYgen.
- Select the option EdDSA.
- Click Generate.
- Enter a Key passphrase.
- Save the output in Public key for pasting into OpenSSH authorized_keys file, we'll use this in the next section.
-
Click Save private key and save the private key in
ppkformat on your computer.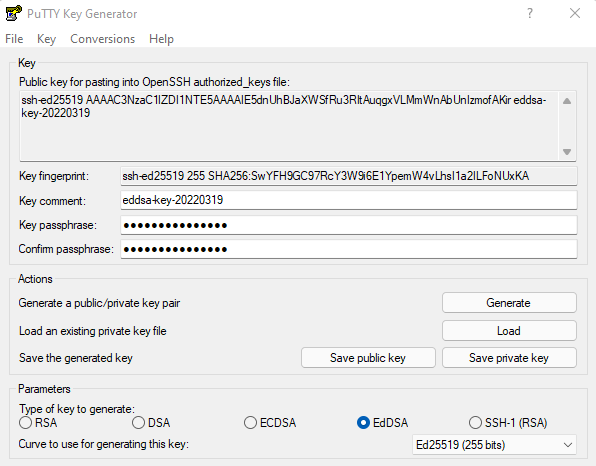
Install Raspberry Pi OS
Write the Raspberry Pi OS to a USB Stick
- Download the Raspberry Pi Imager and plug in a USB stick to your computer.
- Click on Choose Storage and select the USB stick.
- Click on Choose OS, go to Raspberry Pi OS (Other) and select Raspberry OS Lite (32-bit).
- Click on the Advanced Options icon and configure the following settings:
- Set Image customization options to always use.
- Set Enable SSH, Allow public-key authentication only, and paste the public key generated in PuTTYgen into Set authorized keys for 'pi'.
- Set a password for the
piuser. - Optionally, disable telemetry, select locale, and configure WiFi credentials.
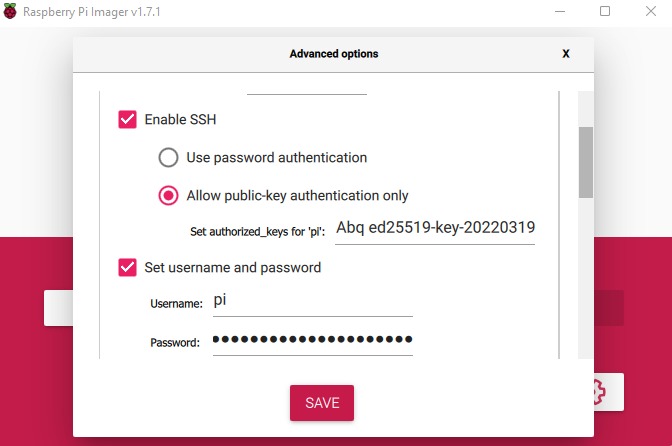
- Click on SAVE and then WRITE.
- Once the image is written to the USB stick eject it from your computer and plug it into the Argon One M.2 case.
- Press the power button on the Argon One case, the Raspberry Pi OS should now boot from USB.
Connect to the Raspberry Pi
To connect to your Raspberry Pi via SSH:
-
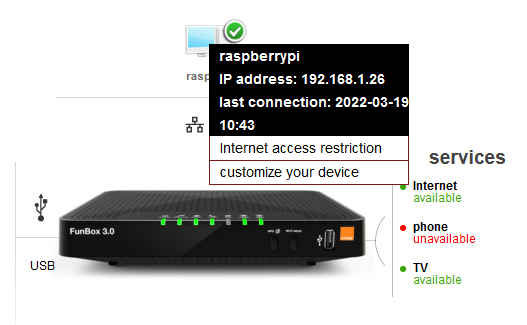
Find the IP address of your Raspberry Pi.
The easiest way to do this is to login to your router (e.g., http://192.168.1.1/):
-
Launch PuTTY and configure the following settings:
-
Enter the IP address into Host Name (or IP address)
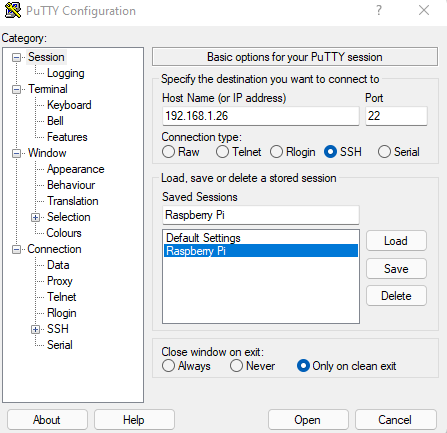
-
Go to Connections, SSH, Auth, and Browse for the private key you created in PuTTYgen.
- Go back to Session, click Save and Open.
-
-
You will be prompted for a username, enter
pi, next enter the password for your SSH key. -
You should now be logged in.
Optional: If you would like to have a prettier PuTTY console, follow the instructions for installing Pretty PuTTY.
Clone the Raspberry Pi OS to the Internal SSD
Once you're logged in to your Raspberry Pi:
-
Pull down the
rpi-clonerepository.git clone https://github.com/billw2/rpi-clone.git -
Install
rpi-clone.sudo cp rpi-clone rpi-clone-setup /usr/local/sbin -
Clone Raspberry Pi OS to the internal disk.
sudo rpi-clone sda Booted disk: sdb 7.9GB Destination disk: sda 240.1GB --------------------------------------------------------------------------- Part Size FS Label Part Size FS Label 1 /boot 256.0M fat32 -- 2 root 7.1G ext4 rootfs --------------------------------------------------------------------------- == Initialize: IMAGE partition table - partition number mismatch: 2 -> 0 == 1 /boot (48.0M used) : MKFS SYNC to sda1 2 root (1.4G used) : RESIZE MKFS SYNC to sda2 --------------------------------------------------------------------------- Run setup script : no. Verbose mode : no. -----------------------: ** WARNING ** : All destination disk sda data will be overwritten! -----------------------: Initialize and clone to the destination disk sda? (yes/no): yes Optional destination ext type file system label (16 chars max): raspberry-pi -
Once cloning is done, run
sudo shutdown -h nowand remove the USB stick from the Argon One case. -
Power up Argon One, Raspberry Pi OS should now boot from the internal disk.
Network Configuration
In order to setup a Dogecoin node you may have to forward certain ports in your router.
Follow the steps outlined in the guide Running a Full Node to get setup.
Argon One Configuration
Run the following command to install the Argon One configurations needed to run the fan inside the case:
curl https://download.argon40.com/argon1.sh | bash
UFW Configuration
To configure a basic firewall:
-
Install
ufw.sudo apt install ufwNote:
ufwdefault rules allow for all outgoing connections, but block all incoming connections.2 -
Limit SSH access.
sudo ufw limit ssh -
Allow SSH access from the internal network.
sudo ufw allow from 192.168.1.0/24 to any port 22 -
Allow Dogecoin traffic:
# for mainnet … sudo ufw allow 22556 comment "Dogecoin mainnet" # … or, for testnet sudo ufw allow 44556 comment "Dogecoin testnet" -
Apply the settings.
sudo ufw enable
Dogecoin Node Installation
Finally, we can install the software that will run our Dogecoin node.
-
Go to the Dogecoin Releases page and download the latest ARM Linux release.
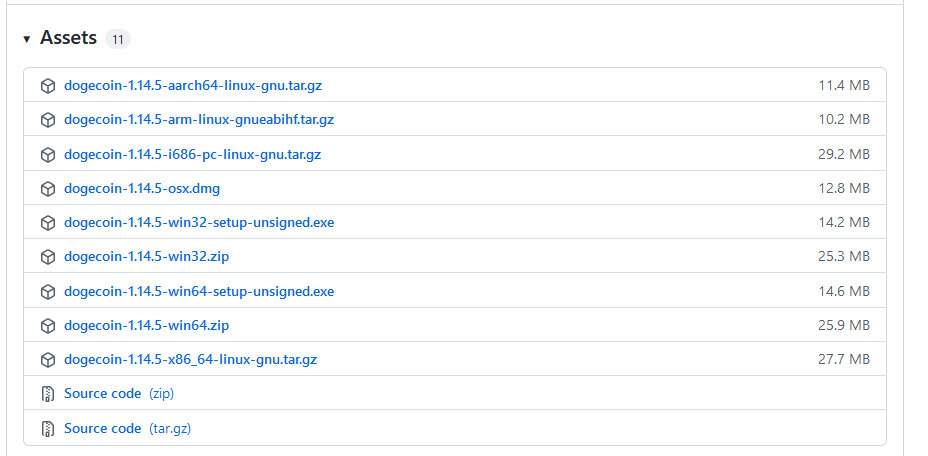
wget https://github.com/dogecoin/dogecoin/releases/download/v1.14.5/dogecoin-1.14.5-arm-linux-gnueabihf.tar.gz -
Unpack the file contents.
tar xzf dogecoin-1.14.5-arm-linux-gnueabihf.tar.gz -
Install the Dogecoin node.
sudo install -m 0755 -o root -g root -t /usr/local/bin dogecoin-1.14.5/bin/* -
Start up the Dogecoin node.
dogecoind -daemon -
Download an example Dogecoin configuration file.
cd ~/.dogecoin; wget https://github.com/dogecoin/dogecoin/blob/master/contrib/debian/examples/dogecoin.conf -
Add the following configurations to the
dogecoin.conffile:maxconnections=32 server=1 rpcuser=DogecoinIsAwesome rpcpassword=A_SAFE_PASSWORD
You're done! The Dogecoin node will take around two days to fully sync the entire blockchain.