This tutorial will use a more general approach to fully recreate the core tech behind code interpreter sandboxes in commercial products like Manus and Claude agent skills.
As always, the source code is at the end of this post. Feel free to grab it.
Introduction
Recently, an incident with Gemini 3.0 generated code wiped out 800GB of customer data. This again reminds us of the importance of building code sandboxes for agents.
In earlier articles, we’ve already seen many times that letting agents generate code and run it in a sandbox environment can boost their math problem-solving ability and help them tackle complex challenges.
I Used Autogen GraphFlow and Qwen3 Coder to Solve Math Problems — And It Worked
More reliable than your math professor
![]() Data Leads FuturePeng Qian
Data Leads FuturePeng Qian

But right now, many commercial products that offer code sandboxes charge fees and limit resources. So in today’s tutorial, I’ll show you how to hook your agent up to a self-hosted Jupyter Server. You’ll get a powerful sandbox runtime with reusable context and solid computing power.
This is a special, exclusive tutorial with full details—enough for you to master this core tech. So what are you waiting for? Let’s jump in.
Environment Setup
Build a Jupyter Kernel container
The “code sandbox” your agent connects to relies on containerization for safety and environment isolation. So first, prepare a Docker image that runs Jupyter Server.
The heart of any Docker container is the Dockerfile. To save you time, here’s the full content:
# Dockerfile.jupyter
FROM python:3.13-slim-bookworm

WORKDIR /app

COPY requirements.txt /app/requirements.txt

RUN pip install --no-cache-dir jupyter_kernel_gateway ipykernel numpy pandas sympy scipy --upgrade

RUN pip install --no-cache-dir -r requirements.txt --upgrade

EXPOSE 8888

ENV TOKEN="UNSET"
CMD python -m jupyter kernelgateway \
    --KernelGatewayApp.ip=0.0.0.0 \
    --KernelGatewayApp.port=8888 \
    --KernelGatewayApp.auth_token="${TOKEN}" \
    --JupyterApp.answer_yes=true \
    --JupyterWebsocketPersonality.list_kernels=true
This file uses python:3.13-slim-bookworm as the base image—not a pre-built Jupyter image—because we’ll customize the Jupyter environment later.
I pulled essential dependencies out of requirements.txt and installed them separately. This maximizes Docker layer caching.
Here’s the requirements.txt content:
matplotlib
xlrd
openpyxl
I included some basic Jupyter launch parameters. As we go, we’ll add more to build the complete Jupyter code sandbox.
Once your Dockerfile is ready, run this command to build the image:
docker build -t jupyter-server .Don’t start the Jupyter container yet—we’ll explain why later.
If your company can't use Docker Desktop due to licensing issues, don't worry—I've got an alternative solution for you. You can click here to read more:
A Quick Guide to Containerizing Agent Applications with Podman
Alternative solutions compatible with Docker SDK
![]() Data Leads FuturePeng Qian
Data Leads FuturePeng Qian

Install the Autogen agent framework
Most agent frameworks have moved Jupyter runtime support into paid offerings. Right now, Autogen is the only solid open option that supports Jupyter runtimes.
To build agents, first install the autogen-agentchat package:
pip install -U "autogen-agentchat"To use containerized code executors, also install Autogen’s Docker client library:
pip install "autogen-ext[docker-jupyter-executor]"With the image built and Autogen installed, you’re ready to code.
Using the Jupyter Code Sandbox
Start with the recommended Docker API approach
Let’s begin with the official API example to see how Autogen’s code executor works.
Autogen has three key modules for Jupyter + Docker: DockerJupyterCodeExecutor, DockerJupyterServer, and CodeExecutorAgent.
DockerJupyterServer uses the Docker API to start a container from a given image, mount directories, and store Jupyter connection info.
DockerJupyterCodeExecutor handles all operations with the Jupyter Kernel API. Once it gets connection info from the server, you can submit and run code.
CodeExecutorAgent is a special Autogen agent that pulls Python code from context and executes it. If you give it a model_client, it can even write its own code and reflect on results.

Now let’s build a code executor agent to test if this stateful Jupyter sandbox works.
Remember the jupyter-server Docker image we built? Use it to initialize DockerJupyterServer.
server = DockerJupyterServer(
    custom_image_name="jupyter-server",
    expose_port=8888,
    token="UNSET",
    bind_dir="temp",
)
Then use that server to create a DockerJupyterCodeExecutor instance:
executor = DockerJupyterCodeExecutor(
    jupyter_server=server,
    timeout=600,
    output_dir=Path("temp")
)
Note: both server and executor mount your local temp folder into the container. Code can read/write files there, but inside the Jupyter kernel, the working directory is /app, not temp.
Next, create the CodeExecutorAgent. Just pass the executor instance to the code_executor parameter.
code_executor = CodeExecutorAgent(
    "code_executor",
    code_executor=executor,
)
Now write a main method to test coder_executor.
async def main():
    async with executor:
        code1 = TextMessage(
            content=dedent("""
            ```python
            x = 1+2
            print("Round one: The calculation for the value of x is done.")
            ```
            """),
            source="user"
        )
        response1 = await code_executor.on_messages(messages=[code1], cancellation_token=CancellationToken())
        print(response1.chat_message.content)

        code2 = TextMessage(
            content=dedent("""
            ```python
            print("Round two: Get the value of variable x again: x=", x)
            ```
            """),
            source="user",
        )
        response2 = await code_executor.on_messages(messages=[code2], cancellation_token=CancellationToken())
        print(response2.chat_message.content)

asyncio.run(main())
To check stateful execution, call code_executor twice:
First, define a variable x and compute something.
Second, print x.
In a command-line sandbox, this fails—the second run doesn’t know about x. But with Jupyter’s stateful kernel, the variable stays alive between calls (as long as you use the same executor):

I’ve already shown how this stateful sandbox helps agents solve hard problems. Read more here:
How I Crushed Advent of Code And Solved Hard Problems Using Autogen Jupyter Executor and Qwen3
A detailed guide on using AI to generate code and solve puzzles automatically and quickly
![]() Data Leads FuturePeng Qian
Data Leads FuturePeng Qian

This method—starting a Jupyter container from an image via code—is called “Docker out of Docker.”
Problems with Docker out of Docker
If you’re just testing Jupyter’s superpowers on your local machine, DockerJupyterServer works fine.
But the big issue? The Jupyter Server actually starts on the same machine running your agent code.
This breaks down if you need serious compute power, or plan to deploy to production:
For data security or performance, companies often use powerful internal Jupyter Servers. If your data is gigabytes big, you need a server with tens of GBs of RAM—not your laptop.
Things get worse if you containerize your agent app. Due to network isolation, your agent container might start a Jupyter container but fail to reach it.
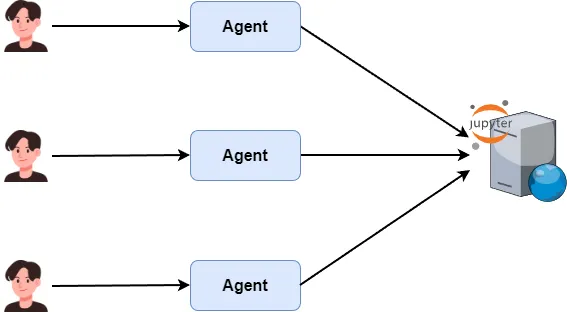
You wouldn’t run both agent and Jupyter on the same web server. Instead, deploy Jupyter on a dedicated compute server and let multiple agents share it—maximizing hardware use.
For example, I rented a GPU server on vast.ai, set up JupyterLab, and want my agent to connect directly for data analysis.
Let agents connect to the Jupyter Server directly
By now it’s clear: to use external compute power, your agent must connect to a pre-deployed Jupyter Server—not spin up its own.
You won’t find this solution anywhere online.
So here’s today’s key reveal: how to connect your multi-agent app to a self-hosted Jupyter Kernel server—for low cost (vs. Azure/Claude) and high compute power.
Go back to the section where we launched Jupyter from a Docker image. Remember: DockerJupyterServer saves connection info after startup, and DockerJupyterExecutor uses that to connect.
What if we skip DockerJupyterServer and make DockerJupyterExecutor connect directly to a standalone Jupyter Server?
Check the DockerJupyterExecutor source code:
class DockerJupyterCodeExecutor(CodeExecutor, Component[DockerJupyterCodeExecutorConfig]):
    ...

    def __init__(
        self,
        jupyter_server: Union[JupyterConnectable, JupyterConnectionInfo],
        kernel_name: str = "python3",
        timeout: int = 60,
        output_dir: Path | None = None,
    ):
        ...

        if isinstance(jupyter_server, JupyterConnectable):
            self._connection_info = jupyter_server.connection_info
        elif isinstance(jupyter_server, JupyterConnectionInfo):
            self._connection_info = jupyter_server
At init, it sets a _connection_info member.
- If you pass a
JupyterConnectionInfoinstance, it uses that directly. - If you pass a
DockerJupyterServerinstance, it reads.connection_infofrom it.
Earlier, we passed a DockerJupyterServer instance. Now let’s try passing JupyterConnectionInfo instead.
First, find your Jupyter connection details. If you launched from our image, it’s:
host='127.0.0.1', use_https=False, port=8888, token='UNSET'.
For internal or vast.ai servers, check your browser’s address bar.

Now update the DockerJupyterCodeExecutor init, pass JupyterConnectionInfo directly:
executor = DockerJupyterCodeExecutor(
    jupyter_server=JupyterConnectionInfo(
        host='127.0.0.1',
        use_https=False,
        port=8888,
        token='UNSET'
    ),
    timeout=600,
    output_dir=Path("temp"),
)
When we re-run main, it crashes—because I’m trying to connect to a container that isn’t running yet.
Manage instances gracefully with Docker Compose
To test our updated agent, we must first start the Jupyter container.
If you know Docker well, just run docker run.
docker run -d -p 8888:8888 --volume temp:/app --name jupyter-server jupyter-serverAgain, I recommend DataCamp’s ‘Introduction to Docker’ course to master the basics fast.
I’ll level up: when starting, I’ll mount the local temp folder into the container’s /app workdir—so code can read/write files.
That command feels messy, right? Honestly, I haven’t used it in ages. I use Docker Compose instead.
Docker Compose manages groups of related containers. For single-image setups, it’s super clean: write a docker-compose.yml file in your project folder.
version: "3.8"
services:
  jupyter:
    image: jupyter-server
    container_name: jupyter-server
    ports:
      - "8888:8888"
    volumes:
      - ./temp:/app
    networks:
      - docker_executor
networks:
  docker_executor:
    driver: bridge
Run docker compose up -d to start, and docker compose down to stop.
After starting Jupyter Server, re-run main. To test stateful execution, put a simple CSV in temp and read it:
async def main2():
async with executor:
code1 = TextMessage(
content=dedent("""
```python
from pathlib import Path
import pandas as pd
file_path = Path("superstore.csv")
df = pd.read_csv(file_path)
print(df.iloc[:5, :6].head())
```
"""),
source="user",
)
response1 = await code_executor.on_messages(messages=[code1], cancellation_token=CancellationToken())
print(response1.chat_message.content)
code2 = TextMessage(
content=dedent("""
```python
region_sales_sum = df.groupby("Region", as_index=False)["Sales"].sum()
print(region_sales_sum)
```
"""),
source="user",
)
response2 = await code_executor.on_messages(messages=[code2], cancellation_token=CancellationToken())
print(response2.chat_message.content)
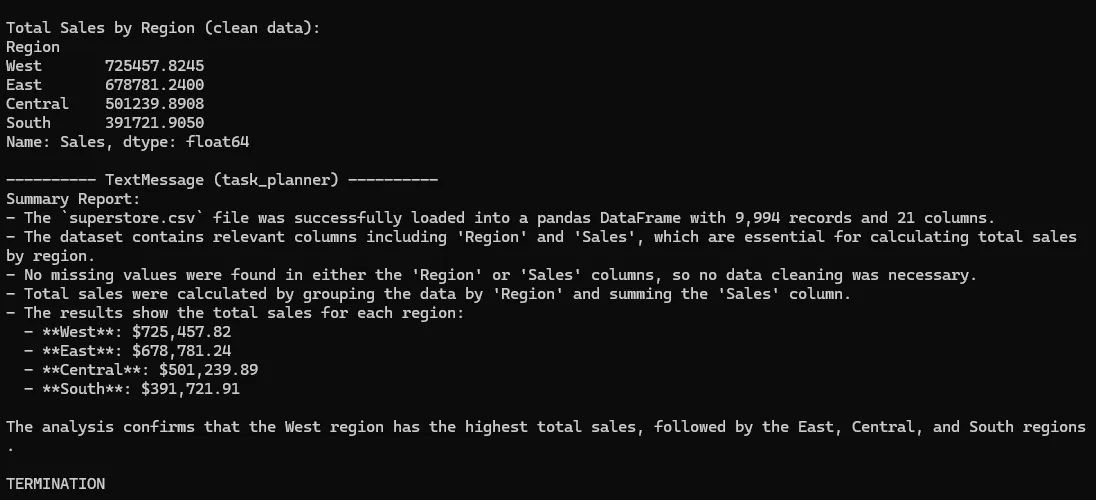
asyncio.run(main2())In this main, I first load and preview the CSV. Then in a second code block, I group by a column and sum values.

See? The file loads fine in Jupyter Server, and the code runs incrementally in the stateful environment.
Tune the Jupyter image to reclaim idle resources
When using Docker API, container resources are auto-cleaned on exit (thanks to async with).
But with standalone deployment, every new DockerJupyterCodeExecutor connection spawns a new Jupyter Kernel. Even after disconnecting, the kernel stays—wasting memory.
So we must tweak the Jupyter image’s Dockerfile to auto-cleanup idle kernels. Add these flags to the Jupyter KernelGateway launch command:
CMD python -m jupyter kernelgateway \
    --KernelGatewayApp.ip=0.0.0.0 \
    --KernelGatewayApp.port=8888 \
    --KernelGatewayApp.auth_token="${TOKEN}" \
    --JupyterApp.answer_yes=true \
    --JupyterWebsocketPersonality.list_kernels=true \
    --MappingKernelManager.cull_idle_timeout=1800 \
    --MappingKernelManager.cull_interval=300 \
    --MappingKernelManager.cull_connected=False \
    --MappingKernelManager.cull_busy=False \
Key settings:
cull_idle_timeout: kill kernel after X seconds idlecull_interval: check for idle kernels every X secondscull_connected: reclaim kernels with active connections?cull_busy: force-kill busy kernels?
With this, disconnected clients free up resources automatically. No more OOM crashes from long-running servers.
Remember to rebuild the image so Dockerfile changes take effect.
A Simple Multi-Agent Project Demo
By now, you’ve mastered the Jupyter code sandbox setup. We even tested stateful execution with hand-written code blocks.
But real projects need LLMs—not humans—to generate Python code step-by-step based on user tasks.
So let’s expand: build a system where the LLM breaks down user requests into incremental Python steps.
Besides code_executor, add two new agents:
task_plannersplits complex user questions into subtasks. It outputs one new step at a time.code_writerturns each subtask into executable Python code and sends it tocode_executor.

Here’s task_planner’s code:
SYSTEM_PROMPT = dedent("""
You are the task planning helper in the team, good at breaking down complex user requests into smaller sub-tasks that can be done with Python code.

## Duties
1. **Only split tasks**, don’t write code or do the sub-tasks yourself.
2. **Make just one sub-task at a time**, don’t skip steps or merge different steps together.
3. **Think about the context**, use the results from earlier steps to make new and reasonable sub-tasks.
4. **Create tasks step by step**, keep breaking things down until the user’s original request is fully answered.
5. When all sub-tasks are done, **make a summary report based on the work history**.
6. At the very end, output "**TERMINATION**" as the finish signal.
""")

planner = AssistantAgent(
    "task_planner",
    model_client=model_client,
    system_message=SYSTEM_PROMPT,
)
Here’s code_writer’s code:
SYSTEM_PROMPT = dedent("""
You’re a code helper in the team, good at writing Python code that can run in a stateful Jupyter Kernel based on the task you need to do.

## Responsibilities
1. **Understand the task**: Clearly understand the analysis or data processing request you’re given.
2. **Write code step by step**: Build the code in small, growing steps, making full use of the Jupyter Kernel’s stateful feature (meaning variables, data, and state stay between code blocks), and avoid running the same thing more than once.
3. **Show the output clearly**: Make sure each piece of code shows or returns its result clearly so the team can see and check it.
4. **Follow code format rules**: All Python code must be wrapped in Markdown code blocks like ` ```python ` to keep it easy to read and run.
5. **Reuse context**: Let later code blocks use variables, data frames, models, and other things you set up earlier, without loading or starting them again.

## Examples
When you write Python code, wrap it in a markdown python code block:
```python
x = 3
```
You can reuse the variable in another code block:
```python
print(x)
```
""")

code_writer = AssistantAgent(
    "code_writer",
    model_client=model_client,
    system_message=SYSTEM_PROMPT,
)
Since we solve problems iteratively, we use Autogen’s RoundRobinGroupChat to loop until the user’s question is answered:
team = RoundRobinGroupChat(
    [planner, code_writer, code_executor],
    termination_condition=combine_term
)
Test it with a main method using Kaggle’s superstore dataset:
if __name__ == "__main__":
    async def main():
        async with executor:
            await Console(
                team.run_stream(task="Read the superstore.csv file and find the total sales for each region.")
            )

    asyncio.run(main())
See? The agent runs code step-by-step, gets the final result, and even adds insights. Jupyter code sandboxes truly unlock agent potential:
Can LangChain or Other Frameworks Use Jupyter Code Sandboxes?
So far, we’ve used Autogen to harness Jupyter sandboxes—and tests prove their power for complex tasks.
But maybe you use LangChain, CrewAI, or another framework.
Can they connect to Jupyter sandboxes as easily as Autogen? Yes!
Create an executor function
At its core, we use DockerJupyterCodeExecutor to talk to Jupyter Server. CodeExecutorAgent isn’t required: you can wrap the executor in a simple function and expose it as a tool.
Take LangChain as an example. Code goes in langchain_with_jupyter_executor.py.
Initialize executor as before, using JupyterConnectionInfo to connect to your standalone server. Then create an execute_code function and mark it as a LangChain tool with @tool:
@tool
async def execute_code(code: str) -> str:
    """
    Use the Jupyter code executor to run your Python code.
    The runtime environment keeps its state, so you can run code step by step.
    reuse variables from earlier code blocks, and avoid writing the same code again.
    :param code: Code waiting to be run, only the code itself, no Markdown syntax
    :return: The result of the code execution.
    """
    code_blocks = [CodeBlock(code=code, language="python")]
    code_result = await executor.execute_code_blocks(code_blocks, cancellation_token=CancellationToken())

    return code_result.output
Important: LLMs often output code wrapped in Markdown code blocks. But executor needs raw Python. Mention this clearly in the function docstring.
Make LangChain use this tool
Now create a LangChain model client and agent. In the system_prompt, tell it: “You can write Python code and send it to the execute_code tool.”
model = ChatOpenAI(
    model="qwen3-next-80b-a3b-instruct",
    api_key=os.getenv("OPENAI_API_KEY"),
    base_url=os.getenv("OPENAI_BASE_URL"),
    temperature=0.1,
    top_p=0.85,
)

agent = create_agent(
    model=model,
    tools=[execute_code],
    system_prompt=dedent("""
    You are a data analysis assistant, good at solving user questions with Python code.
    You use the `execute_code` tool to run the code and summarize the results as the answer.
    """)
)
Test it with a simple main:
async def main():
    async with executor:
        result = await agent.ainvoke(
            {"messages": [
                {"role": "user", "content": "Calculate the value of the 14th Fibonacci number."}
            ]}
        )
        for msg in result['messages']:
            print(msg.content)

asyncio.run(main())
Success! The agent wrote Python code based on the user’s request and got the answer.
Calculate the value of the 14th Fibonacci number.

377
The 14th Fibonacci number is 377.
You can do the same with LangGraph or any agent framework: wrap executor calls in a tool function, then use function calling to trigger it.

Note: DockerJupyterCodeExecutor itself uses Jupyter KernelGateway’s REST API. If you know Jupyter APIs well, you could build a custom CodeExecutor for any framework.
Conclusion
Past tutorials proved that running agent-generated code in a stateful Jupyter sandbox unlocks huge potential for solving complex user problems.
But most multi-agent frameworks either lack this feature or only connect to cloud-based, resource-limited, commercial sandboxes.
Today, I showed you exactly how to connect Autogen to a self-hosted Jupyter Server code sandbox.
I broke it down from multiple deployment angles so you fully master this technique.
And you’re not limited to Autogen. Any agent framework can gain this power through function calling. Jupyter sandbox connectivity works across frameworks.
Remember: incremental, iterative code execution in a Jupyter sandbox is a foundational skill for building deep data analysis agents. In future posts, I’ll cover other core technologies. Together, we’ll build a stable, enterprise-grade deep data analysis agent system. Stay tuned!
Here’s today’s project source code:
agentic-ai-playground/09_Decrypt_Jupyter_Code_Executor at main · qtalen/agentic-ai-playground
Contribute to qtalen/agentic-ai-playground development by creating an account on GitHub.
![]() GitHubqtalen
GitHubqtalen

Stay Ahead in Enterprise AI
Get the latest deep dives into enterprise AI agents. No noise, just real-world experience.
You can unsubscribe anytime.