(still using ghosts as an analogy for Virtual Kubelets here)
28th October 2024
Kubelets are agents of Kubernetes which offload workloads, providing abstraction for compute and memory by managing the lifecycle of containers, monitoring resource usage and ensuring that the necessary compute and memory resources are allocated appropriately. Now that we understand this, we can move into understanding Virtual Kubelets further and how to use them efficiently with the help of a Virtual Kubelet Provider.
21st October 2024 (afternoon …continued)
No, there is no such thing as a supernatural kubelet. We’re still talking about Virtual Kubelets here. If virtual kubelets are ghosts of a node and have no real resources from the cluster, the cluster. They must be deriving their powers from somewhere to be useful in the re, they are drawing powers from a remote/distant source of energy and running the cluster workloads assigned to them. Kubelets are strict interfaces to resource utilization through container runtimes. Virtual Kubelets are just the interfaces. One can write a provider using virtual kubelet to allow users to interface resource utilization of a disparate system into Kubernetes or use these interfaces for simulation.
We are going to try using such a Virtual Kubelet which can delegate to a remote Virtual Machine where our workloads will run. For this we are going to setup Interlink.
Interlink is a Virtual Kubelet Plugin Engine where the Virtual Kubelet running on the cluster can interface with different plugins based on the type of workloads the user would like to run on a non Kubernetes compliant resource.
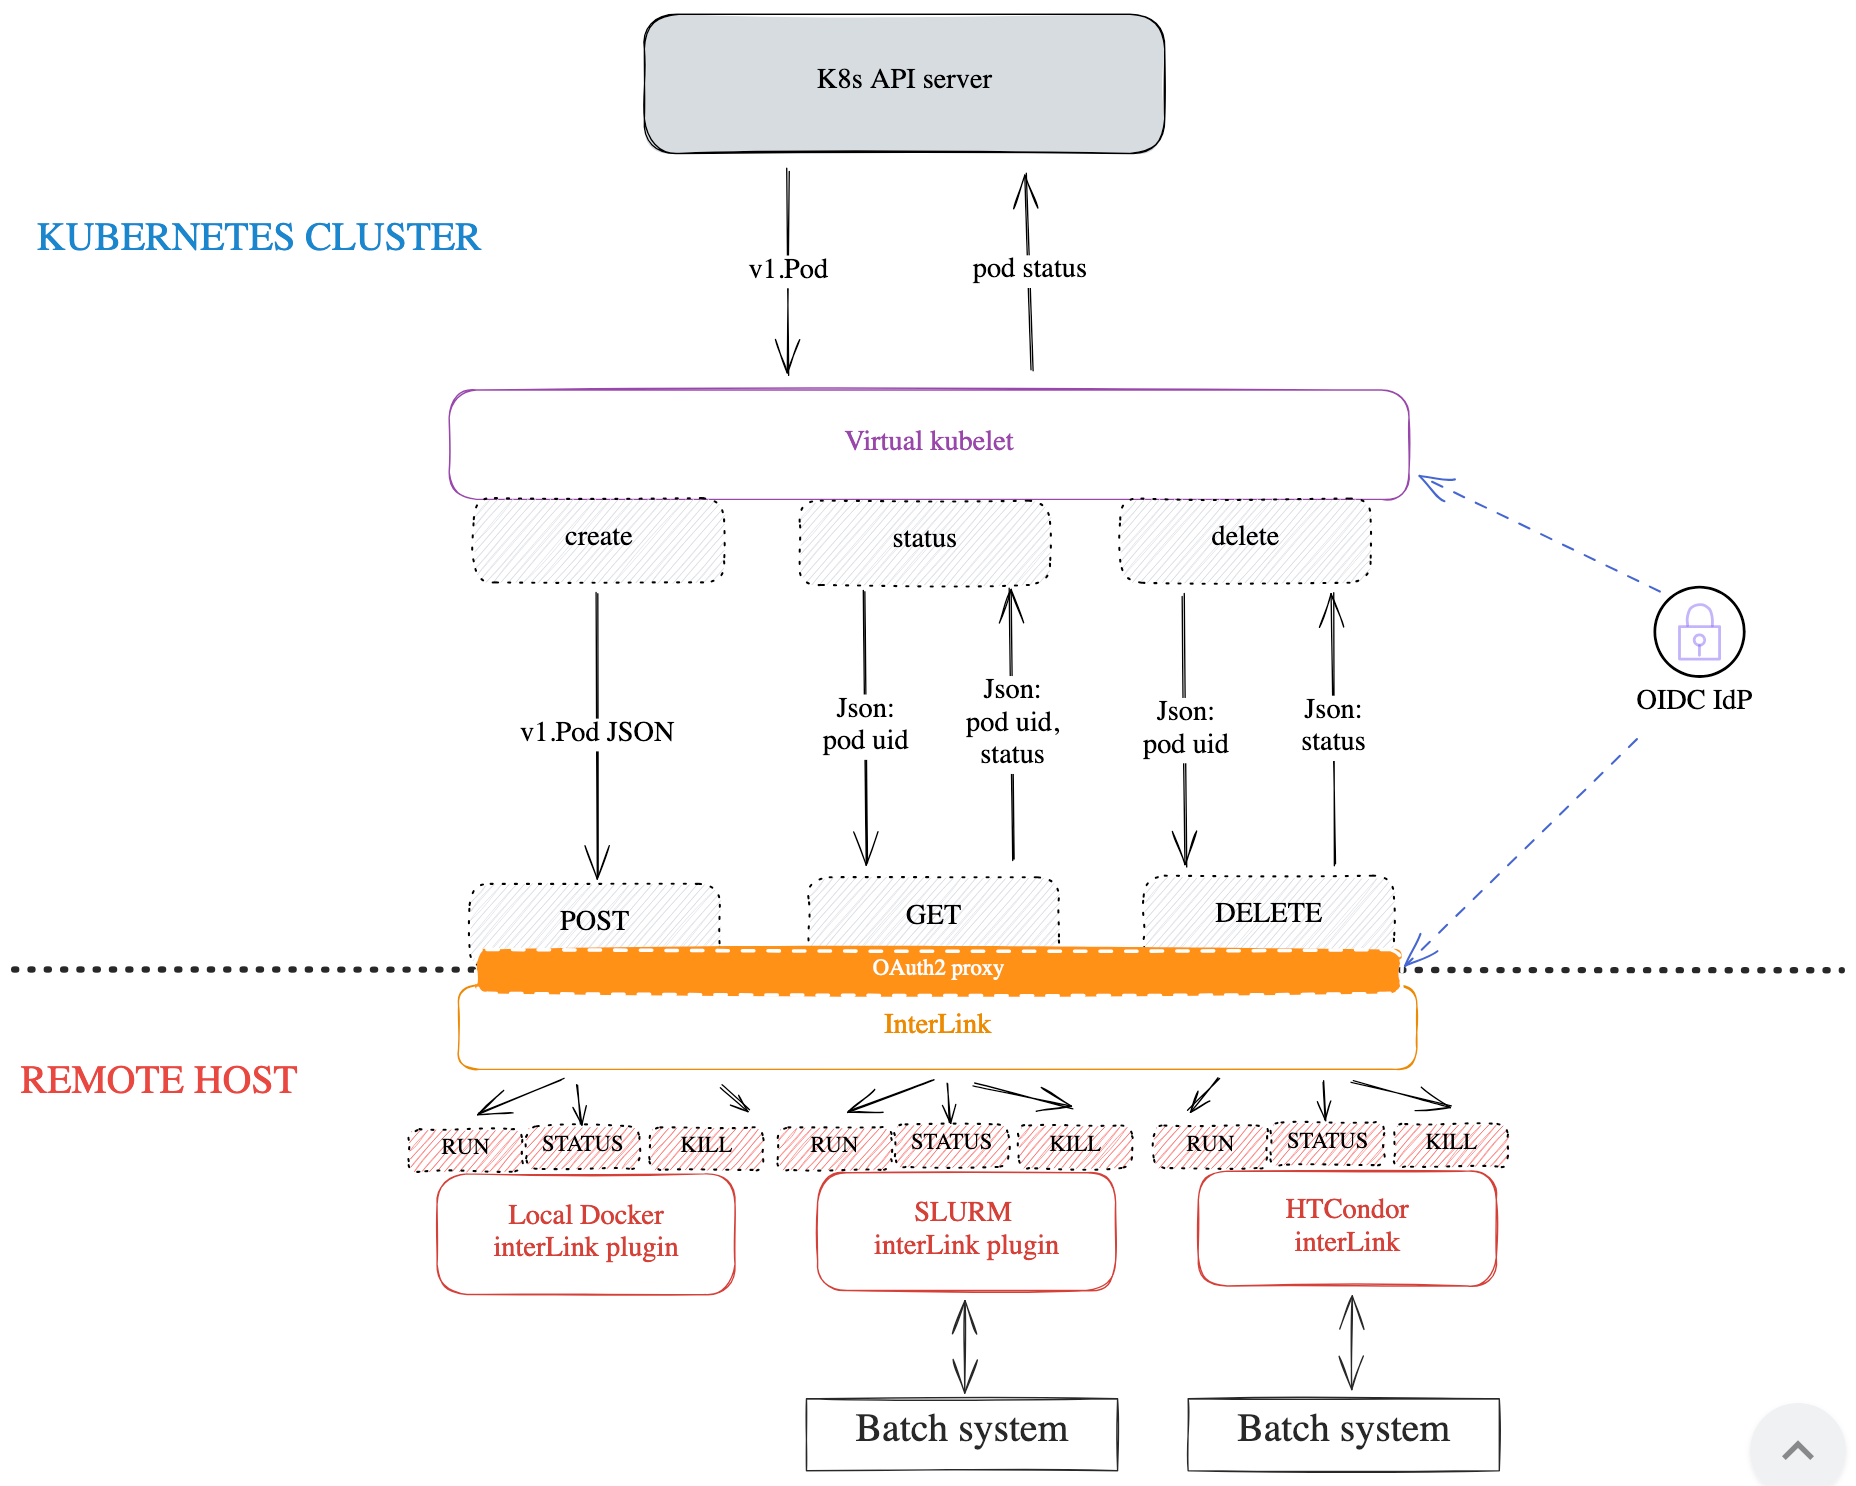
eg: We install the Virtual Kubelet (provider) on the node which talks to an Interlink API server running on the target machine. The Virtual Kubelet and the Interlink API server communicate and the API Server communicates with a plugin on the target system to run the workloads. The translation of the workload from a Kubernetes Object to an equivalent type on the target system; is defined by the plugin.
We will be using the Docker Interlink Plugin to make this work for us. I am using a M2 Mac. I will be running a Minikube cluster and use the Interlink plugin with the local docker instance on the Mac.
Setup the Virtual Kubelet on our cluster which the cluster can use to consume as a Node.
Setup the Edge Node. The Virtual Kubelet running on our cluster will offload workloads to this node via the Interlink API Server + Provider Plugin chain. The provider plugin we would be using here is the

The above is the architecture we are going ahead with.
For this setup I have followed the Interlink Cookbook. We are going to do the Edge Node setup for Interlink. The Virtual Node will be available in the cluster control plane and when workloads will be assigned to the Virtual Node in Kubernetes, the Edge Node will receive instructions through Interlink’s API Server. This Edge Node will be the actual resource provider and the Provider Plugin in question will translate the workload requirements to the Edge Node. We are using the Docker Interlink Plugin for this setup today.
There are three main parts to this setup.
Kubernetes Cluster to Edge Node communication w/ Github OIDC (using Device Flow)
Kubernetes (minikube)
Edge Node (where the workloads will run) (setup with docker)
First things first, we are going to setup a OIDC Provider through which the Kubernetes cluster can communicate with the Edge Node. I followed the instructions here for the same.
Create a virtual machine with the command below. This will create an Ubuntu instance with docker and portainer already installed.
multipass launch docker
multipass shell docker
With the above commands we will be launching the Ubuntu VM and then get shell access to the same.
Networking Setup
Update the VM to enable IP forwarding. Uncomment the following in /etc/sysctl.conf and run the command given after to apply the sysctl changes. This will allow us to use IPTables and do some networking changes on this Virtual Machine.
echo "net.ipv4.ip_forward = 1" | sudo tee -a /etc/sysctl.conf && sudo sysctl -pNow add new IPTables rule to ensure that we accept packets coming to port 30443.
# Change the IP_ADDRESS below to the IP of your VM (use multipass list)
export IP_ADDRESS=192.168.64.9
sudo iptables -t nat -I PREROUTING -i enp0s1 -p tcp --dport 30443 -j DNAT --to-destination $IP_ADDRESS:30443
sudo iptables -I FORWARD -p tcp -d $IP_ADDRESS --dport 30443 -j ACCEPT
Check if the command has been registered.
sudo iptables -L -n -v | grep 30443# Output of the above
\ 0 0 ACCEPT tcp -- * * 0.0.0.0/0 192.168.64.6 tcp dpt:30443Install iptables-persistent to persist the iptables rules. During installation you will be prompted if you want to persist the rules, say yes.
sudo apt install iptables-persistentThe command below will help us download the interlink installation binary for the remote host, in this case, our edge node.
export VERSION=0.3.1-patch2
wget -O interlink-install https://github.com/interTwin-eu/interLink/releases/download/$VERSION/interlink-installer_Linux_arm64
chmod +x interlink-install
Use the command below to create a configuration for the node.
./interlink-install --init # creates a $HOME/.interlink.yaml

interlink_ip: 127.0.0.1
interlink_port: 8443
interlink_version: 0.1.2
kubelet_node_name: my-vk-node
kubernetes_namespace: interlink
node_limits:
    cpu: "10"
    memory: 256Gi
    pods: "10"
oauth:
    provider: github
    grant_type: ""
    issuer: https://github.com/oauth
    group_claim: ""
    scopes:
        - ""
    github_user: myusername
    token_url: ""
    device_code_url: ""
    client_id: ""
    client_secret: ""

YAML data written to /home/ubuntu/.interlink.yaml
The above command will write a default configuration file to the location. I updated the file to have updated working content for interlink to work. I have obfuscated fields which need to be secret. First I need to update the interlink_ip which I get from the following command, where I am taking the IP of the docker Virtual Machine.
multipass list

Name                    State             IPv4             Image
docker                  Running           192.168.64.9     Ubuntu 22.04 LTS
                                          172.17.0.1
Update the rest of the configuration as necessary based on the previous GitHub OAuth Configuration.
cat ~/.interlink.yaml

interlink_ip: 192.168.64.9
interlink_port: 30443
interlink_version: 0.3.1-patch2
kubelet_node_name: multipass-docker
kubernetes_namespace: interlink
node_limits:
    cpu: "10"
    memory: 256 # not 256Gi
    pods: "10"
oauth:
    provider: github
    grant_type: authorization_code
    issuer: https://github.com/oauth
    scopes:
      - "read:user"
    github_user: waveywaves
    token_url: "https://github.com/login/oauth/access_token"
    device_code_url: "https://github.com/login/device/code"
    client_id: "xxx"
    client_secret: "xxx"
Run the interlink-install now. You should get output like the one below.
./interlink-install

please enter code ABCD-1234 at https://github.com/login/device
after you go to the login link above and then

After the above you should get a page like the one below.

You should then get the following output in the node where you are trying to install interlink.
=== Deployment file written at:  /home/ubuntu/.interlink/values.yaml ===

 To deploy the virtual kubelet run:
   helm --debug upgrade --install --create-namespace -n interlink multipass-docker oci://ghcr.io/intertwin-eu/interlink-helm-chart/interlink  --values /home/ubuntu/.interlink/values.yaml


=== Installation script for remote interLink APIs stored at: /home/ubuntu/.interlink/interlink-remote.sh ===

  Please execute the script on the remote server: 192.168.64.9

  "./interlink-remote.sh install" followed by "interlink-remote.sh start"
Now, let’s follow the instructions above for deploying the Interlink Virtual Kubelet. First, let’s create our minikube cluster.
minikube startUse the following command to get the values file we need from our docker VM.
multipass transfer docker:/home/ubuntu/.interlink/values.yaml .Once we have the values file for our interlink helm chart, use it to deploy our interlink virtual node which will interact with the multipass docker VM.
helm --debug upgrade --install --create-namespace -n interlink multipass-docker oci://ghcr.io/intertwin-eu/interlink-helm-chart/interlink --values values.yamlThe Helm chart has installed
a interlink-test-connection Pod and a corresponding ServiceAccount, Role, RoleBinding
a multipass-docker-node Deployment and a corresponding ServiceAccount, ClusterRole, ClusterRoleBinding, ConfigMap (with interlink config we defined earlier)
this bit is running the VirtualKubelet and tries connecting to our Edge Node. This will fail till the next step is complete and the VirtualKubelet is able to discover the Edge Node.
Go to the Edge node now and run the following command.
cd ~/.interlink
chmod +x ./interlink-remote.sh
./interlink-remote.sh install # installs interlink and oauth2-proxy
The above will install Interlink (api server) and the OAuth2-proxy on our edge node.
22nd October 2024
Let’s start the Edge Node with the following command.
./interlink-remote.sh startWe get the following log output upon running the above command.
cat ~/.interlink/logs/interlink.log

time="2024-10-29T16:39:42+05:30" level=info msg="Loading InterLink config from /home/ubuntu/.interlink/config/InterLinkConfig.yaml"
time="2024-10-29T16:39:42+05:30" level=info msg="{unix:///home/ubuntu/.interlink/interlink.sock 0 unix:///home/ubuntu/.interlink/plugin.sock 0 true true false ~/.interlink}"
time="2024-10-29T16:39:42+05:30" level=info msg="interLink version: 0.3.1-patch2"
time="2024-10-29T16:39:42+05:30" level=error msg="dial unix unix:///home/ubuntu/.interlink/plugin.sock: connect: no such file or directory"
Considering we aren’t running any plugin which interlink can consume to run the workloads assigned in Kubernetes cluster to run on the Edge Node.
23rd October 2024
Let’s setup the Interlink Docker Plugin and
First things first, we need a config file for the docker plugin. Create the file below and update it with the correct
# ~/.interlink/config/plugin-config.yaml

Socket: "unix:///home/ubuntu/.interlink/plugin.sock"
InterlinkPort: "0"
SidecarPort: "0"

CommandPrefix: ""
ExportPodData: true
DataRootFolder: "/home/ubuntu/.interlink/jobs/"
BashPath: /bin/bash
VerboseLogging: true
ErrorsOnlyLogging: false
Next, checkout the code from the docker-plugin and build it from scratch to run on a no-gpu system.
git clone https://github.com/interTwin-eu/interlink-docker-plugin
cd interlink-docker-plugin

# sudo snap install go --classic
git checkout origin/2-light-version-no-gpu
CGO_ENABLED=0 GOOS=linux go build -o bin/docker-sd cmd/main.go
Let’s move the plugin to an appropriate location.
cp bin/docker-sd ~/.interlink/bin/pluginRun the following to start the plugin passing the configuration that we created before.
export INTERLINKCONFIGPATH=~/.interlink/config/plugin-config.yaml
$HOME/.interlink/bin/plugin &> $HOME/.interlink/logs/plugin.log &
echo $! > $HOME/.interlink/plugin.pid
With the above the docker plugin will start and we can see it running as a process below.
ps -aux | grep 17974
ubuntu     17974  0.2  0.4 1253620 19432 pts/1   Sl   22:57   0:00 /home/ubuntu/.interlink/bin/plugin
Let’s check the logs for the plugin process.
cat ~/.interlink/logs/plugin.log

...
time="2024-10-23T22:58:07+05:30" level=info msg="✅ DIND container 77ad93afff200bbccf52b45eab288e4a9e8c9c671c26d7bdad1a1917ffff9ac0\n is up and running"
Let’s check the interlink logs to see if it has picked up the creation of the plugin socket. The below is what the logs should look like.
ubuntu@docker:~/.interlink$ cat ./logs/interlink.log
time="2024-10-30T02:36:55+05:30" level=info msg="Loading InterLink config from /home/ubuntu/.interlink/config/InterLinkConfig.yaml"
time="2024-10-30T02:36:55+05:30" level=info msg="{unix:///home/ubuntu/.interlink/interlink.sock 0 unix:///home/ubuntu/.interlink/plugin.sock 0 true true false ~/.interlink}"
time="2024-10-30T02:36:55+05:30" level=info msg="interLink version: 0.3.1-patch2"
time="2024-10-30T02:36:55+05:30" level=info msg="&{0x4000132f80 /home/ubuntu/.interlink/interlink.sock true {{{} 0} {0 0}}}"

ubuntu@docker:~/.interlink$ cat ./logs/plugin.log
time="2024-10-30T02:36:28+05:30" level=info msg="✅ Loading InterLink config from /home/ubuntu/.interlink/config/plugin-config.yaml"
time="2024-10-30T02:36:28+05:30" level=info msg="✅ Start cleaning zombie DIND containers"
time="2024-10-30T02:36:28+05:30" level=info msg="✅ 2 zombie DIND containers found"
time="2024-10-30T02:36:30+05:30" level=info msg="✅ DIND zombie containers cleaned"
time="2024-10-30T02:36:30+05:30" level=info msg="✅ Creating 2 DIND containers"
time="2024-10-30T02:36:30+05:30" level=info msg="✅ DIND network d745ec24-fc71-4cc4-a0d9-673ed0b3f8ce_dind_network created"
time="2024-10-30T02:36:33+05:30" level=info msg="✅ DIND container 99b31fc9435f9ce3407b823b2c5392e3e3a7c207721be65f333b5a85cbc57039\n is up and running"
time="2024-10-30T02:36:33+05:30" level=info msg="✅ DIND network 08492a66-874e-4a1b-9a4a-d59454b57759_dind_network created"
time="2024-10-30T02:36:37+05:30" level=info msg="✅ DIND container 349e79e3420e88e2cc84a3bc53bd73ee5c24a545581e65f2ec97d4ec97eb840e\n is up and running"
30th October 2024
The entry above was revised multiple times as I had to collaborate with the maintainer of the project, Diego Ciangottini who helped me get interlink remote host up and running and graciously accepted patches from me. The below is my current understanding of the system. It will evolve as time goes on and I should be able to put a standalone guide to installing interlink with docker pluginas it seems like there is still a testing remaining to be done to make interlink work well with Github OIDC and Docker.

There is still more work to be done but we aren’t too far off. I was able to debug the Edge node fairly well but still I face one final problem. The Virtual Kubelet is not connecting to the Interlink API Server.
│ vk time="2024-10-29T22:46:26Z" level=info msg="InterlingURL: https://192.168.64.9"                                                                                            │
│ vk time="2024-10-29T22:46:26Z" level=info msg="Pinging: https://192.168.64.9:30443/pinglink"                                                                                  │
│ vk time="2024-10-29T22:46:26Z" level=error msg="Ping Failed with exit code: -1"
I will continue working on this and we will see more progress on this soon ! Till then, cheers !