Written at 2025-12-25 - Updated at 2025-12-28
I built my own Corne keyboard around six months ago, in July. I have been using it ever since. Although I am no expert on split keyboards, I accumulated a fair amount of observations during this whole process. I thought that if I wrote down my experiences, they might still be of interest to people who are considering whether to try a split keyboard. Or, if they are already using one, maybe they can also benefit from some of the tricks that helped me a lot. So, here it is: a blog post about how and why I built my own Corne keyboard, the things I learned and applied to improve my ergonomics over the last 6 months.

I will first talk about my overall reasons for choosing such a niche keyboard, then why and how I built it. Finally, I will share some very cool tips and tricks about how I played with the layout to make my Corne fit my specific needs better.
Let us get started without losing any more time. :)
Why A Split Keyboard?
Whenever a friend sees my Corne keyboard, they usually ask what it is, where I got it from, and why I am using it. Sometimes they want to try it, and I let them play around with it for a bit. After a few minutes, the reaction is almost always the same: they tell me that it is hard and frustrating to use. I understand this. It definitely looks strange, and it is far from a natural typing experience for someone who is used to a “normal” keyboard. Still, I want to try my best to explain why I decided to use a split keyboard in the first place.
I can think of three possible reasons for using a split keyboard. First, they look cool, and some people simply enjoy trying cool things. Second, there is the promise of improved typing speed or efficiency. Third, and most importantly for me, they are often more ergonomic and natural for the body. I admit that the aesthetics played a small role in my decision as well, but the primary factor was simply ergonomics.
For some context, I have been dealing with neck and back pain for quite a while. For this, I had already spent a lot of time thinking about office ergonomics. I regularly use laptop and monitor stands to keep my screen at eye level. I pay attention to chair and desk height, distance, and how they relate to my posture and leg position. I have also invested in a standing desk and a chair that I find comfortable for long work sessions. I also started learning more about biomechanics and began exercising more regularly. 1
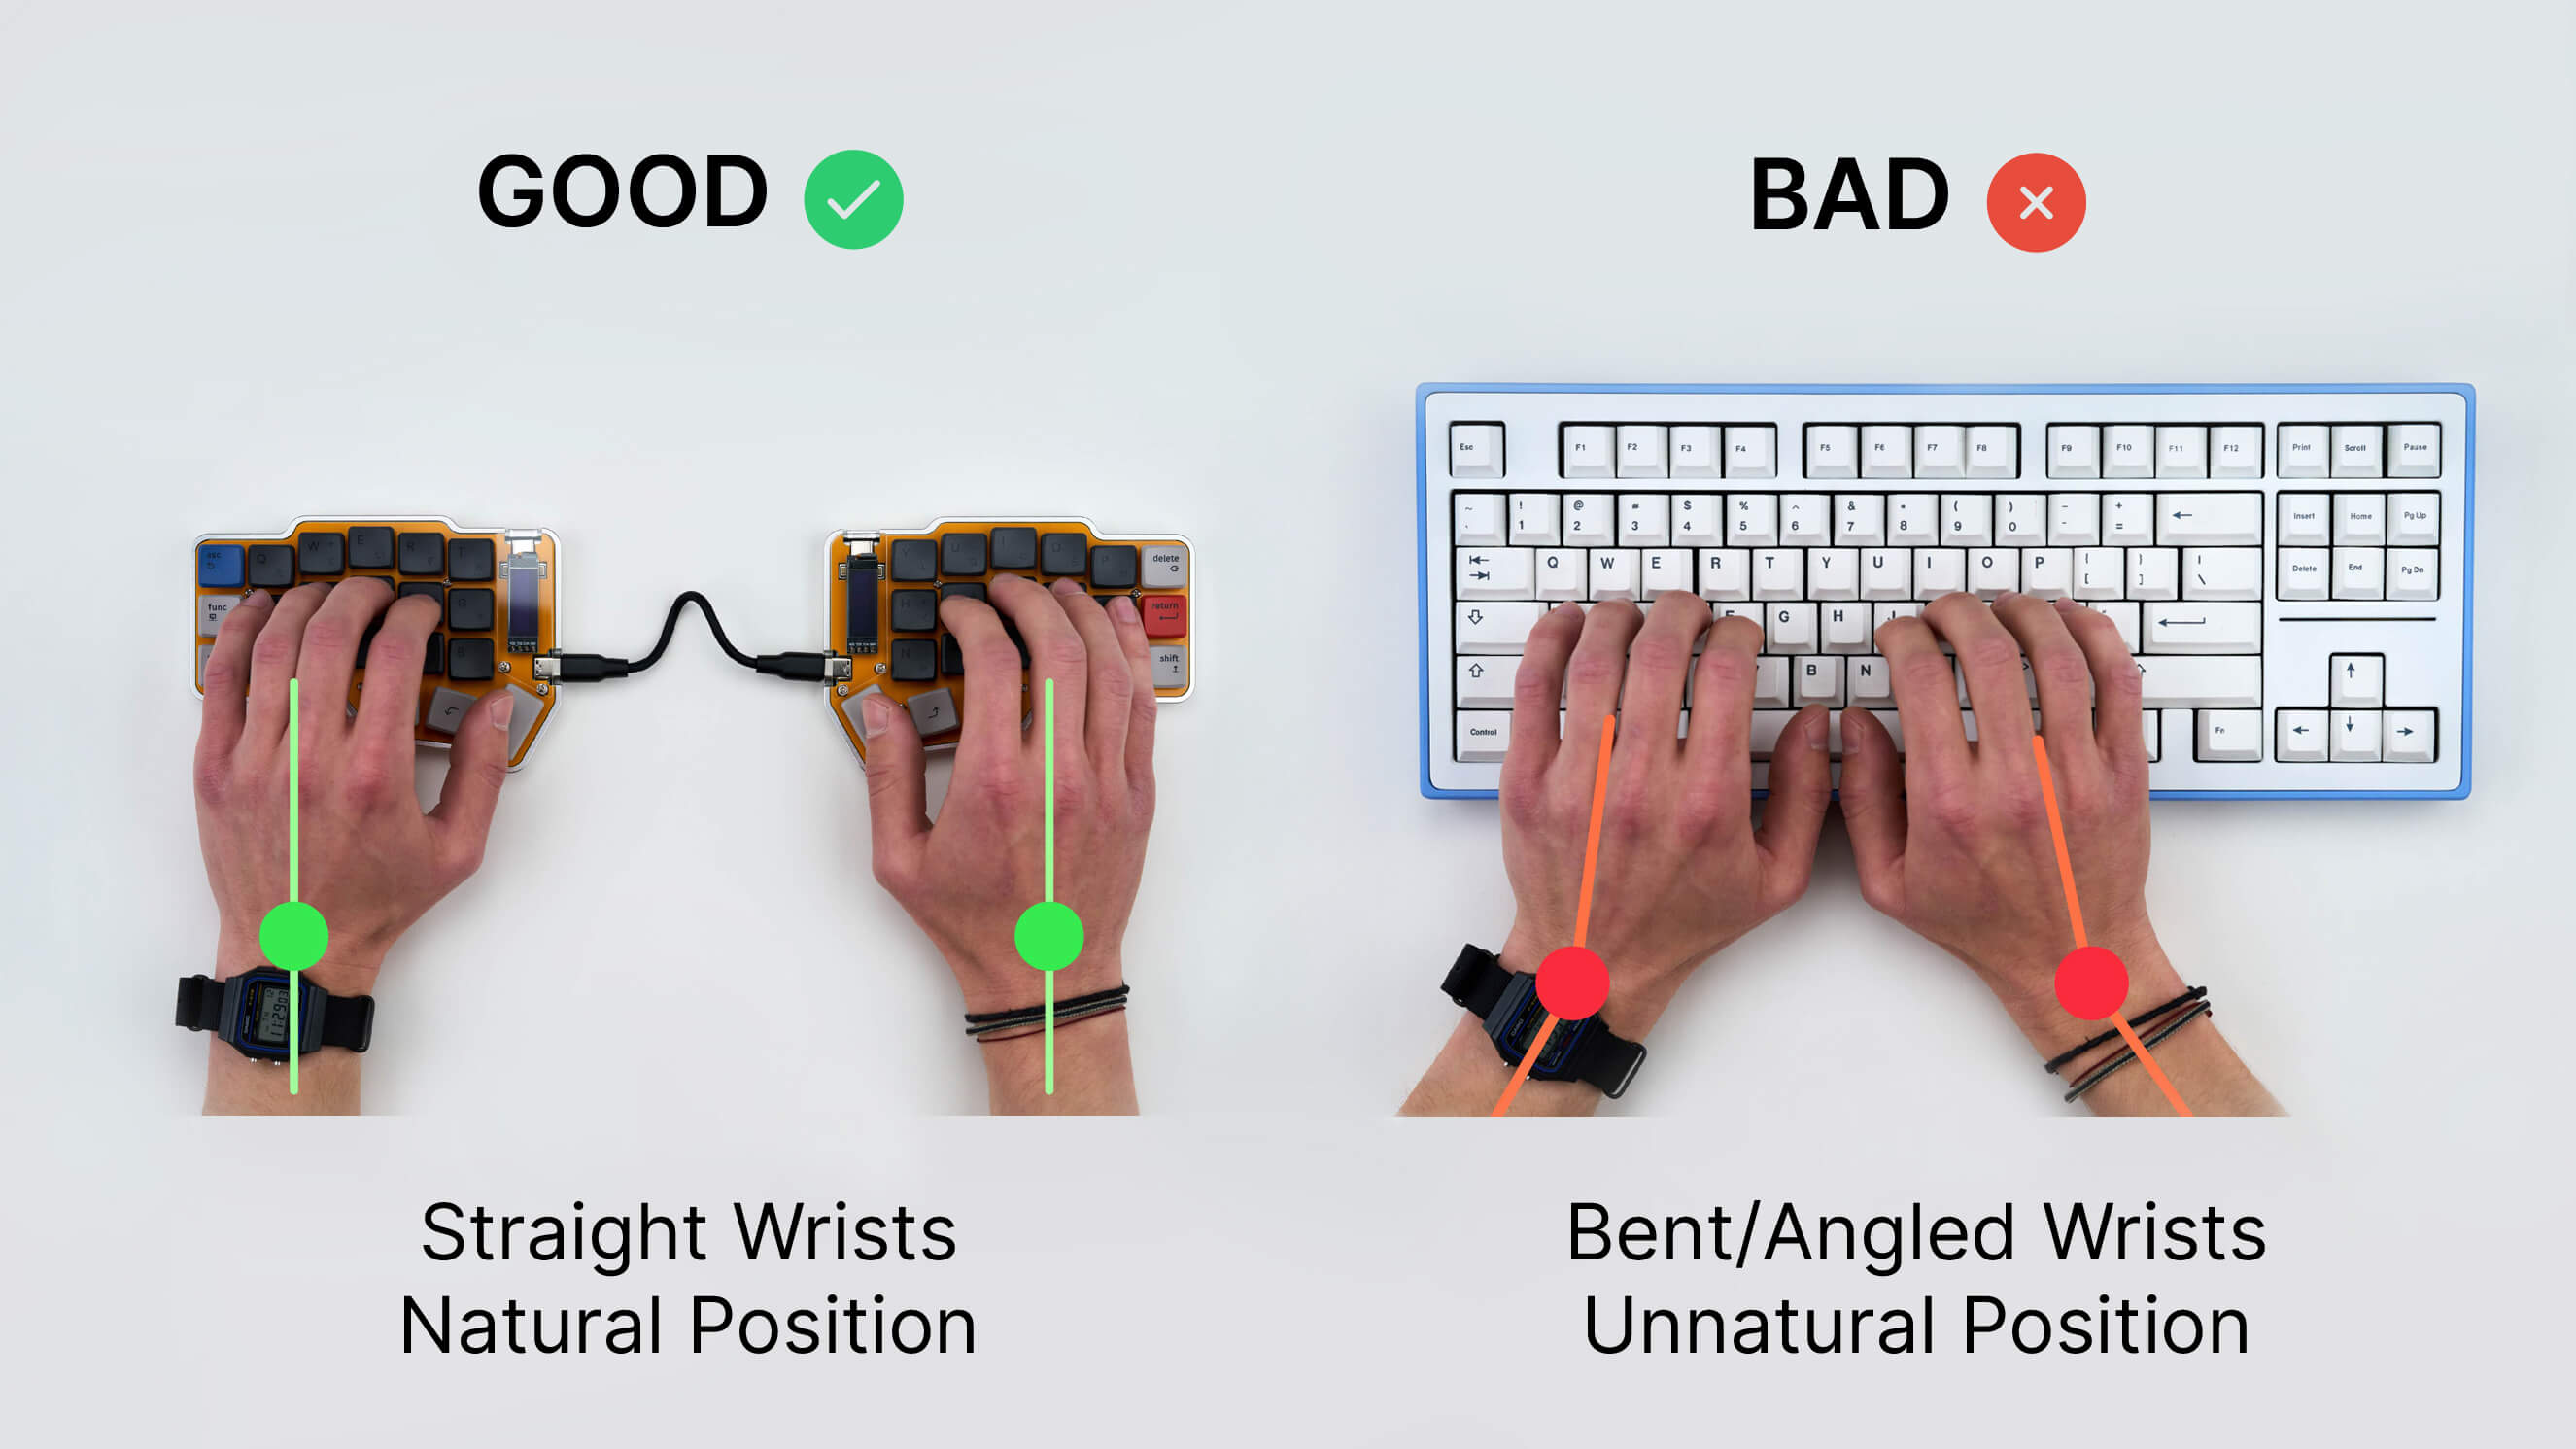
This made me think about how I could further improve my ergonomics. After some thinking, it became obvious that the two things I interact with the most when using a computer are my keyboard and mouse. A quick research pointed me toward two promising upgrades for my setup: a split keyboard and a vertical mouse.
Both made sense to me. A vertical mouse more closely resembles a neutral hand position, which can help reduce awkward wrist movements. With a split keyboard, the ability to position the two halves independently allows the wrists to remain in a more neutral alignment. This same split setup, combined with the option to place the halves farther apart, also helps reduce internal shoulder rotation. Over time, this can improve shoulder comfort and may even reduce neck strain.
To give you a brief idea, the following image from boardsource.xyz demonstrates this really well.
Why Ortholinear?
Another concept that I came across while researching this topic was “ortholinear”. Here, “ortho” means right-angled, and “linear” means arranged in lines. So, an ortholinear keyboard is one where the keys are placed in a straight grid of aligned rows and columns instead of being staggered.
For those who are further interested, I recommend checking out The Planck Keyboard blog post by Matt Gemmell. Just to give you a brief idea of what an ortholinear keyboard looks like, here is a photo of his keyboard:

This makes sense to me. However, I was concerned that, since an ortholinear keyboard is usually narrower than a normal one, it might cause more wrist deviation. So I did not want to try a non-split ortholinear keyboard such as the Planck. Still, I wanted my split keyboard to be ortholinear, because being able to align the two halves already solves the wrist deviation problem.
So, a split, ortholinear keyboard it is. But there is still one very important question: why choose the Corne over the many other split keyboards available?
Why Corne, Specifically?
When I first looked into the list of split keyboards being recommended, I was baffled. Not only are there so many alternatives, but they also differ a lot.
Just to give an example, consider something as minimalist as ChocoFi and something as full-fledged as Moonlander. Both are split keyboards, yet the difference between them is immediately obvious.
This is how I quickly realized that it would be better for me to first set my expectations and then filter them. Not the other way around of trying to learn all the subtleties and then trying to make an educated guess.
Since it would be my first attempt at a split keyboard, I wanted a keyboard with a community around it. This way, I could benefit from the experiences of other people and find answers to my questions if I ever had them.
The split keyboard being open source was also very important, because rebuying it if something ever went wrong was not an option. This is not only due to the prices, but also because customs regulations in Turkey currently make ordering items from abroad very difficult. For example, anything above 30 euros, including shipping, requires a formal customs declaration and additional fees. Likewise, the number of orders that can be placed is limited on a monthly basis, and at the moment, this limit is five orders per month. On top of this, there is not much of a marketplace for split keyboards in Turkey either. That meant I either had to ask friends abroad to buy parts for me as a gift, or obtain the components separately and solder and assemble the keyboard myself. I chose the second option because it made me less dependent on others. I could still ask for keyboard help if needed, but if something went wrong, fixing it myself would at least be possible.
And of course, the keyboard had to be ergonomic. In fact, I was okay with going with split keyboards that prioritize ergonomics more, even at the expense of challenging my habits. I was okay to try new things if I was convinced of the possible benefits.
So, after some market research, my final decision came down to Corne vs Lily58. Both of them seemed to satisfy my main requirements, with one key difference between them. The Lily58 has 58 keys, while the Corne has only 42.
In practice, this means that the entire number row and a few additional keys are removed on the Corne to make it more compact. Access to those missing keys is handled through layer combinations instead. On paper, I liked the idea that it would reduce overall hand movement. However, my main concern was whether I would actually like the experience or not.
Since I could not clearly decide which one to go with, I went YOLO. I decided to build the Corne myself and asked my friend Onur to bring me a Lily58 for personal use.
Building The Corne Keyboard
Before starting on my own, I wanted to see if anyone else in Turkey has already built a split keyboard. I found a subreddit called MechIstanbul, where there were lots of split keyboard builds. Although the subreddit itself seemed to be inactive, I realized that their Telegram group was still very active. There, I was able to ask some of the questions that I had in mind to the experts directly :) I’m especially indebted to a member named Erdem (yes, we share the same name) who helped me a lot with choosing which parts to order and from where for a Corne keyboard build.
After having a better sense of which parts I needed to order, I bought all the parts that were essential for a split Corne keyboard through AliExpress. Specifically, I used all of my monthly order limitations for the following items (each order under a 30 EUR cost):
- 100 XDA keycaps. There was no particular reason behind this choice. I was just browsing keycaps, and these simply looked nice.
- 110 Outemu Silent Yellow switches. I wanted my split keyboard to be relatively quiet. I went with Outemu instead of Cherry MX mainly because they were cheaper. I couldn’t spot any significant difference between the two when listening to sound comparisons between the two.
- 5 NRF52840 MCUs. These basically share the same interfaces and functionalities as nice!nano MCUs, but they are much cheaper.
- A Corne PCB kit, which includes the Corne circuit boards, diodes, hot swappable sockets (so that the switches are not soldered directly to the board and can be easily replaced later), TRRS jacks, and similar components.
- Upper and lower plates to sandwich the PCB. These serve both as a protective layer and as an aesthetic element.
If you are further interested, here is the list of all parts with their costs:

Keep in mind that I bought most of the parts in double the needed amount, just in case I use them for another keyboard later.
After the orders reached, I simply followed the tutorials available on the internet. 2
While watching the video, I noticed that the soldering part looked a bit tedious. Since I had never done soldering before, I did not want to risk the process. So, I went to my cousin, who is experienced with soldering, and asked for help. Thankfully, he helped a lot. After that, I plugged in the parts, installed the ZMK firmware on the MCUs, and then programmed the left and right halves using the Keymap Editor.
Of course, there were a few minor issues along the way. For example, the female pins we soldered onto the PCB were slightly too long, which caused the MCU to sit a bit higher than intended and left insufficient space to attach the covers properly. We also accidentally stripped the soldered area on the battery during soldering, and ended up breaking the on-off switch as well.
But, despite these problems, I think that the overall result was still good enough, and I finally had a keyboard that was fully usable.

The Overall User Experience
Speed
The moment I had my Corne keyboard working, the first thing I did was open MonkeyType and see how fast I could type things down. It was 3 words per minute in my first try. On the second try, it was a bit better, and after a few iterations, I was able to get around 60 WPM in the same hour in which I started experimenting. It’s not really fast compared to my usual speed. 3 But it was still good enough for me to get things done using this keyboard.
I can say that after around two days of using the Corne keyboard, I was getting 90 to 100 WPM, which was about 80 to 90 percent of my previous performance. This was sufficient for me to use the keyboard effectively at work.
I believe this shows two things. First, as many people expect, changing from a normal staggered layout to an ortholinear split layout decreases your typing speed tremendously at first. Second, it is not that hard to recover from that decrease. In fact, not long after that, around three weeks later, I was able to beat my previous typing record on MonkeyType with 139 WPM.

I do not know about other people, but for me, the main reason I slowed down when I first started using the Corne keyboard was not that it was split. I think one reason was simply that the keys are in an ortholinear layout. For example, at the beginning, I used to type ‘C’ a lot when I meant to type ‘X’. This is because I was so used to a staggered layout that when I typed from the row below the home row, my fingers naturally moved a little to the right. I had to unlearn that habit.
Getting Used To Layer Keys
Besides unlearning some of my previous habits, I also realized that I needed to learn new ways of typing special characters. The Corne has fewer keys than a typical keyboard, and as a result, letters and modifier keys occupy almost all of the base layer. This means that other characters, such as curly braces {}, square brackets [], and even numbers, have to be typed using layer keys.
For example, pressing the key that corresponds to q on the base layer produces q. Pressing the same key while holding the layer 1 key produces 1, and holding the layer 2 key produces !.
To give a concrete idea, this is how my keys behave when I am holding the layer 1 key:

And this is how they behave when I am holding the layer 2 key:

This might seem a bit confusing at first, but when you think about it, layer keys are not very different from modifier keys like Shift or Ctrl. They simply change the behavior of the other keys while they are being held.
As for how long it took to get used to these keybindings, adapting to layer 1 was especially easy for me, and layer 2 was not much harder either.
One important thing I noticed is that I adapted faster to the special characters I used most often than to the ones I used less frequently. This is actually good news, because the characters you need the most become available to you first.
Embracing “Less is More”
I think the Corne keyboard is a good example of less is more. You are reducing the number of available keys, but you still gain more than you had before: better ergonomics, more speed, and more precision. Realizing this made me wonder whether I could push the idea more. For example, could I reduce pinky usage even further by removing the sixth column from the keyboard?
After coming across “the endgame keyboard” video by Joshua Blais, I realized that I could even go further.
I started thinking about ways to reduce my pinky usage. Erdem from the MechIstanbul community sent me the Home Row Mods post by Matt Gemmel again. It was a great read. To summarize the main idea, you can define custom behaviors for certain keys so that they act as modifier keys when held and as normal keys when tapped.
This lets you move most of the modifier keys that are usually pressed with the pinkies onto the home row, reducing pinky strain even further. What I did was mirror the home row modifier keys on both halves of the keyboard. This way, when I need to press a key on the left side with a modifier, I can use the modifier on the right side, and vice versa.
Here is what my default layout looks right now:

As you can see, I have four empty keys in total, which means I am actively using 38 keys. I still rely heavily on my right pinky, but I recently realized that some of those keys can be moved to the empty thumb positions. I can also start using combo keys, a custom behavior that allows certain characters to be typed by pressing two keys together. However, at the time I was configuring my keyboard, this setup seemed acceptable.
Emphasis on Thumb Keys
One thing I quickly noticed when using this keyboard was that it shifts some of the load that was previously placed on the pinkies onto the thumbs. Normally, I used my thumbs only for pressing the space key. With this keyboard, each thumb is assigned three keys. The important point is that these thumb keys usually replace functions that were previously handled by the pinkies.
I think this is very good overall. Because it kindof balances the load between your fingers. At the same time, if your thumbs are sensitive, this change can make things worse rather than better. After using the Corne keyboard for a few weeks, I noticed a slight pain in my thumbs. It was concerning, so I took a break over the weekend, and the pain went away. It never returned. I suspect this was either due to my hands adapting to the new layout or a minor strain from doing knuckle push-ups and pull-ups around the time. Even so, the experience made me realize that these keyboards may not be ideal for people with sensitive thumbs.
What About Lily58?
You might remember that in the Why Corne Specifically? section, I mentioned that during my decision period between the Corne and the Lily58, I went YOLO and decided to try both.
Well… By the time my friend handed me a Halycon Lily58 kit that was bought from splitkb.com, it was already too late. I was already certain that I was not going to leave the Corne anytime soon. I had adapted to it extremely well and was not really seeking the additional keys that the Lily58 offered anyway. In other words, even if I used the Lily58, I would most likely stick to the same keybindings and layouts that I already use on my Corne keyboard.
So, I asked a couple of my friends whether they would be interested in using the keyboard. Thankfully, Mert was interested, so I handed my Lily58 over to him. 🙂

Goodbye, Lily58.
So, What’s Next?
So far, I am very fond of my Corne, but I have a feeling that I could eventually switch to a 5x3 layout. I already have a PCB for a wireless Choc Corne at home, and I plan to build it in one of my spare periods. I also want to improve my CAD skills and experiment with 3D printed cases and rests designed specifically for my own needs. For now, however, I am happy with my current Corne, and I think the best next step is to start using this 6x3 keyboard as if it were a 5x3.
Anyway, thanks for reading this far. I hope this post was helpful for at least some of you.
I would also like to thank Oussama for reviewing the initial draft of this post.