The Easiest and Most Cost-Effective Way to Add Secure IoT & Web to Your Existing Product
You've got a solid embedded product that is battle-tested, reliable, and never meant to connect to the internet. Now there's a request to IoT-enable it. Your first thoughts? TLS handshakes, cloud APIs, OTA updates, embedded web interfaces, certificate management... and a creeping sense of dread.
But what if there was a way to skip all the painful parts?
This article guides you through a clean and straightforward method for adding a secure IoT and embedded web interface to any embedded system without requiring firmware rewriting, grappling with low-level C libraries, or becoming a security expert.
The trick? Add an ESP32 as a secure co-processor. It handles all the connectivity (Wi-Fi or Ethernet), crypto, and cloud communication. Your main CPU continues to perform its task, communicating with the ESP32 over a basic serial (UART) link.
This article is also highly relevant for older network-enabled devices that now need to support secure communication. These products typically lack the resources to implement proper TLS, manage certificates, and ensure trusted communication, making a secure IoT co-processor the most practical upgrade path.

To keep the total cost low, we'll use Xedge32, an IoT toolkit that eliminates the need for low-level C coding on the ESP32. With the ready-to-run Xedge32 firmware installed, all networking, IoT, and embedded web interface logic can be developed in the high-level Lua language. Lua is easy to learn, fast to implement, and includes built-in support for MQTT, REST APIs, JSON, OTA updates, strong security, and more. This approach shortens development cycles, reduces maintenance complexity, and minimizes long-term engineering costs.
However, if you don't have the time or expertise to handle IoT, embedded security, or device-level coding, you can easily hand it off to a developer familiar with high-level languages. It's much easier and more cost-effective to find full-stack and IoT developers who can work with Lua or a similar language than to hire an embedded C developer with equivalent experience in IoT and secure networking. This shift doesn't just lower your upfront development cost. It also reduces the total cost of ownership by simplifying maintenance, accelerating development cycles, and avoiding the bottlenecks associated with specialized low-level IoT C programming. High-level developers can move faster, fix bugs more quickly, and are far more abundant.
For hardware engineers, the Xedge32 brochure (PDF) is the go-to quick overview.
Addressing Common Misconceptions About the ESP32 Platform
Some corporations/engineers hesitate when they hear "ESP32" due to misconceptions that originated from its early popularity in the maker ecosystem. In practice, the CPU and supporting software SDK are solid, commercially deployed technologies. In the architecture proposed in this article, the device is not used as the primary control MCU; it operates strictly as a secure networking and identity co-processor. This separation ensures that your main application logic remains isolated from networking complexity while still benefiting from modern TLS, certificate handling, and OTA infrastructure. Note that we do not represent or endorse Espressif Systems; we use the platform solely because it provides a cost-effective, technically sound foundation for secure connectivity in commercial products.
We have used the ESP32 in multiple commercial deployments, including a Car Charger Management Platform where the ESP32 serves as the edge connectivity device. In production use, the platform has demonstrated robust, stable, and reliable operation.
How to Integrate the ESP32 Co‑Processor Into Your Existing Design
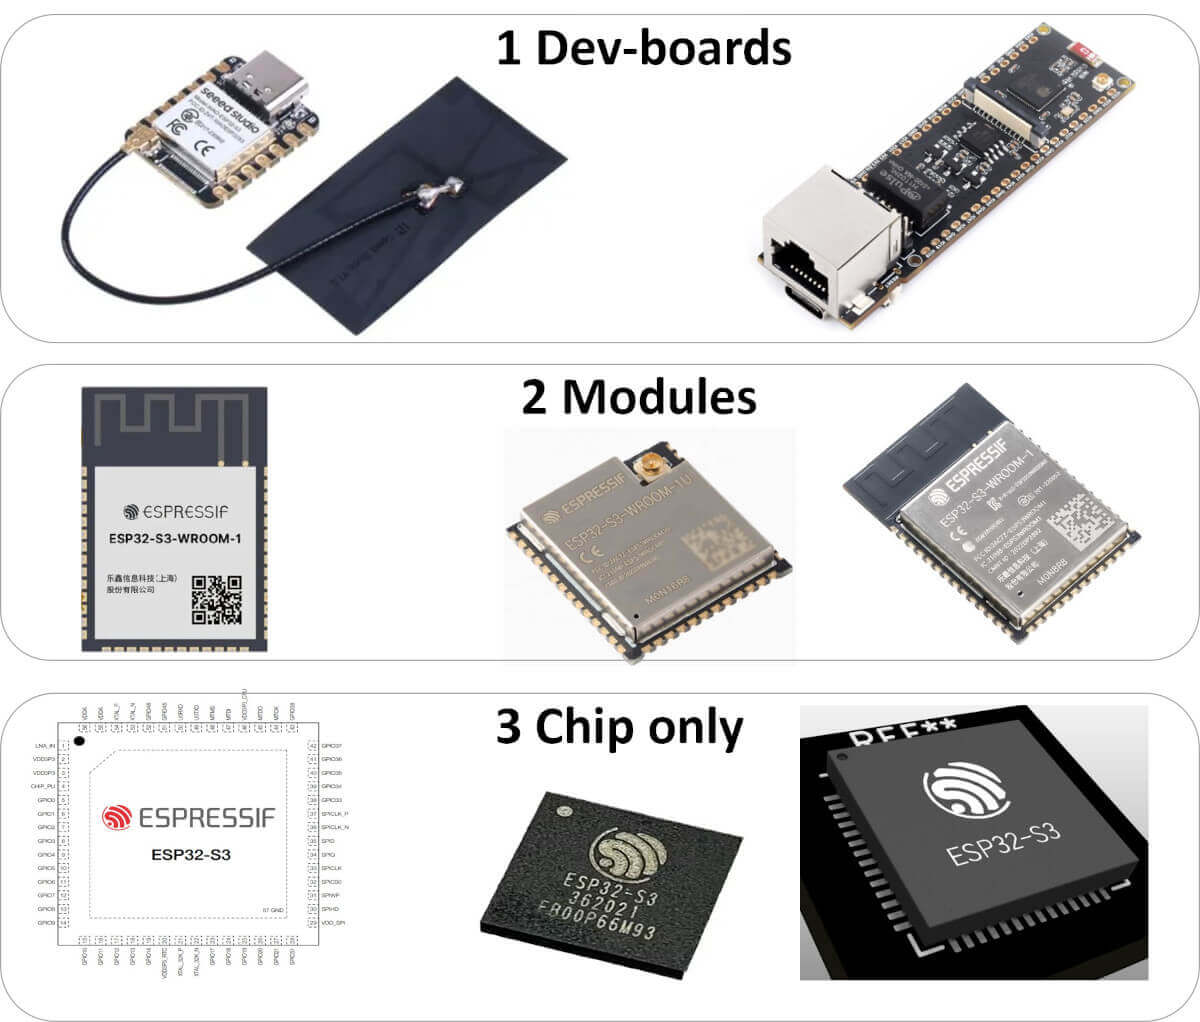
Since the co-processor design centers around a single key component, the ESP32-S3, you have several integration options depending on your production volume, PCB space, and cost constraints:
1. Commercial Development Board
This option uses an off-the-shelf board that includes the ESP32-S3, a USB-programmable low-dropout (LDO regulator) voltage regulator, and a USB connector. It is ideal for development, prototyping, and low-volume production. The integrated USB interface makes it easy to flash the Xedge32 firmware for the first time without any extra hardware.
2. Module-Based Integration
Surface-mount modules contain the ESP32-S3 core along with RAM, flash memory, and an onboard antenna. These modules are soldered directly onto your PCB, simplifying layout and RF considerations. They strike a good balance between integration and ease of use, and many are pre-certified for wireless compliance, reducing regulatory burden.
3. Chip-Only Integration
For high-volume production or designs with very tight space constraints, you can place the bare ESP32-S3 chip directly on your PCB, along with the necessary external components. This approach offers the smallest footprint and maximum flexibility but requires careful attention to layout, power integrity, and RF design.
Power Supply
The ESP32-S3 requires a clean, regulated 3.3 V supply capable of sourcing at least 300 mA during peak operation.
- Development boards typically include an onboard LDO that allows powering the board from a 5V USB supply, which is convenient if your primary system voltage is 5V (such as with AVR-based hosts).
For module or chip-only designs, ensure proper decoupling:
Place a 0.1 µF ceramic capacitor close to each VCC pin.
Add at least one 10 µF bulk capacitor to handle transient current spikes.
A well-designed power supply is crucial for maintaining stable Wi-Fi performance and ensuring reliable operation at high clock speeds.
UART Communication Link (HW)
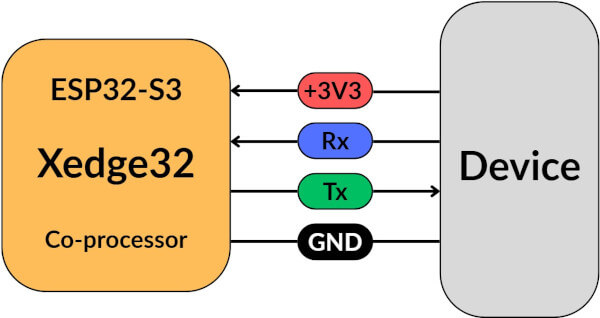
The ESP32-S3 communicates with the host processor using a standard UART logic-level interface (NRZ format, often loosely referred to as "RS-232").
- Voltage levels: The ESP32-S3 uses 3.3 V logic levels on its GPIOs. If your host MCU runs at a different voltage (e.g., 5 V), use a level shifter or a resistive voltage divider to prevent damage.
- Baud rate: For short PCB traces (up to approximately 5 cm), baud rates of 921600 or even 1 Mbps are typically reliable. For longer runs or external cabling, use shielded wires and consider lowering the baud rate to maintain signal integrity and reduce the risk of data errors.
UART Communication Link (SW)
You can use any wire format between the two CPUs; however, we recommend our stream-based JSON parser (standard JSON or UBJSON) to keep things efficient and event-driven. The benefit of UBJSON is that you can include binary data in the payload.

On the Xedge32 side (ESP32-S3): The built-in Lua JSON parser consumes the UART stream and fires an event each time a complete JSON message has been parsed. No explicit delimiters or length fields are required, the parser detects message boundaries.
On the device/host side: Our C JSON streaming library does the same on the host, letting you send commands or telemetry incrementally over UART and handle responses as soon as each full JSON message is complete.
By combining UART's simplicity with this message-level, event-driven parsing, the host and ESP32-S3 exchange structured data asynchronously and reliably, without tight coupling or heavyweight buffering.
Programming and Debug Port
While Xedge32 supports over-the-air (OTA) firmware updates, the initial firmware flash must be done via the ESP32-S3's primary UART interface via USB, typically on GPIO 19 (USB_D-) and GPIO 20 (USB_D+).
- It's recommended to provide easy access to these pins on your board.
- These same pins can also serve as a serial debug console, simplifying troubleshooting and diagnostics in both factory and field settings.
- For high security deployments, production devices may permanently disable the ROM download and debug interfaces via eFuse configuration after final provisioning, eliminating unauthorized firmware access through the programming port.
Wireless Connectivity
The ESP32-S3 includes built-in 2.4 GHz Wi-Fi. Depending on your module or board:
- You may have a PCB trace antenna, ceramic patch antenna , or a U.FL connector for an external antenna.
- If your enclosure blocks RF signals or you require an enhanced range, select a module with an external antenna interface.
Proper antenna placement and RF design are critical for maintaining strong and reliable wireless connectivity.
Ethernet Support
Ethernet is a strong alternative if your application requires reliable, high-throughput networking or must operate in environments with congested Wi-Fi. Here are two Ethernet options:
Use an external Ethernet PHY such as the Wiznet W5500, connected via SPI. The W5500 supports 10/100 Mbps Ethernet and is compatible with power-over-Ethernet (PoE) front-ends, enabling isolated and cable-powered deployments. See the tutorial ESP32 and Ethernet Using Xedge32 for details.
Alternatively, as an option to using the ESP32-S3, consider the ESP32-P4 processor, which includes an integrated Ethernet MAC and PHY, eliminating the need for an external chip and reducing both component cost and PCB complexity.
Final Recommendations
- Start with a full-featured development board that includes Ethernet, PoE, antenna connectors, and a power interface. This lets you prototype and validate your design before moving to custom hardware.
- Use certified modules if you want to avoid the cost and complexity of wireless regulatory testing.
- Separate power and digital domains carefully in your PCB layout, and include ample bypass capacitance near the ESP32-S3's supply pins. At clock speeds up to 240 MHz, current transients can be significant, and poor decoupling may lead to instability.
Cyber Resilience Act Compliance
The EU Cyber Resilience Act (CRA) introduces mandatory cybersecurity requirements for products with digital elements sold in the EU. When using an embedded web server, one area in particular is often overlooked: even products that already use HTTPS (TLS) are unlikely to meet CRA expectations due to how web browsers handle certificate trust. It's a subtle but important corner case that isn't immediately obvious from the regulation itself. Luckily, Xedge32 provides an easy solution to this problem.
Conclusion
For smaller companies, the co-processor model is where the real cost savings show up. With ESP32 and the ready-to-use Xedge32 firmware, you get a coherent, production-ready IoT foundation out of the box; no months lost stitching together mismatched SDKs and BSPs and struggling with securing the IoT connection(s). The alternative, using the generic Xedge toolkit on another MCU, such as Xedge on ARM, works but requires GPIO serial integration, which larger firms can absorb but may be a pressing issue for a small company. In practice, choosing the ESP32 co-processor means you ship secure, connected products faster, with less engineering overhead and at a fraction of the cost.
Key Takeaways
- No C code required for the IoT co-processor - All IoT logic, connectivity, and web functionality run on Xedge32 using Lua, keeping your existing firmware untouched.
- Security by design, not as an afterthought - Xedge is built to steer you toward secure IoT applications, with ready-to-use support for TLS, certificates, secure provisioning, and OTA updates.
- Easier outsourcing and faster iteration - Because Xedge32 uses Lua, IoT and web development can be outsourced or scaled more easily, without relying on scarce embedded IoT C/C++ expertise.
Note: The ESP32 does not have to be limited to a co-processor role; in many cases, it can serve as the main CPU. In addition, with newer, faster microcontrollers like the 400MHz ESP32-P4 (for which the Xedge32 source code can also be compiled), companies have a clear upgrade path while maintaining the same software stack. In practice, this means shipping secure, connected products faster, with less engineering overhead and at a fraction of the cost. If you wonder how Lua works in a mixed C and Lua environment, check out the tutorial Why Smart C Coders Love Lua.
👉If you need more technical details or want to ask questions, join the LinkedIn discussion on using Xedge32 as an IoT co-processor.
How to Get Started With Xedge32
With an ESP32-S3 development board, you can install Xedge32, experiment with it, and quickly become familiar with the development environment. Xedge32 is a secure and embeddable Lua runtime designed for connected products. It runs directly on the ESP32 and includes everything needed to build web-based device interfaces and IoT applications, all without requiring a toolchain or external software.
The easiest way to get started is by following the tutorial that lets you install the firmware directly from your browser. This method is ideal for evaluation and first-time use.
For production environments, however, it is recommended to use the command-line installation tools. These tools let you install the Xedge32 firmware using a script, which is more suitable for automation.
To develop IoT and web applications in Lua, you will need access to the complete Xedge32 documentation. Xedge32 consists of several modules, and the documentation is organized accordingly. The tutorial Your First Xedge32 Project includes a section that explains each module and shows how to access the full documentation set, including the Lua UART API.
If you require a web interface, check out the ESP32 tutorial Designing Your First Professional Embedded Web Interface, which explains how to use the Dashboard app as a starting point for any embedded web interface.
Release Build
You can create a release build and disable developer mode and the onboard IDE using Lua with the stock firmware. However, Xedge32 also supports more advanced release build options that require compiling the C source code.
Refer to the following options for more details:
- Create an Xedge32 release using Lua and the stock firmware
- Create an Xedge32 release using a custom build
The custom build option lets you enable additional security features, such as application signing.
Xedge32 Security
Security is complicated, so Xedge gives you rails. Think railroad tracks: the route is defined as long as you follow the application design guidelines in the tutorials, you can't quietly change direction at the sharp edges. The result is predictable, secure behavior without ad-hoc shortcuts.
Xedge32 security benefits:
- Secure-by-default stack: encrypted config, TLS via SharkSSL, secure email logging, and controlled access.
- SoftTPM key management: secure key gen/storage and tamper-resistant vault.
- Protected user database: softTPM-encrypted credentials with integrity protection.
- Signed/encrypted apps: enforced signature checks, anti-tamper deployment workflows.
- Modern auth: WebAuthn/FIDO2 and SSO for passwordless, federated access.
- Production hardening:
- Xedge32 firmware: disable or strip the web IDE (runtime or build-time) for a minimal attack surface.
- ESP32 (ESP-IDF): the ESP32 secure boot feature ensures that only cryptographically signed Xedge32 firmware images can execute, preventing unauthorized or tampered code from running on the device.
Xedge32 is based on Xedge, thus providing an easier path to:
See the Xedge product page for additional security details.
Posted in Whitepapers