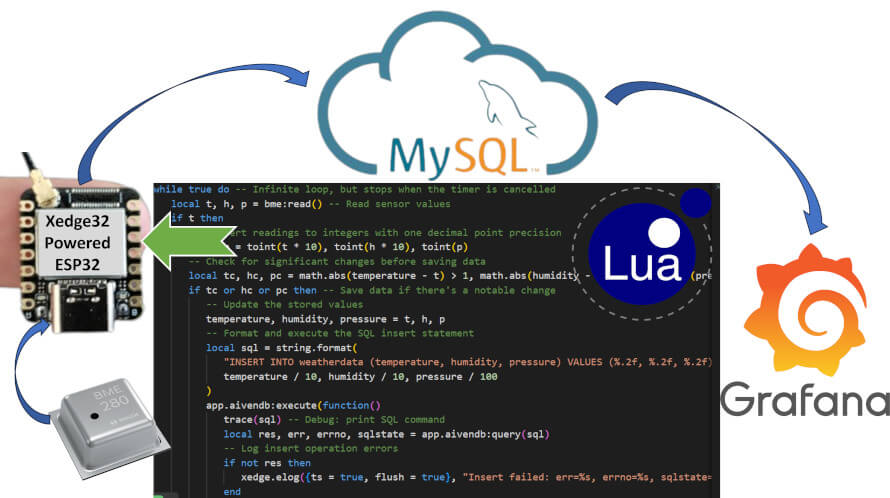
In this hands-on tutorial, you will learn how to connect an ESP32 to a MySQL cloud instance using the Lua programming language.
Don't have an ESP32? No worries! You can still explore and run the Lua code on your Windows or Linux machine by using an ESP32 simulator. Check out the section titled Running the Lua Examples on Windows and Linux for complete details on how to set this up. However, if you want to run the tutorial on real ESP32 hardware, you’ll first need to install Xedge32 on your ESP32 microcontroller. For step-by-step instructions on setting up and using the Xedge32 IDE, be sure to refer to our Getting Started with Xedge32 tutorial.
What You Will Learn
In this tutorial, you will learn how an ESP32 microcontroller can directly use SQL queries via a client SQL API. The SQL statements are written in Lua and stored on the ESP32. The ESP32 then sends these SQL queries to the MySQL server in the cloud using the MySQL client API running on the ESP32. The actual database runs in the cloud, not on the ESP32.
You will learn how to:
- Connect an ESP32 securely to a remote MySQL database
- Store SQL queries in the ESP32 firmware and send them to the database via the SQL client API
- Insert sensor data into the cloud database
- Visualize the stored data using a Grafana dashboard
By the end of the tutorial, you will understand how a microcontroller can act as a lightweight database client that sends SQL queries directly to a cloud database without needing an intermediate server.
Weather Station
For those who want to go one step further, the tutorial also shows how to sample temperature, humidity, and pressure from a BME 280 sensor and then insert this data continuously into the database.
Components Used
The Xedge32 foundation, the Barracuda App Server, includes MySQL and Redis drivers, which can be executed directly on an ESP32 microcontroller. If you're experienced with MySQL installations, you may choose to install your own database on your computer and have the ESP32 connect to this database. However, this tutorial focuses on how to securely connect to a MySQL instance on the Internet using a free service provided by Aiven.
Getting Started
Begin by visiting Aiven's website and clicking the "Get Started" button. After signing up, follow the wizard to create a free MySQL instance.
Once signed up, we recommend installing a MySQL tool such as MySQL Workbench. Refer to the Connect to Aiven using the MySQL Workbench tutorial for details.
Installing the MySQL Driver
The ready-to-use MySQL driver is available for download from GitHub. Follow these steps to download and prepare the driver:
git clone https://github.com/RealTimeLogic/LSP-Examples.git
cd LSP-Examples/MysqlAndRedis/MySQL/
zip -D -q -u -r -9 ../MySQL.zip .
Next, after installing Xedge32 on your ESP32, navigate to the ESP32 IDE: http://xedge32.local/rtl/, click the three dots in the top right corner, and select "App upload." Drag and drop the MySQL.zip onto the upload form to install the driver. Choose "Do not unpack" when asked whether to unpack the ZIP file. For more information on this process, see the tutorial Xedge Application Deployment: From Installation to Creation.
You should now see MySQL in the left pane, marked green, indicating that the driver is in execution mode.
Creating a DB App
It is now time to create an app that connects to your Aiven database instance. Start by creating a new app, such as MyDbTest. If you're new to Xedge32, refer to the tutorial Your First Xedge32 Project, section How to Create an Xedge App. In this app, create a .preload script with the following code:
-- Create a new, unconnected DB instance
local mysql = require "resty.mysql"
local aivendb, err = mysql:new()
if not aivendb then
   trace("mysql:new failed:", err)
   return
end

-- Configuration settings for the Aiven database connection
local cfg = {
   host = "rtl-weather-data.a.aivencloud.com",
   port = 13031, -- Aiven DB port number
   database = "defaultdb", -- Aiven DB name
   user = "avnadmin", -- Database username
   password = "AVNS_dadfgkjasdfufld9X_9", -- Database password
   ssl = true -- Important: Aiven requires a secure connection
}

-- Flag to control the running state; remains true until 'onunload' is executed
local running = true

-- Callback function for handling the database connection response
local function cb(ok, err, errno, sqlstate)
   -- Log the connection status
   trace("Connect", ok, err, errno, sqlstate)
   -- Continue attempting to connect until 'onunload' is called
   return running
end

-- Initiates a persistent asynchronous connection to the database with
-- the provided configuration and callback
aivendb:async(cfg, cb)

-- 'onunload' function to gracefully shut down the database connection
function onunload()
   -- Update the running state to false to stop the connection attempts
   running = false
   aivendb:close()
end

-- Make it possible for scripts in this app to access the db instance
app.aivendb = aivendb
The code provided above is detailed in the MySQL and Redis Drivers Readme File. We recommend consulting this readme file to understand how the code works.
Important: After inserting the above code into your .preload script, you'll need to adjust the database configuration settings to match those provided by your Aiven portal.
Save the .preload script, then open the Application Configuration dialog by clicking on the .appcfg file in the left pane. If the app is already running, restart it; otherwise, start the app. Upon successful startup, you should see the following output in the console:
cb 25: Connect 1 nil nil nil
If you encounter an error code, stop the application. The connection callback is designed to perpetually request a reconnect by returning true as long as the application remains active. Should an error arise, investigate the error message; common issues include Xedge32's inability to connect to the Internet or incorrect database configuration parameters.
Notice that the SQL command executes within a callback function passed to app.aivendb:execute(). The 'execute' method ensures the code within is executed in the MySQL connection's Cosocket. The MySQL and Redis Drivers Readme File section, Using the Database Drivers, explains this concept.
Once the .preload is operational and a persistent database connection has been successfully established, proceed to the following section.
Creating a Database Table
The next step involves creating a database table directly from the ESP32. Within the MyDbTest app, generate a new file named WeatherData.xlua and populate it with the following code:
-- SQL statement to create the 'weatherdata' table
local sql = [[
CREATE TABLE weatherdata (
    id BIGINT AUTO_INCREMENT PRIMARY KEY,
    timestamp TIMESTAMP DEFAULT CURRENT_TIMESTAMP ON UPDATE CURRENT_TIMESTAMP,
    temperature DECIMAL(5,2),
    humidity DECIMAL(5,2),
    pressure DECIMAL(7,2),
    INDEX idxtimestamp (timestamp)
) ENGINE=InnoDB;
]]

-- Access the DB object exported in .preload
-- Execute the SQL query in a cosocket, allowing for non-blocking I/O
app.aivendb:execute(function()
   -- Output the result of the query
   trace(app.aivendb:query(sql))
end)
After editing, click the "Save & Run" button. You should then see a console output similar to the following:
? 17: table: 3c21d630
The question mark signifies the trace function's inability to identify the anonymous function's name. The query returns a Lua table, indicating successful table creation. Verify the existence of this table using the MySQL Workbench.
Attempting to re-run the script by clicking "Save & Run" again will yield the following error, as the table weatherdata already exists:
? 17: nil Table 'weatherdata' already exists 1050 42S01
Inserting SQL Data
Now that our 'weatherdata' table is set up, the next step involves populating it with simulated data to test the insertion process. Replace the code in WeatherData.xlua with the following, discarding the table creation code since it's no longer necessary.
-- This function generates random environmental data and inserts it into the database
local function timerFunc()
   -- Generate random temperature, humidity, and pressure values
   local r = ba.rnd -- Shortcut for the random function
   local temperature = (20 + r(-50, 50) / 10) -- Random temperature between 15.0 and 25.0 degrees
   local humidity = (50 + r(-150, 200) / 10) -- Random humidity between 35.0% and 70.0%
   local pressure = (1013 + r(-500, 500) / 10) -- Random pressure between 963.0% and 1063.0% hPa

   -- Construct the SQL insert statement with formatted values
   local sql = string.format(
      "%s VALUES (%.2f, %.2f, %.2f)",
      "INSERT INTO weatherdata(temperature, humidity, pressure)",
      temperature, humidity, pressure
   )

   -- Execute the SQL query in a cosocket, allowing for non-blocking I/O
   app.aivendb:execute(function()
      trace(sql) -- Output the SQL command to the console for debugging
      local res, err, errno, sqlstate = app.aivendb:query(sql) -- Execute the query
      -- Check for errors in the insert operation
      if not res then
         xedge.elog({ts=true, flush=true},
                    "Insert failed: err=%s, errno=%s, sqlstate=%s",
                    tostring(err), tostring(errno), tostring(sqlstate))
      end
   end)

   return true -- Return true to keep the timer running at regular intervals
end

-- Set up a timer to call the function every 3 seconds
local timer = ba.timer(timerFunc)
timer:set(3000) -- Interval set to 3000 milliseconds

-- 'onunload' function to stop the timer when the application is stopped
function onunload()
   timer:cancel() -- Stops the timer
end
After clicking the "Save & Run" button, you should see a printout similar to the following every 3 seconds.
? 18: INSERT INTO weatherdata(temperature, humidity, pressure) VALUES (23.30, 55.40, 1009.00)
This debug message confirms that data is being continuously inserted into the weatherdata database table. The application maintains an active secure TCP connection with the database through the persistent MySQL Cosocket established in the .preload script. In the event of a disconnection, the connection callback in the .preload script is invoked, returning true to signal an attempt to reconnect, thereby ensuring your data insertion process is resilient and uninterrupted.
Handling Database Operation Failures
Notice the use of the function xedge.elog(), which is particularly useful if a database operation does not succeed. This function logs detailed error information, including the nature of the database error, the error number, and the SQL state. How to use the email function xedge.elog() for logging errors is explained in the tutorial Logging for Testing and Production Mode.
Ensuring Continuous Data Flow
The design of this application, particularly its use of a persistent asynchronous database connection and intelligent error handling, exemplifies how to build resilient IoT applications capable of continuous data collection and storage. By leveraging the persistent connection feature of the MySQL Cosocket, the application is designed to automatically recover from connection disruptions, ensuring that environmental data collection proceeds without manual intervention.
Creating a Weather Station
With the foundational knowledge and setup complete, it's time to transform your project into a fully operational weather station. The weatherdata table we've established in the MySQL database is ready to receive and store data from a BME280 sensor, which measures temperature, humidity, and atmospheric pressure. To proceed, you must purchase a BME280 sensor and integrate it with your ESP32.
Wiring and Testing the BME280 Sensor
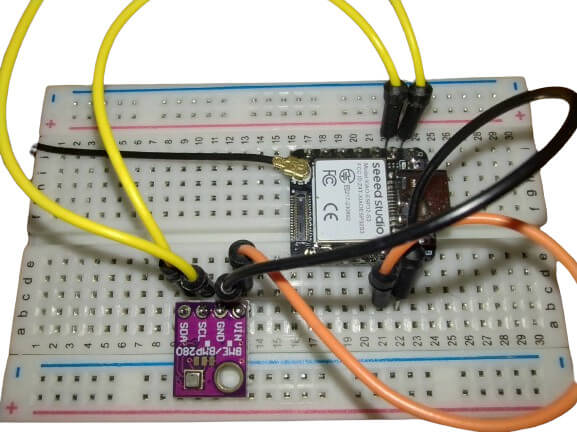
Once you have your BME280 sensor, the next step is to connect it to your ESP32. This connection can be achieved through direct soldering or using a breadboard for a non-permanent setup, which might be preferable for those experimenting or looking to reuse components for future projects.
The ready-to-run bme280.xlua test program is wired according to the following:
| BME280 | ESP32 |
|---|---|
| Vin | 3.3V |
| GND | GND |
| SCL | GPIO 22 |
| SDA | GPIO 21 |
Wire the ESP32 and the BME280 as above, or use alternative GPIO pins. However, change the GPIO settings in bme280.xlua accordingly if you use alternative GPIO pins.
Copy the Lua code in bme280.xlua and replace the code in your WeatherData.xlua using the Xedge IDE. After replacing the code, click the "Save & Run" button. You should see a printout similar to the following if everything is working:
Temperature: 24.50, Humidity: 48.01, Pressure: 1003.86
Final Integration: Weather Data Collection
After verifying the BME280 sensor's functionality, it's time to implement the final code version in WeatherData.xlua. This code will continuously read data from the BME280 sensor and insert it into your MySQL database based on specified conditions. Replace the code in WeatherData.xlua with the following:
-- GPIO pins for I2C communication with the BME280 sensor
local SDA_GPIO <const> = 21
local SCL_GPIO <const> = 22

-- I2C address for the BME280 sensor
local BME280_I2C_ADDR <const> = 0x76
local bme -- Placeholder for the bme280 instance, set in saveMetrics

-- Coroutine timer function to send weather data to the MySQL database
local function saveMetrics()
   local err
   -- Initialize the BME280 sensor
   bme, err = require "bme280".create(0, BME280_I2C_ADDR, SDA_GPIO, SCL_GPIO, settings)
   if not bme then
      trace("Cannot create bme280 instance:", err)
      return
   end

   local toint = math.tointeger -- Shortcut for integer conversion
   -- Initialize measurements to trigger the first save
   local temperature, humidity, pressure = 1, 1, 1

   while true do -- Infinite loop, but stops when the timer is cancelled
      local t, h, p = bme:read() -- Read sensor values
      if t then
         -- Convert readings to integers with one decimal point precision
         t, h, p = toint(t * 10), toint(h * 10), toint(p)
         -- Check for significant changes before saving data
         local tc, hc, pc = math.abs(temperature - t) > 1, math.abs(humidity - h) > 4, math.abs(pressure - p) > 30
         if tc or hc or pc then -- Save data if there's a notable change
            temperature, humidity, pressure = t, h, p -- Update the stored values
            -- Format and execute the SQL insert statement
            local sql = string.format(
               "INSERT INTO weatherdata (temperature, humidity, pressure) VALUES (%.2f, %.2f, %.2f)",
               temperature / 10, humidity / 10, pressure / 100
            )
            app.aivendb:execute(function()
               trace(sql) -- Debug: print SQL command
               local res, err, errno, sqlstate = app.aivendb:query(sql)
               -- Log insert operation errors
               if not res then
                  xedge.elog({ts = true, flush = true}, "Insert failed: err=%s, errno=%s, sqlstate=%s",
                             tostring(err), tostring(errno), tostring(sqlstate))
               end
            end)
         end
      else
         -- Log sensor reading errors
         xedge.elog({flush = true, ts = true}, "BME280 reading failed: %s", tostring(h))
         -- Attempt to reinitialize the sensor
         bme:close()
         bme, err = require "bme280".create(0, BME280_I2C_ADDR, SDA_GPIO, SCL_GPIO, settings)
         if not bme then
            xedge.elog({flush = true, ts = true}, "Cannot recreate bme280 instance: %s", tostring(err))
            return -- Exit if reinitialization fails
         end
      end
      coroutine.yield(true) -- Pause until the next timer tick
   end
end

-- Set up and start the timer to save metrics every 3 seconds
local metricsTimer = ba.timer(saveMetrics)
metricsTimer:set(3000)

-- Cleanup function called when the application is closed
function onunload()
   metricsTimer:cancel() -- Stop the metrics timer
   if bme then bme:close() end -- Close the BME280 sensor instance
end
Understanding the Final Code
- Sensor Initialization: At the start, the BME280 sensor is initialized using the specified GPIO pins and I2C address. This step creates an instance of the sensor for reading data.
- Continuous Data Monitoring: The saveMetrics function enters an infinite loop, periodically reading temperature, humidity, and pressure from the sensor. It compares these readings with the previous values to detect significant changes.
- Data Insertion: When a notable change is detected, the new readings are formatted into an SQL INSERT command and sent to the MySQL database. This approach reduces unnecessary data storage and network traffic by ensuring that only meaningful changes in environmental conditions trigger database updates.
Grafana Weather Station Visualization Dashboard
Grafana makes it easy to visualize the weather data. This section will guide you through setting up a Grafana dashboard designed for this tutorial. Follow these steps to download and set up the custom Grafana Weather Station Visualization Dashboard.
Step 1: Download the Custom Dashboard
Begin by downloading the ready-to-use Grafana Weather Station Visualization Dashboard designed for this tutorial. This dashboard connects with your MySQL database and seamlessly visualizes temperature, humidity, and pressure data.
- Download the Dashboard: Download the Grafana Weather Station Visualization Dashboard. Save this file to your computer; you'll need it to import the dashboard into Grafana.
Step 2: Connect Grafana to Your Aiven MySQL Database
Grafana needs to retrieve the weather data from your MySQL database to visualize the weather data. Let's set up Grafana to connect to your Aiven-hosted MySQL instance.
- Log Into Grafana: Open your Grafana instance in a web browser and sign in.
- Add a New Data Source: Navigate to Configuration > Data Sources from the side menu, and click on Add data source. Select MySQL as the type of data source to add.
- Configure the Data Source:
- Host: Enter your Aiven MySQL database host and port.
- Database: Specify the name of your database.
- User and Password: Input your database user and password.
- Ensure you select SSL Mode
- Save & Test: After filling in the connection details, click Save & Test to ensure Grafana can successfully connect to your MySQL database.
Step 3: Import the Dashboard into Grafana
You're now ready to import the custom dashboard with the data source configured.
- Open the Import Interface: In Grafana, go to the side menu, click the + icon, and select Import .
- Import the Dashboard: Click on Upload JSON file and select the dashboard JSON file you downloaded in Step 1. Grafana will prompt you to select the data source you've just configured. Choose the MySQL data source connected to your Aiven database.
- Complete the Import: Follow the import wizard's instructions to finish importing the dashboard. Once imported, the dashboard will be ready to use and to display your weather data.
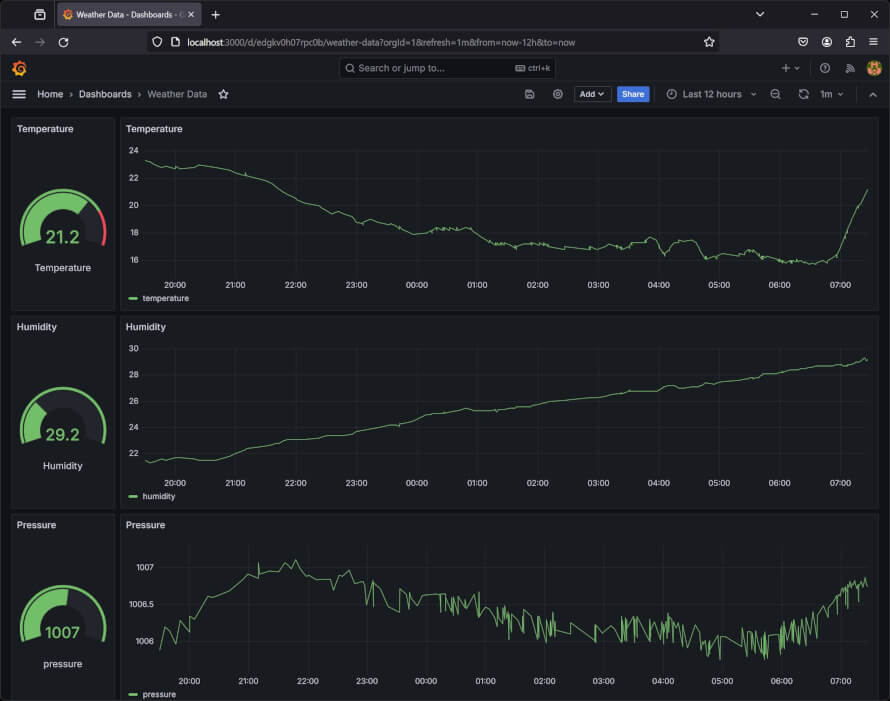
Step 4: Visualize Your Data
Navigate to your new Weather Station Visualization Dashboard in Grafana to see your ESP32-collected weather data come to life. As new data is inserted into your MySQL database, the dashboard will update, providing real-time insights into temperature, humidity, and pressure conditions.
MySQL Security Considerations
In this tutorial, we have used a user with full database access, which is OK for a DIY project. However, tighter security is paramount for a professional product interfacing with MySQL. MySQL enables us to restrict user access effectively. A prudent step is creating a user with permissions limited to only inserting and fetching data from the weatherdata table. This approach minimizes risks and ensures our database operations are secure and efficient. Here's a conceptual guide to setting this up:
- Creating a New User: Use the MySQL CREATE USER command to create a user with a password.
- Granting Permissions: Use the GRANT statement to grant this user specific permissions. For inserting data and fetching data from the weatherdata table, you would grant INSERT and SELECT permissions. This ensures the user (the ESP32) can add new entries into the table and read from the table (Grafana) but cannot modify or delete existing data or access other parts of the database.
Next Step:
Well done on finishing this tutorial! Don’t stop now - there's so much more to explore. Check out our full range of Xedge32 tutorials to continue your journey in network and IoT-enabled embedded systems.
Posted in Xedge32