fun-with-old-mainframes.github.io
Intro
This page assumes you have a machine (emulated or not) running the VM370 Community Edition OS available. There are a couple ways to get one, and you might want to choose the one that appeals to you the most (or the one that’s less work - it’s up to you).
With Docker
The easiest way to run this is with Docker installed. How to install it depends on your platform, and we won’t cover it here. Besides, Docker is only one option - you can use Podman as well - it has some nice features. When you are set up, you can just issue a shell command to have your own machine.
docker run -it --name vm370 -p 3270:3270 rbanffy/vm370ce
This will bring up the machine and display the machine’s console on your terminal.
The container image we are using is based on the excellent work of the VM/370 Community Edition team. You can see their releases on vm370.org.
3270 terminals
IBM mainframes used screen-oriented terminals. They worked more or less like a web browser - the mainframe would send you a screen with a form, you’d write some information on the fields of the form, and the terminal would send the information back to the mainframe, restarting the cycle. Our examples use the x3270 emulator that’s available on any modern Unix-like environment (which includes Linux).
Start x3270 and connect it to your host. If you are running on your computer, it’ll be “localhost:3270”. Since I’m running mine on a small cluster, I’ll point the terminal to the entry address in the cluster.
With that taken out of our way, we can start to have fun.
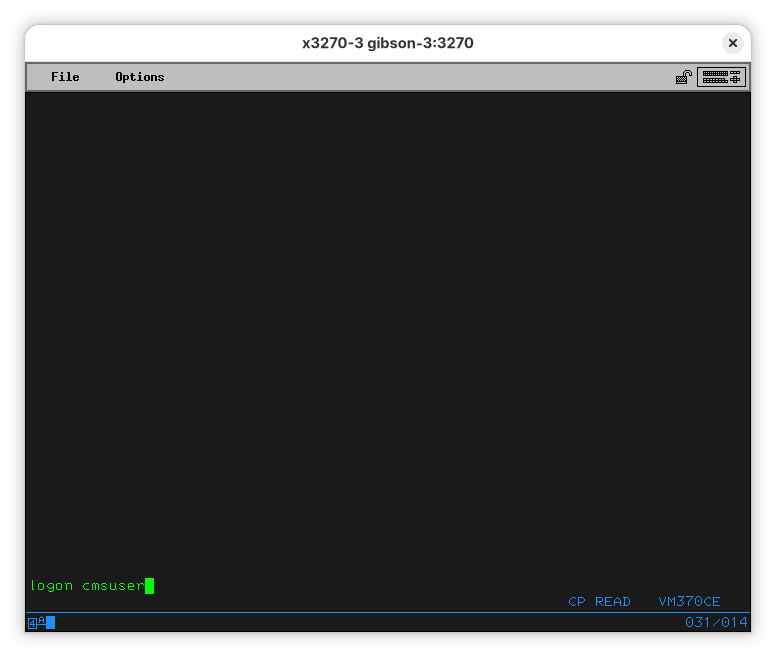
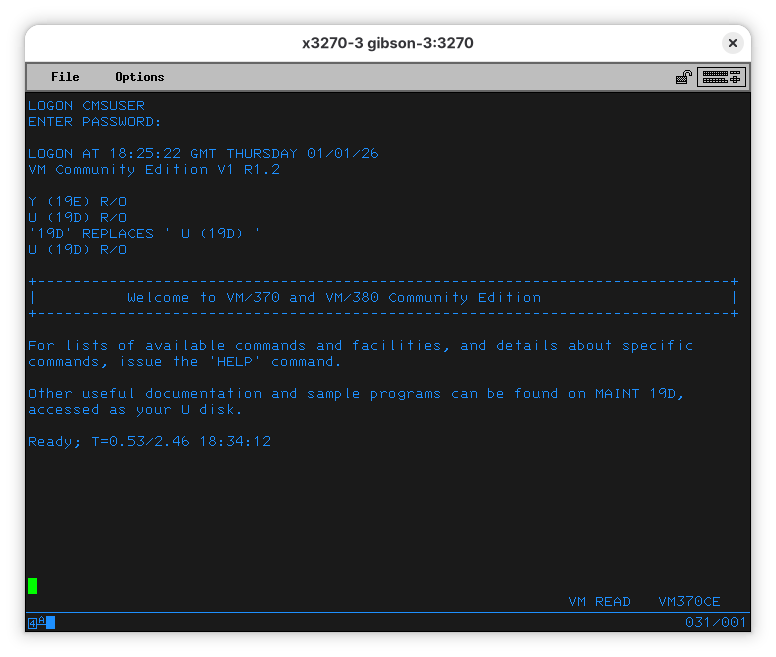
Logging on
For normal things, we’ll log on to the CMSUSER VM, or, if you renamed it, to your own VM. The default password is “CMSUSER”:
On the banner screen, press ENTER.
The screen will clear. You can then enter logon cmsuser:
And enter the password, “cmsuser”:
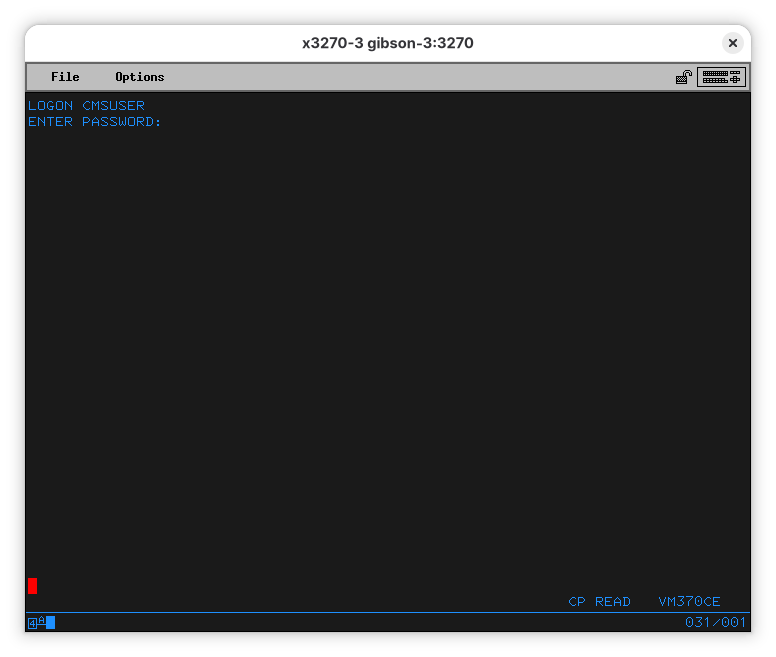
As expected, the password isn’t shown. The red cursor means that.
You can also logon using LOGON CMSUSER CMSUSER, typing the password after the user name, but that horrifies me even more than having the username as the password. Back when VM/370 was invented, intrusions were a lot less of a problem than they are now. Please do not expose your VM/370 mainframe directly on the internet.
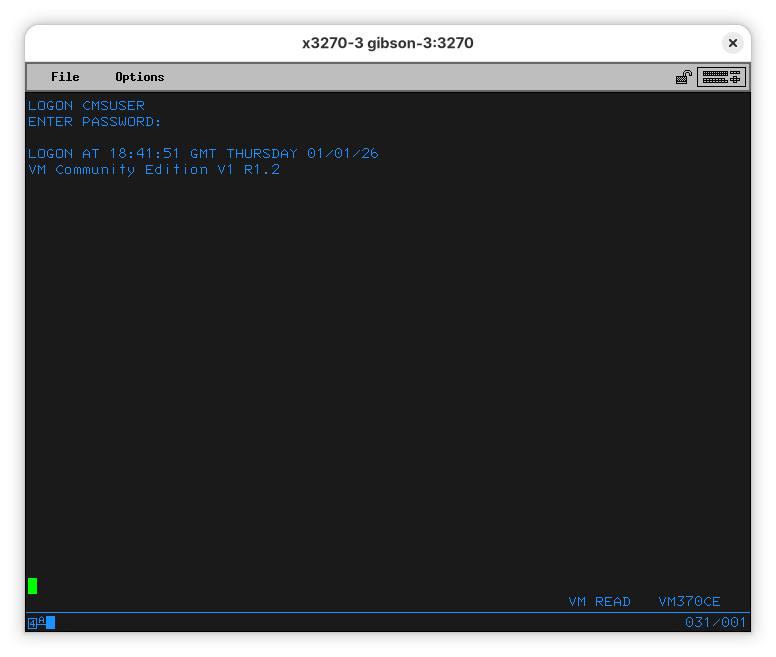
At this point, you are logged on. When you press ENTER another time, a program, called “PROFILE EXEC” will be run:
We can examine it. Note that “PROFILE EXEC” means the name is “PROFILE” and the type is “EXEC” (a script). To show the contents of the file, use:
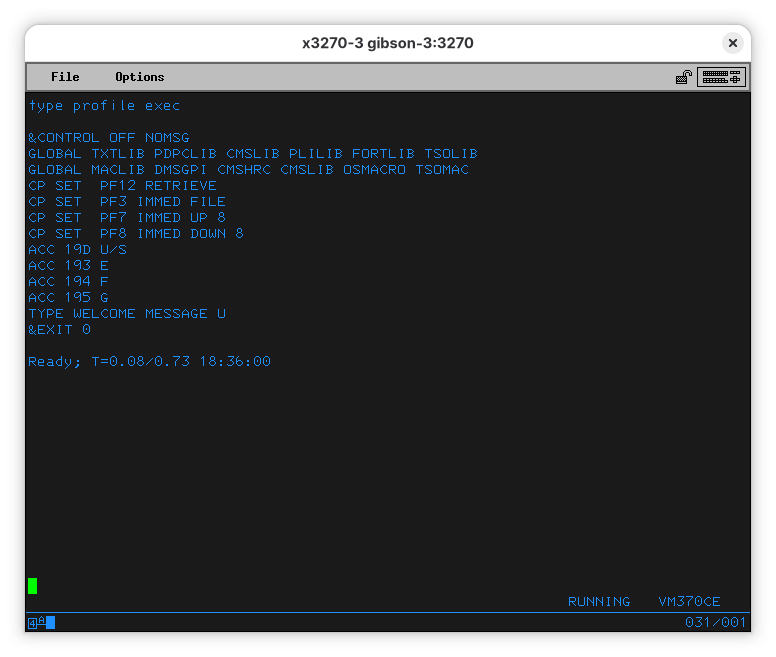
Unlike Unix, commands and file names are case insensitive, so it’s fine to type them either way. Be careful, however, so you don’t overwrite your files accidentally.
As for the PROFILE program, we’ll look at it in more detail later.
Running a BASIC program
What is a vintage computer without a BASIC interpreter, right?
Let’s start with the lamest, most basic BASIC program: a Hello World.
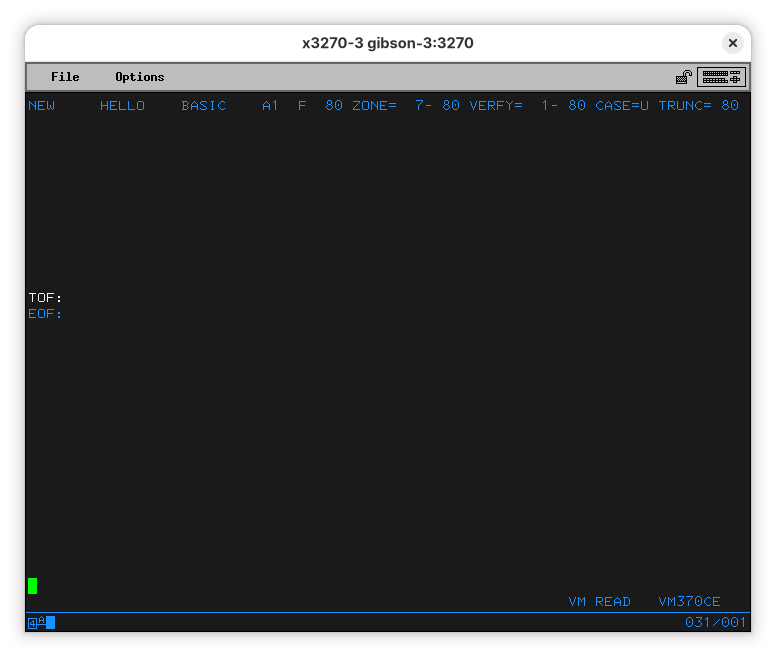
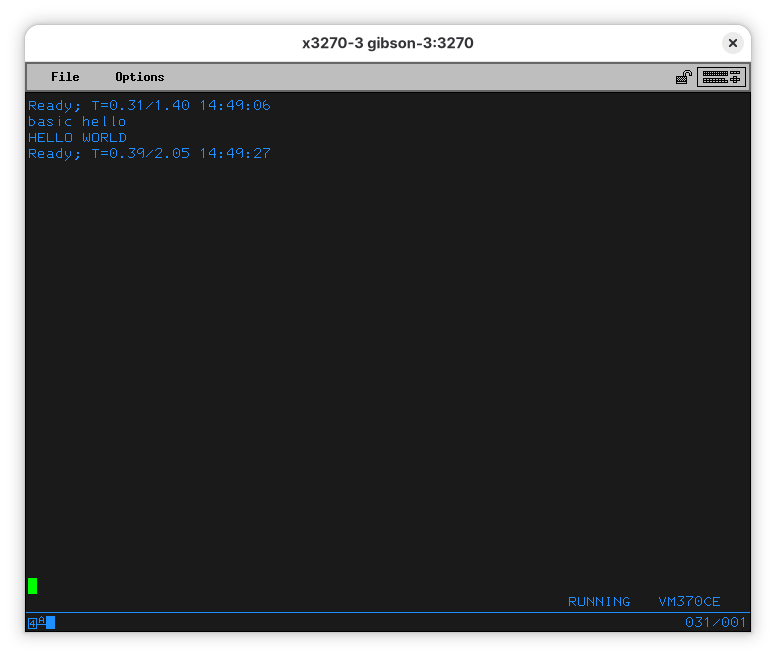
On your terminal, type:
Note that “basic” is not a suffix, but a type - it’s a separate parameter. The type of the file is a property of the file and will remain with it unless forcibly changed.

When you press enter (or send) you’ll end up on the EDIT program. On the surface, it looks a lot like vi from the Unix side: it’s terse, hard to use, and sometimes counter-intuitive. It’s also hard to guess how to exit it. That’s about where the similarities end.
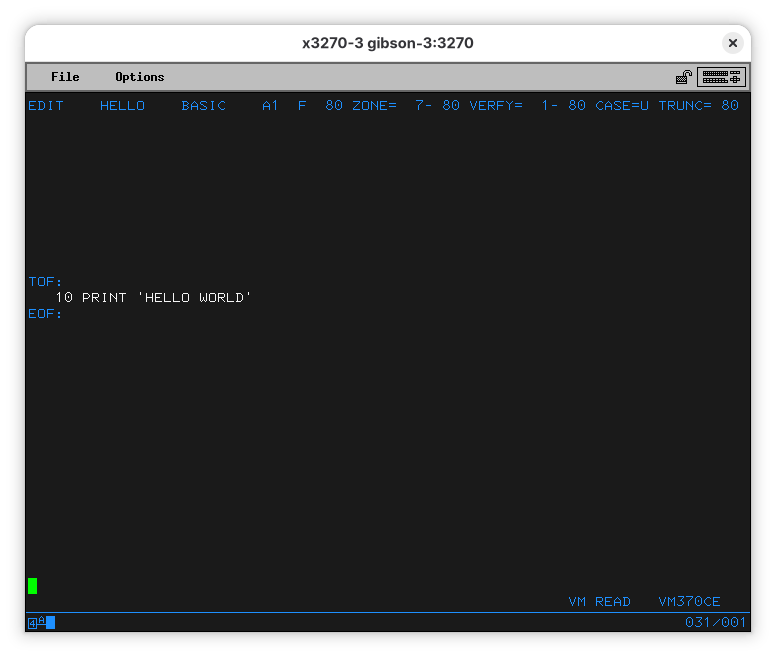
Let’s start typing our program:
10 print 'hello world'
When you press enter, you’ll see the line was entered. It was also changed to uppercase (see the “CASE=U” at the top line?). Let’s save the file and quit the editor. Type “file” and press Enter.
The line at the bottom shows a “MORE…” note. This means the terminal is waiting for you before it shows more output. Press PA2 (Alt-2 for x3270) and you’ll see you have exited EDIT.
Now we can run our program:
You’ll see your command (“basic hello”) show up at the top of the screen (after the message indicating EDIT finished), then the message you ordered it to print “HELLO WORLD”, followed by another line telling how much CPU it used and how long did it take to run your program.
A bit of FORTRAN
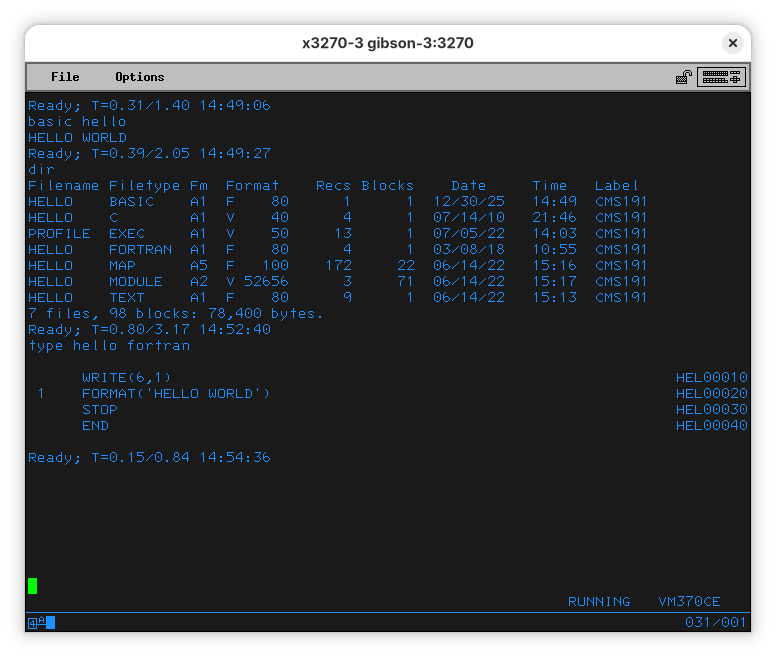
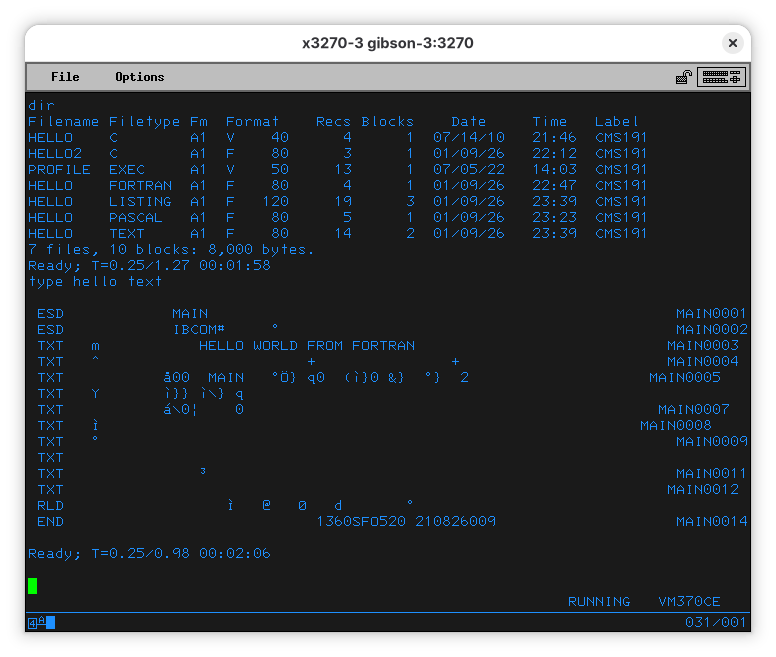
VM/370 CE comes with a couple hello world programs. You can use the DIR command to list what files are in the disk you are seeing. We typed our own in BASIC, but there is one in C and one in FORTRAN. Let’s see the FORTRAN one:
Let’s compile that FORTRAN program (so we can run it)
To compile it, run:
The computer will output:
FORTRAN IV (G) COMPILATION COMPLETE.
Ready; T=0.84/2.59 23:39:34
It’s about time we mention the message. It’s telling me the program run using 0.84 seconds of CPU and took 2.59 seconds to complete. It also told me what time it is for the computer.
After compiling the program, you might have noticed two new files appeared:
HELLO    LISTING  A1  F   120     19      3  01/09/26   23:39  CMS191
HELLO    TEXT     A1  F    80     14      2  01/09/26   23:39  CMS191
The first one is a nicely formatted listing, and, in ancient times, you’d find it printed alongside the punched cards you submitted for compilation. It is formatted for 132 columns, as big printers of the time used to be.
   FORTRAN IV G LEVEL  21                 MAIN              DATE = 26009  TIME = 23.39.33             PAGE 0001
    0001              WRITE(6,1)                                                        HEL00010
    0002         1    FORMAT('HELLO WORLD FROM FORTRAN')                                HEL00020
    0003              STOP                                                              HEL00030
    0004              END                                                               HEL00040
   FORTRAN IV G LEVEL  21                 MAIN              DATE = 26009  TIME = 23.39.33             PAGE 0002

                                SUBPROGRAMS CALLED
  SYMBOL    LOCATION      SYMBOL    LOCATION      SYMBOL    LOCATION      SYMBOL    LOCATION      SYMBOL    LOCATION
  IBCOM#        90

                                FORMAT STATEMENT MAP
  SYMBOL    LOCATION      SYMBOL    LOCATION      SYMBOL    LOCATION      SYMBOL    LOCATION      SYMBOL    LOCATION
       1        94

     *OPTIONS IN EFFECT*  ID,EBCDIC,SOURCE,NOLIST,NODECK,LOAD,MAP
     *OPTIONS IN EFFECT*  NAME = MAIN    , LINECNT =       60
     *STATISTICS*    SOURCE STATEMENTS =        4,PROGRAM SIZE =      298
     *STATISTICS*  NO DIAGNOSTICS GENERATED
The other is telling me it’s a text, but it appears it’s a lie:
In order to run the Fortran program we just compiled, we’ll do:
Let’s see what that means:
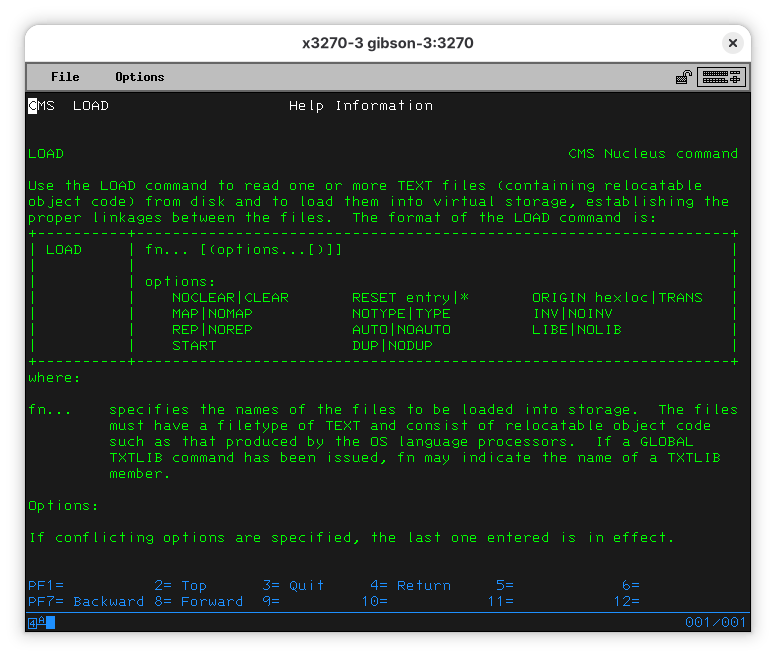
So… LOAD will load one or more relocatable object code, which is the TEXT file (we knew it was a lie!). So, we are asking LOAD to load the HELLO TEXT file, and we are passing the START option to it (so the code runs).
LOAD HELLO ( START
Execution begins...
Ready; T=1.23/3.90 00:09:54
Looks like nothing happened. But it actually did. There is a new file:
FILE FT06F001 A1 V 24 1 1 01/10/26 0:09 CMS191
If we look into it, we’ll see:
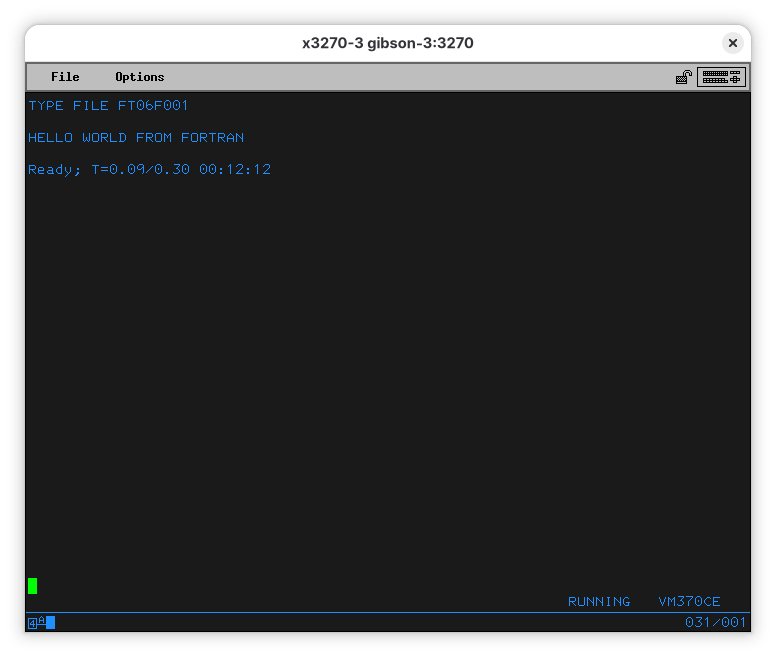
So, the program ran, and the output went into this oddly named file.
See the “6” in the middle of the file type? We can redirect the output to the terminal:
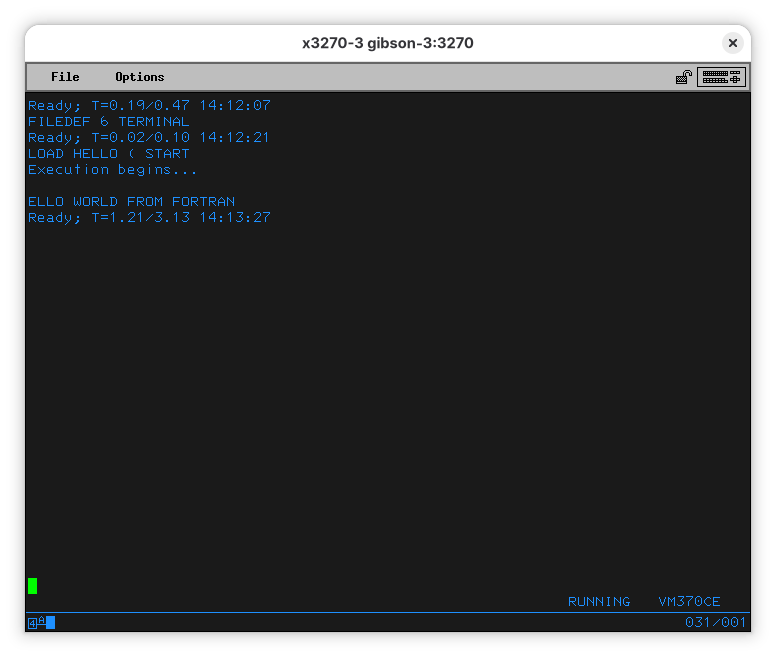
Now the program outputs to the terminal. Why the first character is missing is an interesting problem. I am not sure why this is happening, neither are my current mainframe gurus. Our current best guess is that “H” would be telling something to the terminal and, therefore, the terminal isn’t showing it. If you know, please file a bug and a PR with an explanation.
What was the magic we used? Let’s see what FILEDEF does. Do a HELP FILEDEF:
FILEDEF                                                   CMS Transient command

Use the FILEDEF command to establish data definitions for OS ddnames, to define
files to be copied with the MOVEFILE command, or to override default file
definitions made by the assembler and the OS language processors.  The format
of the FILEDEF command is:
+----------+------------------------------------------------------------------+
| FIledef  | ddname nn *  device                                              |
|          |                                                                  |
|          | device:                                                          |
|          |    Terminal [(optionA optionD[)]]                                |
|          |    PRinter  [(optionD[)]]                                        |
|          |    PUnch    [(optionD[)]]                                        |
|          |    Reader   [(optionD[)]]                                        |
|          |    DISK [FILE|fn ddname|ft [A1|fm]] [DSN ?|q1 q2 ...]            |
|          |             [(optionA optionB[)]]                                |
|          |    DUMMY    [(optionA[)]]                                        |
|          |    TAPn     [(optionA optionC[)]]                                |
|          |    CLEAR                                                         |
|          | optionA:                                                         |
|          |    BLOCK|BLKSIZE nnnnn  CHANGE|NOCHANGE     LRECL nnnnn          |
|          |    PERM                 RECFM a                                  |
|          | optionB:                                                         |
|          |    CONCAT               DISP MOD            DSORG PS|PO|DA|IS    |
|          |    KEYLEN nnn           LIMCT nnn           MEMBER name          |
|          |    OPTCD a              XTENT 50|nnnnn                           |
|          | optionC:                                                         |
|          |    7TRACK|9TRACK        TRTCH a             DEN den              |
|          | optionD:                                                         |
|          |    UPCASE|LOWCASE                                                |
+----------+------------------------------------------------------------------+
where:

ddname | nn | *
         is the name  by which the file is referred to in your program.  OS
         ddname syntax rules should be followed.  If a number nn is specified,
         it is translated to a FORTRAN data definition name of FTnnF001.  An
         asterisk (*) may be specified with the CLEAR operand to indicate that
         all file definitions not entered with the PERM option should be
         cleared.

Devices:

Terminal is your terminal (terminal I/O must not be blocked).  Terminal input
         will be truncated to the console input buffer length of 130
         characters.
… and so on. Fortran, by default, outputs to whatever is defined as file “6”, which ends up being “FILE FT06F001”. This is all related to the way batch processes were set up where things like input and outputs were specified by a configuration for when a program is run. This was done in a language called JCL (for Job Control Language). It was uncommon for programs to be run interactively at the terminal, and even having a terminal was considered a luxury most programmers didn’t have - they’d submit their code in special forms that someone else would type, convert to punch cards, and feed to the compiler.
Running our own programs
There is a lot of code you can use. For exaple, the IBM System/360 Operating System FORTRAN IV Programmer’s Guide has an example, primes.fortran I copied into this repo:
C PRIME NUMBER PROBLEM
C FROM IBM System/360 Operating System FORTRAN IV Programmers Guide
C https://bitsavers.org/pdf/ibm/360/fortran/
C GC28-6817-4_OS360_FORTRAN_IV_G_and_H_Programmers_Guide_197309.pdf
C page 108
C Modified for brevity from 1 to 1000 to 1 to 100
100 WRITE (6,8)
8 FORMAT (52H FOLLOWING IS A LIST OF PRIME NUMBERS FROM 1 TO 100 /
X 119X,1H1/19X,1H2/19X,1H3)
101 I=5
3 A=I
102 A=SQRT(A)
103 J=A
104 DO 1 K=3,J,2
105 L=I/K
106 IF(L*K-I)1,2,4
1 CONTINUE
107 WRITE (6,5)I
5 FORMAT (I20)
2 I=I+2
108 IF(100-I)7,4,3
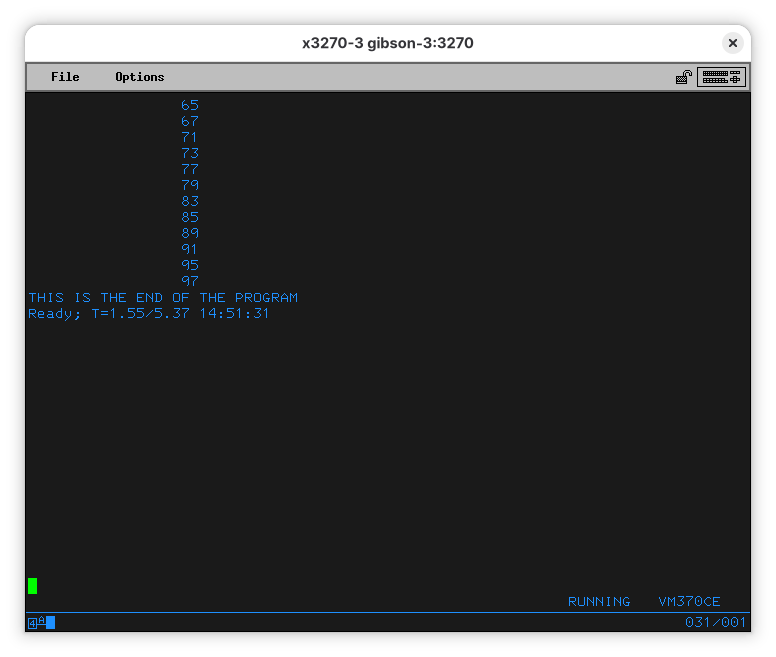
4 WRITE (6,9)
9 FORMAT (14H PROGRAM ERROR)
7 WRITE (6,6)
6 FORMAT (31H THIS IS THE END OF THE PROGRAM)
109 STOP
END
When you upload it, make sure it’s fixed length at 80 characters, as punched cards were. If you forget, you’ll get a helpful error message:
FILE 'PRIMES FORTRAN' IS NOT FIXED, 80 CHAR. RECORDS.
Upload like this:
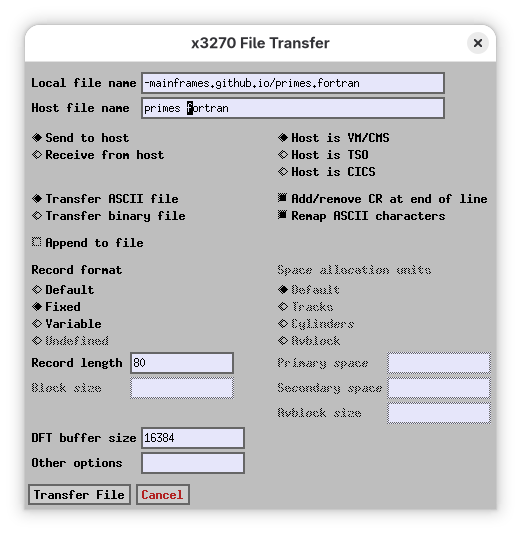
You’ll now see that the file is now of fixed 80 character width (F 80 in the format column).
Filename Filetype Fm  Format    Recs Blocks    Date     Time   Label
...
PRIMES   FORTRAN  A1  F    80     27      3  01/11/26   14:47  CMS191
Now you can compile and run it:
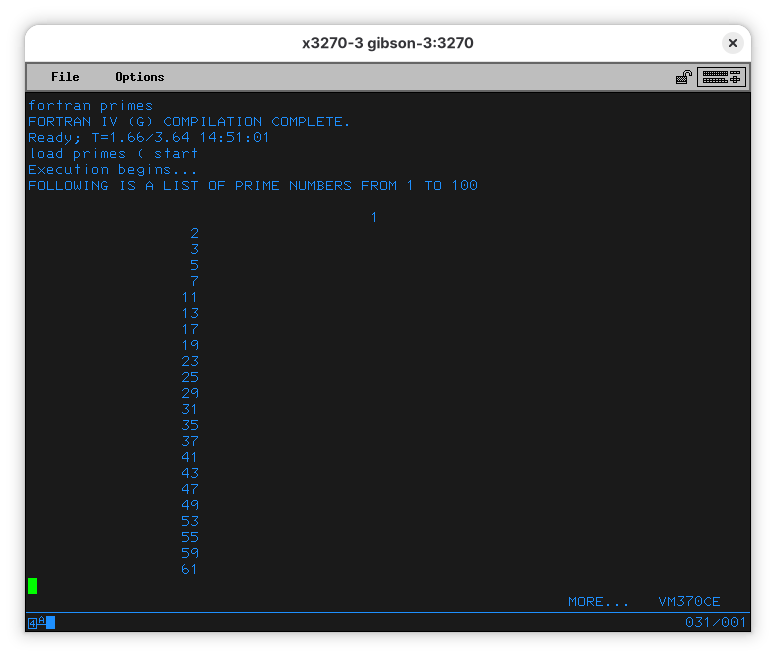
Again we see some oddness at the start of the output.
… but we can see the program completed successfully.
Other interesting languages available
C
Pascal
ALGOL
This is interesting - there is a VM without a login that has the name ALGOL. [TBA]
Navigating the disks
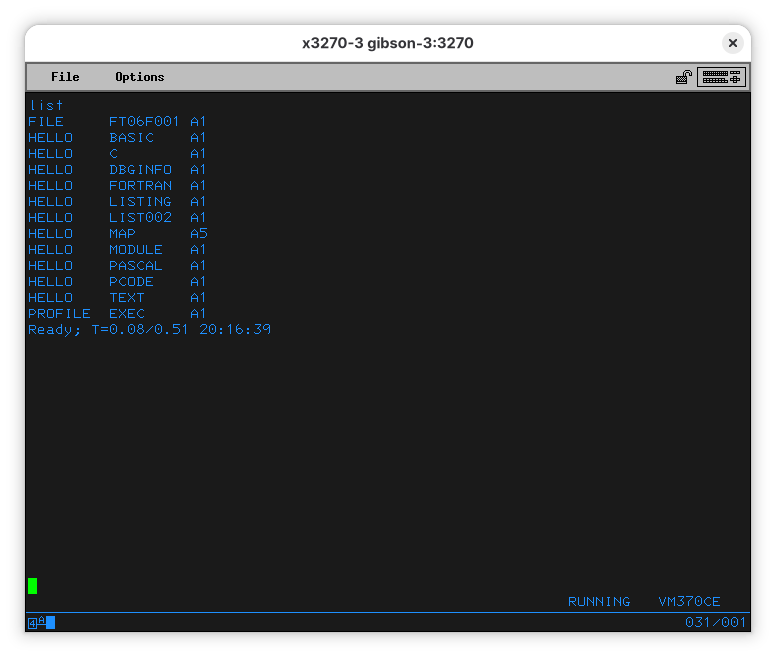
The VM370CE distribution has a lot of disks. You can check which ones you have immediate access with. If you logged on as CMSUSER, you can use the LISTFILE (we abreviated it to “LIST”) command to see what files are on your default disk. In CMS, commands can be abbreviated - the actual command is LISTFILE but LIST is neat enough.
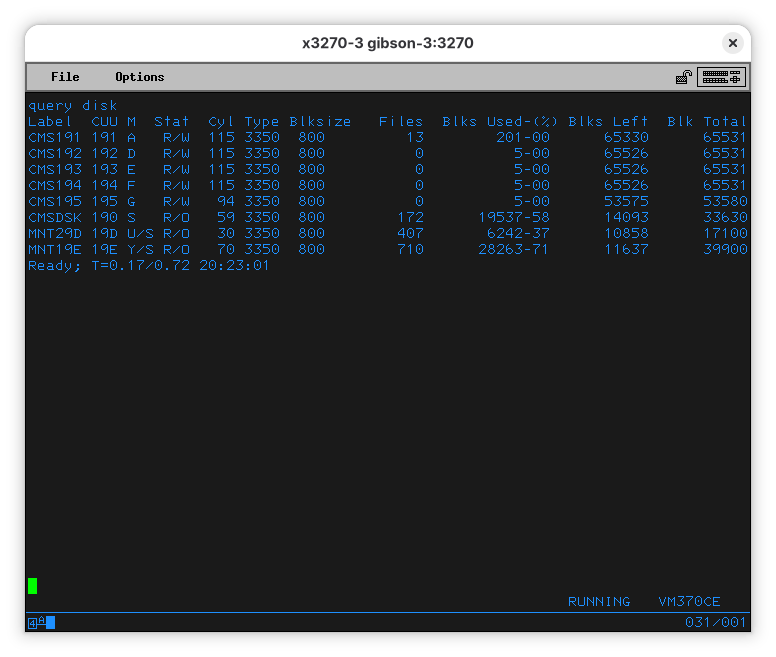
To check the disks you have, use QUERY DISK (query can also be abbreviated - Q will suffice for the computer to understand what you want):
To list what’s on a disk, you’ll use LISTFILE * * [disk]. The first “*” is a wildcard that will show all file names, the second is for all types. If you are familiar with windcards from CP/M, MS-DOS, or Unix, these don’t behave the same.
he third parameter is the disk:
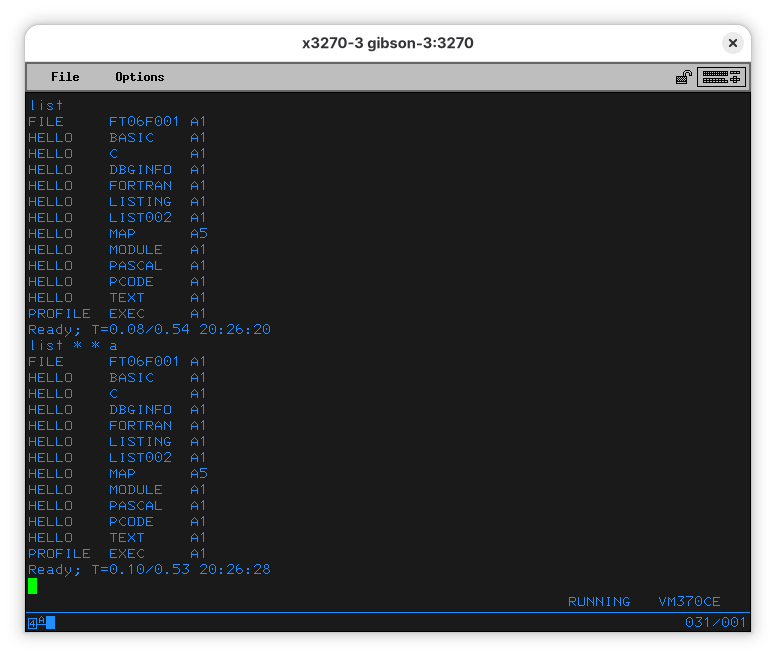
So… Looking at the output of LISTFILE and LISTFILE * * A, we can conclude we were start from disk A. In this case, A is a shortcut to disk 191 (mainframes always were supposed to have lots of disks, and our emulated one - a tricked out 4381 - has more than most companies could afford, or that would fit in most period accurate computer rooms). In our case, 191 is the “address” of the disk, and tells where the disk is connected to the virtual machine. Disks also have 6-character labels (or “VOLSER” in mainframe slang). A is “CMS190”.
Let’s check the other disks:
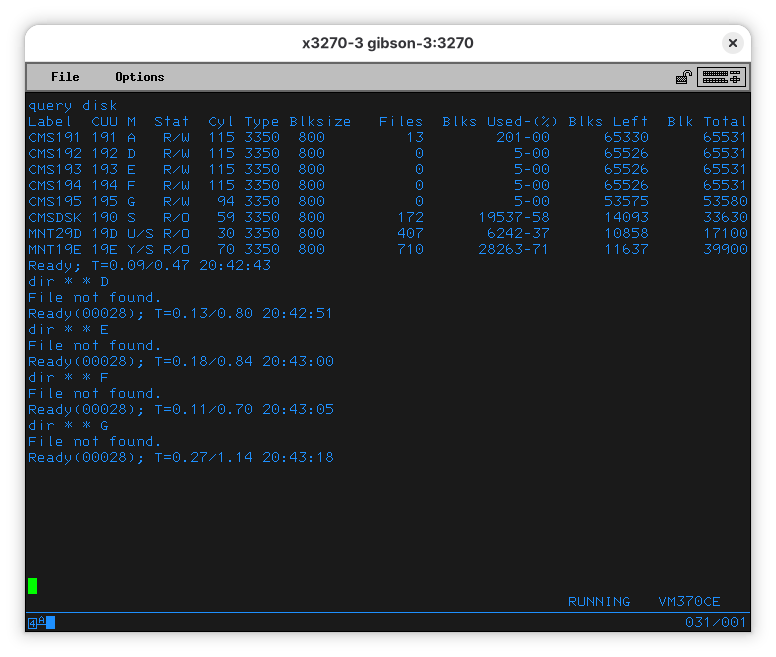
Disks D, E, F, and G are empty. That wouldn’t be a surprise if we had paid attention to the output of QUERY DISK - it clearly says they have zero files, and use 5 blocks (rounded to 0% of the disk).
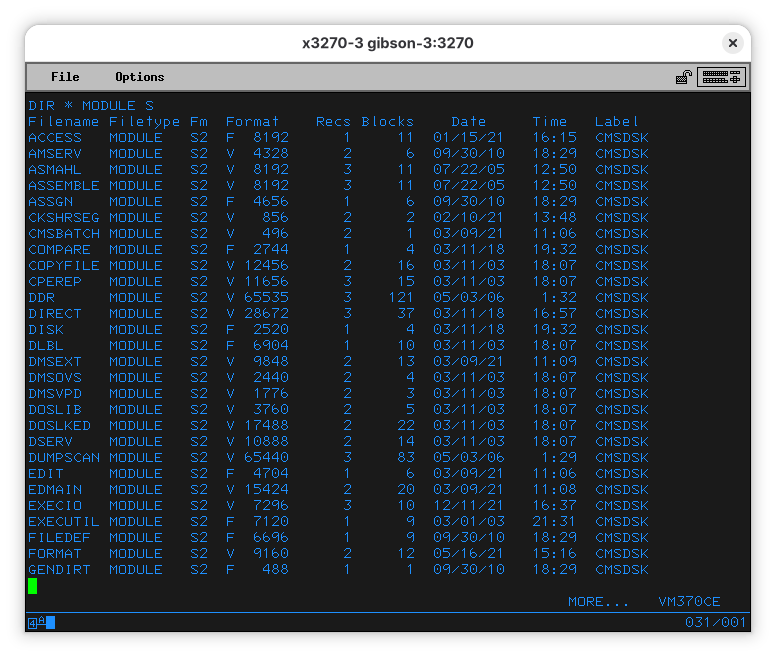
There is also disk S (or 190, or ). It has 172 files, so it’ll take a couple pages to list everything. In the list you’ll see a lot of interesting files - this disk contains system utilities - there’s ACCESS, EDIT, QUERY, SET, SORT, GLOBAL, and other things that we have seen before or that look like things an OS would provide (not a big surprise, as its label is “CMSDSK”). Binary programs seem to be of type “MODULE”. Let’s remember that. Try listing all files of type MODULE in S:
[Other disks TBA]
Uploading files to your machine (and playing games)
For this example, we’ll use the GAMES.VMARC file available at the h390-vm group at groups.io. The easiest way to upload a file to your mainframe is with the x3270 app - on the File menu select “File Transfer”:
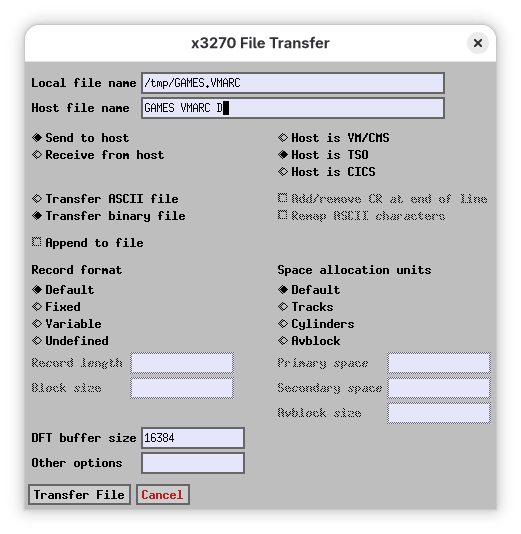
Since we are uploading a VMARC file (think a .zip or .tar.bz2), we’ll chose a binary transfer. The file will be saved to our disk D.
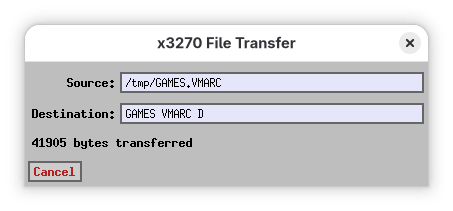
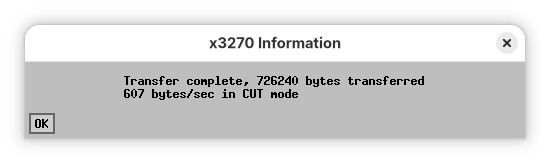
It might be a while if you are running Hercules on an underpowered Raspberry Pi Zero W. I assume a local instance on a sensible computer will be a lot faster. When the transfer is finished, a new dialog will pop up telling you so.
Now we need to understand how to open a VMARC file. Luckily for us, VM370CE has a very comprehensive help system. On the terminal, issue a:
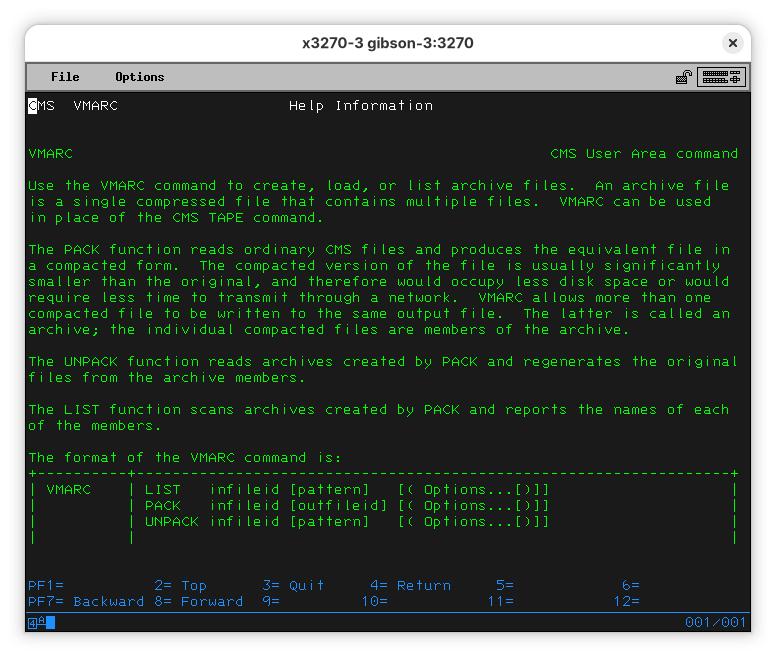
Listing the contents of the file seems like a good first step:

Let’s get one of the games:
VMARC UNPACK GAMES VMARC D TICTOE MODULE D
It’s there!
Now we want to run it.
… and it works!

As most people know, the only winning move with Tic Tac Toe (and Global Thermonuclear War) is not to play. The other games are a lot more interesting.
Moar games
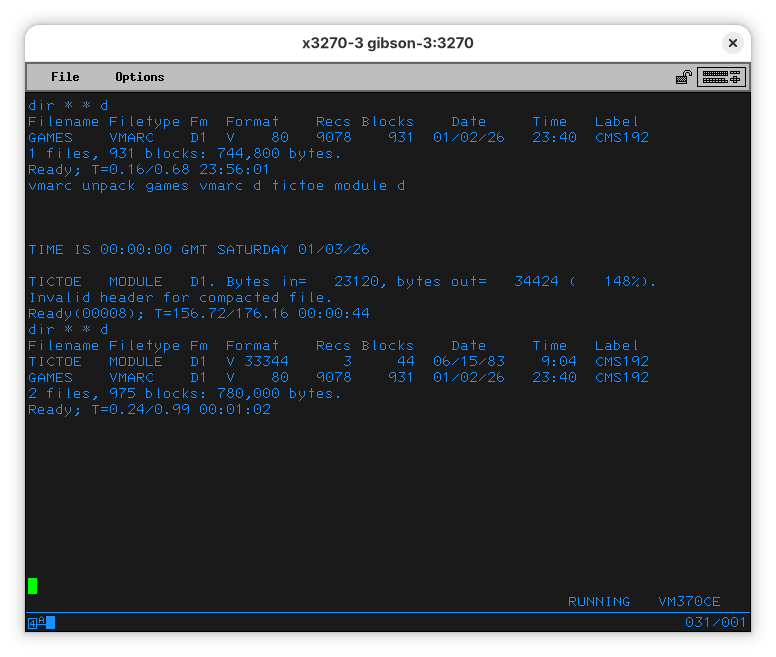
Other two game archives that are easy to obtain are under the VM-370-Games repo on Github. Once you download the files to your desktop and sent them to your VM/370 machine, you’ll have:
Filename Filetype Fm  Format    Recs Blocks    Date     Time   Label
VM86F155 VMARC    D1  V    80  15578   1597  01/03/26    1:20  CMS192
ZORK     VMARC    D1  V    80   8865    909  01/03/26    0:37  CMS192
The first one, VM86F155, has a lot of games in BASIC you can explore and modify (it you figure out how EDIT works).
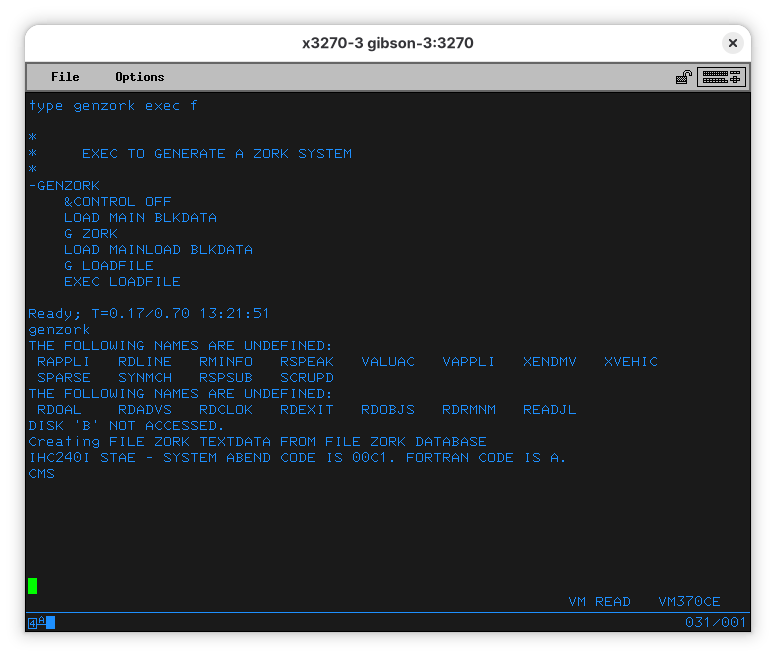
The ZORK code is in FORTRAN, and, while there is a program called GENZORK, it fails (maybe it needs to run on a disk at B).
Let me know if you figure it out.
[Solution TBA]
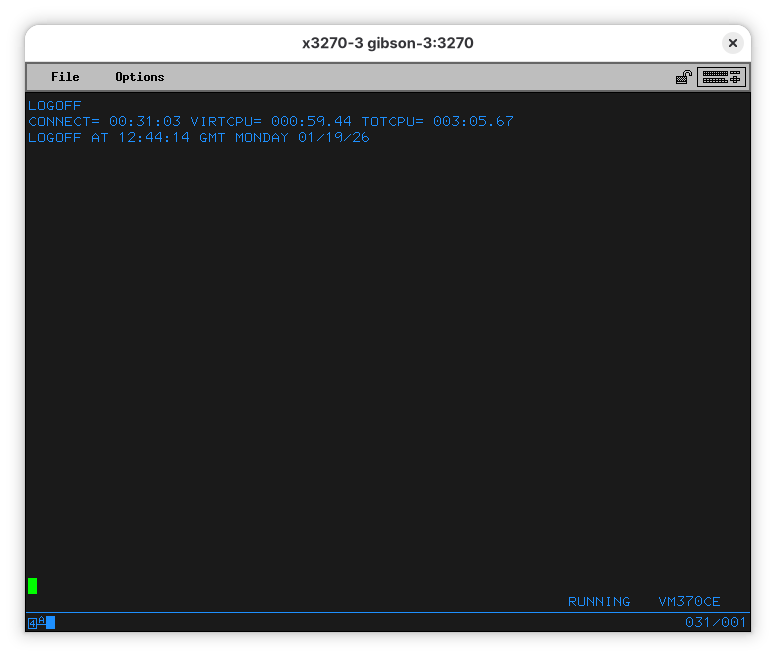
We are done with CMSUSER for now, so we’ll be good users and log off our machine:
Adding a user for you
It’s no fun to log in as CMSUSER every time you want to do something. You’ll want a user for yourself, with reasonable permissions to do things to the machine. In my case, I want to create an “RBANFFY” user for me.
Here’s the first shock for those who come from other platforms - you wouldn’t create a user, you’d create a VM, and you log in to that VM.

Creating a VM is a bit involved - you’ll need to do a lot of things before - allocate and format storage, for instance. We’ll leave that for later.
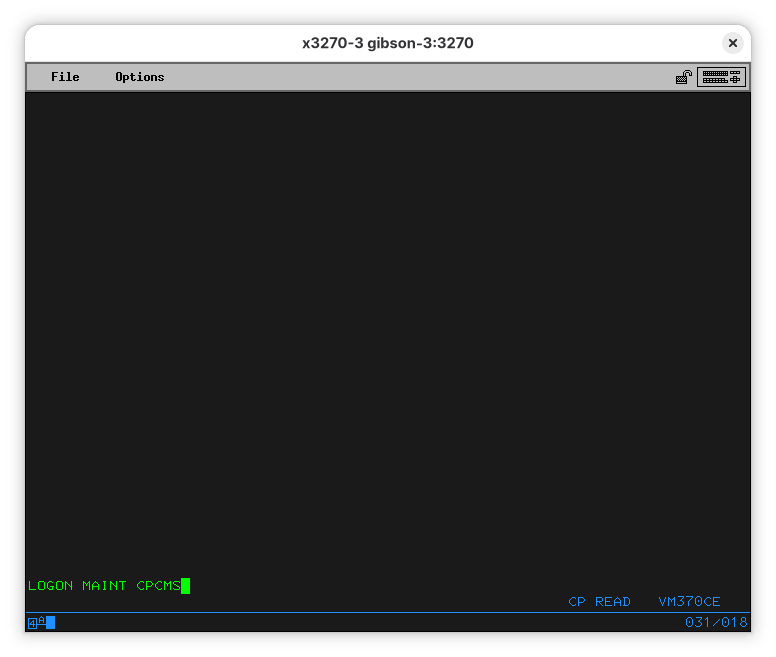
In the meantime, if you want to rename the CMSUSER VM to your preferred name (and change the password), we can explain that. We’ll start logging on as MAINT (which means, logging on to the MAINT VM).
We’ll also learn a lot of interesting things about our system, and a couple new commands for the EDIT editor.
Editing USER DIRECT
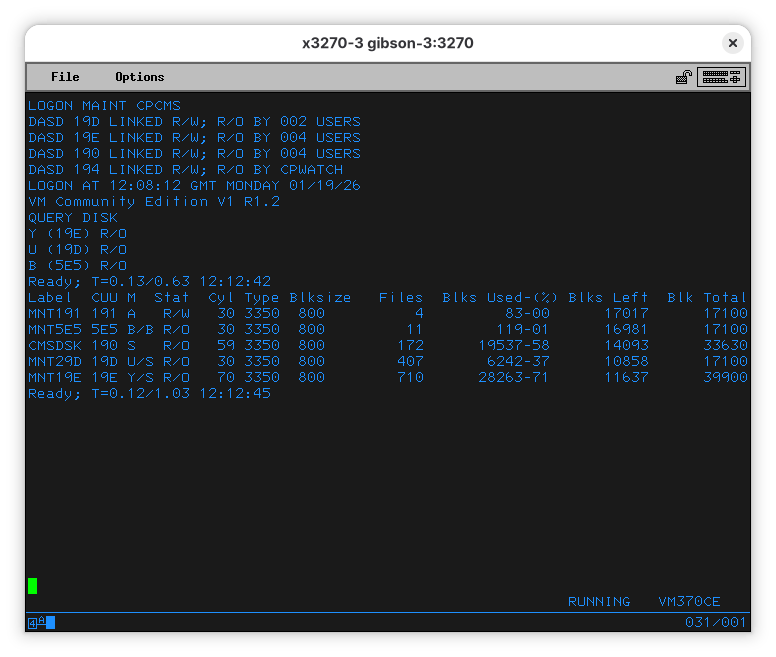
The first thing we want to do is to check which disks are available to this VM.
Note that we share a couple disks with other VMs. This is counterintuitive to people used to do VMs the Windows or Linux way - under VM/370 (and its descendants) VMs can share filesystems, not disks. Think of it as mounting a remote filesystem, but there is no remote server - this is done within the hypervisor. We are sharing volumes CMSDSK, MNT29D and MNT19E with other users (we saw it logged in as CMSUSER).
The file we want to look into is USER DIRECT. Let’s first find where it is located. Use LISTFILE USER DIRECT * to list files named USER DIRECT in all volumes you can access. Your terminal will show something like:
LISTFILE USER DIRECT *
USER     DIRECT   A1
Ready; T=0.07/0.13 12:20:46
So, we see the file is in our default disk (A), which is volume MNT191. Let’s edit it - on your terminal, run EDIT USER DIRECT.
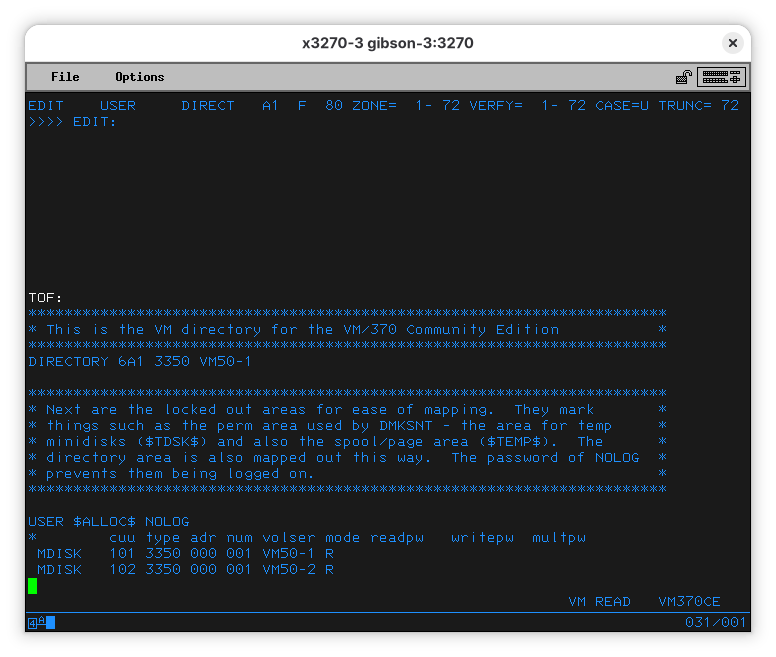
The top line tells you the file and the mode you are working in.
EDIT USER DIRECT A1 F 80 ZONE= 1- 72 VERFY= 1- 72 CASE=U TRUNC= 72
This tells me we have the USER DIRECT file, located on A (ignore the 1 for now), that it is a fixed line length file of 80 columns (F 80), and that everything we type will be converted to uppercase (CASE=U). It also says TRUNC= 72 to tell us we can’t go past column 72. This was used for punchcards to identify the card (which is a line in the file).
To navigate, you can use EDIT’s commands up and down. When you follow them with a number, they repeat the operation that number of times. If you are lost, you can use top or bottom to get to the top of the end of the bottom of the file. Let’s do a DOWN 14.

This is how you define VMs. They are called users here, so you might be confused. Some VMs start automatically while others will only be started on LOGON (and will shut down on LOGOFF). This first definitions are, as the comment explains, created to make it easier to define your own users, and you can’t log-on to them yourself.
The file gets more interesting when you look at the ASSIST user. Do a LOCATE ASSIST:
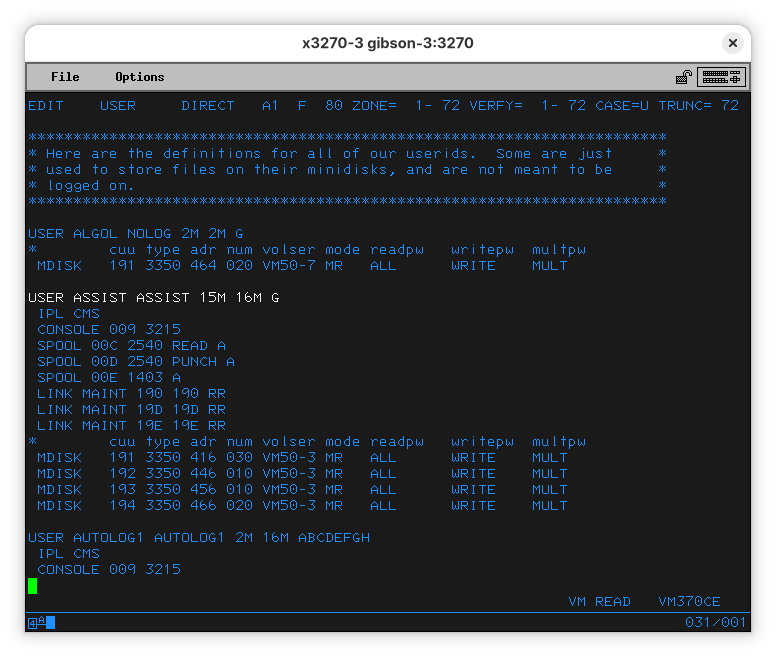
Note: The user ALGOL is also interesting, but we won’t talk about it right now.
Here you see a couple commands before the disk definitions. They tell the user will log-on to the CMS operating environment (IPL means “Initial Program Load” and is what other systems would call “boot”). It’ll then tell how the console is to be used (like an IBM 3215 console as device 009). It’ll also set up a card reader/puncher (one IBM 2540 connected on 00C and 00D) and a printer (an IBM 1403).
USER ASSIST ASSIST 15M 16M G
 IPL CMS
 CONSOLE 009 3215
 SPOOL 00C 2540 READ A
 SPOOL 00D 2540 PUNCH A
 SPOOL 00E 1403 A
Note: The first line tells us the user name (
ASSISS), the password (yes, in clear text), and how much memory the machine should have allocated.
Let’s now look into the user we might want to rename. In EDIT, do a LOCATE CMSUSER:
USER CMSUSER CMSUSER 15M 16M G
 IPL CMS
 CONSOLE 009 3215
 SPOOL 00E 1403 A
 SPOOL 00C 2540 READ *
 SPOOL 00D 2540 PUNCH A
 LINK MAINT 190 190 RR
 LINK MAINT 19D 19D RR
 LINK MAINT 19E 19E RR
*        cuu type adr num volser mode readpw   writepw  multpw
 MDISK   191 3350 001 115 VM50U0 MR   ALL      WRITE    MULT
 MDISK   192 3350 116 115 VM50U0 MR   ALL      WRITE    MULT
 MDISK   193 3350 231 115 VM50U0 MR   ALL      WRITE    MULT
 MDISK   194 3350 346 115 VM50U0 MR   ALL      WRITE    MULT
 MDISK   195 3350 461 094 VM50U0 MR   ALL      WRITE    MULT
Now you’ll want to open a second x3270 window and log on as CMSUSER.
LOGON CMSUSER CMSUSER
DASD 190 LINKED R/O; R/W BY MAINT; R/O BY 004 USERS
DASD 19D LINKED R/O; R/W BY MAINT; R/O BY 002 USERS
DASD 19E LINKED R/O; R/W BY MAINT; R/O BY 004 USERS
LOGON AT 13:10:22 GMT MONDAY 01/19/26
VM Community Edition V1 R1.2
Notice these are the 3 disks mentioned in the LINK commands after the card reader/puncher and the printer are added. They are being linked from the user MAINT
When there, do a QUERY DISK:
 Label  CUU M  Stat  Cyl Type Blksize   Files  Blks Used-(%) Blks Left  Blk Total
CMS191 191 A   R/W  115 3350  800          7        111-00      65420      65531
CMS192 192 D   R/W  115 3350  800          0          5-00      65526      65531
CMS193 193 E   R/W  115 3350  800          0          5-00      65526      65531
CMS194 194 F   R/W  115 3350  800          0          5-00      65526      65531
CMS195 195 G   R/W   94 3350  800          0          5-00      53575      53580
CMSDSK 190 S   R/O   59 3350  800        172      19537-58      14093      33630
MNT29D 19D U/S R/O   30 3350  800        407       6242-37      10858      17100
MNT19E 19E Y/S R/O   70 3350  800        710      28263-71      11637      39900
Ready; T=0.13/0.82 13:19:36
The first five disks are the ones defined in USER DIRECT in the MDISK lines. The last 3 are the ones LINK’ed from MAIN.
To exit EDIT saving your changes, use the FILE command. To leave without saving changes, use QUIT. You’ll need to clear the terminal to continue (the “MORE…” message in the bottom right).
Another interesting file you might look into. It is a comprehensive list of all disk partitioins, the users those partitions are used by, the CUU they are attached to, and the start and end of the partition, in cylinders. All entries look like this one:
VOLUME   USERID      CUU   DEVTYPE   START      END     SIZE
GCCBRX   $ALLOC$     110      3350   00000    00000    00001
                                     00001    00050    00050    GAP
         MAINTC      293      3350   00051    00100    00050
         MAINTC      191      3350   00101    00150    00050
         MAINTC      394      3350   00151    00200    00050
         MAINTC      194      3350   00201    00250    00050
         MAINTC      395      3350   00251    00300    00050
         MAINTC      393      3350   00301    00350    00050
         MAINTC      193      3350   00351    00400    00050
         MAINTC      493      3350   00401    00450    00050
         MAINTC      19C      3350   00451    00500    00050
         MAINTC      195      3350   00501    00550    00050
         MAINTC      295      3350   00551    00551    00001
Creating a new user (or VM) would be more work than I’d like to cover here. It’d mean adding new disks, partitioning them, creating filesystems, and adding them to the configuration. Perhaps more importantly, it’d require me to learn a whole lot of things before I could confidently do it.
So, instead of creating a new user, we’ll change the CMSUSER user name and password (passwords can’t have more than 8 characters and are case insensitive). Keep in mind this is how it used to be in the 1970s - modern mainframes are much better protected.
My plan of having a user for me, one for my wife, and users for my kids will have to wait for another day.
Updating the USER directory
[TBA]
Talking to other mainframes
Mounting a disk on another running Hercules instance
Hercules can run without a UI in Shared Device Server mode. In this mode, it can start and no environment needs to be IPL’ed.
[Details TBA]
TCP/IP networking on VM370
[TBA]
Printing
To a virtual printer
Hercules supports routing a printer to a local file. On the packaged version of MVT 3.8j a 1403 line printer is mapped to the prt/prt00f.txt file, and on VM/370 there are two 1403 printers, mapped to io/print1.listing and io/print2.listing. On the container images, these files are not exposed to the host directly, and you’ll have to map the container folder to the host yourself.
To a real printer
[TBA]
Using a “normal” terminal
Enabling access via a printing terminal (not screen-based).
© 2025-2026 Ricardo Bánffy