
Last week, in a meeting about 3D printing and Hermes and the agent flow- how those use cases apply to different fields- one suggestion that popped up was about adding Hammer’s workflow for 3D printing so you can basically send a print directly to your 3D printer using Hermes Agent. So that was an interesting use case, and I thought I would take a look into that.
And when I was solutioning that part, I came across different issues, and finally I was able to print it by sending a MakerWorld URL or WhatsApp or Telegram, and the agent will take care of all the downloading and slicing on the home server, then it starts the print. So the whole idea is how my Home Assistant, my 3D printer, and everything worked in sync to create a unified ecosystem that I can use to print from a single link.
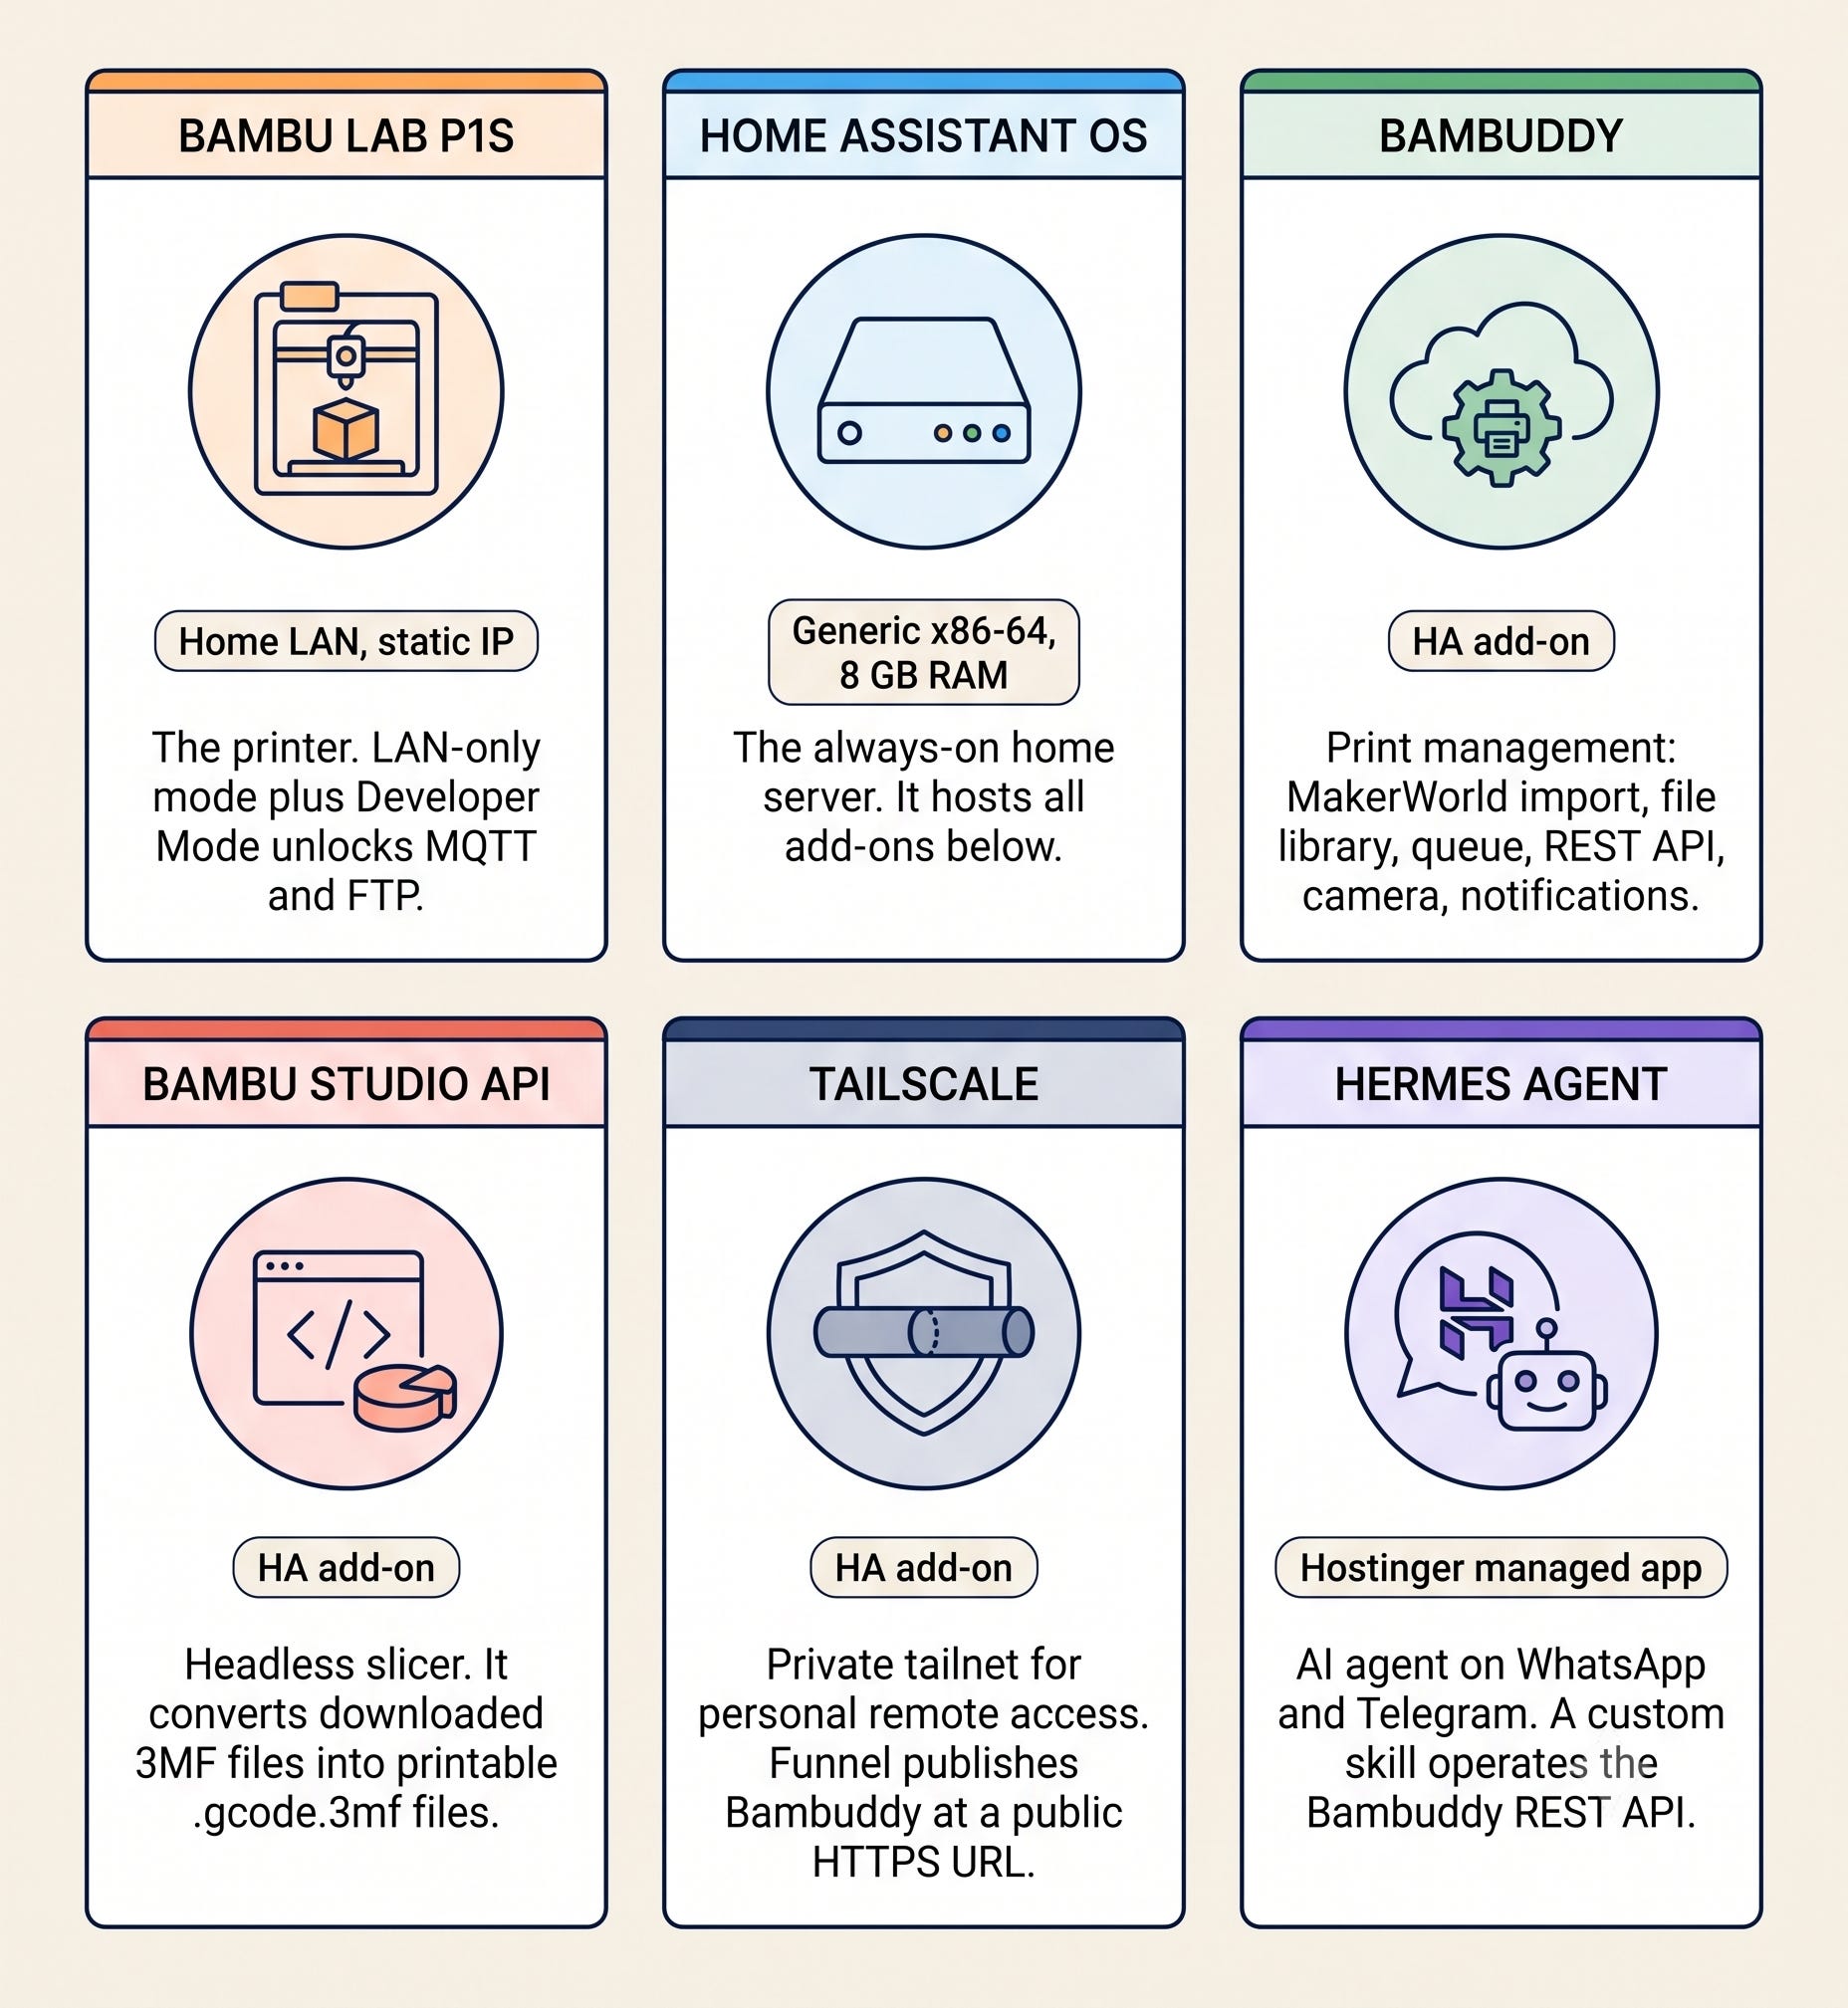
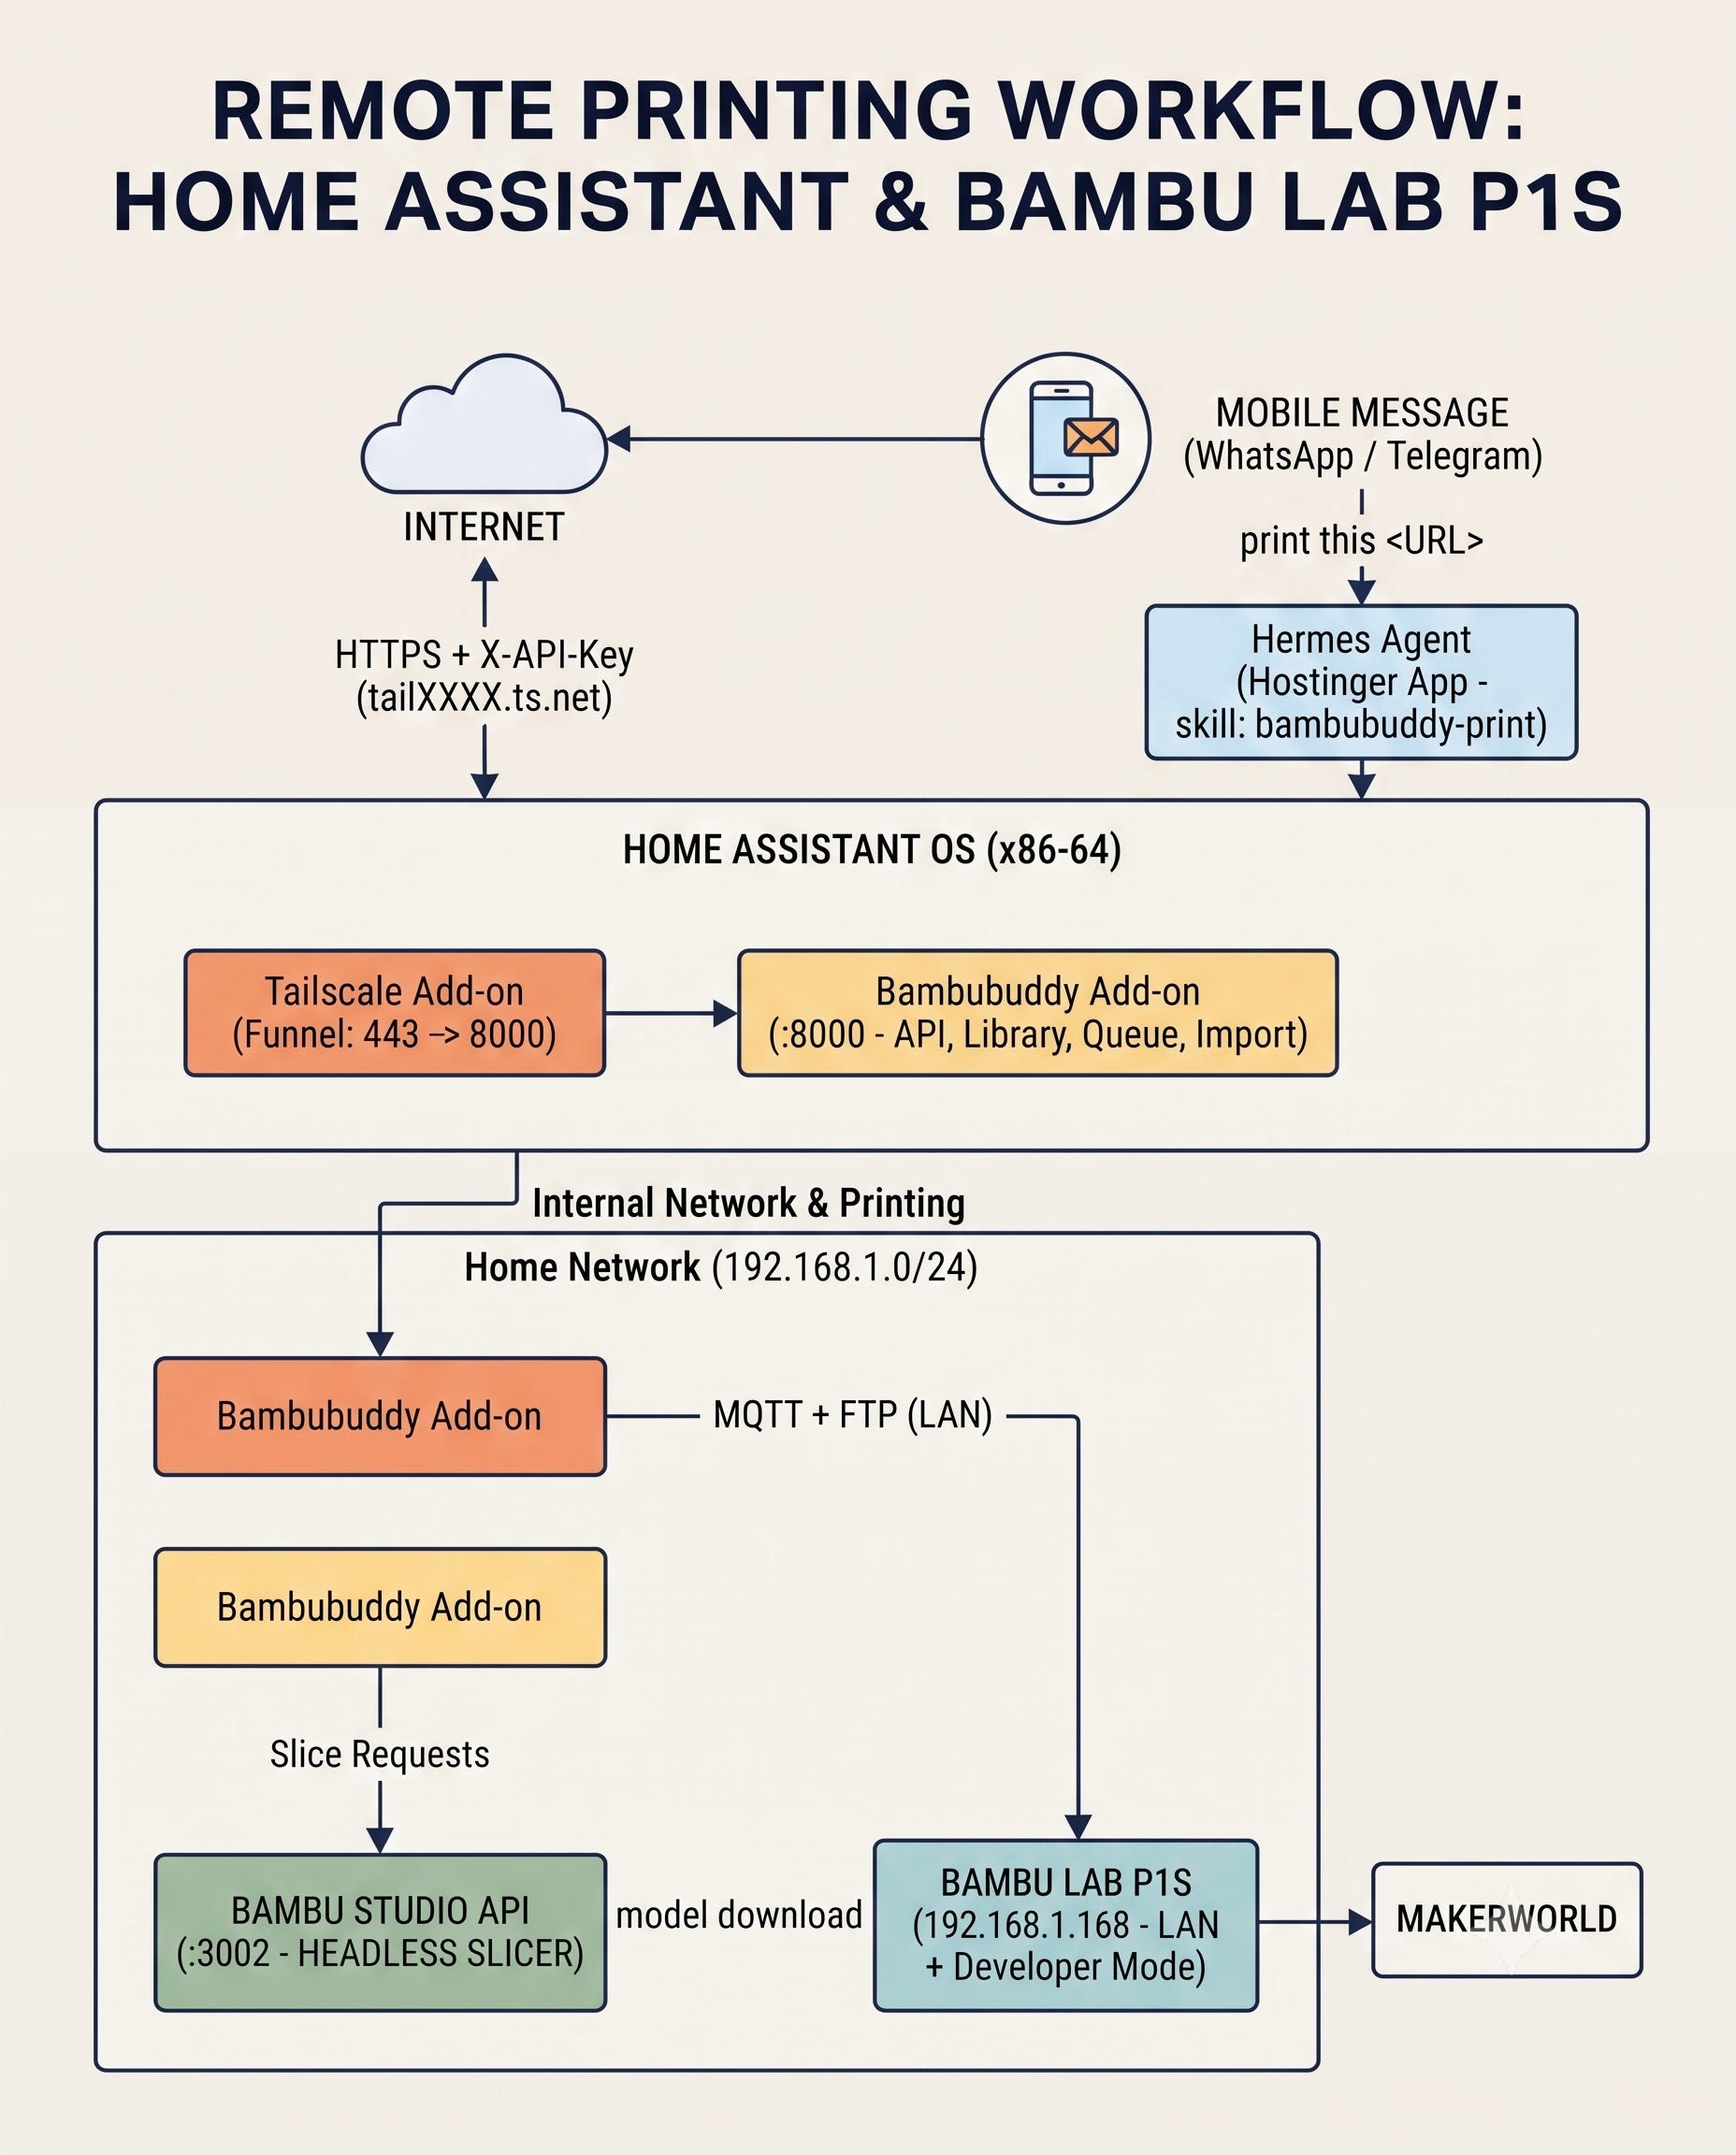
I have a Bambulab P1S printer at home. Also, my Home Assistant OS is running on an Intel NCU with 8 GB of RAM. On this unit, I added Bambuddy as a Home Assistant add-on to manage printing and installed the Bambu Studio API on the same machine. This setup allows Bambuddy to access Bambu Studio within the same machine to orchestrate the slicing. I’m using Tailscale to connect remotely to my Home Assistant, which links everything through Hermes, enabling remote control.
On Telegram or WhatsApp, you send a message to Hermes requesting that a MakerWorld URL be printed. The printer then starts printing. That’s the whole idea.
But in between, there are a lot of steps executed by the agent. You send the link on WhatsApp. Hermas resolves the URL. It downloads the particular model and asks you to approve. Once it’s approved, it starts the slicing process. Once slicing is complete, it sends the sliced G-code to the printer to print.
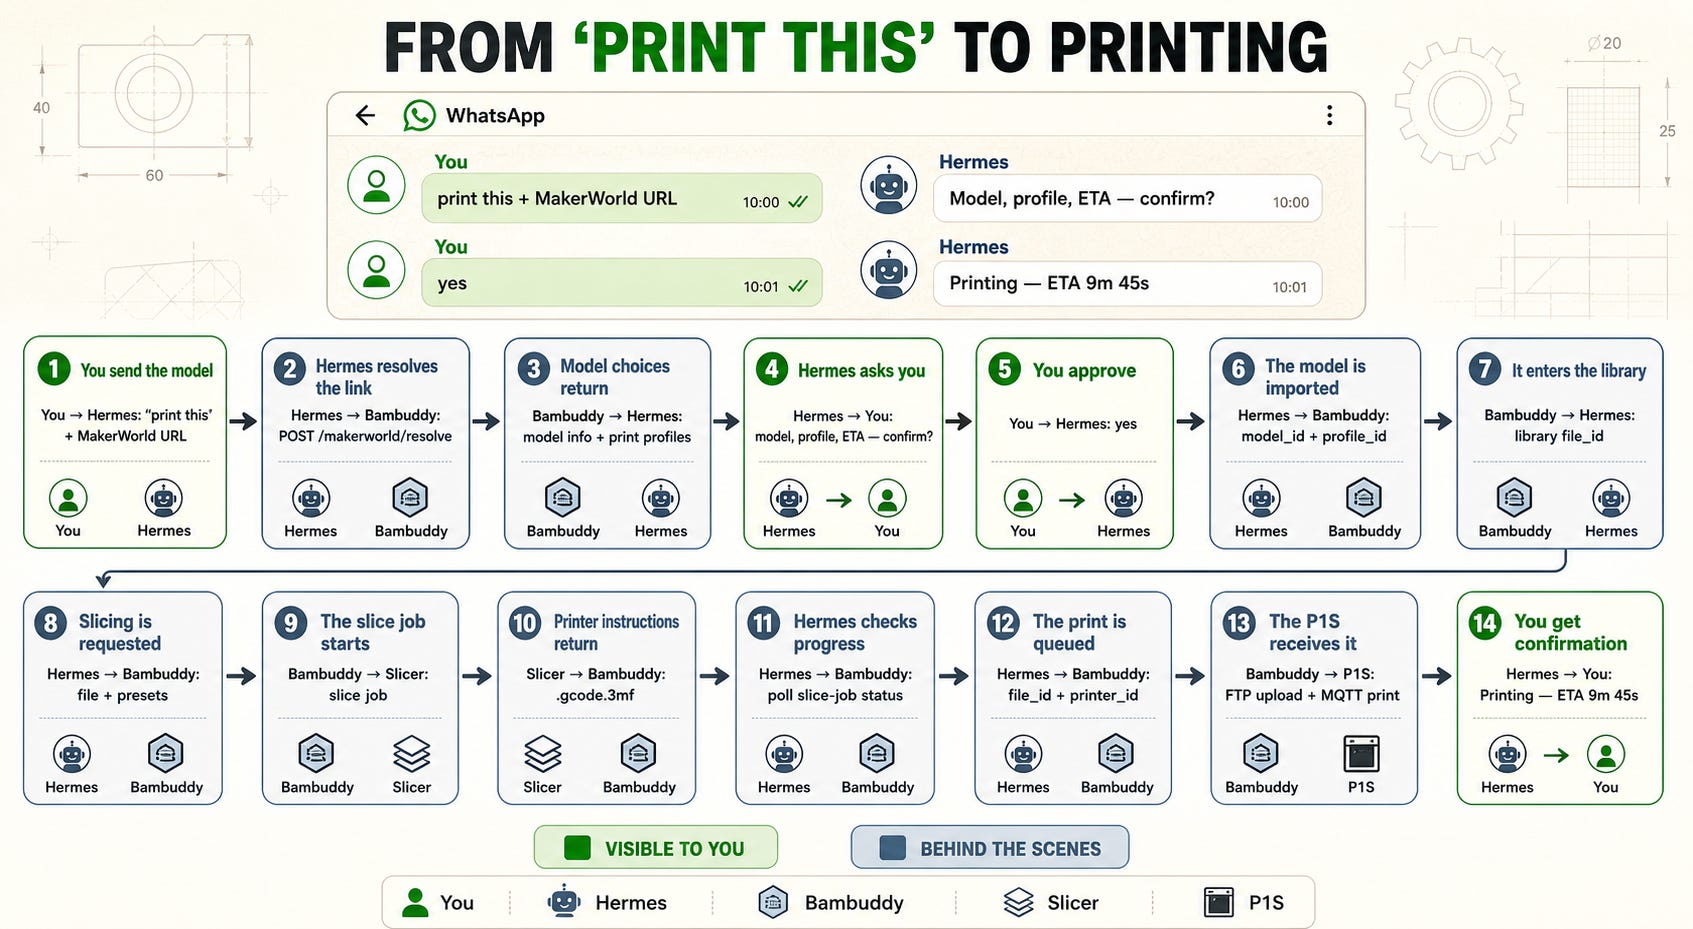
My Hermes is running in the cloud and can access Home Assistant through the Tailscale add-on. Both Bambuddy and Home Assistant (for home automation) are open through the Tailscale funnel. Once the message arrives in Hermes, it connects to my Home Assistant Bambuddy instance and initiates the download and slicing. Bambuddy has an API interface; Hermes is essentially using that API to connect to HA to do the downloading and slicing. Once Bambuddy completes the slicing, it will send it to the print queue, and it will start printing the model.
One thing you have to understand is that the bamboo must be enabled with LAN and developer mode. That’s a hard requirement because in early 2025, Bamboo Lab released an authorization control system (ACS). In cloud mode, the printer rejects write commands from third-party software, so no third party can effectively access the printer, and they cannot access the APA. Hence, you must enable local mode and developer mode in the printer.
Update the printer firmware first, while the printer is in cloud mode.
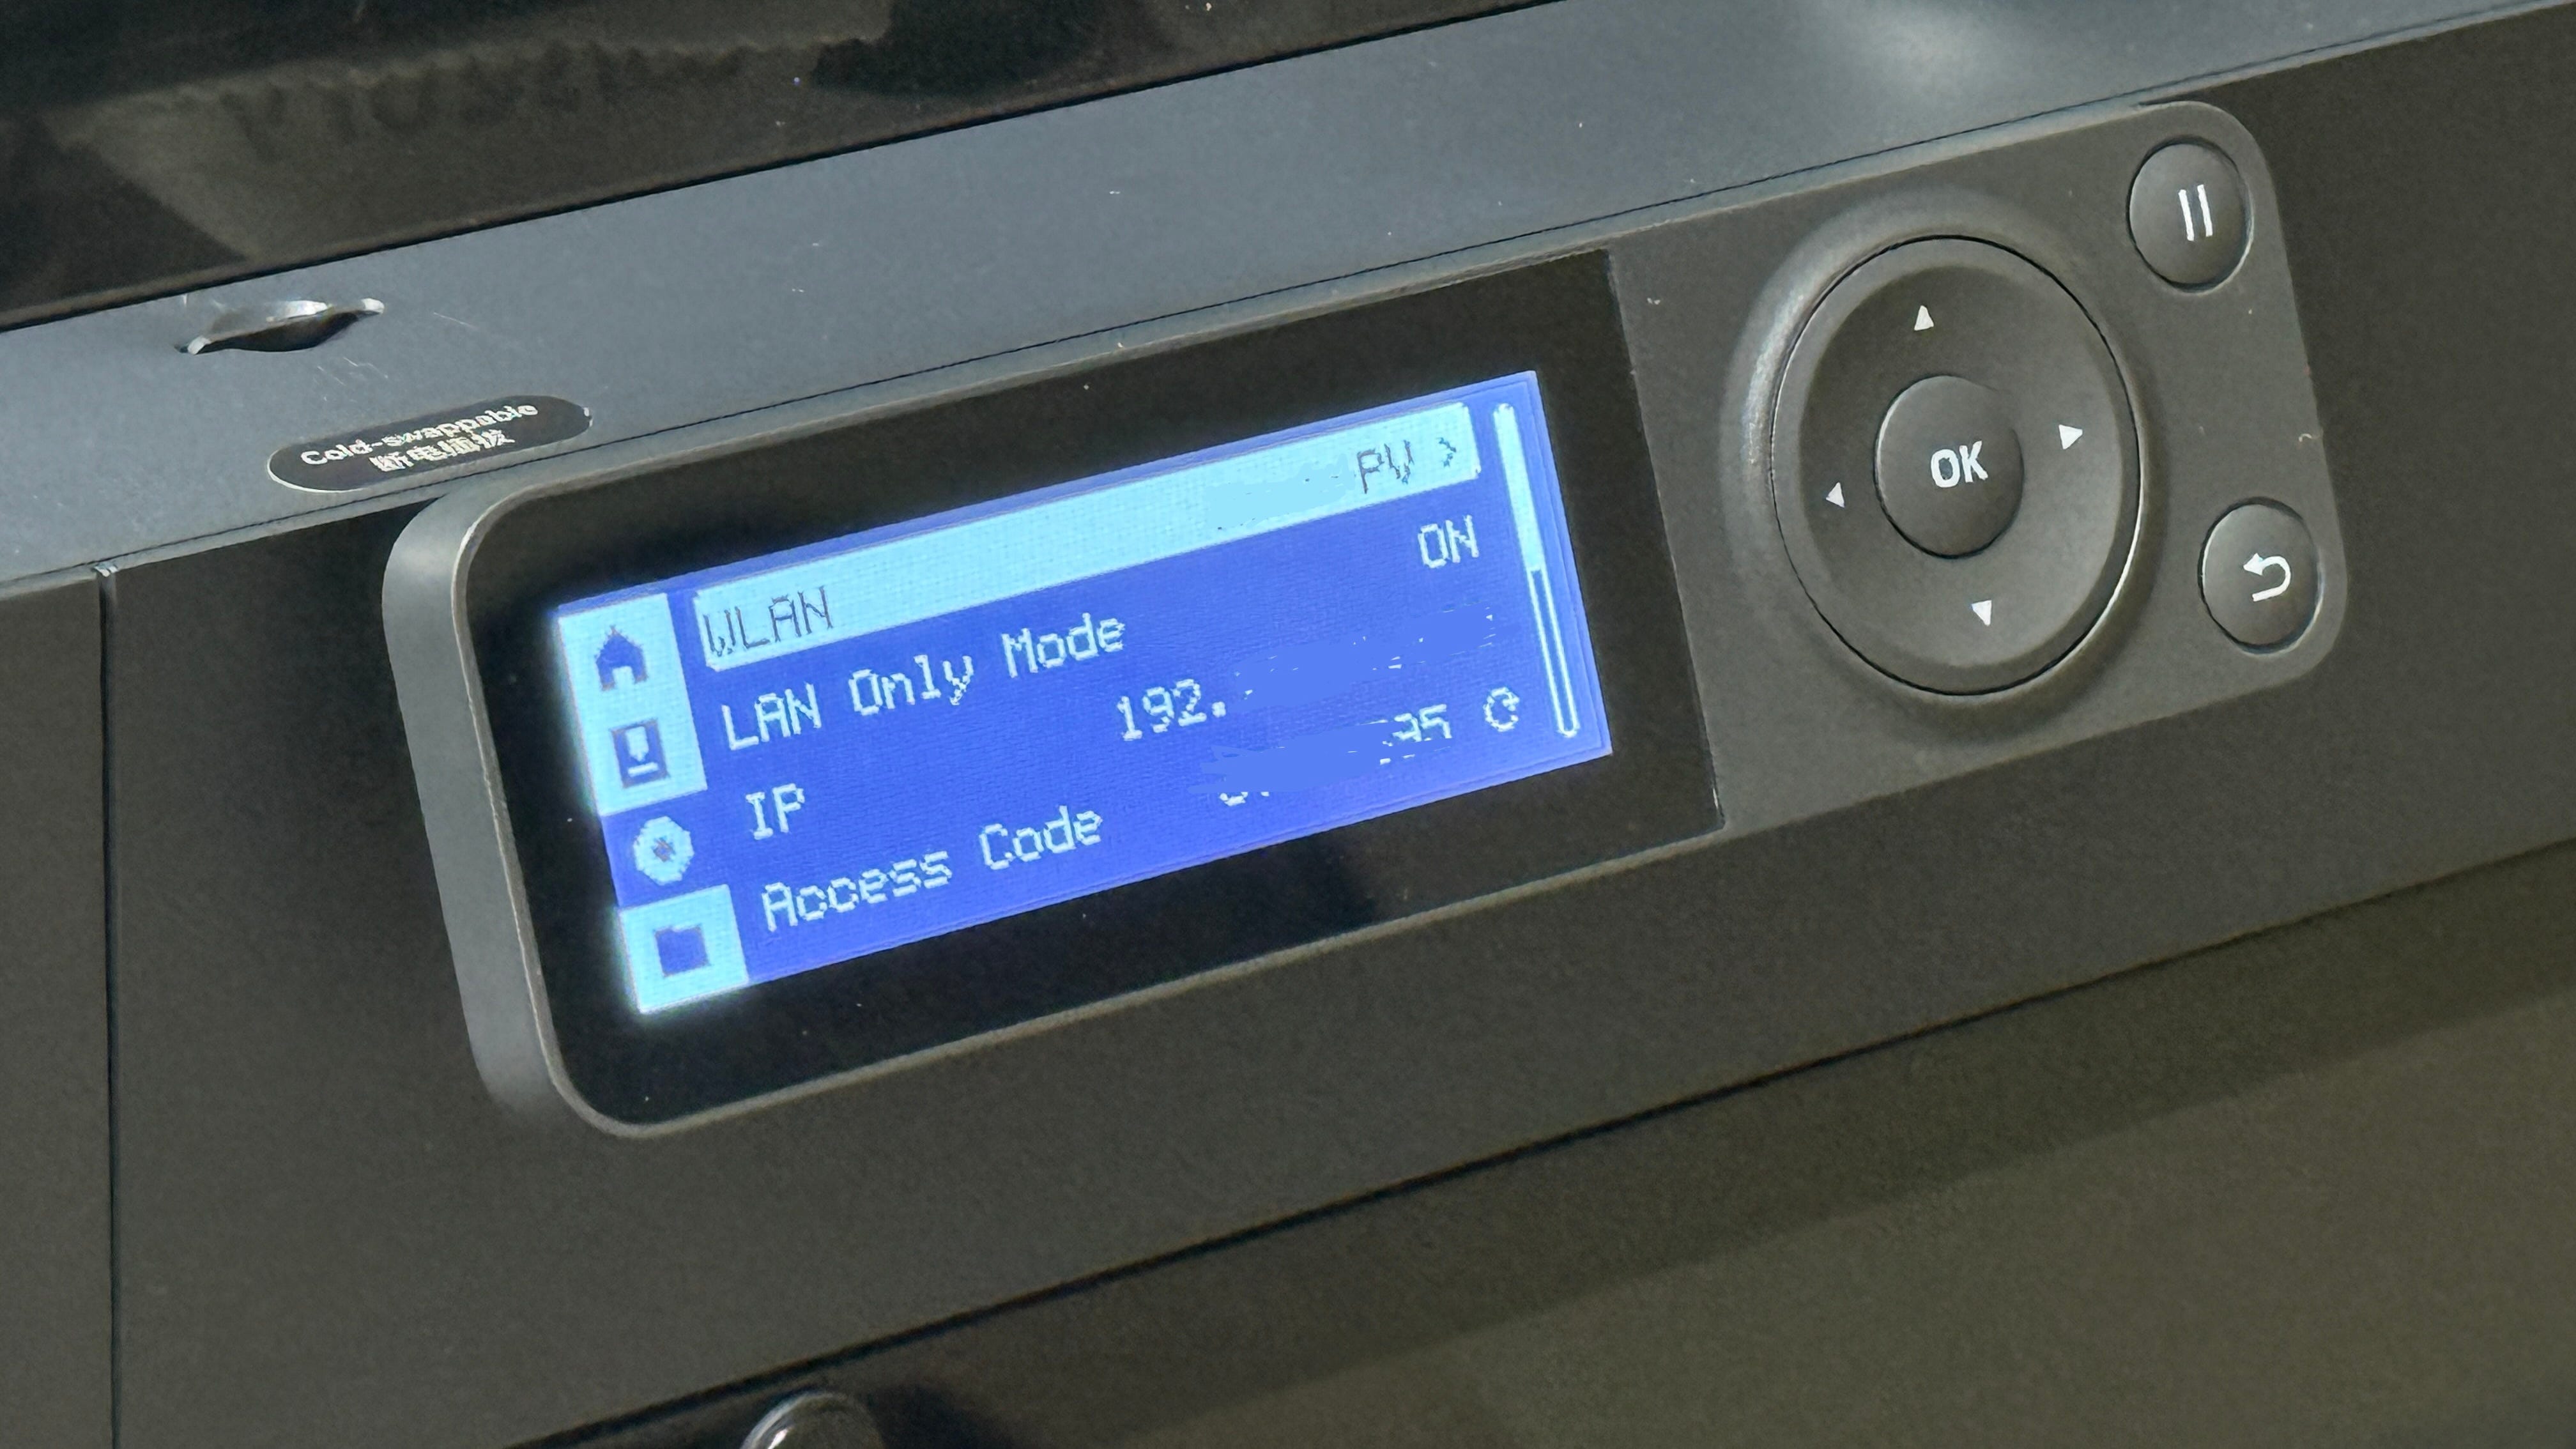
On the P1S screen, open Settings (gear) → WLAN → “LAN Mode Only”. Enable it and confirm the warning.
The “Developer Mode” switch shows in the same menu. Enable it and confirm. This switch unlocks local MQTT and FTP.
Write down the Access Code and the IP address from the WLAN screen.
In the router, reserve the IP address of the printer. On Linksys Smart Wi-Fi: Connectivity → Local Network → DHCP Reservations. Select the printer, then select Add and Apply.
The IP address must not change. Bambuddy connects to this address.
These functions stop: the Handy app, cloud printing, and cloud timelapse. Bambu Studio on the desktop can still connect over LAN. Add the printer with its IP address and access code.
Open Settings → Add-ons → Add-on Store → ⋮ → Repositories. Add:
https://github.com/Spegeli/homeassistant-app-bambuddyInstall Bambuddy (Stable). Enable Start on boot and Watchdog. Start the add-on.
Open the Web UI on port 8000. Create the admin user.
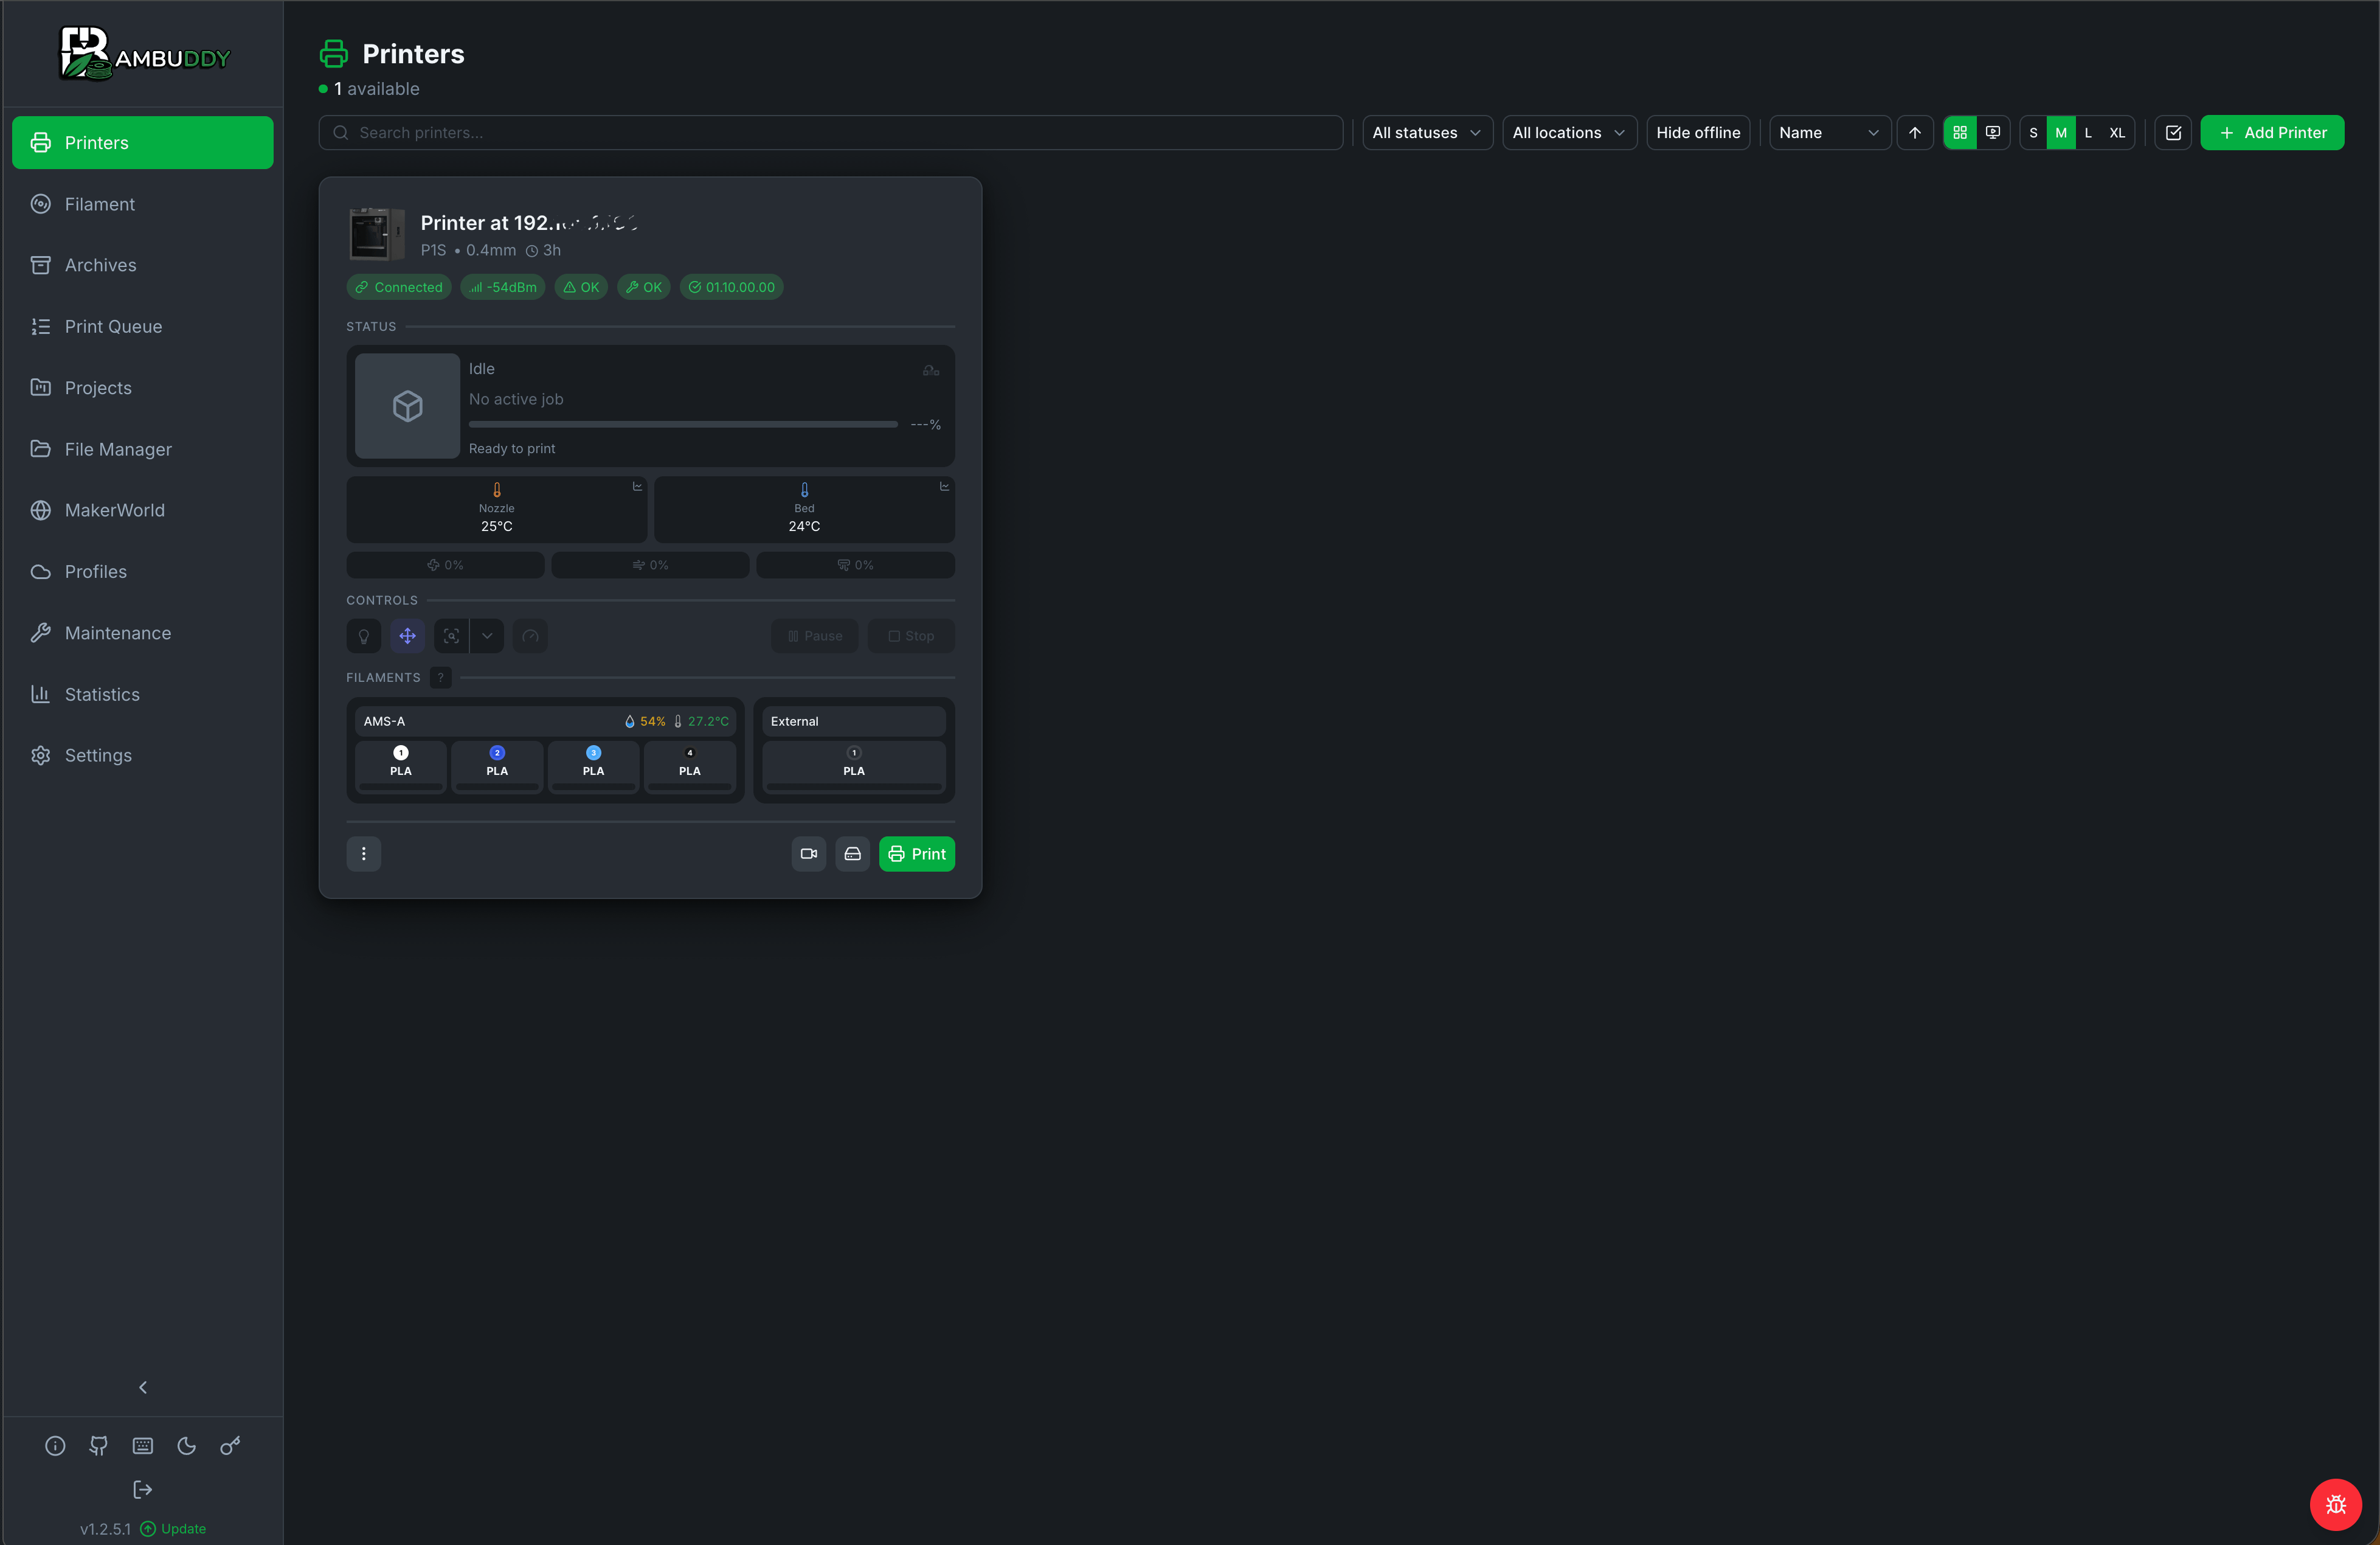
Add the printer with its IP address, access code, and serial number. The serial number is on the printer screen under Settings → Device, or in Bambu Studio. Set the connection type to LAN/Developer Mode.
Make sure that the dashboard shows the printer as connected, with live temperatures and a camera stream.
MakerWorld “Save” gives an unsliced 3MF file. Bambuddy prints only sliced files. Without a slicer, the flow stops at the error “Failed to load G-code.”
Add the repository
https://github.com/griffinmartin/ha-app-bambu-studio-api. Install Bambu Studio API.If the add-on reports that port 3001 is in use, open Configuration → Network. Change the port to 3002. Start the add-on.
Make sure that
http://homeassistant.local:3002/healthgives a response.In Bambuddy, open Settings → Workflow → Slicer. Enable Use Slicer API. Set the URL to
Do this test before you connect anything to the internet.
In Bambuddy, open the MakerWorld page. Sign in with your Bambu account. Bambuddy uses this account only for model downloads. The printer stays on LAN.
Paste a model URL and select Resolve. Save a plate to the library.
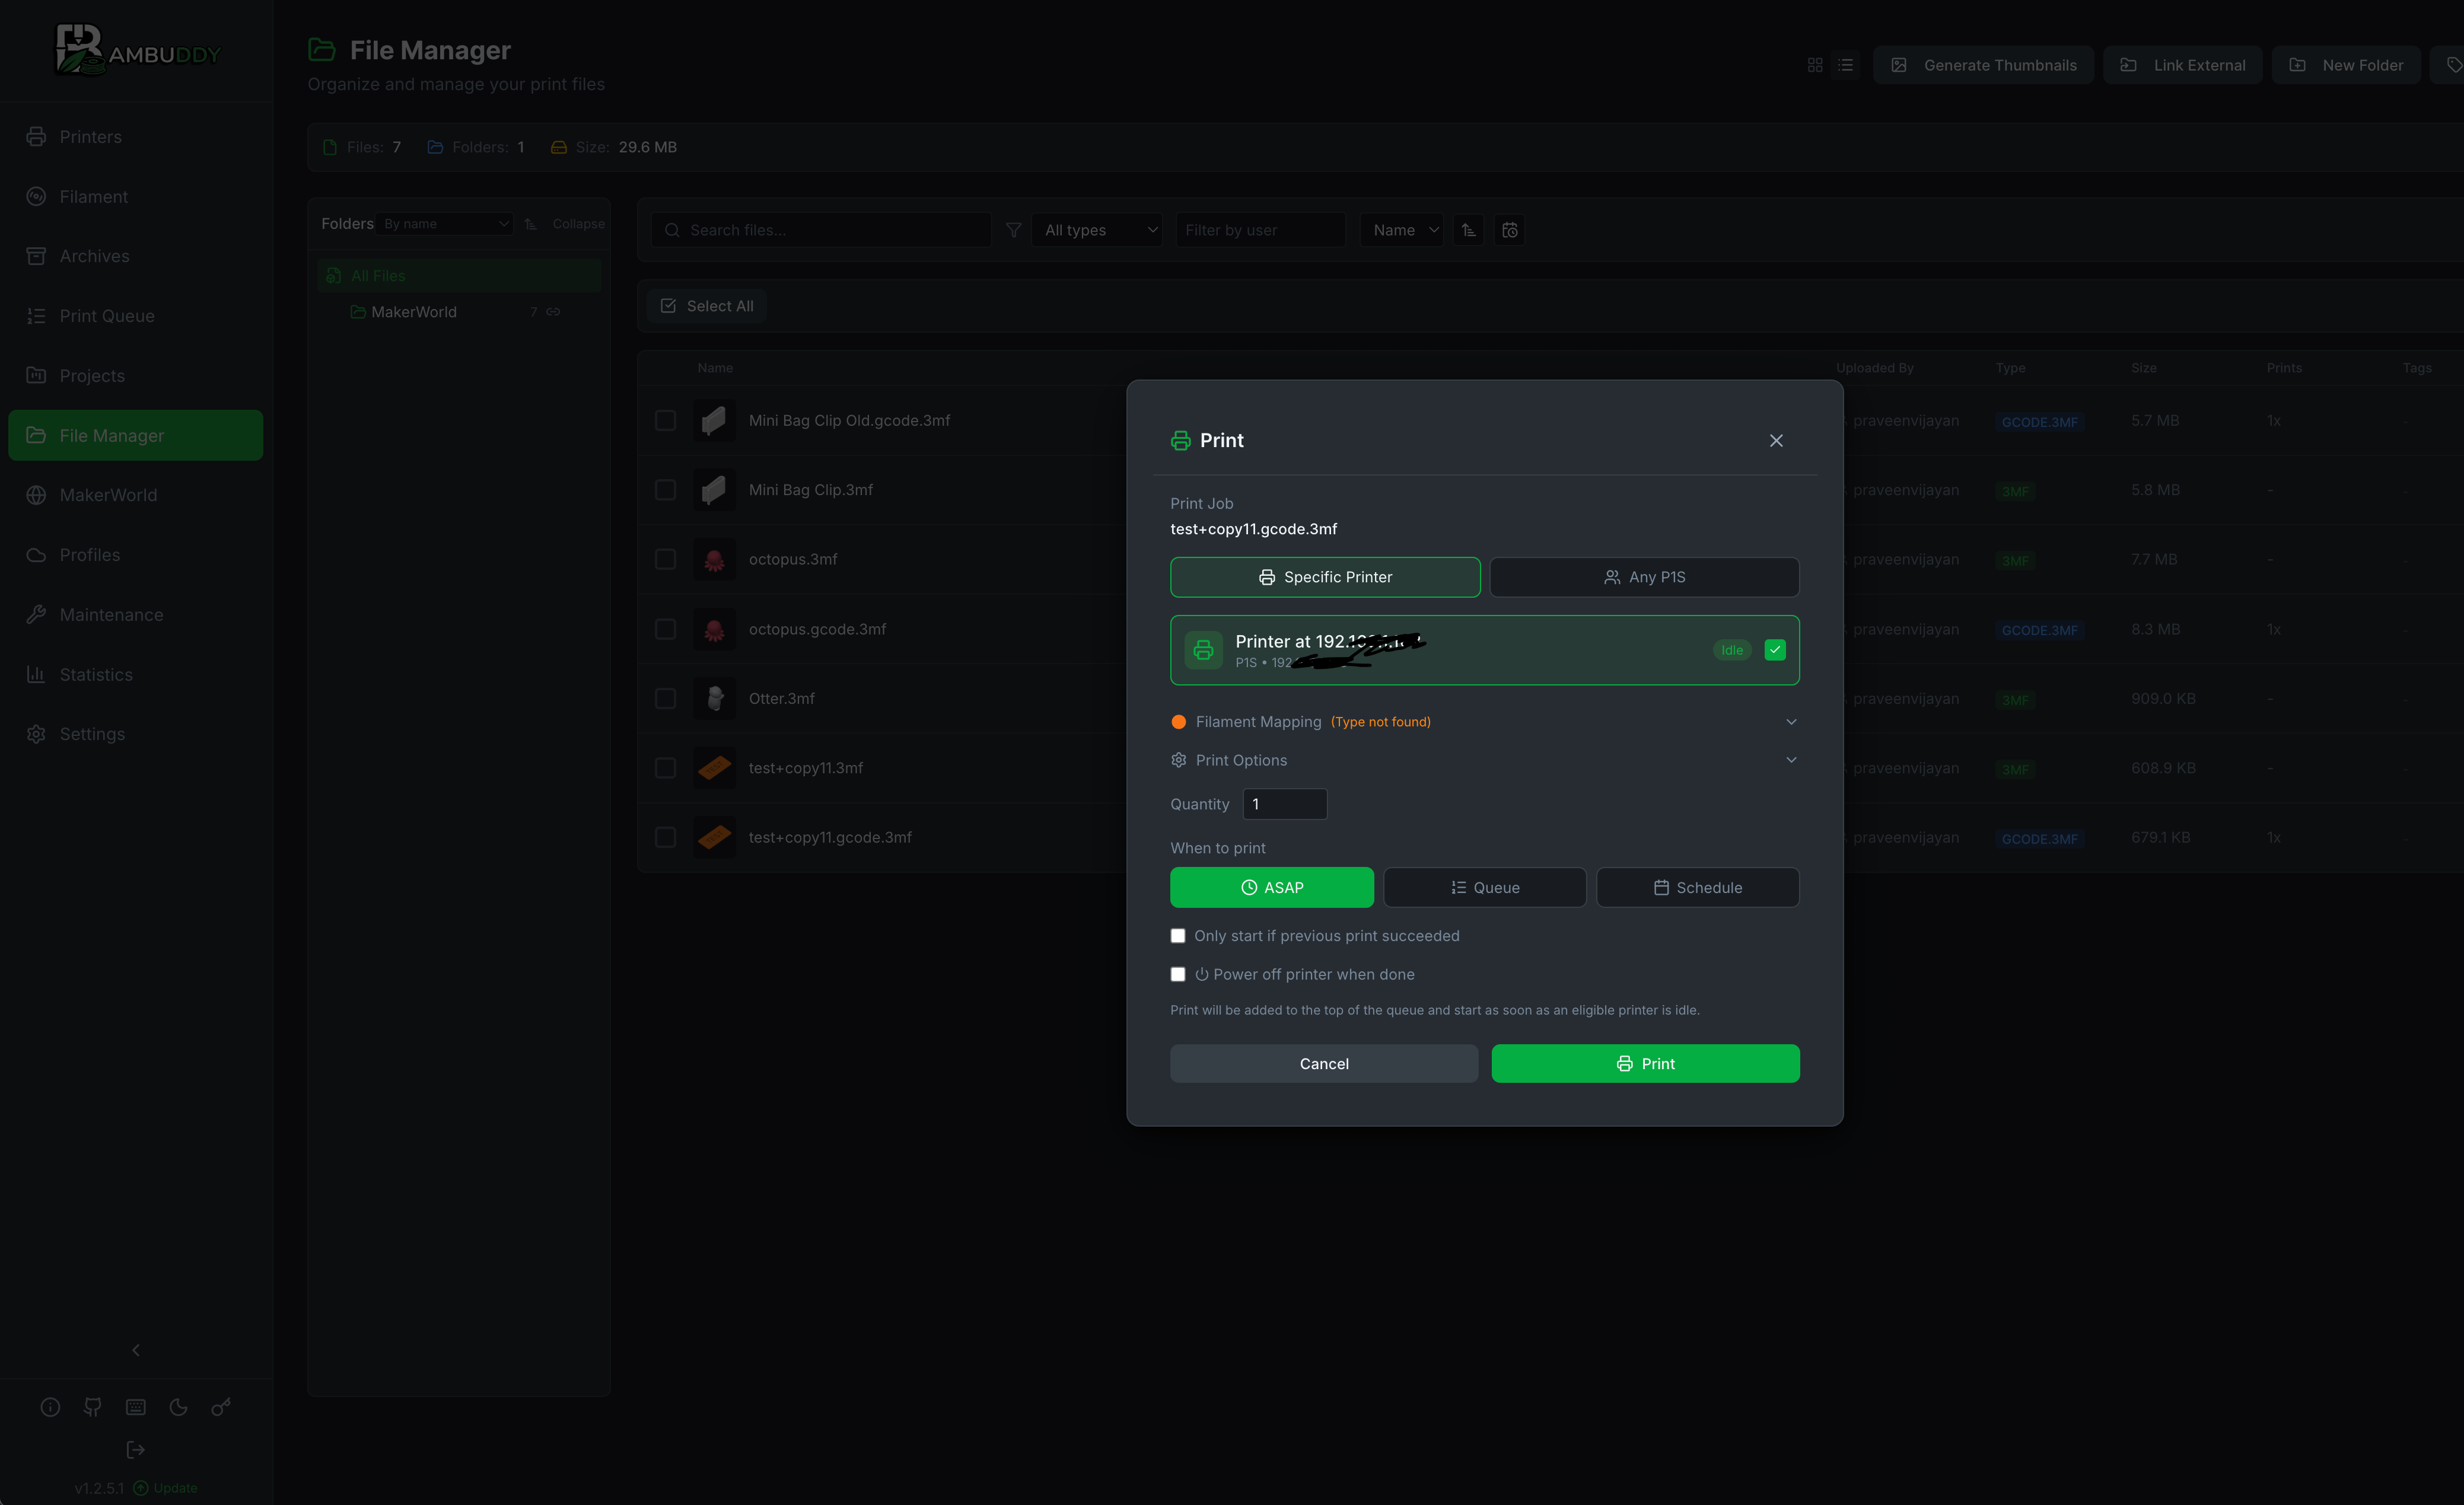
In File Manager, select the saved 3MF file and select Slice. The print action does not show for unsliced files.
Right-click the sliced file and select Print. Select the printer and the AMS mapping. Start the print.
Watch the print. After this test, only the remote connections remain.
Known problems in the UI:
The Print action is in the right-click menu or on the printer icon in list view. A double-click does not open it.
The buttons “Save & Slice in Bambu Studio” and “Open in Slicer” open the desktop application. Ignore them. The server-side slicer replaces them.
Select profiles made for the P1S, P1P, or X1. These are compatible. G-code made for the A1 is for a different machine.
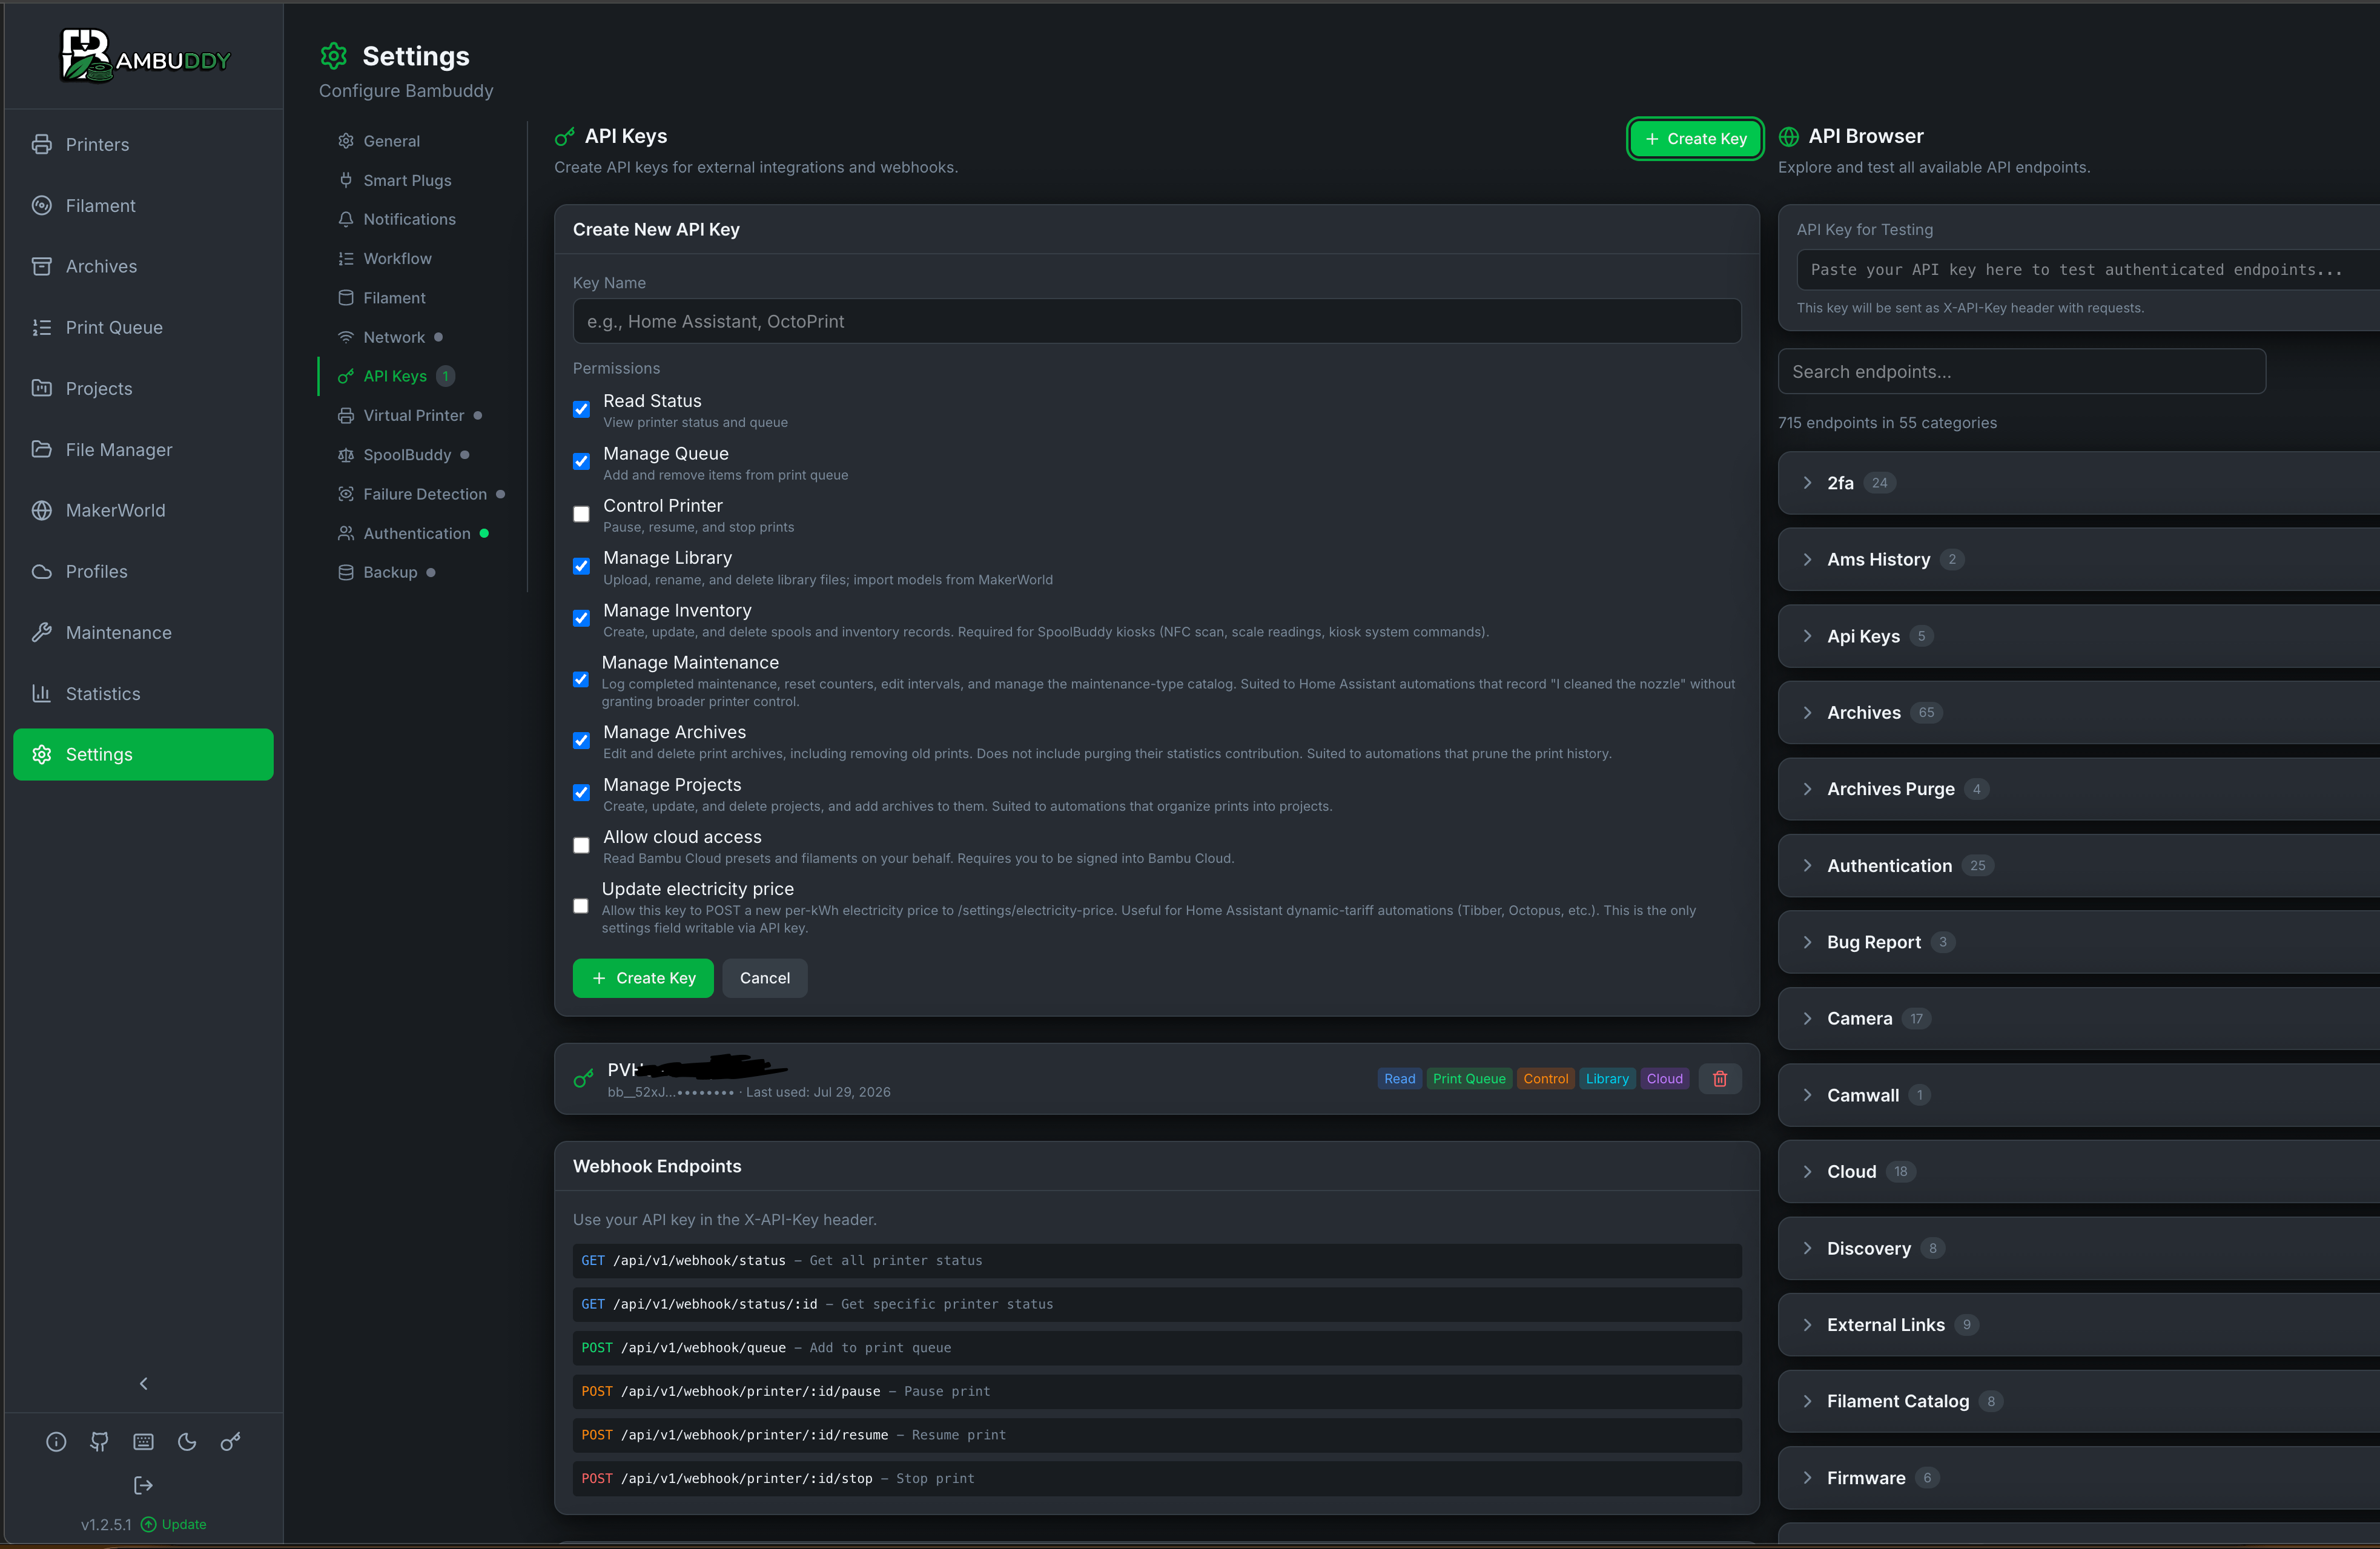
In Bambuddy, open Settings → API/Security and create an API key. This key is the only credential that the agent gets. Never give the agent the UI login.
Bambuddy enforces key permissions. In a live run, a key without can_control_printer had its clear-plate call rejected. The agent needs these permissions:
This step creates the one public entrance.
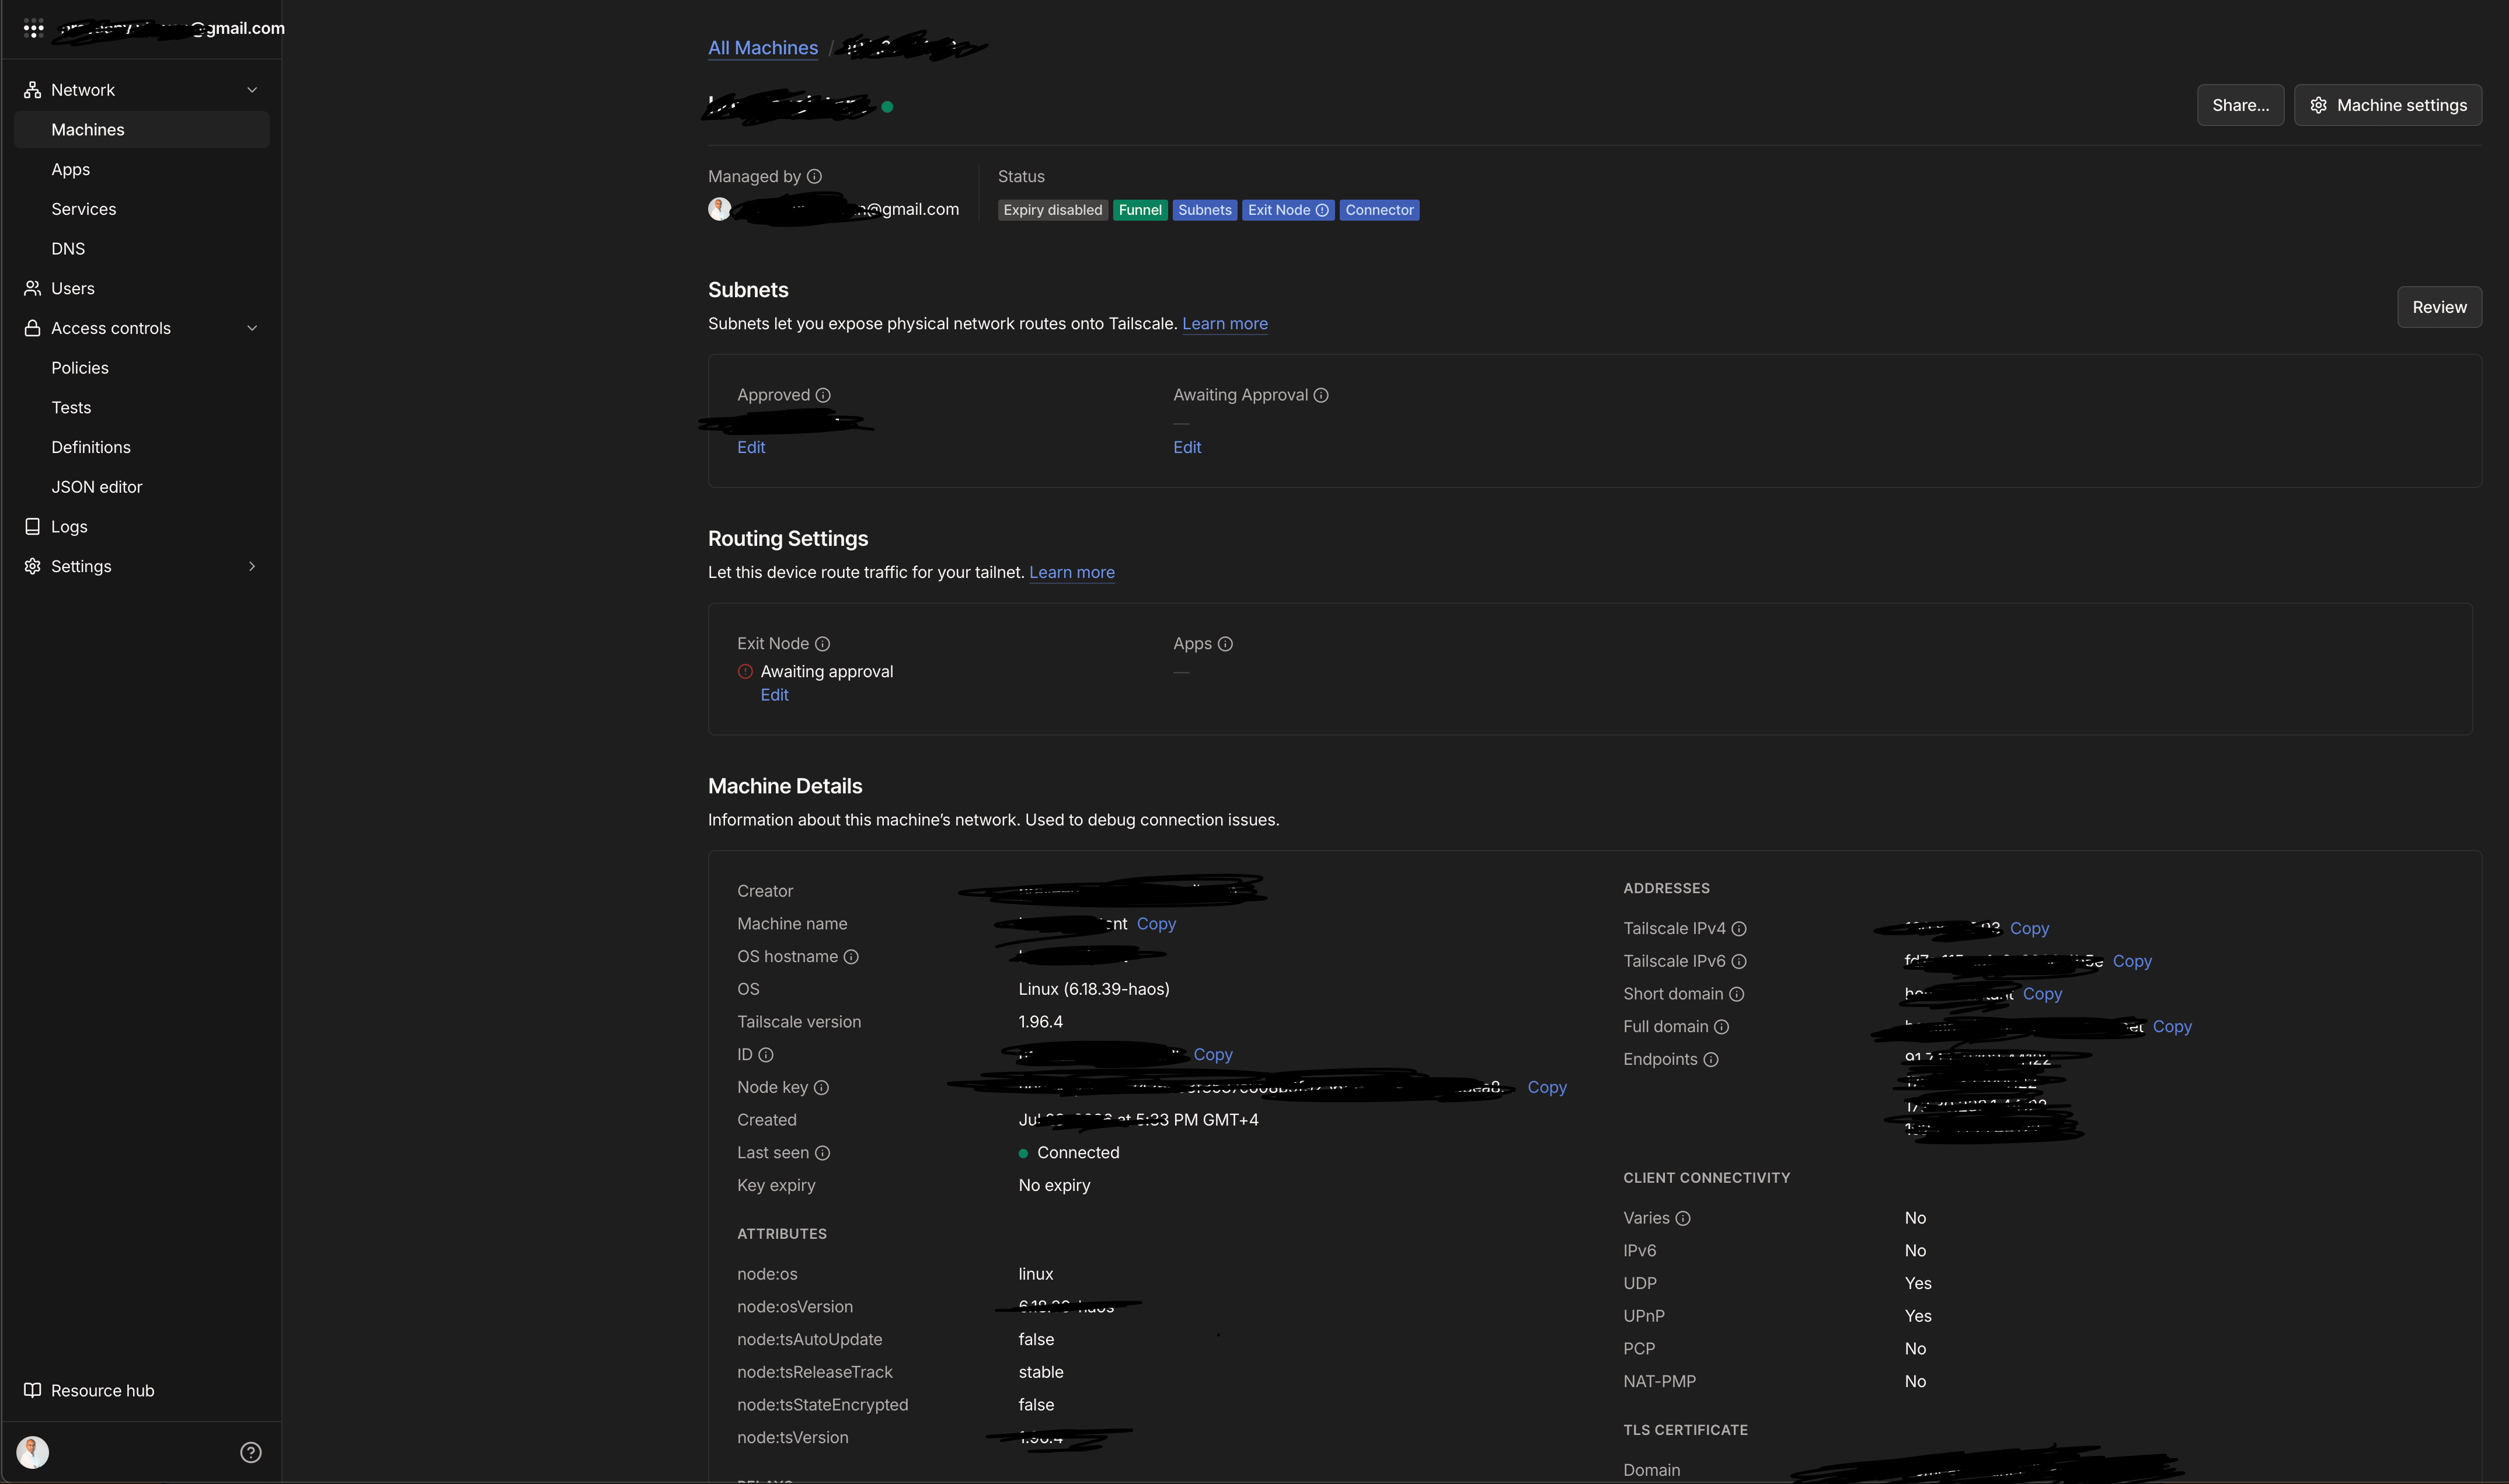
Install the Tailscale add-on (official community). Start it. Open the auth URL from the Log tab. Sign in and authorise the device.
In the Tailscale admin console, disable key expiry for the machine. Approval of subnet routes and exit node is optional (see section 6).
The funnel command runs in the Tailscale add-on container. Install the Advanced SSH & Web Terminal add-on and set a password. Disable Protection Mode on its Info page. Docker access needs this. Start the add-on and open the terminal.
docker exec addon_a0d7b954_tailscale /opt/tailscale funnel --bg 8000After executing this command, you'll receive a public Tailscale URL pointing to your Bambuddy. This URL remains accessible even after starting your mission, provided the configuration persists. It uses HTTPS, with TLS managed by Tailscale. When accessing this URL, you'll need to authenticate with your username and password, so ensure they are strong.
Hermes (Nous Research) supports skills in the SKILL.md format. It has the skill_manage tool and the /skills commands.
Give Hermes the
3df-printSKILL.md text. Tell it: “Create this skill via skill_manage, exactly as written.” 🔗 Full SKILL.md - https://drive.google.com/file/d/13Ea2VdlN0Ceg4SqLcpspNsNJ_YY-LpGr/view?usp=sharingAdd the environment variables in hPanel → Hermes Agent → Dashboard → Environment:
BAMBUDDY_URL=https://homeassistant.tailXXXX.ts.net
BAMBUDDY_API_KEY=bb_...
Do not use
.envor shell profile files. Those files do not persist on the managed platform.Restart Hermes. The variables load at the start.
From WhatsApp, send a MakerWorld URL and the text “print this.”
Costs depend on your existing environment and ecosystem. In my case, no new hardware is required because the Home Assistant box is already available. I’m using the Intel NCU. There is also no new subscription. Tailscale has a free tier, and BabuBuddy is AGPL. It’s an add-on and free. Hermes is hosted in Hostinger, and I am paying 4$ per month. The build time will take two to three hours to complete everything: the installation, configuration, skill mapping, everything. So it’s a weekend afternoon project.