I’ll be honest: this blog is mainly a form of documentation for myself, a record of what I did and what I learned while setting up an ad-blocking mechanism on my home server. While running Pi-hole is relatively straightforward, using it properly usually means changing your router’s DNS settings to point to the Pi-hole server. That’s a step I wasn’t entirely comfortable with.
The main issue is reliability. If your DNS server ever goes down, you’re suddenly stuck without internet access and forced to log into your router to fix things. In my case, that’s especially annoying because my router’s admin interface is entirely in German, with no option to change the language. It’s not a deal breaker, but it definitely adds unnecessary friction. On top of that, routing all your devices through Pi-hole isn’t always desirable. You may not want ad blocking on every single device in your network, right?
This is where Tailscale comes into the picture - and where the blog shifts from being just a “Pi-hole setup” to a “Pi-hole + Tailscale setup.” Instead of modifying router-level DNS settings, Tailscale allows you to selectively route only specific devices through Pi-hole. This gives you fine-grained control over which devices have ads blocked, without putting your entire network at risk if something goes wrong.
High level overview of what we are going to do
Before getting into the setup, here’s a quick overview of what we’re building. Pi-hole will run inside a Docker container on my home server and act as the DNS server. Tailscale will be used to securely connect selected devices to this server, allowing them to use Pi-hole for DNS without modifying any router-level settings.
For some quick context: Pi-hole is a network-level ad blocker. Instead of running inside a browser, it works by blocking requests to known ad and tracking domains at the DNS level. This means ads are filtered out before they ever reach your device, and the blocking applies to all apps and browsers that use DNS, without needing to install anything locally.
Optional: How everything works under the hood
This section is optional and a bit more technical. If you just want to get Pi-hole and Tailscale up and running, feel free to skip ahead to the next section.
If, however, you’d like a deeper understanding of how DNS resolution works, how devices get their network configuration, and how Tailscale and Pi-hole fit into the picture, this section walks through those concepts step by step.
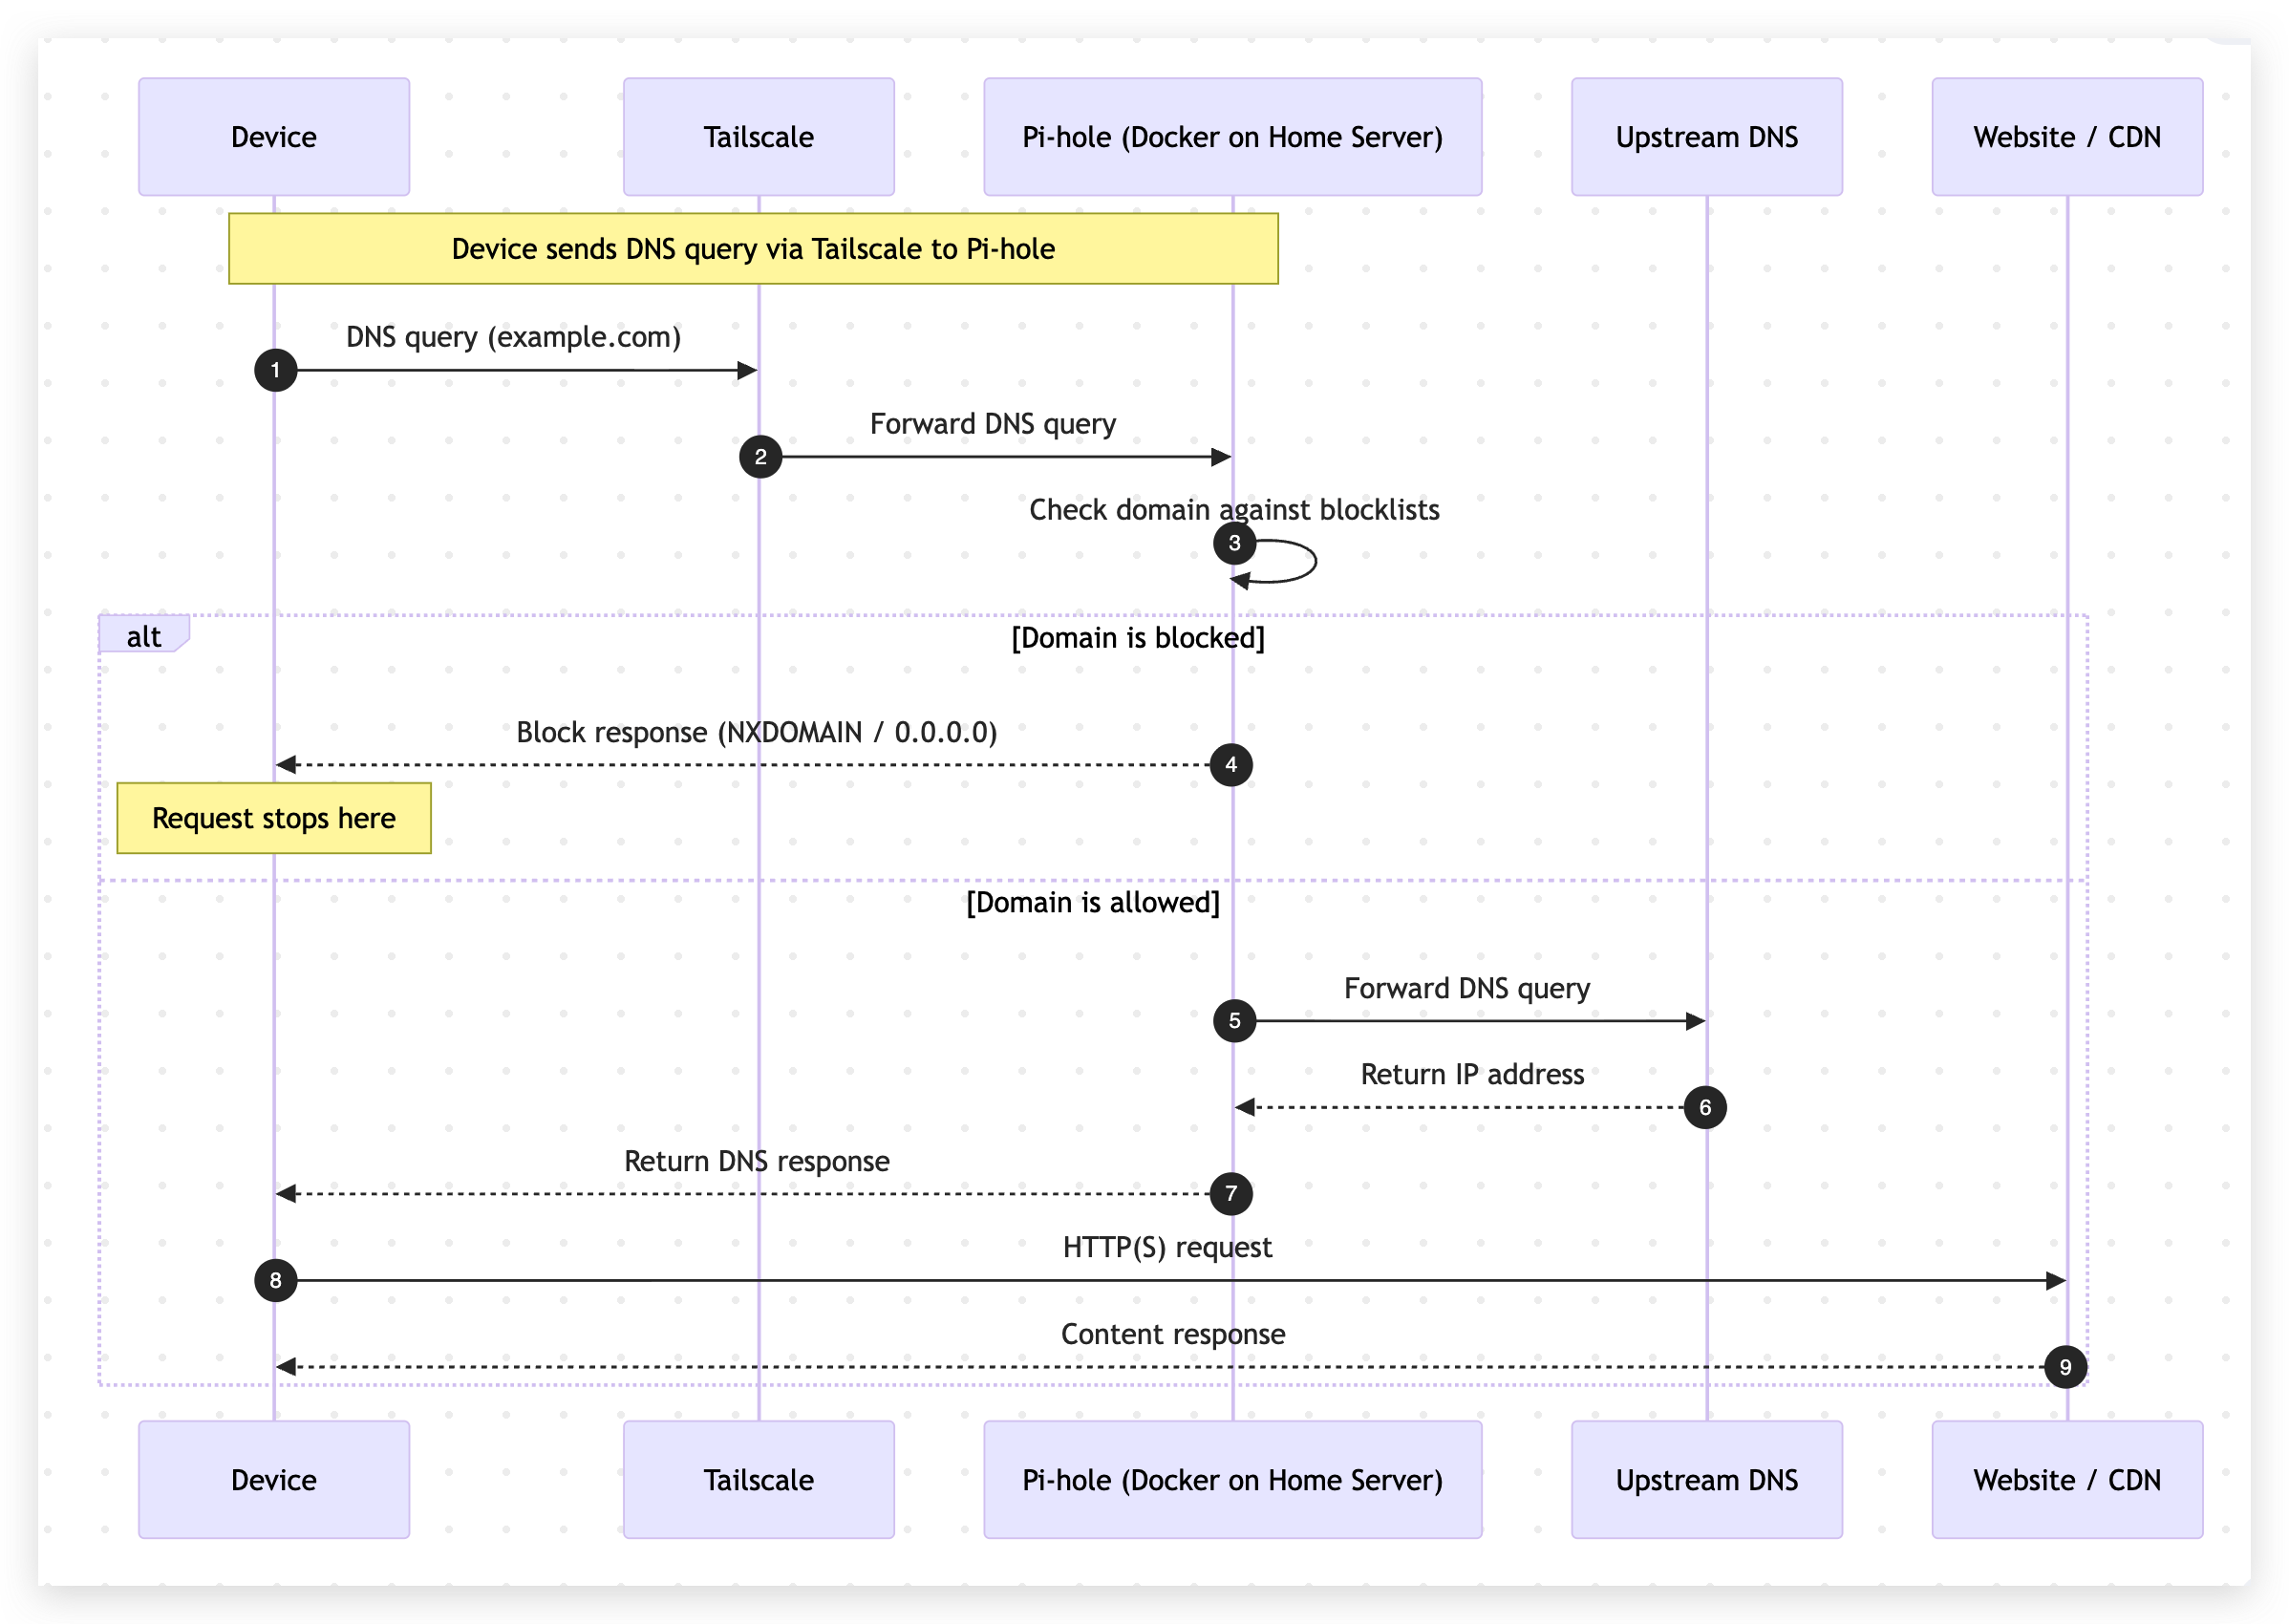
Here is a small sequence diagram that illustrates the flow of DNS requests in this setup for requests that are blocked and allowed by Pi-hole:
DNS
DNS (Domain Name System) is responsible for translating human-readable domain names (like example.com) into IP addresses that computers can communicate with.
Whenever a device wants to access a website, it performs a DNS lookup to determine where that service is hosted. If DNS stops working, most internet access effectively stops as well.
This makes DNS a critical component of any network and also a powerful place to apply filtering and control.
Tailscale
Tailscale is used in this setup to connect selected devices to the home server without exposing anything to the public internet or modifying the existing network configuration.
Under the hood, Tailscale creates a private network between all devices connected to the same account. Each device authenticates using your Tailscale identity, receives a stable Tailscale IP address, and can securely communicate with other devices in that network as if they were on the same local network. Even if they are physically located elsewhere.
Unlike traditional VPNs, Tailscale does not rely on a single central server to route all traffic. Instead, it forms a mesh network where devices connect directly to each other whenever possible. This reduces latency, improves reliability, and avoids unnecessary bottlenecks. From the perspective of the operating system, the connection behaves like a normal network interface.
One of the most useful features of Tailscale in this setup is its DNS integration. Tailscale allows you to define global DNS servers that apply only within the Tailscale network. This makes it possible to override DNS resolution for connected devices without touching router-level settings or affecting the rest of the network.
By pointing Tailscale’s DNS configuration to the home server, only devices connected through Tailscale will attempt to use Pi-hole for DNS. At the same time, fallback DNS servers can be configured to ensure that name resolution continues to work if the Pi-hole service is temporarily unavailable.
In practice, this means you get fine-grained control over which devices use Pi-hole, a stable and secure connection to the home server, and a setup that remains resilient even when parts of it are offline.
Pi-hole
Pi-hole acts as the DNS server for selected devices in this setup, sitting between those devices and the wider internet. Instead of simply resolving domain names, it inspects DNS queries and decides whether a request should be allowed or blocked.
The core idea behind Pi-hole is simple: most ads, trackers, and many malicious services rely on well-known domain names. Pi-hole maintains curated block lists containing these domains. When a device makes a DNS request that matches one of them, Pi-hole responds with a blocking answer, preventing the connection from ever being established. Since the request is stopped at the DNS level, no ad content is downloaded and no client-side extensions are required.
Because this filtering happens at the network layer, it applies uniformly across browsers, applications, and even devices that do not support traditional ad blockers. From the client’s perspective, the request simply fails to resolve.
Pi-hole also provides detailed visibility into DNS activity through its query log. Every request, allowed or blocked, is recorded, making it easy to see which domains devices are attempting to reach. This is invaluable not only for understanding what is being blocked, but also for troubleshooting applications, identifying misbehaving devices, and gaining insight into overall network behavior.
In this setup, Pi-hole becomes more than just an ad blocker it serves as a centralized control and observability point for DNS traffic.
With the background out of the way, it’s time to get our hands dirty and start the actual setup.
Things you will need to install
-
Docker
Install Docker on your home server. -
Tailscale
Install Tailscale on your home server and on the devices you want to use Pi-hole as a DNS server.
Download link: https://tailscale.com/download
Setup
We’ll begin with Tailscale, as it forms the foundation for everything that follows. Getting connectivity and DNS routing in place first makes it easier to add Pi-hole and verify each step as we go.
Tailscale setup
We will start by setting up Tailscale before Pi-hole is running. This is intentional and safe, and I’ll explain why later.
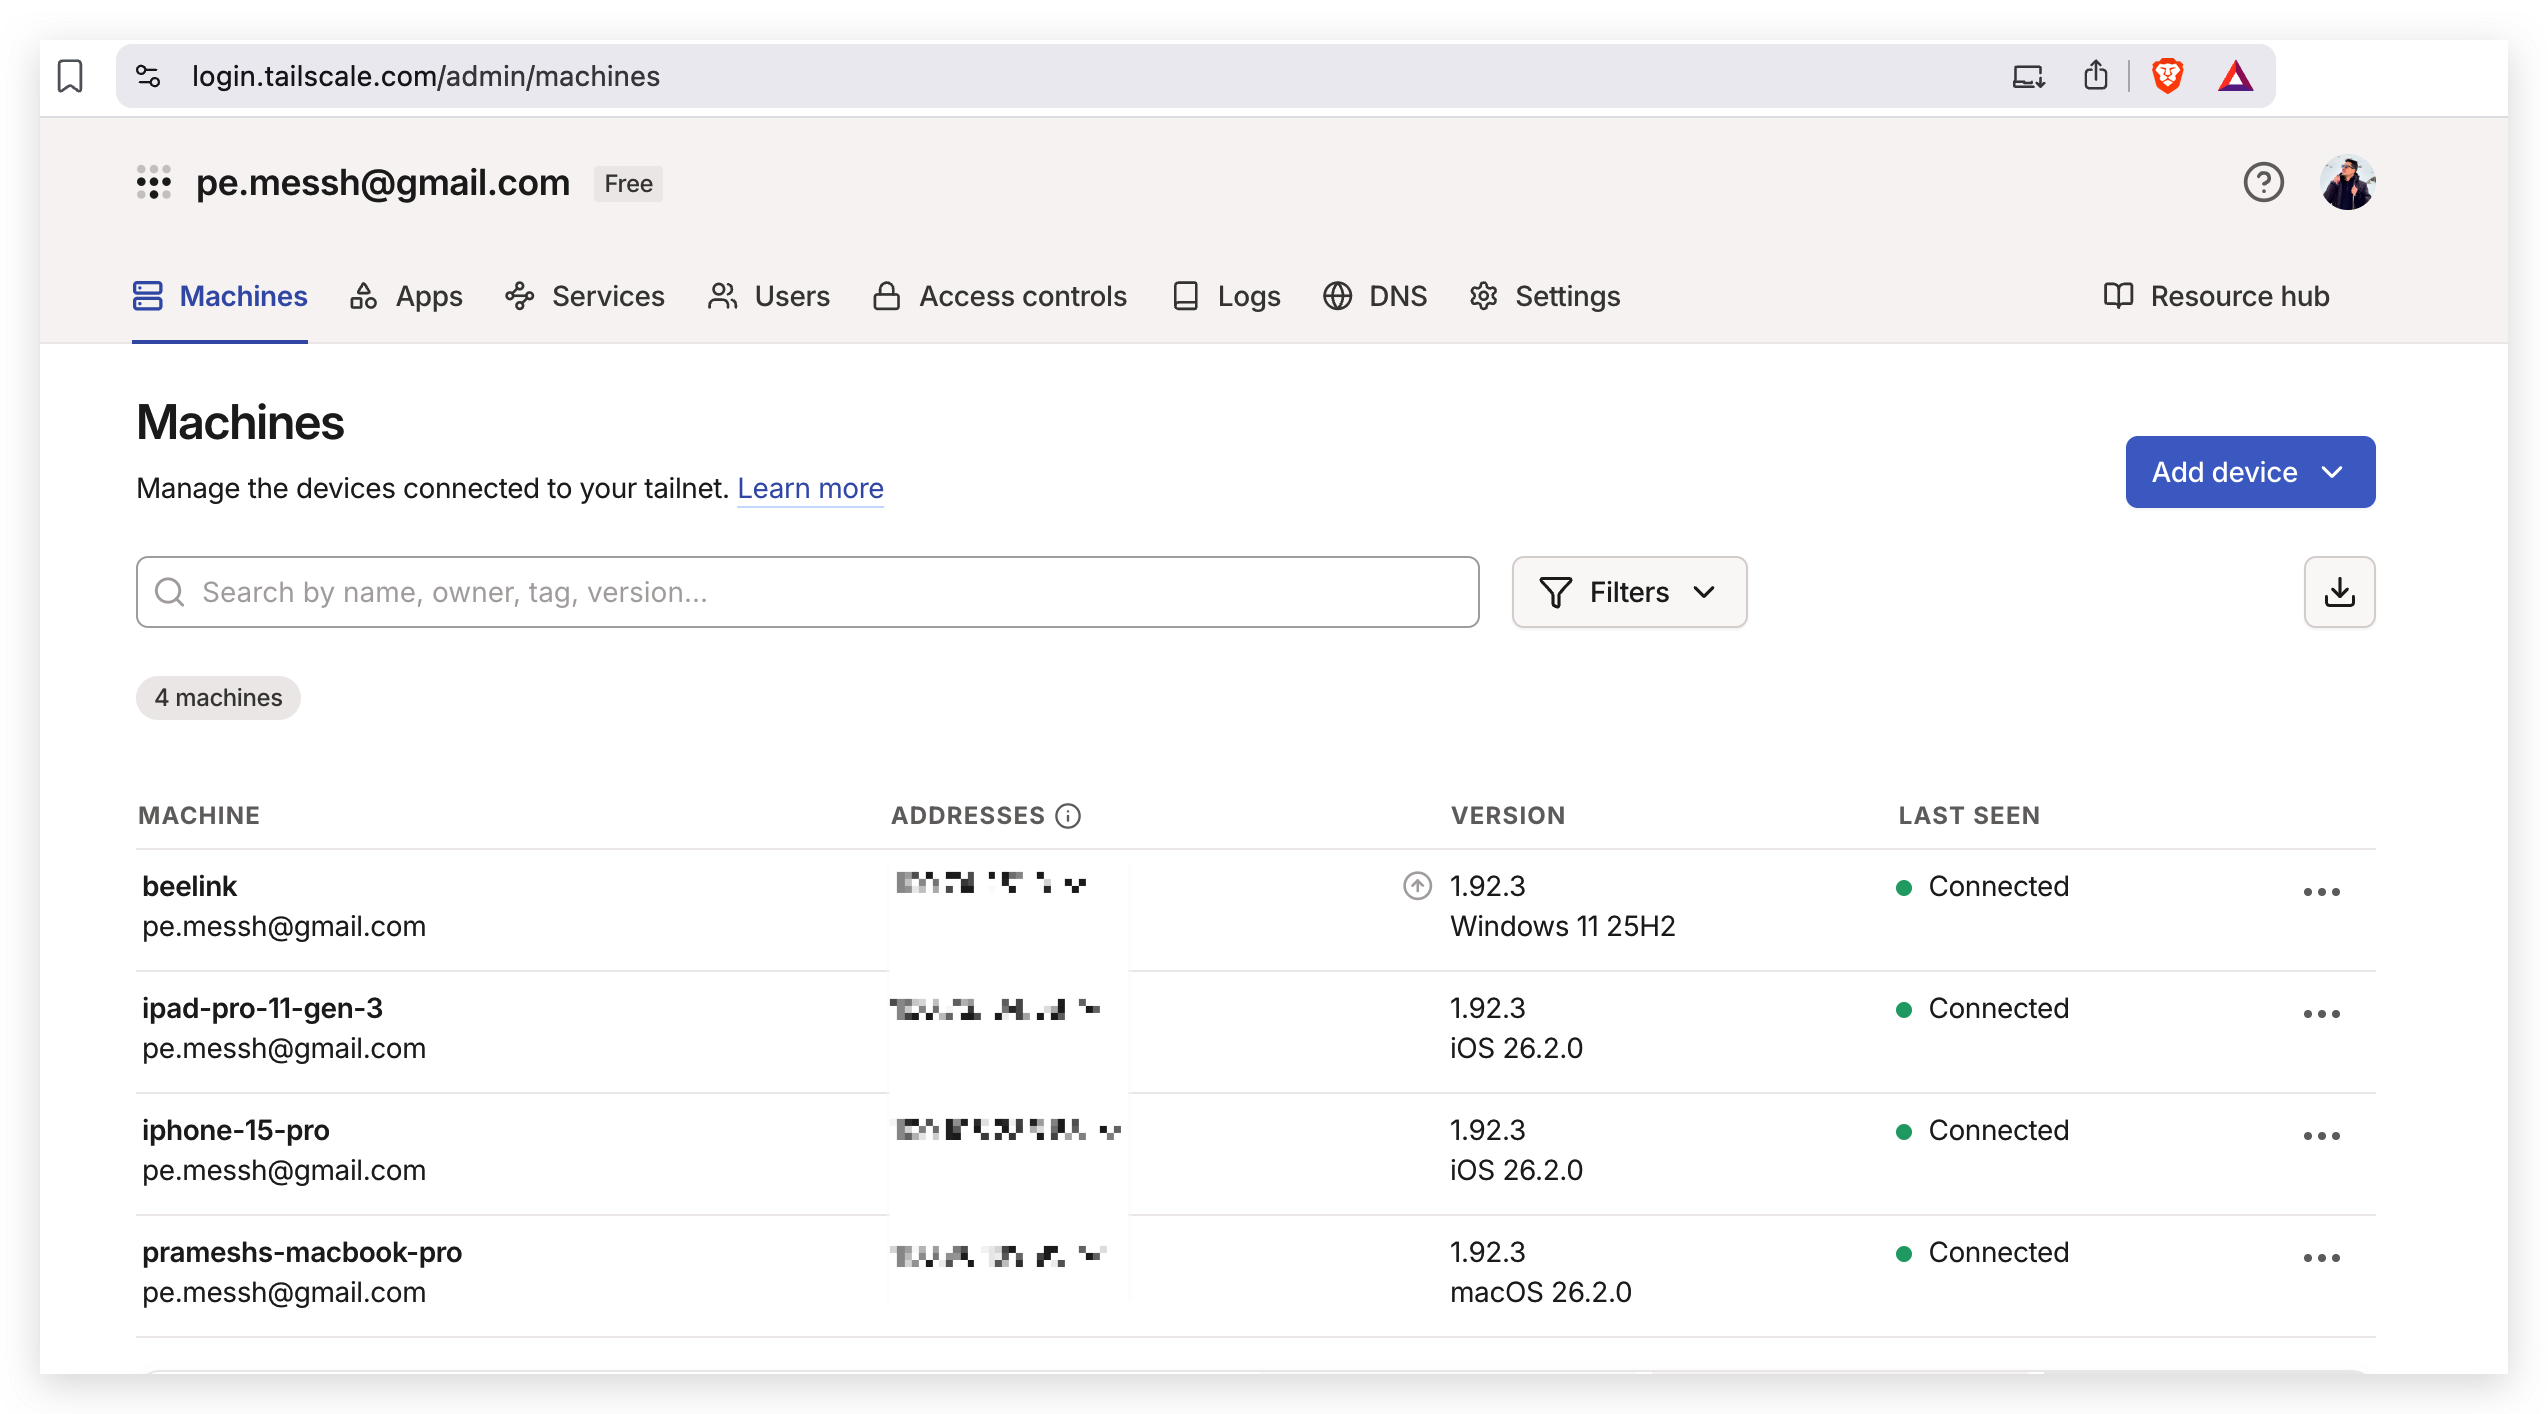
Before we begin, this page is where you can see all your connected devices and their Tailscale IP addresses:
https://login.tailscale.com/admin/machines
Now, here’s what needs to be done.
-
Head over to the Tailscale admin DNS settings. You can access it here:
https://login.tailscale.com/admin/dns -
In the Global nameservers section, click
Add a global nameserver.
SelectAdd nameserver > Custom nameserver, then enter your home server’s Tailscale IP address.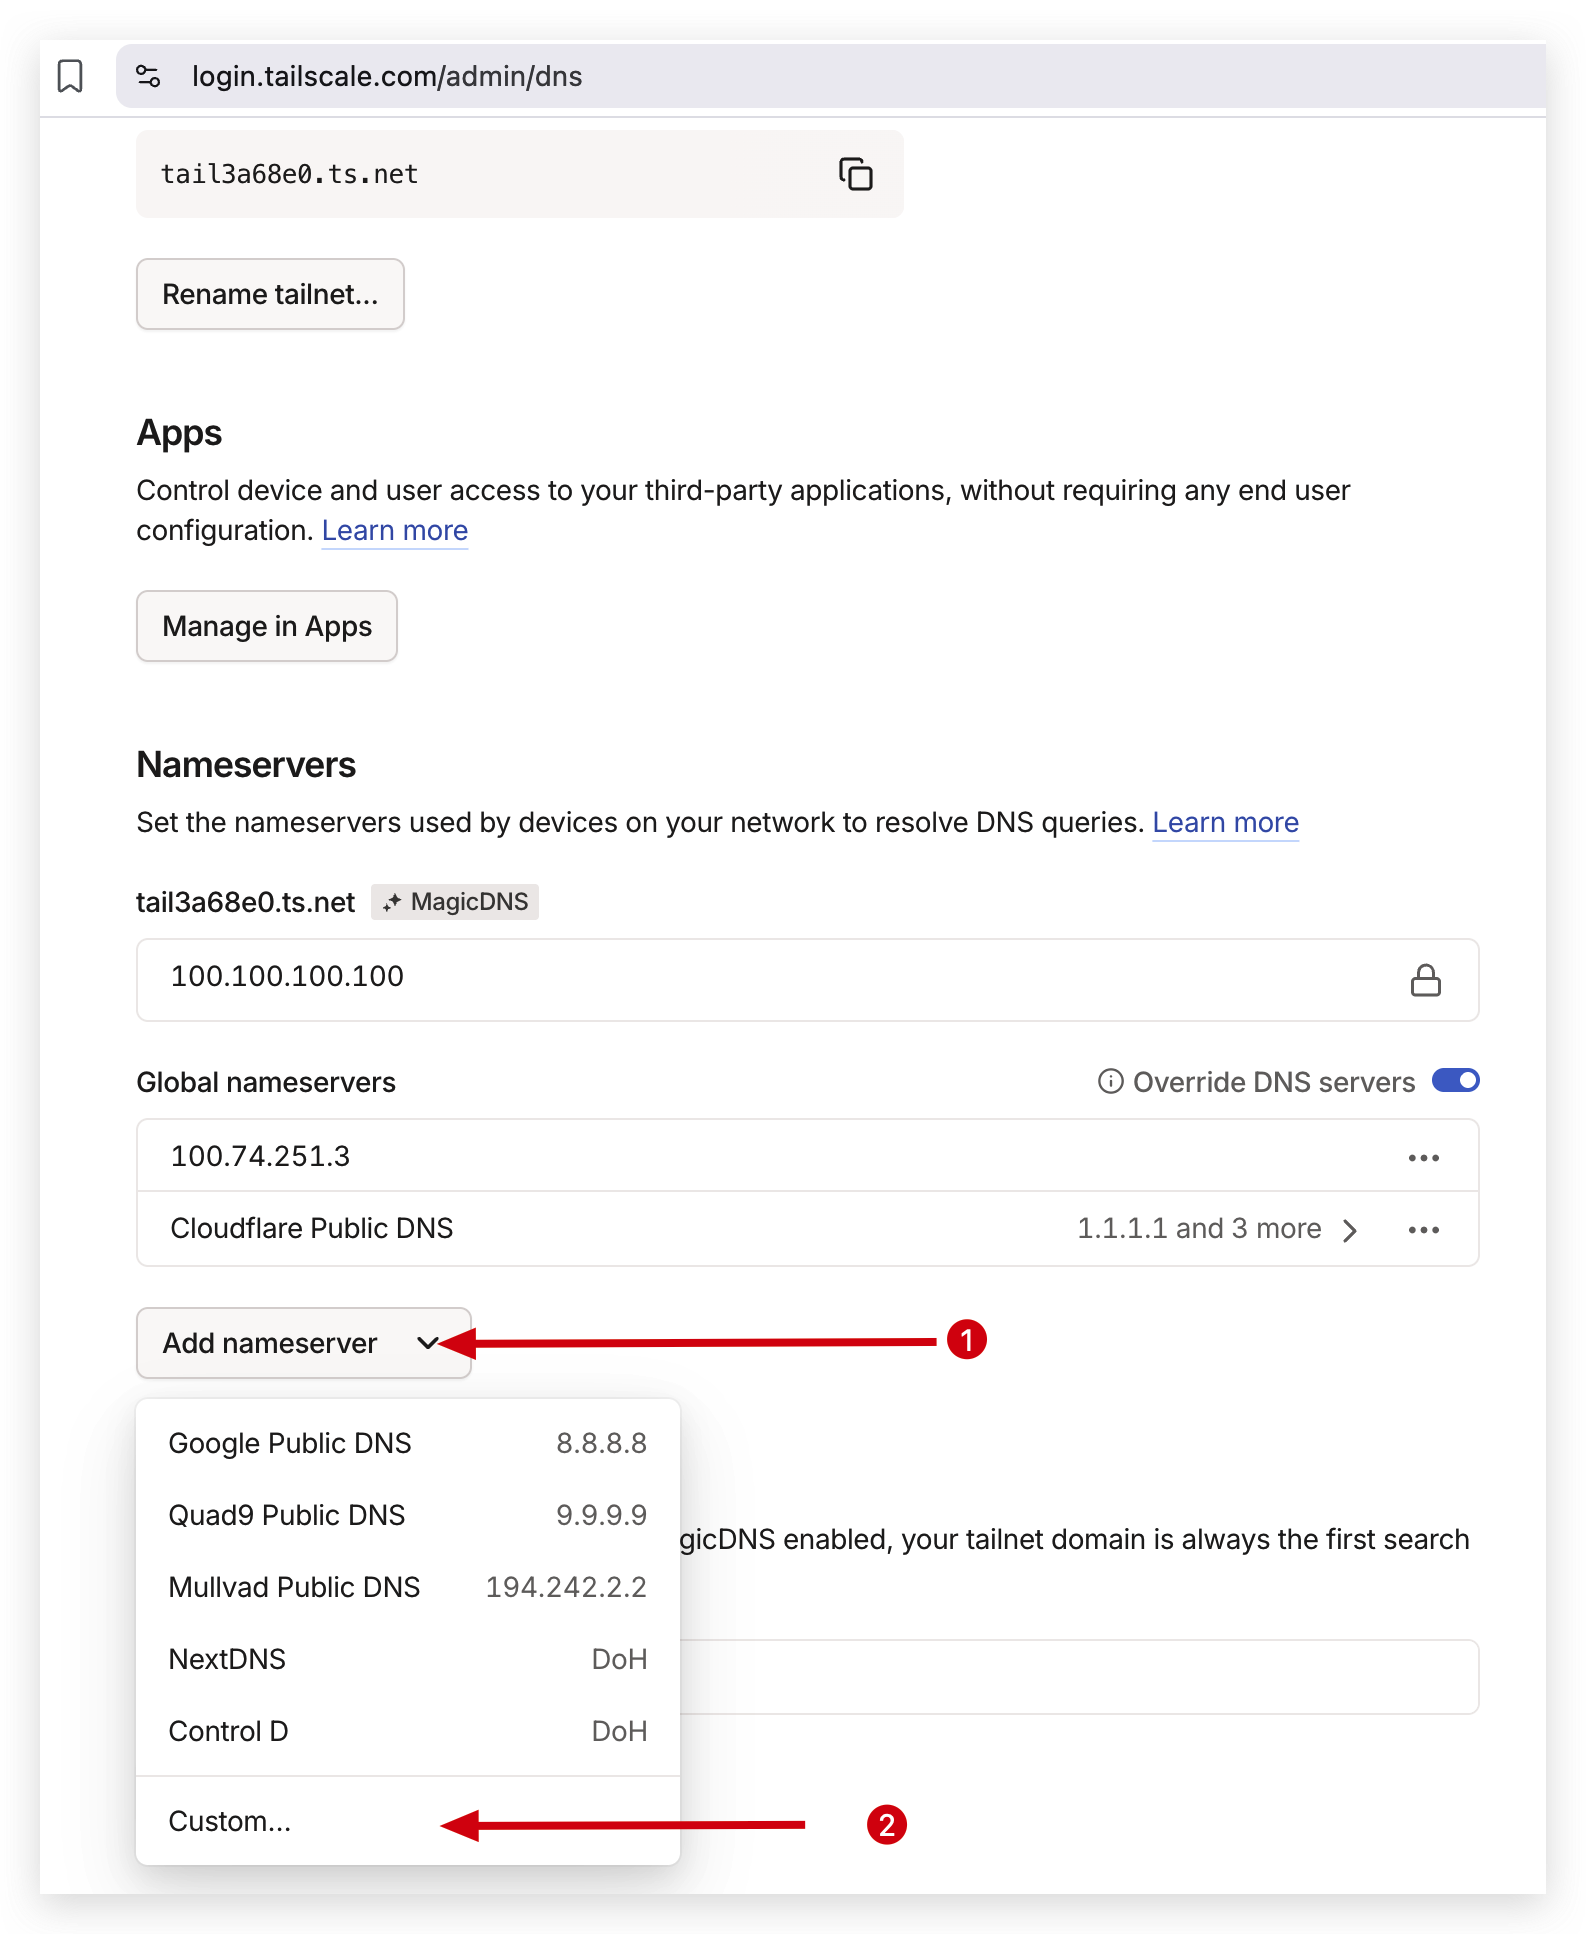
-
The Tailscale IP address should look something like
100.10.1.12.
After entering the IP address, click Save.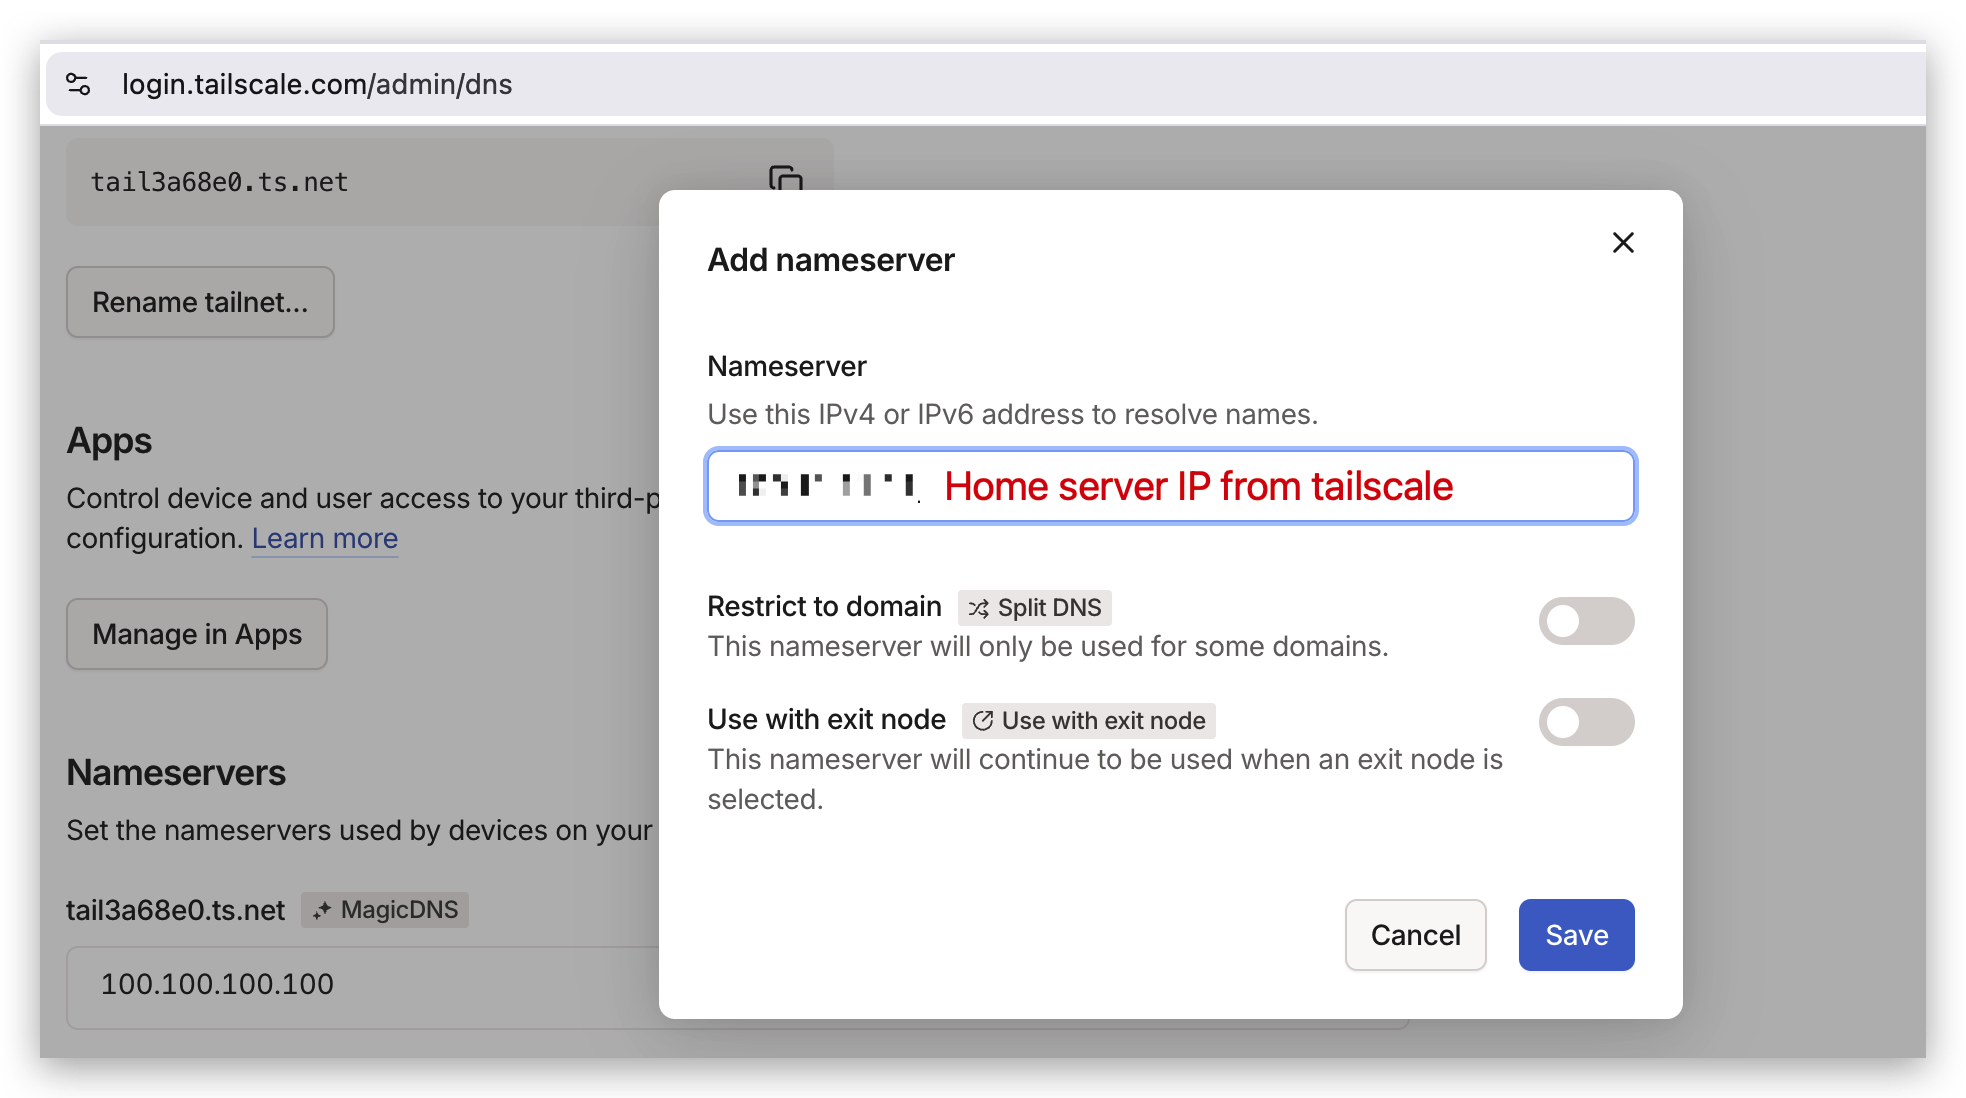
-
Add a second Global nameserver as a fallback.
You can useGoogle,Cloudflare, orQuad9—any of them are fine.
After that, enable theOverride DNS serversoption.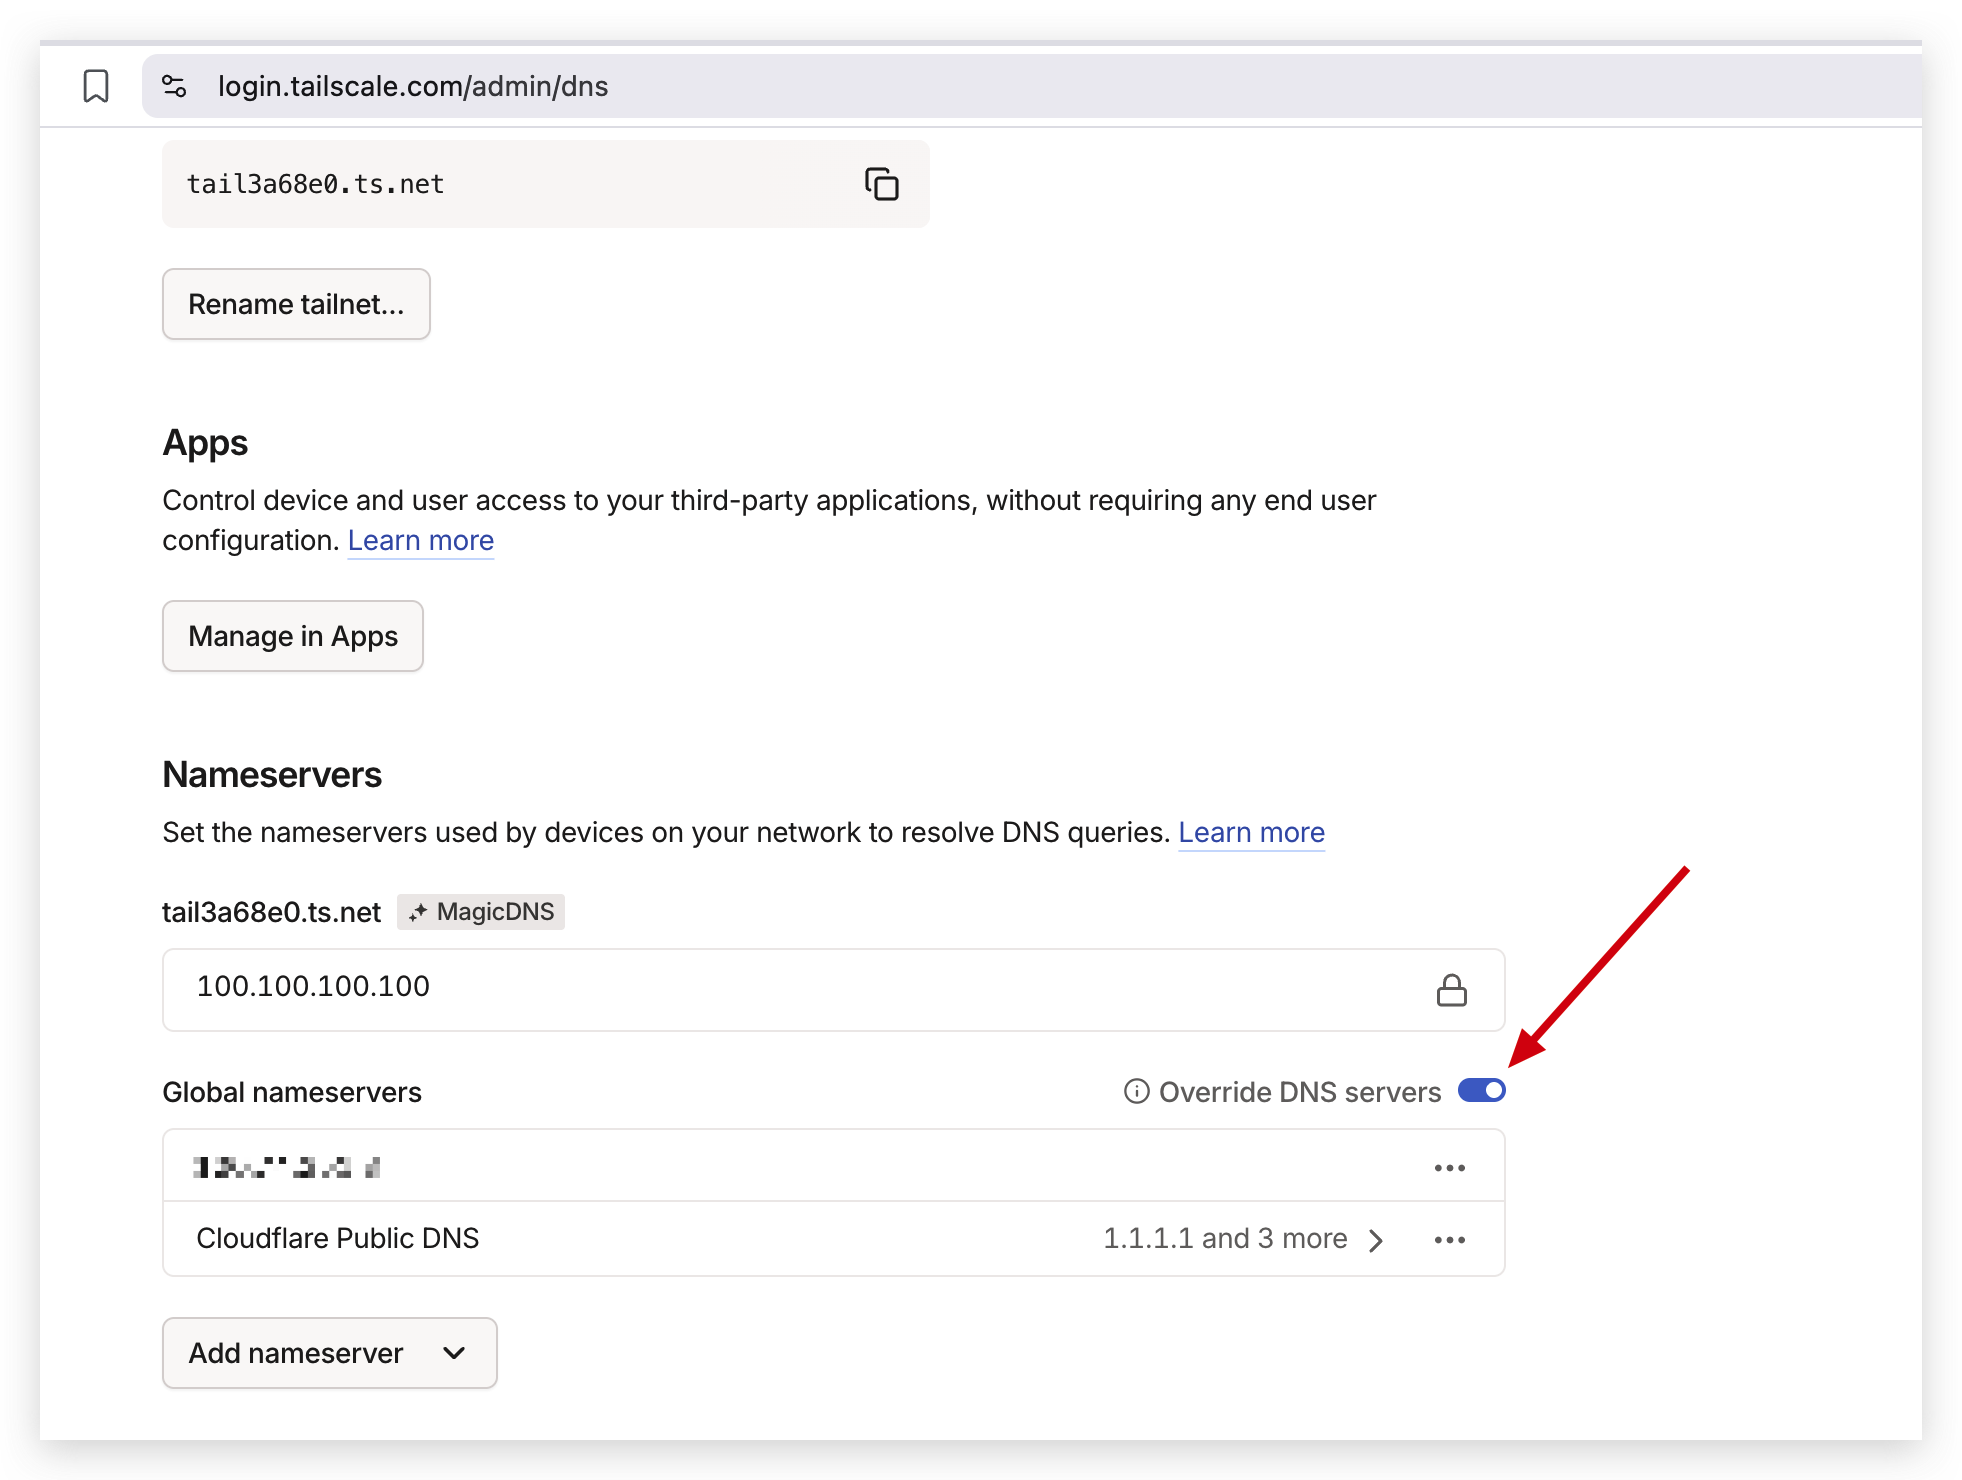
This is all that’s required on the Tailscale side.
At this point, all devices connected to your Tailscale network will attempt to use the Pi-hole server as their DNS server. Since we’ve configured a fallback DNS provider, your internet connection will continue to work even though Pi-hole is not running yet. This is the reason why we set up Tailscale first—it ensures that your devices remain connected to the internet while we configure Pi-hole.
Pi-hole setup
With Tailscale configured, the next step is to set up Pi-hole on the home server.
Pi-hole will run inside a Docker container and act as the DNS server for devices connected via Tailscale. Since Tailscale is already configured to forward DNS queries to this machine, DNS resolution and ad blocking will start working as soon as Pi-hole is up and running.
It is very simple to get Pi-hole running using Docker. Here’s the command you need to run:
Create a docker-compose.yml file and copy and paste the content from this link: https://github.com/pi-hole/docker-pi-hole/#running-pi-hole-docker
You can make modifications to the file as per your requirements in this file. This basically is the configuration file for Pi-hole.
After that, run docker-compose up -d to start the Pi-hole container.
And that’s it! Pi-hole should now be running and ready to accept DNS queries from your Tailscale-connected devices. To check if you can access the Pi-hole dashboard, open a web browser and navigate to http://<HOMESERVER_IP>:<PORT>/admin (if you want to access it from any other device) or localhost:80/admin if you want to access it from the home server itself.
Note: You can use the home server’s Tailscale IP address to access the Pi-hole dashboard from any device connected to your Tailscale network. For example, if you want to access the dashboard from your phone, simply make sure the device is connected to Tailscale. You can then open the Pi-hole admin interface using the server’s Tailscale IP address.
Tailscale IP addresses typically look like 100.x.x.x, so the dashboard would be accessible at a URL like:
http://100.x.x.x/admin
This works because Tailscale places all devices connected to the same account into a private mesh network, allowing them to communicate with each other as if they were on the same local network.
Assigning a static IP to your home server
This is the nice part of the setup. Since we’re using Tailscale, we don’t actually need to assign a static IP address to the home server at the router level.
Tailscale automatically assigns a stable IP address to every device connected to the same account. This IP remains consistent across reboots and network changes, and it’s the address used by our devices when sending DNS queries to Pi-hole. As long as Tailscale is running, the home server is always reachable at the same IP, without any additional router configuration.
Final thoughts
At this point, the setup is complete. We now have a Pi-hole instance running on a home server, selectively providing DNS-based ad blocking to chosen devices via Tailscale—without modifying any router-level settings.
This approach keeps the network flexible and resilient. Devices that should use Pi-hole can opt in simply by connecting to Tailscale, while everything else continues to function as before. If Pi-hole ever goes down, fallback DNS ensures connectivity, and the rest of the network remains unaffected.
More importantly, this setup avoids many of the common pitfalls of network-wide DNS changes. There’s no risk of accidentally taking the entire network offline, no need to fight router interfaces, and no requirement for static LAN IPs thanks to Tailscale’s stable addressing.
From here, there’s plenty of room to extend the setup by adding Unbound for recursive DNS resolution, fine-tuning block lists, or using Pi-hole’s query logs to better understand network traffic. But even without those extras, this configuration already strikes a good balance between control, reliability, and simplicity.
WITH THAT SAY GOODBYE TO ADS! 😉
If this guide helped you, consider experimenting further and adapting it to your own needs. If you run into issues while setting this up or have questions about adapting it to your own environment, feel free to reach out. I’m happy to help where I can and would love to hear how this setup works for you.