Claude Code has seen an incredible rise in popularity since its release in February. This guide will help you get up to speed with all the latest suggestions made by Anthropic and give you an entire overview on using Claude Code, from the set up to advanced techniques that were honed from my own and other engineers’ extensive use of Claude Code these past few months. A few weeks ago, I gave a talk named Claude Code: Tips and Tricks alongside Patrick Ellis and Galen Ward at Foundations in Seattle, Washington. This guide pulls heavily from that talk and should help you both learn about what Claude Code’s uses are, as well as how to get the most out of it. You can find the complete talk here. Whether you’re just starting to use Claude Code or have been using it for some time, there will be something here that will help you improve your development workflow and get more out of Claude Code. Below is the general structure of this guide. Feel free to jump to the section that most fits your level. At the bottom, I have a cheat sheet with all the tips mentioned here in a condensed format. Here’s how this article is structured: Now, let’s dive into how to use Claude Code and how to get the most out of it. Claude Code is no longer the only CLI Coding Agent in town. We have Gemini and Cursor which both have CLI Agents, and a host of open source ones being created. While it’s still uncertain which one will survive in the coming years, it’s clear that for now, Anthropic’s Claude Code has a major head start, and an amazing set of auxiliary tooling that is being built up around it. These tools and the tight coupling between Claude Code and the Claude Sonnet and Opus models make Claude Code an extremely powerful and useful tool. As a result, it’s worth diving into and learning how to use, as it will at the very least improve your development speed. And at the end of the day, it’s just so much fun to use. At its essence, Claude Code is a coding agent. It makes use of an agentic loop to get a task → generate a list of subtasks → execute a task → reflect on the output and either add more tasks or respond with the final output. In the end, Claude Code outputs a combination of Files, Text Output, and/or Bash Commands. Source (Claude Code: Tips and Tricks by Anand Tyagi) This agentic loop is what made Claude Code unique in its implementation and what made it more useful compared to other tools. However in the past few weeks, we’ve seen a host of competitors enter this space, such as Gemini CLI, Codex, and Cursor CLI. But, while this loop is no longer unique to Claude Code, it’s arguably still the best CLI Coding agent currently out there. If you’re just starting off with Claude Code, you can follow the quickstart guide to get set up. Claude Code lives in the terminal with both the input and output flowing through this one channel. Beyond the terminal, Claude Code can also be attached to an IDE, which allows you to view the changes (but not edit them) within the IDE instead of through the terminal’s diff view. Claude Code also makes use of a With this, we have the starting point for what Claude Code is and how to get it set up. After playing around with it for a few minutes, it’s easy to see how Claude Code operates and how it will fit into your development workflow. I suggest you set it up and give it a try before implementing the recommendations from the next section. Context Engineering has been the hot topic of the week; but those working with Claude Code have been thinking about this for months. Unlike Cursor, which makes an index of the codebase, each Claude Code session is effectively starting as a contextless agent that has been spontaneously injected into your codebase. It heavily “abuses” the grep functionality in order to navigate the codebase and determine what it should do and where. As a result, if not thought through, the context often gets polluted with irrelevant search information. In order to give Claude Code the right context for the task you want to accomplish, we can use the Explore, Plan, Execute, Commit framework that Anthropic recommends in their best practices guide (Anthropic: Claude Code Best Practices). Pairing this framework with the correct use of You want to start by having Claude Code “explore” the codebase by asking it to go through and read files that will be relevant to your task. At this stage, you don’t want Claude Code to start executing, so it’s best to ask it not make any changes, or, ask it to “prepare to discuss” what it plans to do (Claude Code: Tips and Tricks by Galen Ward). Claude Code will make use of the Through this initial exploration process, Claude Code will have loaded the context window with all the relevant searches it made. Once this is complete, it’s time to move on to the planning phase. Once you have the context you need loaded into your Claude Code session, you want to spend some time creating your execution plan. Anthropic explicitly recommends using words like “think”, “think hard”, “think harder”, or “ultrathink” which will directly impact how much thinking budget is allocated to Claude. You can also use the built in Plan Mode by hitting After you’ve drafted up a plan that looks correct and will address your task, you’re ready to execute. Claude Code allows you to explicitly accept every single action it takes and edit it in the case you want to closely monitor all the changes that it does. However, I’ve found that with a specific enough plan and when working on a separate branch, it’s easiest to let Claude Code work through all the changes it needs to until it reaches a stopping point that makes sense. You can toggle the Auto Accept Edits mode by clicking Claude Code recently added the ability to run bash commands in the background of the conversation. This makes it possible to give Claude Code visibility on all the output logs in the same conversation you are in, make it easier for Claude Code to debug its changes and make suggestions as you run tests. This will appear as an option when Claude Code runs a bash command. After executing and working with Claude Code to accomplish your task, you can save and commit your work. I also recommend using Claude Code to generate your commit messages, as it does a great job of writing up all the details of the changes it made. This is useful down the line when an Agent wants to better understand past commits and gets access to a thorough commit message. (This was a commit made by Claude Code. As you can see, it likes to take credit for its work!) With this loop complete, let’s discuss some additional tools you can use in order to get more out of Claude Code. In the explore stage, Claude Code will heavily rely on While Claude Code’s built in After doing this in your root directory, it’s good practice to generate additional Here is a real example of how we might structure our high level, front end, and back end This would go into your This would go into your This would go into your You can also use There may be times when you want to access other directories more explicitly. In those cases, you can use the It’s important to frequently update After you’ve spent time loading up your Claude Code session with the right context, you may want to use that context to accomplish multiple tasks. Both the This becomes useful when you want to continue on a previous thread, want to better understand past actions, or accidentally exit out of Claude Code. You can also use it to open up multiple conversations in different shells, both of which would effectively be copies of the same conversation up until that point. Doing so splits the conversation into multiple branches, and is useful for making many small changes in parallel, all of which might require the same context. Once we’ve already loaded the context we want, it’s also likely that we’ll want to go back and fork a conversation at a previous point. For this, we can use double escape ( This will open up all the previous points at which we prompted Claude Code, as well as actions that were taken by the agent, and allow us to hop back in time to a previous point in the conversation. Unfortunately, it won’t roll back the changes it made up until that point, but it will allow you to remove context related to tasks or searches you no longer want in your context. Effective use of this command keeps your context clean and relatively short, which increases the Claude Code’s efficacy. Galen Ward also spoke a lot about this in his presentation. In case you want to preserve all the context you’ve gathered and don’t want to keep track of the past instances of where that context has been loaded, consider asking Claude Code to gather all the context it has and save it in multiple Markdown files. These can be saved in a top level Claude Code’s basic functionality will get you very far. But there are a bunch of additional tools that Claude Code natively provides which can supercharge your development experience. This bump comes from using custom slash commands, subagents, and hooks, all of which help codify the workflows that you’d want to use across sessions. Slash commands are effectively prompts that we can save in our codebase and use for repeatable tasks. Hooks give Claude Code a rule-set which makes it more secure and predictable. And subagents allow you to fire off separate workflows in parallel, all with their own context, rules, and instructions. Put together, these tools can elevate Claude Code from a basic coding agent into a high-functioning junior developer. Custom Slash Commands allow you to store and save prompts that Claude Code can use repeatedly. You can provide a set of allowed tools, like the ability to read and write to specific files and even reference files with the In practice, you will often use a few commands across all of your projects. It’s best to start with existing templates, and slowly tweak the commands to best fit your use case. Whenever you find yourself repeatedly executing the same prompt, consider turning it into a workflow. The important thing to note is that slash commands are effectively prompts that get loaded into your Claude Code session. As a result, they both use and add to the context of that session. If you want to create repeatable workflows, with specific tools, goals, behaviors, and an independent context, it’s better to use subagents. There is some ambiguity around the difference between custom slash commands and subagents. After all, their file structure looks strikingly similar with both having tools, description, and a prompt. However, the main difference comes from the fact that subagents use their own context. As a result, it’s better to think of subagents as independent actors that work in their own context space and can be controlled and monitored in parallel from a single main thread. Subagents should be described in terms of roles on a team. Some examples Anthropic provides in their documentation are a Code Reviewer, a Debugger, and a Data Scientist. Instead of specific tasks that you’d want executed that are better suited as a command, we should think of subagents as team members who operate in a specific way, and can handle any task we give it in the manner most appropriate to them. With subagents, you can split your current session into multiple specific ones where each agent can work on parts of a larger task in tandem, and complete the work you want to get done faster and more effectively. While subagents and commands must be explicitly called or executed, you may also want to ensure a specific tool or process is run before, after, or during Claude Code’s execution. For this, you should use hooks. Hooks are shell commands that you can hard code into Claude Code’s execution workflow. If you want to run a linter after every edit, log every search made, or prevent Claude Code from ever seeing your There are currently five event triggers: PreToolUse, PostToolUse, Notification, Stop, SubagentStop. On PreToolUse for example, you can set code that runs before any tool use: think, checking to make sure We can also make use of other tools in conjunction with the in-built tools that Claude Code comes with. The huge catalog of MCP servers that Claude Code has access to gives Claude Code the ability to pull in external information, navigate webpages, and more. Besides MCP servers, Claude Code also comes with a Github App that can be easily installed using the Claude Code can connect to any MCP server that you already use. At this point, people tend to use MCP servers for connecting their agents to their ticketing services like Linear, or their repositories with the Github MCP, but other MCP servers like Playwright are especially useful for allowing Claude Code to test its changes automatically, and continue running without too much manual intervention. Some other MCP servers that are popular include Firecrawl and Context7 which help provide context from outside the codebase to a session. You can see an official list of MCP servers here and learn more about this aspect of Claude Code in Patrick Ellis’ presentation. Another underutilized aspect of Claude Code is the ability to use it within Github. You can set up a Claude Code integration into your codebase with the I personally use it to determine if there are any glaring security issues, code pattern inconsistencies, or other considerations that I might want to make before merging in the code. I also often employ it for simple fixes I don’t want to do manually or to help me create an initial commit on a new feature I want to implement. Another way Claude Code can interface with Github is through the Github CLI. With the commands included with the Below is a cheat sheet that includes information you can easily take with you from this article. Feel free to refer back to it whenever you need. Explore, Plan, Execute, Commit Framework Commands, Subagents, and Hooks MCP Github I hope you were able to gain some useful tips from this guide. Whether you are just getting started with Claude Code or have been using it for a while, I’d love to talk and discuss the kind of use you’re getting out of it and learn about any suggestions I may have missed. You can find me on X and LinkedIn. Here are some useful links to help you learn more about Claude Code: Claude Code Best Practices By Anthropic Like what you saw? Find your local meetup and meet other builders. Got thoughts? Reply to this email. We read it all. Forward this to someone who should be building with us.
CLAUDE.md files and how to make use of the /resume command and double escape.
Getting started with Claude Code
Why use Claude Code?
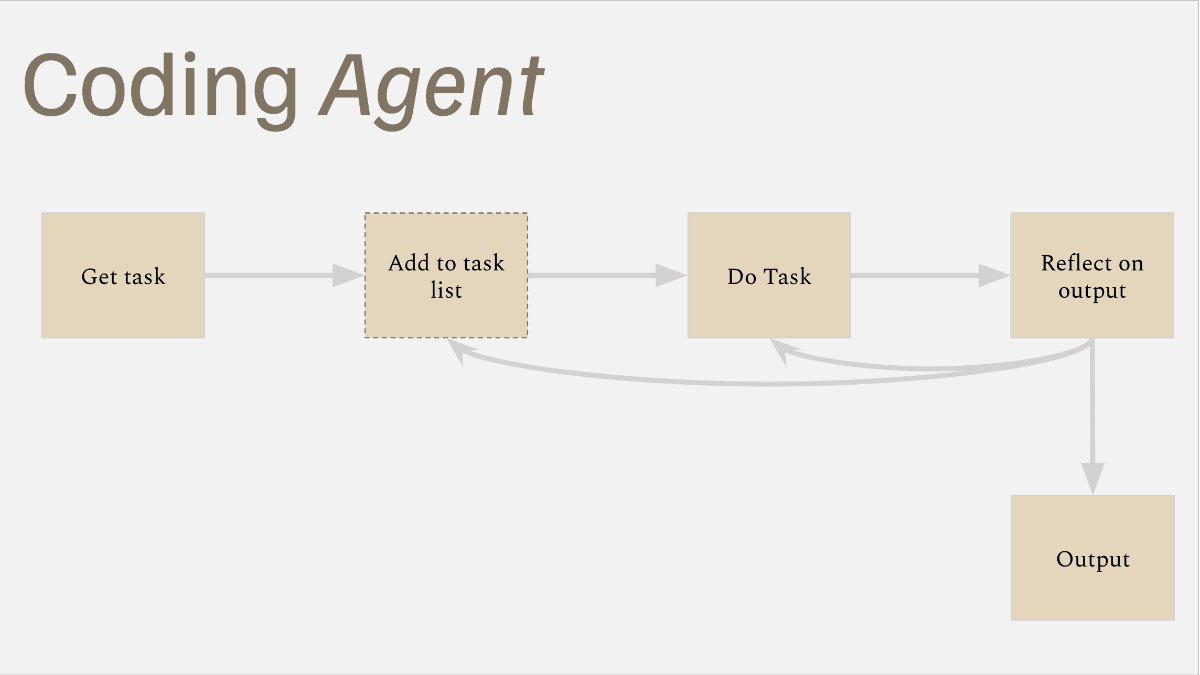
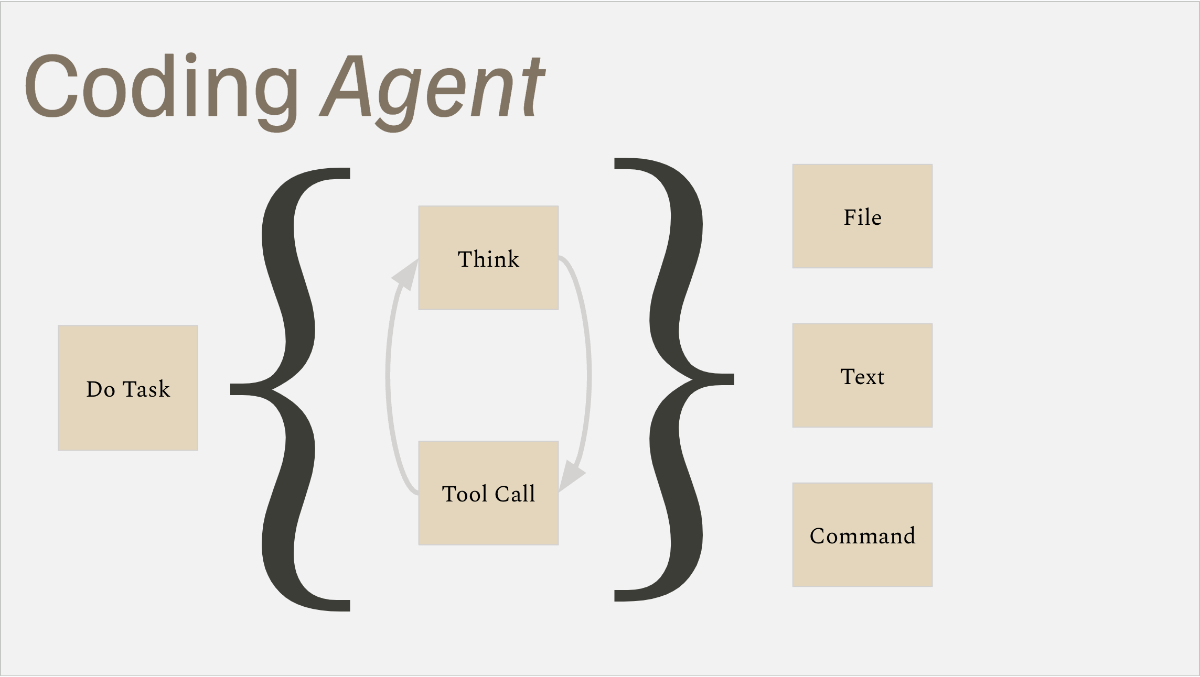
Claude Code’s Agentic Loop
Setup

.claude/ directory in which all settings, commands, subagents, hooks, and future configurations live. The only other document Claude Code makes explicit use of is the CLAUDE.md files which it automatically fills into Claude Code’s context window. For existing codebases, Claude Code includes a /init command which will generate the CLAUDE.md file for the project.
Context Engineering for Claude Code
CALUDE.md files for your project, using the /resume command, the double escape operation, and the planning mode all allow you to give Claude Code the context it needs when it needs it. Let’s now cover how to best use this framework with Claude Code.Explore
CLAUDE.md files to better understand your codebase. I’ll cover best practices for setting up your CLAUDE.md files below, but it’s important to know that Claude Code uses these files as a first point of contact with a given folder. Writing and structuring these well can significantly improve how effectively and how easily Claude Code will understand your codebase.Plan
shift+tab+tab. Plan mode will also search through the codebase for additional context, but it explicitly prevents Claude Code from making edits or running bash commands, making it a safe way to write up the plan.Execute & Commit
shift+tab or selecting the option when it first asks for explicit approval. Doing so will allow you to get to more relevant stopping points and overall speed up your development.![(Other) The image displays a screenshot of a dark-themed digital document or code editor, featuring a title, a bulleted list of technical tasks or features, and additional lines detailing components, dependencies, and authorship. Text: Implement Epic 3 - Code Editor & Diff Integration • Add Monaco Editor React integration with TypeScript/TSX/CSS/JSON syntax highlighting • Create comprehensive file tab system with dirty state indicators • Implement auto-save with 800ms debounce to IndexedDB for data persistence • Add sample project generator with realistic Next.js files for testing • Integrate editor state management with existing FileNav and project store • Support keyboard shortcuts (Ctrl/Cmd+S to save) • Fix ProjectStore initialization issues for proper autosave functionality Key components: CodeEditor.tsx, EditorTabManager.tsx, EditorPanel.tsx Dependencies added: @monaco-editor/react@4.7.0, monaco-editor@0.52.2, next-themes@0.4.6 Generated with [Claude Code] (https://claude.ai/code) Co-Authored-By: Claude <noreply@anthropic.com> Note: This image is a direct digital capture of text content displayed on a screen, resembling a code editor or a technical document. It does not fit the characteristics of a photo, illustration, logo, banner, or handwriting.](https://sloppy-joe-app.imgix.net/blog_images/screenshot-2025-08-13-at-23-48-pm-png-jTzc.png)
Using the
CLAUDE.md fileCLAUDE.md files to help it understand and navigate your codebase. Claude Code will automatically load CLAUDE.md files into its context. It will always load the CLAUDE.md file in the root folder, and all CLAUDE.md files present in parent folders. When searching through sub directories, Claude Code will automatically check for the CLAUDE.md file to help it understand the subfolder’s contents./init command will generate a good starting CLAUDE.md file, I prefer to ask Claude Code to further embellish the file with more details and diagrams, or run the Analyze Codebase Command which generates a more detailed outline of your codebase which you can then add to your CLAUDE.md file.CLAUDE.md files in your subdirectories with more detailed specifics pertaining to that folder. For example, in a monorepo that includes both the frontend and backend, I like to have both a high level CLAUDE.md file and one for each of the two major parts of the project. This way, I can easily run Claude Code from the subdirectory, or, make larger, combined frontend and backend changes with all the context I need for both.CLAUDE.md files. For this example, imagine we have the following folder structure:root/
frontend/
backend/
root/CLAUDE.md.
frontend/CLAUDE.md.
backend/CLAUDE.md.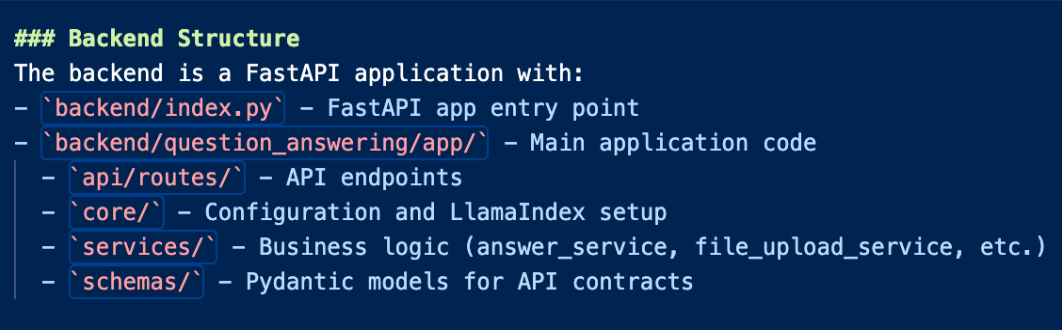
# in order to add instructions to the CLAUDE.md file from within Claude Code. These can be reviewed with the /memory command./add-dir command in order to add those directories to your current Claude Code session, which will also refer to their CLAUDE.md files as a result.CLAUDE.md files. Ideally, do so every time you make a PR. You can always ask Claude Code to do this for you, or use a slash command like Update CLAUDE.md in order to automate the process.
/resume command and double escape/resume and double escape commands allow you to revisit past Claude Code states, giving you the ability to reuse well-formed context windows and also keep your context window clean over time./resume or claude -resume opens up a list of past conversations which we can use to continue past sessions you were working on.
Esc+Esc).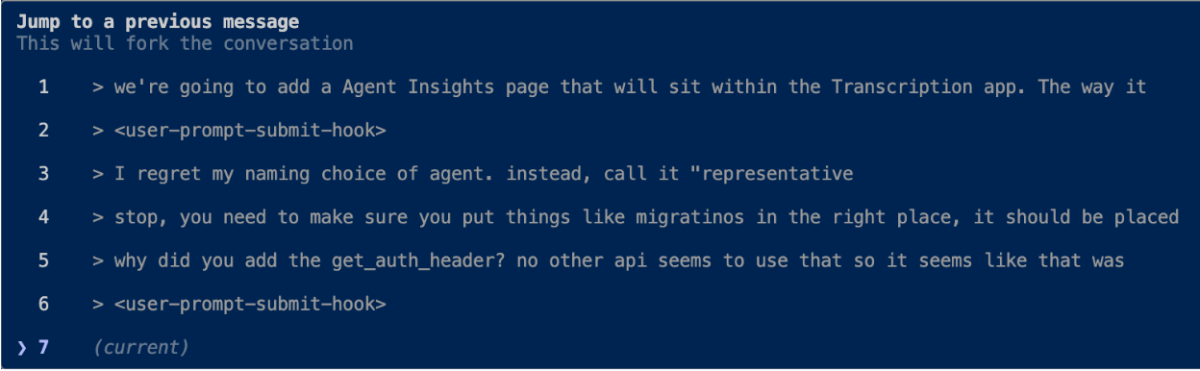
Outside the Session
notes/ folder, or within specific subfolders to which the notes pertain to. I like to use my CHANGELOG.md as the place where Claude Code can keep track of all the major changes I make over time, so they are easy to refer back to across branches.Commands, Subagents, and Hooks
Custom Slash Commands
@ command. I use commands in order to automate things like analyzing new codebases I need to ramp up on quickly, updating my CLAUDE.md file before merging my PRs, and even allowing Claude Code within Github to run specific workflows like reviewing my code, checking for bugs, and other common tasks.Subagents
Hooks
.env files, you can use hooks in order to set those rules in place..env files are never deleted. Another example might be running a linter whenever we reach a Stop trigger. Using hooks allows you to add more structure and predictability to the Claude Code experience and is especially useful in production environments.install-github-app command, which gives you the ability to use Claude Code directly from within Github. Here are some ways you can use these tools.MCP
Github
/install-github-app command and subsequently call Claude Code using @claude within Github. With this, you can go from Issue to PR all without touching an IDE. Beyond the actions that Claude Code provides out of the box, you can also write your own Github Actions that make use of Claude Code. Through this, you can automatically set up actions to perform code reviews as CI checks, automatically update documentation, and even spin up instances of your codebase in sandboxes to run automated tests against.gh tool, Claude Code can easily gain access to all the issues, PRs, and other repos during a session making it easy to fly through all your tasks right from the command line. The Anthropic guide also recommends using Github Worktrees, and launching an individual instance of Claude Code on each worktree in order to work on multiple tasks at once. Patrick Ellis also discusses this in his presentation.Cheat Sheet
Claude Code: Tips and Tricks Cheat Sheet
Plan Mode by clicking shift+tab+tab or asking it to plan out what it will do before execution.
shift+tab to trigger the Auto Accept Edits mode and let it run more fluidly.
CLAUDE.md file
CLAUDE.md files are your agent’s first point of contact with a directory and should be kept up to date and include a lot of helpful information about your codebase structure.
/init or the Analyze Codebase Command to generate a CLAUDE.md file.
CLAUDE.md files updated, either manually or by using a command like Update CLAUDE.md.
# to add additional memories to CLAUDE.md files.
/resume and double escape
/resume to continue old Claude Code conversations. Use it in multiple shells to have parallel conversations with Claude Code using the same context.
Esc+Esc) to jump back to earlier points in your conversation. Use this to also fork Claude Code sessions and repeatedly reuse well-formed context windows.
install-github-app to add Claude Code to your Github repo.
@claude to automatically setup PRs, review code, and anything else you’d typically tag a developer for.
Final Thoughts
You can also join the Claude Code Commands Directory and Claude Code Subagents Directory which are directories I made to help make it easier to find and use commands and subagents for Claude Code.Additional Links
Official Claude Code Documentation
Claude Code: Tips and Tricks by Anand Tyagi
Claude Code: Tips and Tricks by Patrick Ellis
Claude Code: Tips and Tricks by Galen Ward
Mastering Claude Code in 30 minutes
Claude Code: Tips and Tricks Presentation Recording Full
Master Claude Code: Proven Daily Workflows from 3 Technical Founders (Real Examples)
Claude Code Commands Directory
Claude Code Subagents Directory
Stay in the Loop, Stay in the Lab
More from Post-Training