There are a couple steps to creating a AI browser use-agent. This gets extra complicated if you are doing this entirely on the browser (without sending images to a server). At first I thought this might not even be possible, which made it all more fun to come up with a solution.
Part of the fun was the novelty - people had done the parts separately before, there were grounding LLM models, there were webpage capturing libraries, but no one had ever brought everything together.
The solution I’ve developed is here https://github.com/pdufour/browser-use-wasm and in the next few articles I want to cover the core components that make a browser use agent and what I learned along the way. Follow me on LinkedIn and https://www.linkedin.com/in/pauldufour/ to learn about my next post.
 with position click input enter Act on live DOM elementFromPoint at each position click type select Pipeline diagram")
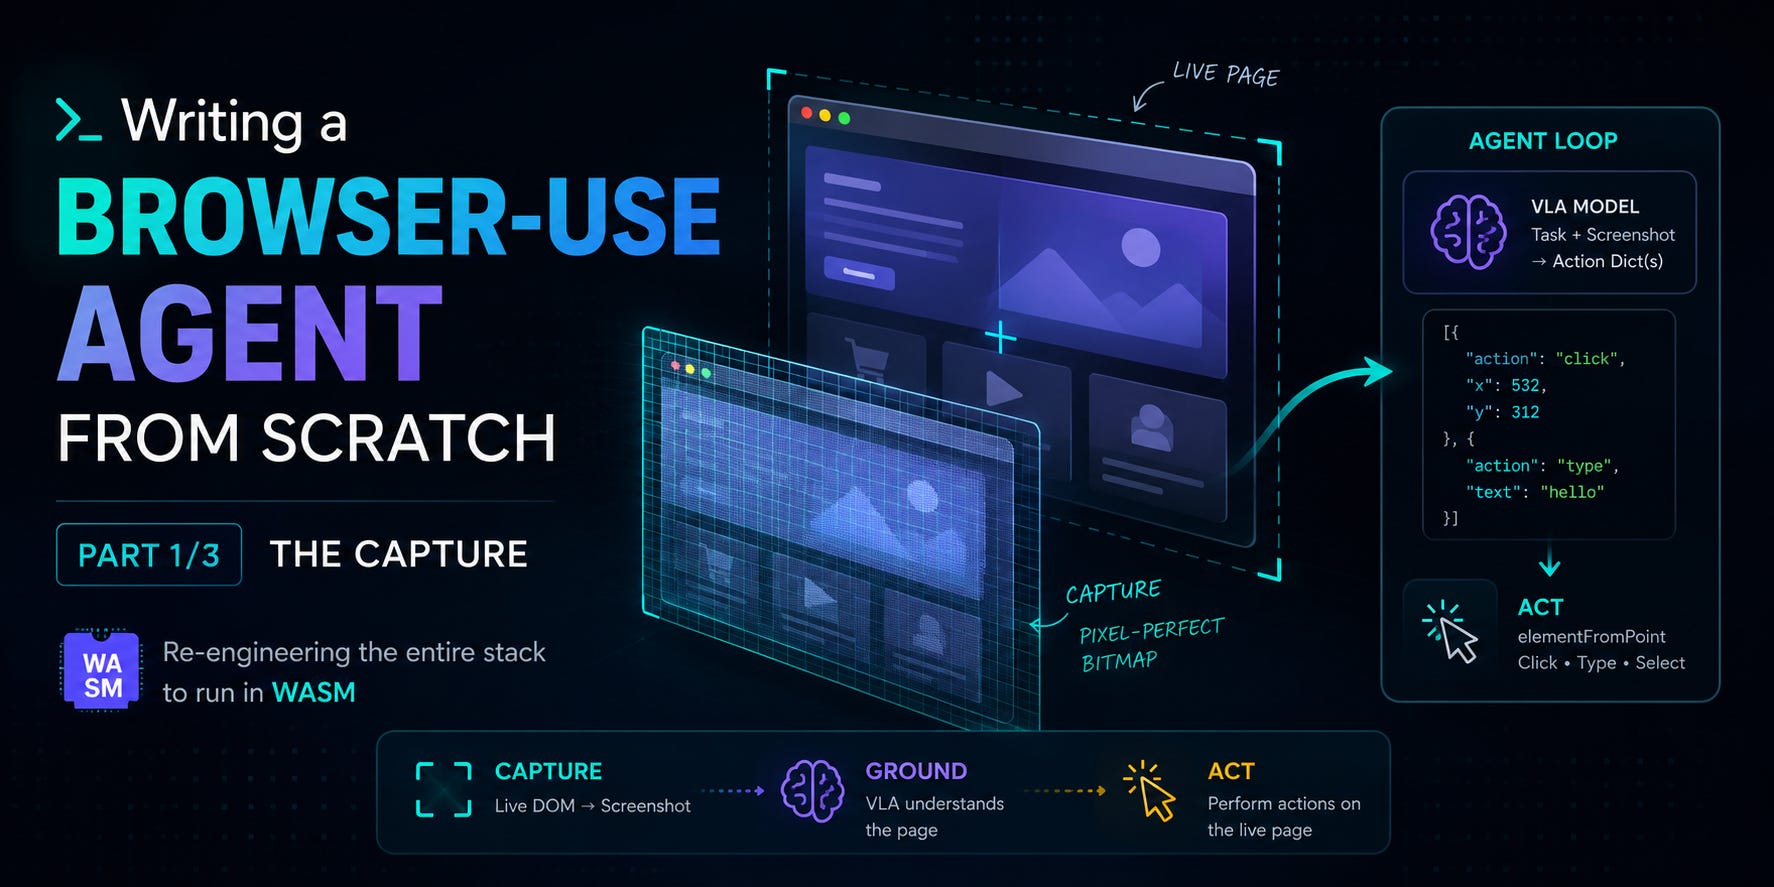
As seen above, the core parts of browser-use are the capture, ground, and act steps. For now, let’s stick to talking about capture.
You have three options for the capture step:
Send an entire DOM tree (all the HTML markup) to a text-based LLM which then responds with the coordinates for the actions you want to take, and executes them accordingly
Don’t send any HTML to the LLM, instead have the LLM try to intelligently call out to the DOM based on a number of CSS selectors (i.e. user says click the Order button and the LLM looks for buttons with “Order” in their text.
Send an image of the page to a vision language action model (preferred option)
Option 1 is not practical though because of the huge size of DOM trees. Also we didn’t even consider the fact that in order for a LLM to truly “understand” a page, you would also need the styles. The following table compares the two options for a few sample webpages.
As you can see the screenshot option is a lot more practical in regards to context size for a browser-use library. Context size is very limited on webgpu. Running on a m4 max gives these:
Constraints are good for end-users though - it means their machines won’t crawl to a halt because of a client side LLM running.
For option 2 - have the LLM generate DOM query selectors - I didn’t even attempt that - most likely the performance would be so bad it would not make it worth it. I can think of so many edge cases for it:
Iframes - the code required to traverse all iframes as well and include that in the context would be a) very difficult and b) probably hit a lot of security problems. A vision model handles this elegantly because you actually see what the user sees, iframe or not.
Canvas / WebGL / <video> - vision based models could actually “see” these videos so you could ask things like “click the video that has a panda in it”
“Click the green button” - natural for VLAs
Now that we’ve discussed why we are using a vision-based approach, let’s talk about the actual capturing implementation. What I mean again by capturing, is the browser-use agent capturing the page you are on and converting it to a screenshot that a VLA can read.
There are a couple options which we are going to be looking at:
html2canvas (https://github.com/niklasvh/html2canvas) is probably one of the first libraries to do this and has existed for years. This library has not been maintained for some time though, so that led to other forks being developed - html2canvas-pro (https://github.com/yorickshan/html2canvas-pro) being one of them.
However, newer options became available in recent years which followed a new methodology. One of these libraries is called snapdom. This quickly became popular as seen below:
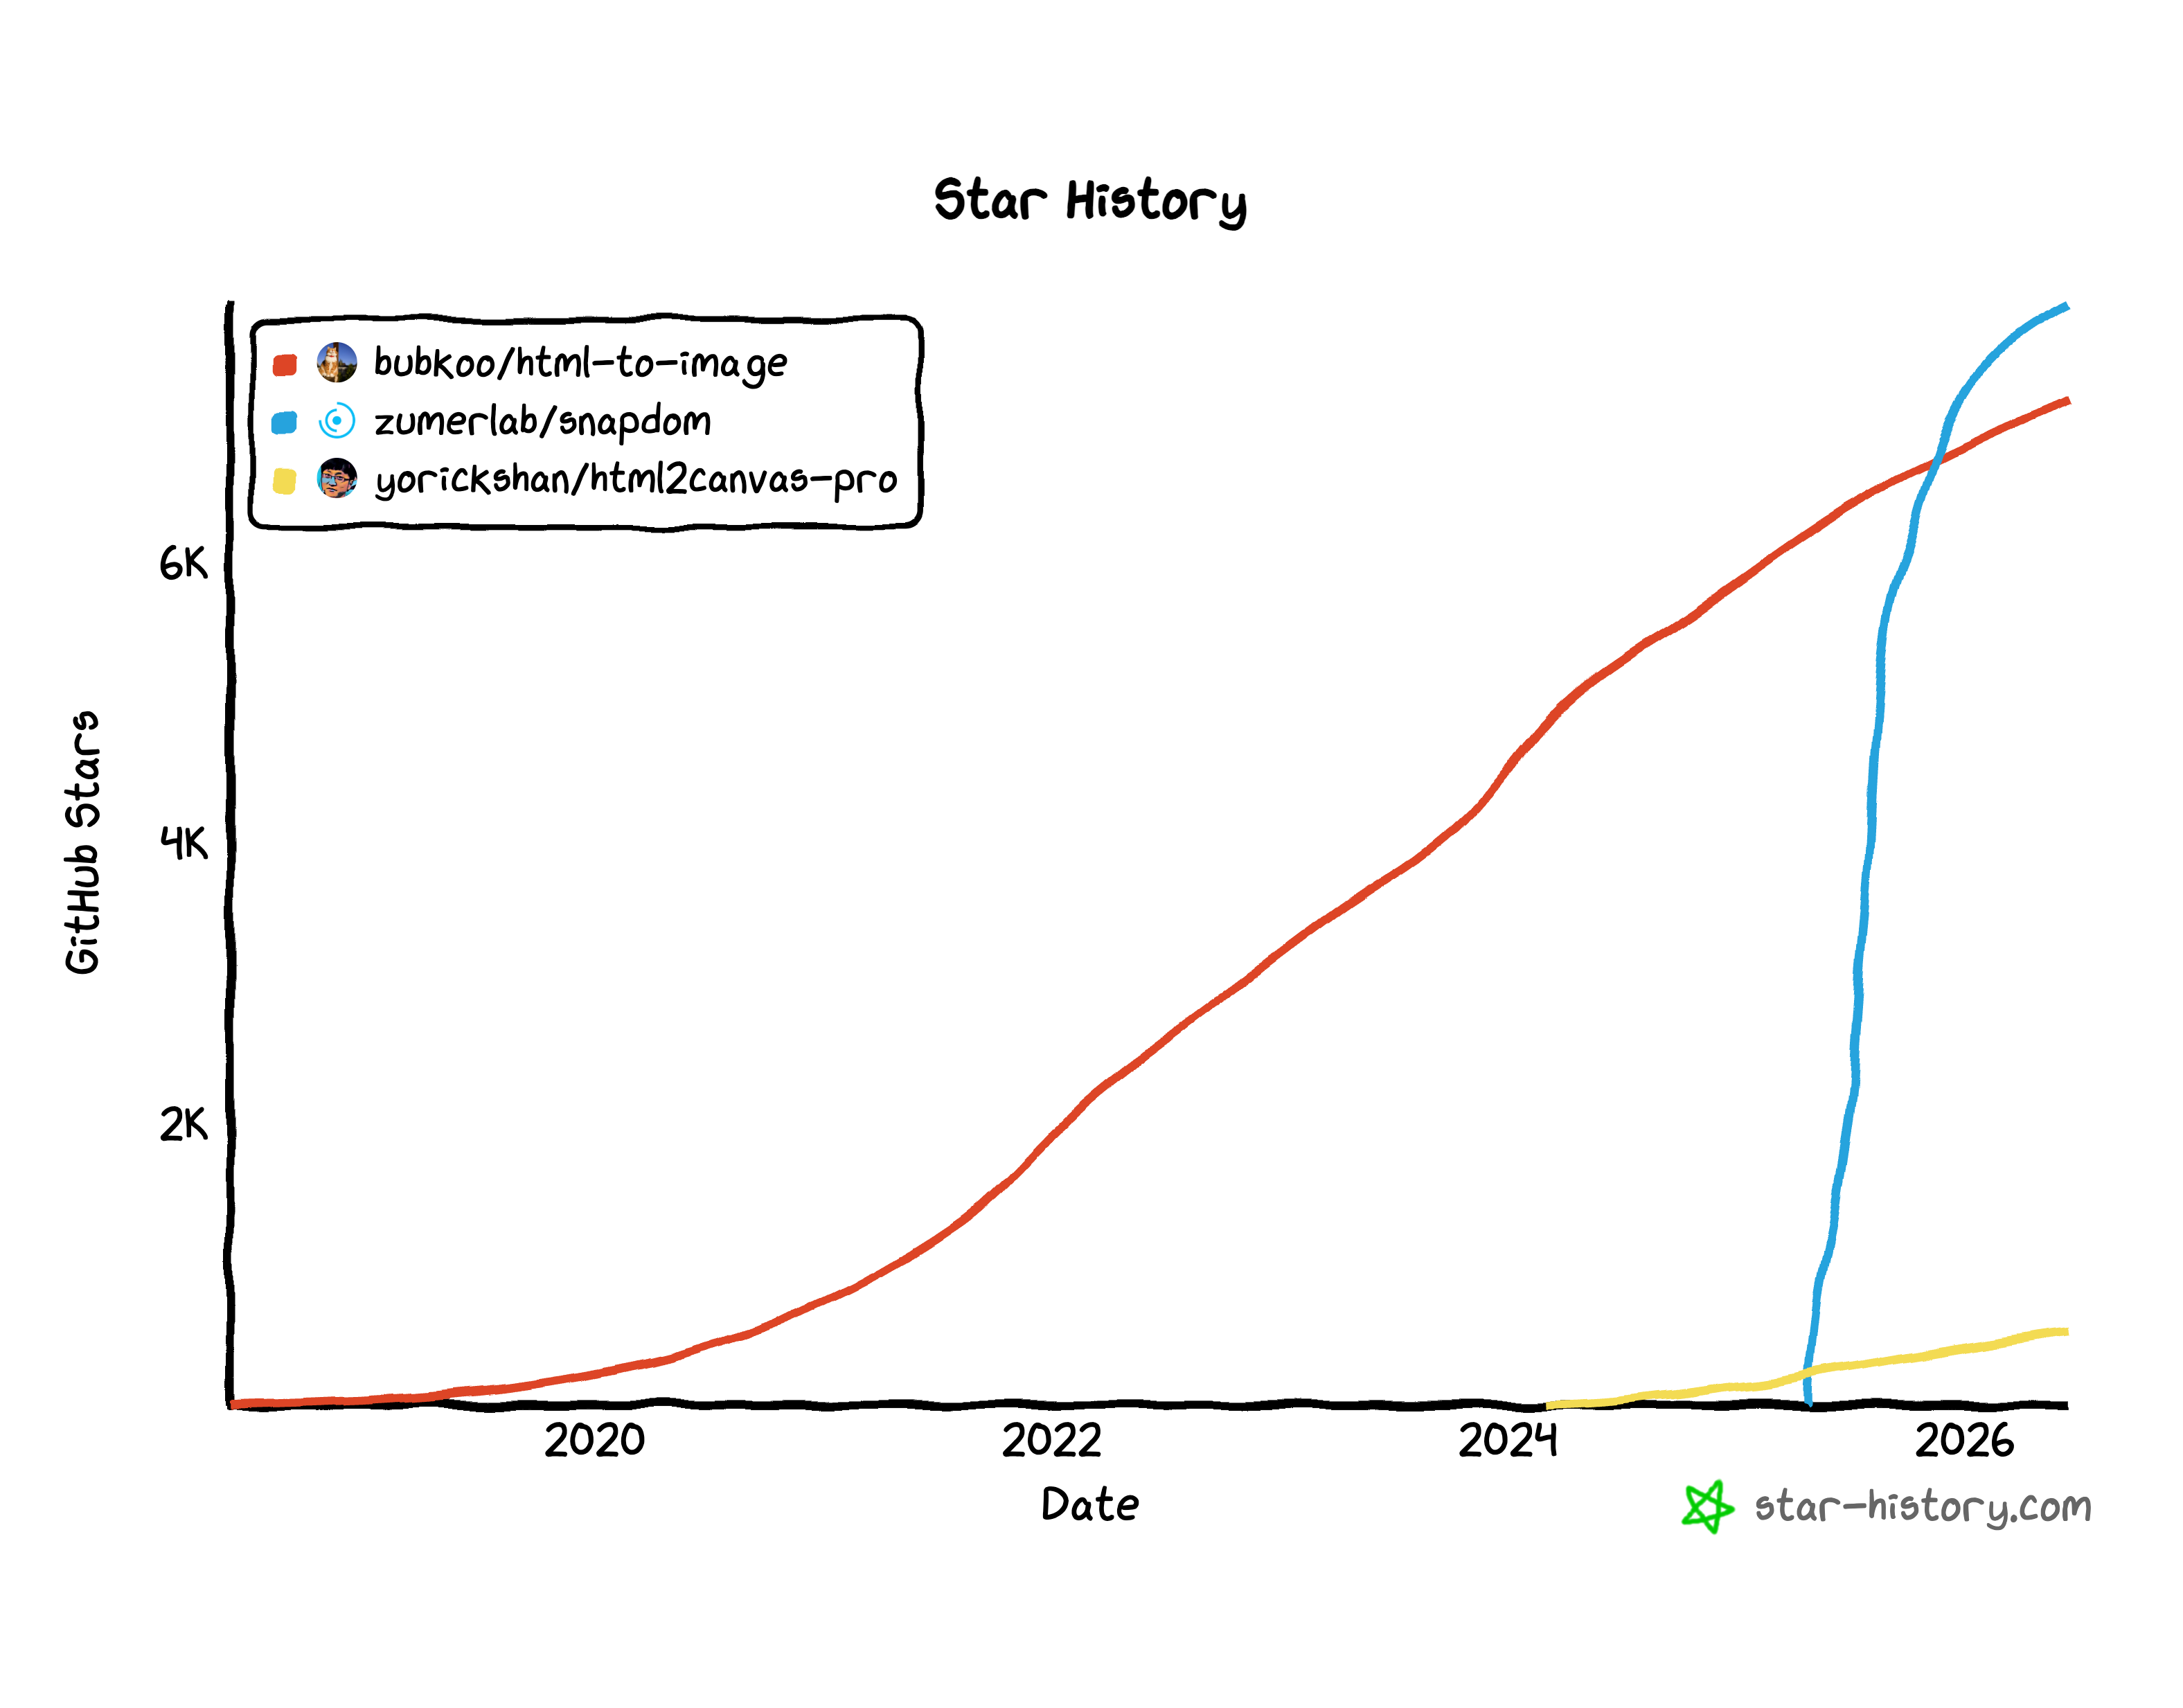
Let’s compare the different options and go into why SnapDOM is preferable for a browser-use task.
html2Canvas and its fork operate on the same methodology: walk the dom, gather computed styles, and re-draw that to a canvas using canvas draw commands. Let’s take an example:
Live DOM
Html2Canvas will look at this and execute roughly the following:
For a browser-use library, performance is critical, so we needed another method. Snapdom uses the following methodology:
Clone the DOM and associated metadata - It remembers where the user has scrolled, what input fields have been filled out, and context needed to recreate the page
Style computation - it extracts all styles for each element using getComputedStyle
Asset embedding - embed fonts so they work within the SVG context and same for images.
Serialization - this is the trick, after you have the full clone with styles and all - Snapdom wraps the entire HTML inside an SVG using <foreignObject>. Now you have a perfect representation of your page in an SVG.
Rendering - snapdom then moves your SVG over to a canvas element. From there it can be exportable to other formats such as PNG and JPG.

The following is a performance benchmark of SnapDOM to html2canvas-pro, the numbers don’t lie!
I didn’t include this option as a contender because it’s still quite experimental but I did want to give it a shout out. Blitz (https://github.com/DioxusLabs/blitz) is completely different than the other options. It renders webpages without using Chrome’s rendering engine. You still write html + css but it renders using a custom redering engine.
I have an example here of what that looks like - https://github.com/pdufour/browserbrowserbrowser. Although it may look like a simple iframe, the canvas which renders the webpage is completely controlled by Blitz which is a rust module exported to a WASM module. So WASM is in fact rendering your webpage. Cool stuff!
So we’ve clarified why Snapdom is good to use for a browser-use agent. Let’s go over our trials and tribulations with using it.
In order to create an accurate browser-use agent pixels are perfect. Clicking on [10,11] is very different than clicking on [10,12]. One could be a button, one could be whitespace! Much to my dismay, this was exactly the problem I experienced after integrating Snapdom into my browser-use library.
The issue is listed here: https://github.com/zumerlab/snapdom/issues/421. It took some time for me to understand this issue though. At first all I knew was that my button clicks weren’t registering.
![Vertical drift - for browser-use, pixels matter: clicking [10, 11] vs [10, 12] can be a button vs whitespace. SnapDOM’s canvas export paints text slightly lower than the live page. The break is SVG → canvas rasterization, not “wait longer for fonts.” Live compositor Complete your order Review details before you submit. Cancel Submit SnapDOM canvas (what the VLA sees) Live heading (4× zoom) Complete your order Review details before you submit. Cancel Submit Canvas heading (4× zoom) Heading ink sits +3.5px lower on the canvas. Same normalized [x, y] on live vs screenshot can miss the control the model intended. Live page vs SnapDOM capture SnapDOM capture Heading zoom - same crop on live and canvas](https://substackcdn.com/image/fetch/$s_!BUoK!,f_auto,q_auto:good,fl_progressive:steep/https%3A%2F%2Fsubstack-post-media.s3.amazonaws.com%2Fpublic%2Fimages%2Ffdc96594-fe4d-4d17-a9eb-59d460c8b0dc_2400x1360.png "Vertical drift - for browser-use, pixels matter: clicking [10, 11] vs [10, 12] can be a button vs whitespace. SnapDOM’s canvas export paints text slightly lower than the live page. The break is SVG → canvas rasterization, not “wait longer for fonts.” Live compositor Complete your order Review details before you submit. Cancel Submit SnapDOM canvas (what the VLA sees) Live heading (4× zoom) Complete your order Review details before you submit. Cancel Submit Canvas heading (4× zoom) Heading ink sits +3.5px lower on the canvas. Same normalized [x, y] on live vs screenshot can miss the control the model intended. Live page vs SnapDOM capture SnapDOM capture Heading zoom - same crop on live and canvas")
How to get from finding the drift to root cause discovery
As you can see from the image the red and blue lines don’t match up!
I tried many different solutions to fix this drift including:
Wait longer before capture
There were a mix of timing tricks I tried: waiting for fonts to load, double image encode pass, using requestAnimationFrame before encoding the image.
Result: This had no effect on the text shift
Rounding consistency fix
Snapdom turns your page into a canvas bitmap, and canvas elements use size in device pixels. On a MacBook retina screen, if a page box is 316 px tall, and DPR is 2, device pixels should be 316 x 2 = 632.
However layout a lot of times gives fractional numbers like 632.5 - so for the canvas to render that, it has to make a decision - round that number up or down. So instead of 632.5 you get 632 or 633. So I tried rounding using floor and ceil operations whenever I saw a fractional number to see if this would fix it.
 = 632 canvas.height = 632 0.6 device px clipped (~0.30 CSS px) round(632.6) = 633 canvas.height = 633 · SnapDOM default 0.4 device px empty below (~0.20 CSS px) ceil(632.6) = 633 canvas.height = 633 same as round 0.4 device px empty below (~0.20 CSS px) Bottom edge magnified - only the last ~2.0 device px (real gap is sub-pixel) Layout bottom - 632.6 device px floor canvas - 632 device px round canvas - 633 device px ceil canvas - 633 device px Card previews look the same, but when you zoom in you can see the difference - the magnified ruler shows how much floor, round, and ceil can shift the layout. Takeaway: Rounding fractional pixels may be an issue, and rounding everything beforehand to whole numbers does fix some issues, but the font issue still persists. Fractional device pixels on a text card")
Result: This seemed to fix some scenarios out of luck but wasn’t consistent
Font fix
By now most people would have given up, but if you can’t have accurate capturing, your entire browser-use agent falls apart. Clicks won’t work, typings won’t work. Luckily it was now that I noticed something common in all the times I saw the drift - it was always within text elements. So I came up with an example that clearly demonstrated the problem:
The github author of snapdom luckily helped me out here and pointed it out to a built in font issue:
There is also another related cause: snapDOM does not embed system fonts such as
system-ui. That is not somethingembedFonts: truecan solve by itself, because browsers do not expose system font files to JavaScript.To make the captured result match the live render more closely, you need to use an actual font file, either locally through
localFonts, or externally through something like a CDN or Google Fonts, withembedFontsenabled.
Font metrics are crucial. CSS uses the metrics from font files to determine where to place text within a line.
 and the same CSS moves ink even when the family name stays the same. em box (line box) Hh gyp ascender cap height x-height baseline descender Real system-ui text on one baseline. Metric lines show where the font file places ascender, cap height, x-height, baseline, and descender. line-height and vertical alignment use the font’s ascender/descender tables - not the painted glyph bbox alone. system-ui resolves to an OS face at runtime; there is often no .woff2 URL for capture tools to load. A loaded webfont (@font-face, Google Fonts, CDN) ships the same metrics file the layout engine already used live. CSS font metrics primer Font em box: ascender, cap height, x-height, baseline, descender on Hh gyp")
If those metrics are not available you are bound to have issues. Luckily in this case the issue was resolved and then I could begin the next stage of building a AI browser use agent: the grounding.