Position‑independent code is fundamentally simple: it is machine code that can execute correctly regardless of the memory address at which it is loaded.
Most texts on the subject look intimidating though, including some very well written ones, such as Eli Bendersky’s Position Independent Code (PIC) in shared libraries. The topic often appears complicated because it is usually explained in the context of building shared libraries for Linux; a domain that requires discussing linkers, loaders, the ELF format, and other complex mechanisms. I felt it would be easier to understand the core idea of position‑independent code by using a much simpler computer, so I went back to the dawn of personal computing and picked the original Apple II.
Some of the reasons I chose Apple II for this exercise are:
It was built around the MOS 6502 - a very simple 8-bit CPU with a small address space, no virtual memory, one accumulator register. In one of my previous posts, I argued that 6502 is a Good Starting Point for Beginning Assembly Programming.
It includes a built‑in machine‑code monitor and mini‑assembler which are handy for entering and testing machine code. Most other machines from that era would require to use BASIC commands like
PEEKandPOKEwhich is doable but less comfortable.I have never had a chance to work with an Apple II1 and this is my excuse to finally try it.
To be clear: in this article, mu goal is simply to describe the concept of position-independent code. I am not going to investigate techniques making full Apple II programs position‑independent2.
I do not have access to an actual Apple II computer. Instead, I used the AppleWin emulator in Apple ][ 48K mode which emulates the original Apple II from 1977 with 48 KB RAM and with Integer BASIC, Machine Language Monitor and Mini Assembler in ROM. I used APPLE II USER’S GUIDE by Lon Poole and Steven Cook to learn how to use the Monitor and Mini-Assembler; there was no need for BASIC.
To read this article, you don’t need any of that. What is needed is some basic understanding of computer architecture and assembly programming (with any instruction set). If you were never exposed to these topics but still have some programming experience, just spend half an hour playing with Easy 6502 web page, and you will be ready to follow the rest of this post.
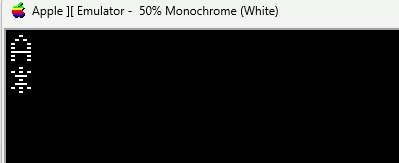
Let’s start with a minimal program that is position independent. It will first clear the screen and then print letter ‘A’ in the upper left corner.
I used the Mini-Assembler to enter the code. The listing is here:
*300L

0300-   20 58 FC    JSR   $FC58
0303-   A9 C1       LDA   #$C1
0305-   8D 00 04    STA   $0400
0308-   60          RTS
...
The JSR instruction at address
0300calls the monitor routine at$FC58(HOME) to clear the screen. The entry point of the routine is fixed, so it works regardless of where our program itself is loaded.LDA loads the accumulator with
$C1, which is normal (i.e. not inverse or flashing) code for letter ‘A’ in Apple II character set. It is calculated as the ASCII code for the symbol($41) + $80.STA stores the accumulator value (currently
$C1) to memory location$400, the beginning of the text screen buffer. Again, this address is absolute and does not depend on our program’s position in memory.RTS returns to the caller - in our case the Apple Monitor.
Running the code produces the expected result:
To prove the code is truly position independent, we can copy it to address $320, erase the original program at $300 and run it:
*320<300.308M
*300:00 00 00 00 00 00 00 00 00
*320L
0320-   20 58 FC    JSR   $FC58
0323-   A9 C1       LDA   #$C1
0325-   8D 00 04    STA   $0400
0328-   60          RTS
*320G
As expected, the result is exactly the same as above.
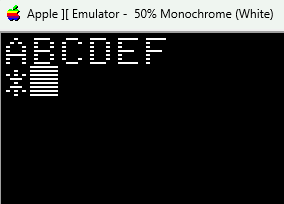
Let’s see whether a simple loop is position independent. In this example we’ll extend the program to write letters “ABCDEF” at the top left corner of the screen.
We’ll need to keep track of two “variables”: the current character to print (stored in register A, just as before), and the current screen position (stored as an offset in register X, counting from the beginning of the text screen area). We’ll loop until X reaches the value 6 while incrementing both A and X on each iteration.
*300L

0300-   20 58 FC    JSR   $FC58
0303-   A2 00       LDX   #$00
0305-   A9 C1       LDA   #$C1
0307-   9D 00 04    STA   $0400,X
030A-   18          CLC
030B-   69 01       ADC   #$01
030D-   E8          INX
030E-   E0 06       CPX   #$06
0310-   D0 F5       BNE   $0307
0312-   60          RTS

*300G
JSR clears the screen, just as above.
LDX initializes register
Xto0.LDA loads register
Awith the display code for the first character, ‘A’, just as before.STA stores the value of the accumulator to the screen memory. Note that we use a different opcode for STA here:
9D, vs8Dwe used above. The difference is in the address mode: here the Absolute, X addressing mode adds value ofXto the address specified in the operand. For instance, if the operand is$400andXcontains$01, the value ofAwill be stored at$401.CLC clears Carry flag, so it does not affect the following instruction.
ADC increases the value in the accumulator which changes the value of the character we write on the screen.
INX increases the value of the
Xregister and points us to the next screen position.CPX compares the contents of register
Xto$06and sets zero flag if they are equal.BNE branches back to the STA instruction at
$0307if the zero flag is not set.RTS returns to the caller.
The result is:
Most instructions are obviously position-independent, just as in the first example. The exception is BNE at address $310:
0310- D0 F5 BNE $0307At first glance, the jump target looks absolute: $0307. If that was literally encoded in the instruction our program would not be position independent. But this is just the disassembler being smart: the BNE instruction takes relative offset as the operand. The actual machine code displayed in the same line shows the operand value of $F5. Why? The distance between the next instruction and the target address is $307 - $312 = $F5 (negative 11 decimal).
Again, let’s move the program from address $300 to $320, clear out the original copy and see whether it works:
*320L

0320-   20 58 FC    JSR   $FC58
0323-   A2 00       LDX   #$00
0325-   A9 C1       LDA   #$C1
0327-   9D 00 04    STA   $0400,X
032A-   18          CLC
032B-   69 01       ADC   #$01
032D-   E8          INX
032E-   E0 06       CPX   #$06
0330-   D0 F5       BNE   $0327
0332-   60          RTS

*320G
Yep, it’s the same. And if we look at the BNE line, we can see what the disassembler did: it updated the displayed target to $0327, but the actual operand, the relative offset, remains $F5.
0330- D0 F5 BNE $0327As we have seen, BNE uses a one‑byte relative offset, which allows it to jump up to 127 bytes backward or 128 bytes forward from the current instruction. That works fine in our example, but if the body of the loop was large enough, we would need to use the JMP instruction instead:
*300L

0300-   20 58 FC    JSR   $FC58
0303-   A2 00       LDX   #$00
0305-   A9 C1       LDA   #$C1
0307-   9D 00 04    STA   $0400,X
030A-   18          CLC
030B-   69 01       ADC   #$01
030D-   E8          INX
030E-   E0 06       CPX   #$06
0310-   F0 03       BEQ   $0315
0312-   4C 07 03    JMP   $0307
0315-   60          RTS

*300G
The only difference from the position-independent loop is that we replaced the BNE instruction with BEQ + JMP pair. BEQ was necessary to exit the loop, as JMP is not conditionally executed. The important detail is that JMP uses an absolute address, and here it jumps to an address inside the program itself.
To prove the program is position dependent, we’ll move it to $320 and zero out the original copy at $300:
*320<300.315M
*300:00 00 00 00 00 00 00 00 00 00 00 00 00 00 00
*320L
0320-   20 58 FC    JSR   $FC58
0323-   A2 00       LDX   #$00
0325-   A9 C1       LDA   #$C1
0327-   9D 00 04    STA   $0400,X
032A-   18          CLC
032B-   69 01       ADC   #$01
032D-   E8          INX
032E-   E0 06       CPX   #$06
0330-   F0 03       BEQ   $0335
0332-   4C 07 03    JMP   $0307
0335-   60          RTS
*320G
The program prints ‘A’ but then crashes, as expected. JMP still points to address $0307 which now contains zeroes.
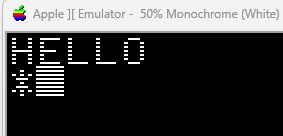
Now, we’ll try printing the word “HELLO” in the top-left corner of the screen. The main difference from the previous program is that the character values cannot be calculated - instead we read them from memory, and the memory is a part of the program, just as the instructions. On the Apple II there are no ELF sections to keep data separate from code, so we’ll just place the text immediately after the RTS instruction:
*300L

0300-   20 58 FC    JSR   $FC58
0303-   A2 00       LDX   #$00
0305-   BD 11 03    LDA   $0311,X
0308-   9D 00 04    STA   $0400,X
030B-   E8          INX
030C-   E0 05       CPX   #$05
030E-   D0 F5       BNE   $0305
0310-   60          RTS
0311-   C8          INY
0312-   C5 CC       CMP   $CC
0314-   CC CF 00    CPY   $00CF

*300G
JSR calls HOME to clear the screen as always.
LDX initializes
Xto0. As before, we useXboth to index into the screen buffer and to index into the message.LDA loads the current character from memory using absolute,X addressing. The message bytes are placed immediately after the RTS, so the base address is
$0311. Note how using the same index for both the data and the screen position keeps the loop simple.STA writes the character to the appropriate location on the text screen.
INX increases
Xto get the next character and move the position on the screen.CPX checks whether we’ve reached the end of the string (5 characters).
BNE loops back if we have not.
RTS returns to the monitor.
The five bytes after RTS:
C8 C5 CC CC CFcorrespond to characters ‘H’ ‘E’ ‘L’ ‘L’ ‘O’ in Apple II character set (ASCII codes +$80)
The result is as expected:
What happens if we move the program to $320?
*320<300.315M
*320L

0320-   20 58 FC    JSR   $FC58
0323-   A2 00       LDX   #$00
0325-   BD 31 03    LDA   $0331,X
0328-   9D 00 04    STA   $0400,X
032B-   E8          INX
032C-   E0 05       CPX   #$05
032E-   D0 F5       BNE   $0325
0330-   60          RTS
0331-   C8          INY
0332-   C5 CC       CMP   $CC
0334-   CC CF 00    CPY   $00CF
As we can see, the LDA instruction at $0325 still loads from the absolute base address $0311. That address did not change when we moved the program.
Let’s erase the old program, and run the relocated one:
*300:00 00 00 00 00 00 00 00 00 00 00 00
 00 00 00 00 00 00 00 00 00
*320G
Again, as expected, the result is not “HELLO”:
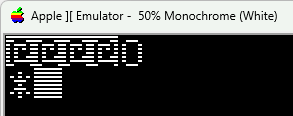
The program now reads whatever bytes happen to be at address $0311, which are zeros after we erased the old program. I miscalculated the size of the program by one when zeroing it out, so the final letter ‘O’ is still being printed.
For a program to be position independent, it must avoid absolute references to its own code and data. Any internal jump or data access has to be expressed through relative addressing so the program can run correctly no matter where it is loaded. Absolute addresses are safe only when they refer to external routines that live at fixed, well‑known locations, such as the Apple II’s ROM monitor, or an operating system.