How the pg_logical extension helped us save a lot of money by shrinking our production database

CloudSQL, provided by Google Cloud Platform, is a fully managed relational database service offering a convenient and scalable solution for hosting and managing relational databases in the cloud. It allows users to effortlessly deploy and administer popular database engines like MySQL, PostgreSQL, and SQL Server.
While CloudSQL is an excellent service that we extensively utilize at Torq, it does have one significant drawback, which, as we have been informed, has been resolved in AlloyDB. The issue pertains to the management of storage. Apparently in AlloyDB you pay for what you use, as in what your data occupies at any given time.
In CloudSQL, the storage automatically expands (if enabled), which is highly advantageous for production applications. However, there is no straightforward way to shrink the storage when it is no longer required. In other words, if a database or table occupying 1TB of space is created and subsequently deleted, the block storage volume of the CloudSQL instance will not contract, remaining at 1TB. This is a known limitation acknowledged by Google in their documentation. The database will reuse that space, however if you don’t plan expanding that much again there is no way back.
At Torq, we have been using a CloudSQL PQ instance for our product since the inception of our company. Over the course of the years, the data within this instance has grown to an enormous size, surpassing tens of terabytes.
Eventually, this data became obsolete and burdensome. Although we dropped or deleted a significant portion of this data, the storage size remained unchanged since CloudSQL storage volumes do not shrink in size. This led to exorbitant costs.
Upon initiating my investigation into reducing the storage size, I discovered several available options:
- The Simple Export/Import Method: This method involves dumping all the necessary data and importing it into a new CloudSQL instance. However, it necessitates downtime as data cannot be written to the old instance during the backup and import process. Additionally, performing a backup operation (using
pg_dump) for large databases may consume a significant amount of time, ranging from hours to days. Similarly, the restore operation is also time-consuming. - Google Data Migration Service (DMS): DMS is the preferred method for migrating data (or shrinking your database) with minimal downtime, and Google provides several articles detailing its usage. However, it has a limitation: it does not allow migration of specific Postgres schemas. Instead, it mandates migrating an entire database. Unfortunately, in our case, we wanted to migrate select schemas, making DMS unsuitable for our requirements. It is worth noting that DMS internally utilizes a PostgreSQL extension called
pg_logicalfor executing the migration. If DMS works for your use case, I highly encourage you to use it instead of fiddling directlypg_logicalextension directly. - pg_logical: This extension offers logical streaming replication utilizing a publisher/subscriber model. It is a powerful tool that provides flexibility in migrating selected schemas, tables, or databases with maximum granularity.
pg_logicalworks exceptionally well in scenarios where minimal downtime is crucial since any changes made to the source database continue to be replicated in the destination database in near real time. This ensures that during the transition when services are redirected from the old database to the new one, no data will be lost. Here’s Google’s article on logical replication.
It is important to mention that both DMS and pg_logical, despite their advantages, do not provide completely zero downtime solutions. This is because they don’t work without enabling certain flags on the CloudSQL instance. Changing database flags necessitates restarting the database. Consequently, there will be a period of several minutes during which your application will be unable to access the data. It is essential to consider this potential downtime when planning the migration. Regrettably, based on my research, there doesn’t seem to be any other viable solution available that guarantees absolutely no downtime.
As you might have anticipated, we opted to implement our migration using the pg_logical extension.
Data migration using pg_logical
Below, I will outline the process and commands necessary to configure replication between two database instances: the “source database” (the original database with all the data to be migrated) and the “destination database” (the new database that will contain a subset of the original data).
Before proceeding with the commands, it is crucial to ensure network connectivity between the destination and source databases.
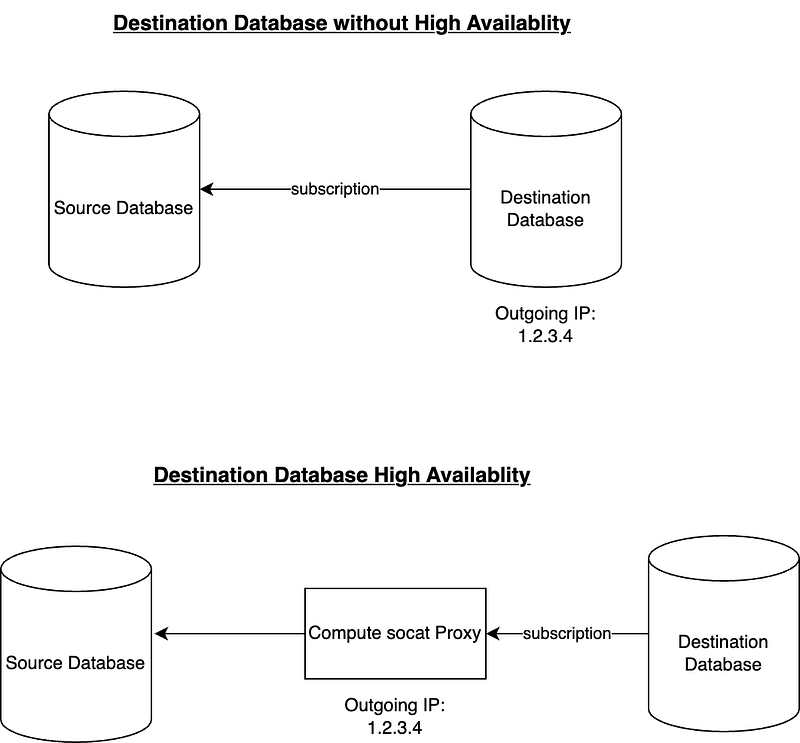
Officially, if your destination database is using High Availability then you can’t use pg_logical replication as the Outgoing IP is unknown. In order to overcome that we will be using a Compute Instance running the great socat tool as a proxy between our databases. In this scenario the Outgoing IP we will be using is the one of the Compute Instance.
# Example socat tunnel command
sudo socat -d -d TCP-LISTEN:15432,fork TCP:1.2.3.4:5432
If you are using HA then go ahead and create a new Compute Instance and write down it’s IP address. You will be using it in the network configuration.
To configure connectivity, follow these steps:
- Access the source database and navigate to Connections > Networking.
- Add the Outgoing IP of the destination database (or the proxy compute instance) in the Authorized Networksarea.
- Additionally, in the security settings of the source database, ensure that the “Allow only SSL connections” checkbox is unchecked. Unfortunately, at the time of this writing, it is not possible to install a client side certificate on a CloudSQL instance, which would be the destination database that is making the outgoing connection to the source database. But don’t worry too much, the migration will still be using ssl, just not client side certificates for authorization.
Once you have completed these preliminary steps, you can proceed with the following commands and configurations to set up replication between the databases.
Enabling the necessary flags
Enable the necessary database flags on both the source and destination databases. These flags allow the usage of the pg_logical extension on CloudSQL PostgreSQL instances. This step requires a database restart, but it will be the only restart needed. Set the following flags:
cloudsql.logical_decoding=on
cloudsql.enable_pglogical=on
Temporary disabling SSL encryption
To ensure successful replication, it is necessary to disable the “Allow only SSL connections” security setting on your source database. It is accessible via the Connections > Securitysettings.
Unfortunately, it is not possible to install a client-side certificate on a CloudSQL instance (in our case we would need it on the destination database), which means that leaving this checkbox on will prevent replication from functioning as the connection will be rejected.
It’s worth noting that this does not imply the replication will be unencrypted. To ensure encryption, make sure to include the attribute sslmode=require in the DSN connection string. This will guarantee that the tunnel between the destination and source databases is encrypted.
Database Schema Synchronisation
It is important to manually synchronize the database structure between the source and destination databases. Typically, this involves executing database migrations on the destination database. Please note that the pg_logical extension is responsible for synchronizing data only and does not create any database objects such as schemas, tables, sequences, indexes, and so on.
Make sure the user you are using for replication has the replication role
You need to execute this query both on the source and the destination database. You should use the same PQ user your services use to create data for replication. This will ensure data is created with the right permissions that the service can access.
ALTER USER replication_user WITH REPLICATIONInstalling pg_logical and configuring the publisher node on the source database
-- Install the pg_logical extension
CREATE EXTENSION pglogical;

-- Create the publisher node, we call it origin_node for future reference/teardown
SELECT pglogical.create_node(
 node_name := 'origin_node',
 dsn := '<SOURCE DATABASE DSN>’'
);

-- Enable replication for a specific schema
SELECT pglogical.replication_set_add_all_tables('default', ARRAY['<SCHEMA_NAME>']);

-- If you need to replicate sequences, configure sequence replication
-- Do note that sequences will be replicated but the count will increase by 1000
-- See documentation for more information
-- Make sure the replication user has access to modify your sequences
GRANT ALL PRIVILEGES ON ALL SEQUENCES IN SCHEMA <SCHEMA_NAME> TO replication_user;

-- Configure sequence replication
SELECT pglogical.replication_set_add_all_sequences('default', ARRAY[<SCHEMA_NAME>], synchronize_data := true)
If you don’t have any sequences there is no need to execute the last command. If you do, do keep in mind that sequences sometimes take some time to replicate, if you want to speed up the process you can execute this query after setting up the subscription on your destination database:
select pglogical.synchronize_sequence( seqoid ) from pglogical.sequence_state;Creating a subscriber on the destination database
Now lets create the subscriber on the destination database to start the process
-- Install the pg_logical extension
CREATE EXTENSION pglogical;

-- Create the subscription
-- DNS looks something like this:
-- host=10.0.0.1 port=15432 dbname=my_db sslmode=require password=pw user=data_user
SELECT pglogical.create_node(
 node_name := 'target_node',
 dsn := <TARGET DATABASE DSN>
);

SELECT pglogical.create_subscription(
 subscription_name := 'my_subscription',
 provider_dsn := <SOURCE DATABASE DSN>
);
Checking that everything is working
You can check that everything is working by running the following query on the destination database
SELECT subscription_name, status FROM pglogical.show_subscription_status();It should either say initializing (if you have a lot of data it may take several hours or more) once the initial data was copied over to the destination database the status will be replicating.
Cleaning up
Once you finished replicating your data and switched your service to work with the destination database you want to cleanup all the configuration you’ve made for the replication, which you no longer need.
You can run the following queries on the destination database:
-- Remove replication set
SELECT pglogical.alter_subscription_remove_replication_set('my_subcription', 'default')

-- Disable subscription
SELECT pglogical.alter_subscription_disable('my_subcription', true);

-- Remove subscription
SELECT pglogical.drop_subscription('my_subscription');

-- Remove node
SELECT pglogical.drop_node('target_node')
And then run this on the source database:
-- Remove node
SELECT pglogical.drop_node('origin_node')
Common Issues
- No Outgoing IP on the destination database — See the compute instance method above.
- Replication status is stuck in initializingfor a long time — You probably have a lot of data. Wait patiently, this may take several hours or more. You can try synchronizing data table-by-table instead of the entire schema. Review the documentation for
pg_logicalextension how to configure it. - Replication status *down —*Review the logs both of origin and destination databases. You will be able to see clues there. A common use case for this is that the destination tables already contain some data and the migration causes a conflict with this data. The replication is best done to an empty database.
- Connectivity Issues — There are sometimes strange networking issues with the databases failing to connect to the Socat proxy. You can use the Google connectivity tool to test why its happening. In my experience it happened because: socat wasn’t running on the compute instance. Socat’s compute instance external IP is not configured in Authorized Networks of both Origin and Destination databases. For some reason CloudSQL instance has no access to the Socat Compute via the external IP, in that case try using it’s Internal IP address.
Validating the replication
In our migration service I implemented several sanity checks to verify that the migration process is working as expected.
- Before configuring the replication I compared the database schema of the source and the destination databases, like I mentioned
pg_logicalonly replicates data. - After replication was complete, meaning the status is
replicatingI compared the number of rows in the destination database’s tables is greater or equal than in the source database. In our use case this worked just fine as the database is mostly CRUD operations. In your case it could be different so consider implementing the check based on your applicative logic.
The whole picture
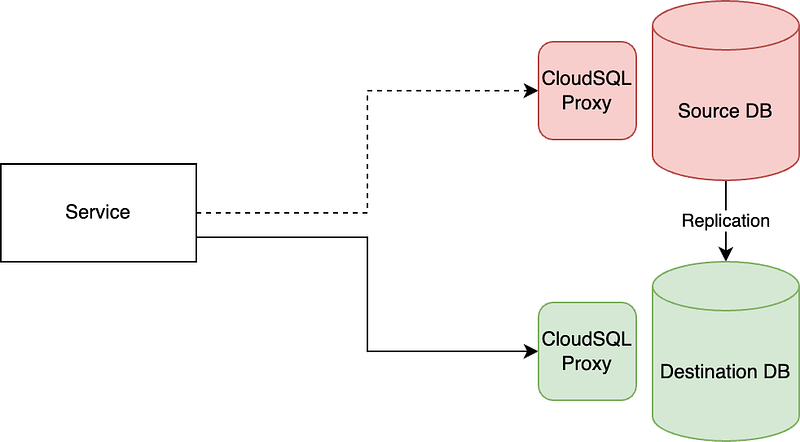
The sequence of the migration in our case was as follows:
- Verify database schema
- Set up database replication and wait for replication status to become
replicating - Compare the number of rows in all the tables in the replicated schema
- Modify Service’s ConfigMap and make it point to the new database while the replication is still enabled
- Let the service start and be healthy
- Cleanup the replication setup
Great success
Using the outlined technique we were able to shrink our database from many terabytes to hundreds of gigabytes by removing the data we no longer needed. Using pg_logical is quite simple once you understand its principles and get over the initial pains of the configuration.
I hope this article will help you shrink your database storage if you have a use case similar to the one I described.
Originally published on Medium.