![]()


A universal cache inspector for Django.
Docs
https://yassi.github.io/dj-cache-panel/
Features
- Browse Cache Instances: View all configured cache backends from your
CACHESsetting - Abilities Matrix: See at a glance which operations each cache supports (Query, Get, Delete, Flush)
- Key Search: Search and browse cache keys with wildcard patterns (for supported backends)
- Value Preview: View cache values directly in search results
- Pagination: Navigate through large sets of keys efficiently
- Admin Integration: Seamlessly integrates with Django's admin interface
- Secure: Only accessible to staff users
- Backend Agnostic: Works with any Django cache backend (with varying feature support)
Project Structure
dj-cache-panel/
├── dj_cache_panel/          # Main package
│   ├── templates/           # Django templates
│   ├── cache_panels.py      # Backend specific panels
│   ├── views.py             # Django views
│   └── urls.py              # URL patterns
├── example_project/         # Example Django project
├── tests/                   # Test suite
├── images/                  # Screenshots for README
└── requirements.txt         # Development dependencies
Requirements
- Python 3.9-3.14
- Django 4.2+
Screenshots
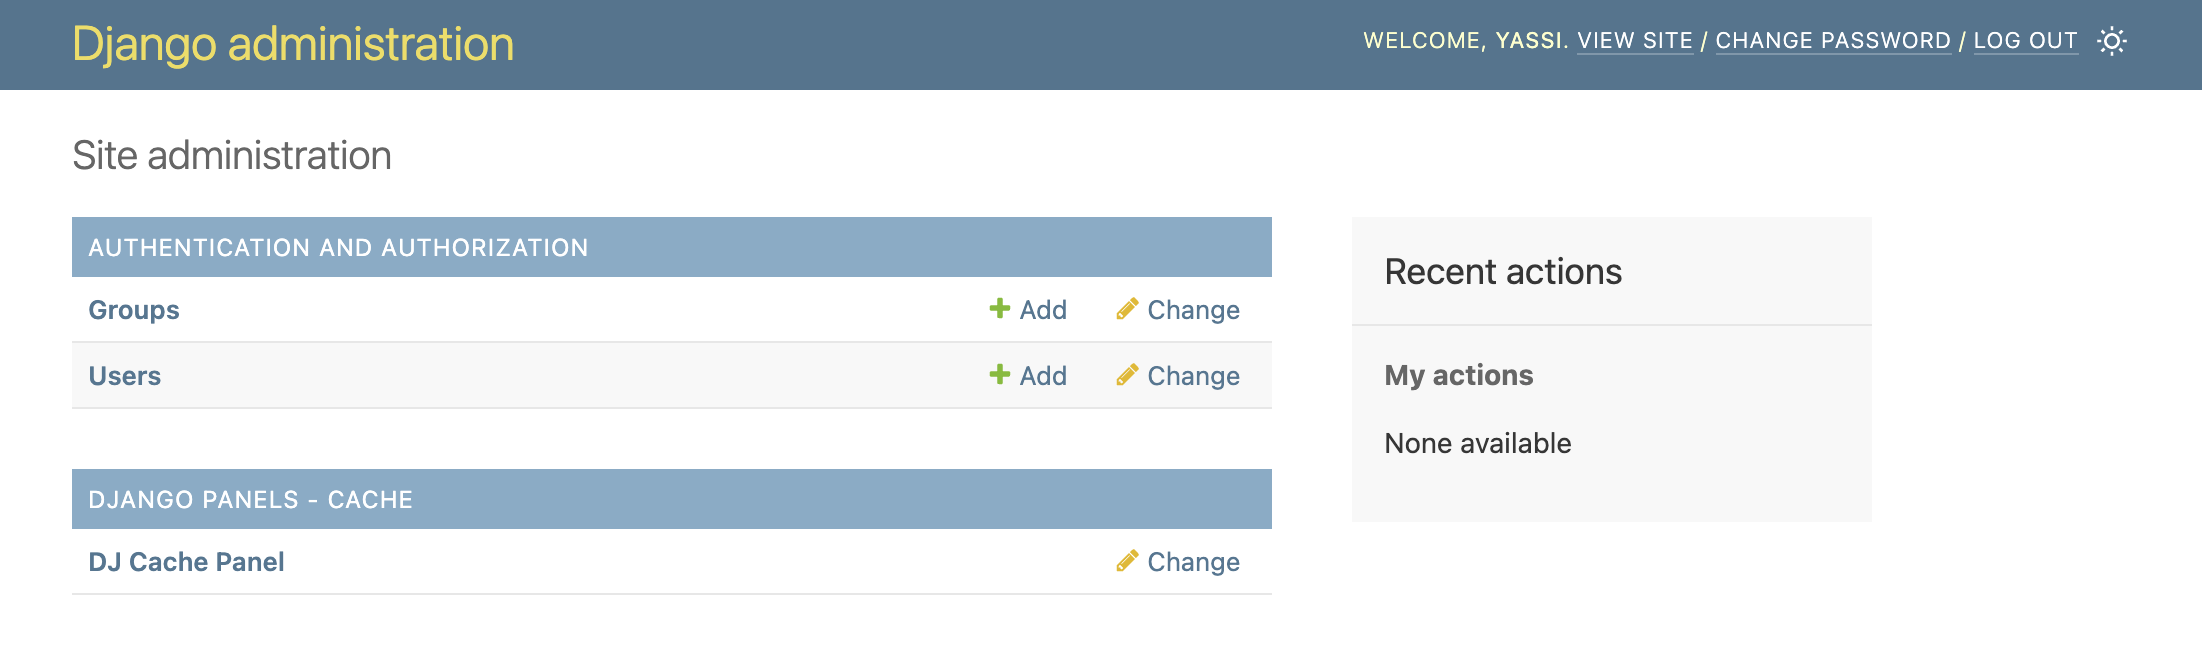
Django Admin Integration
Seamlessly integrated into your Django admin interface. A new section for dj-cache-panel will appear in the same places where your models appear.
NOTE: This application does not actually introduce any model or migrations.
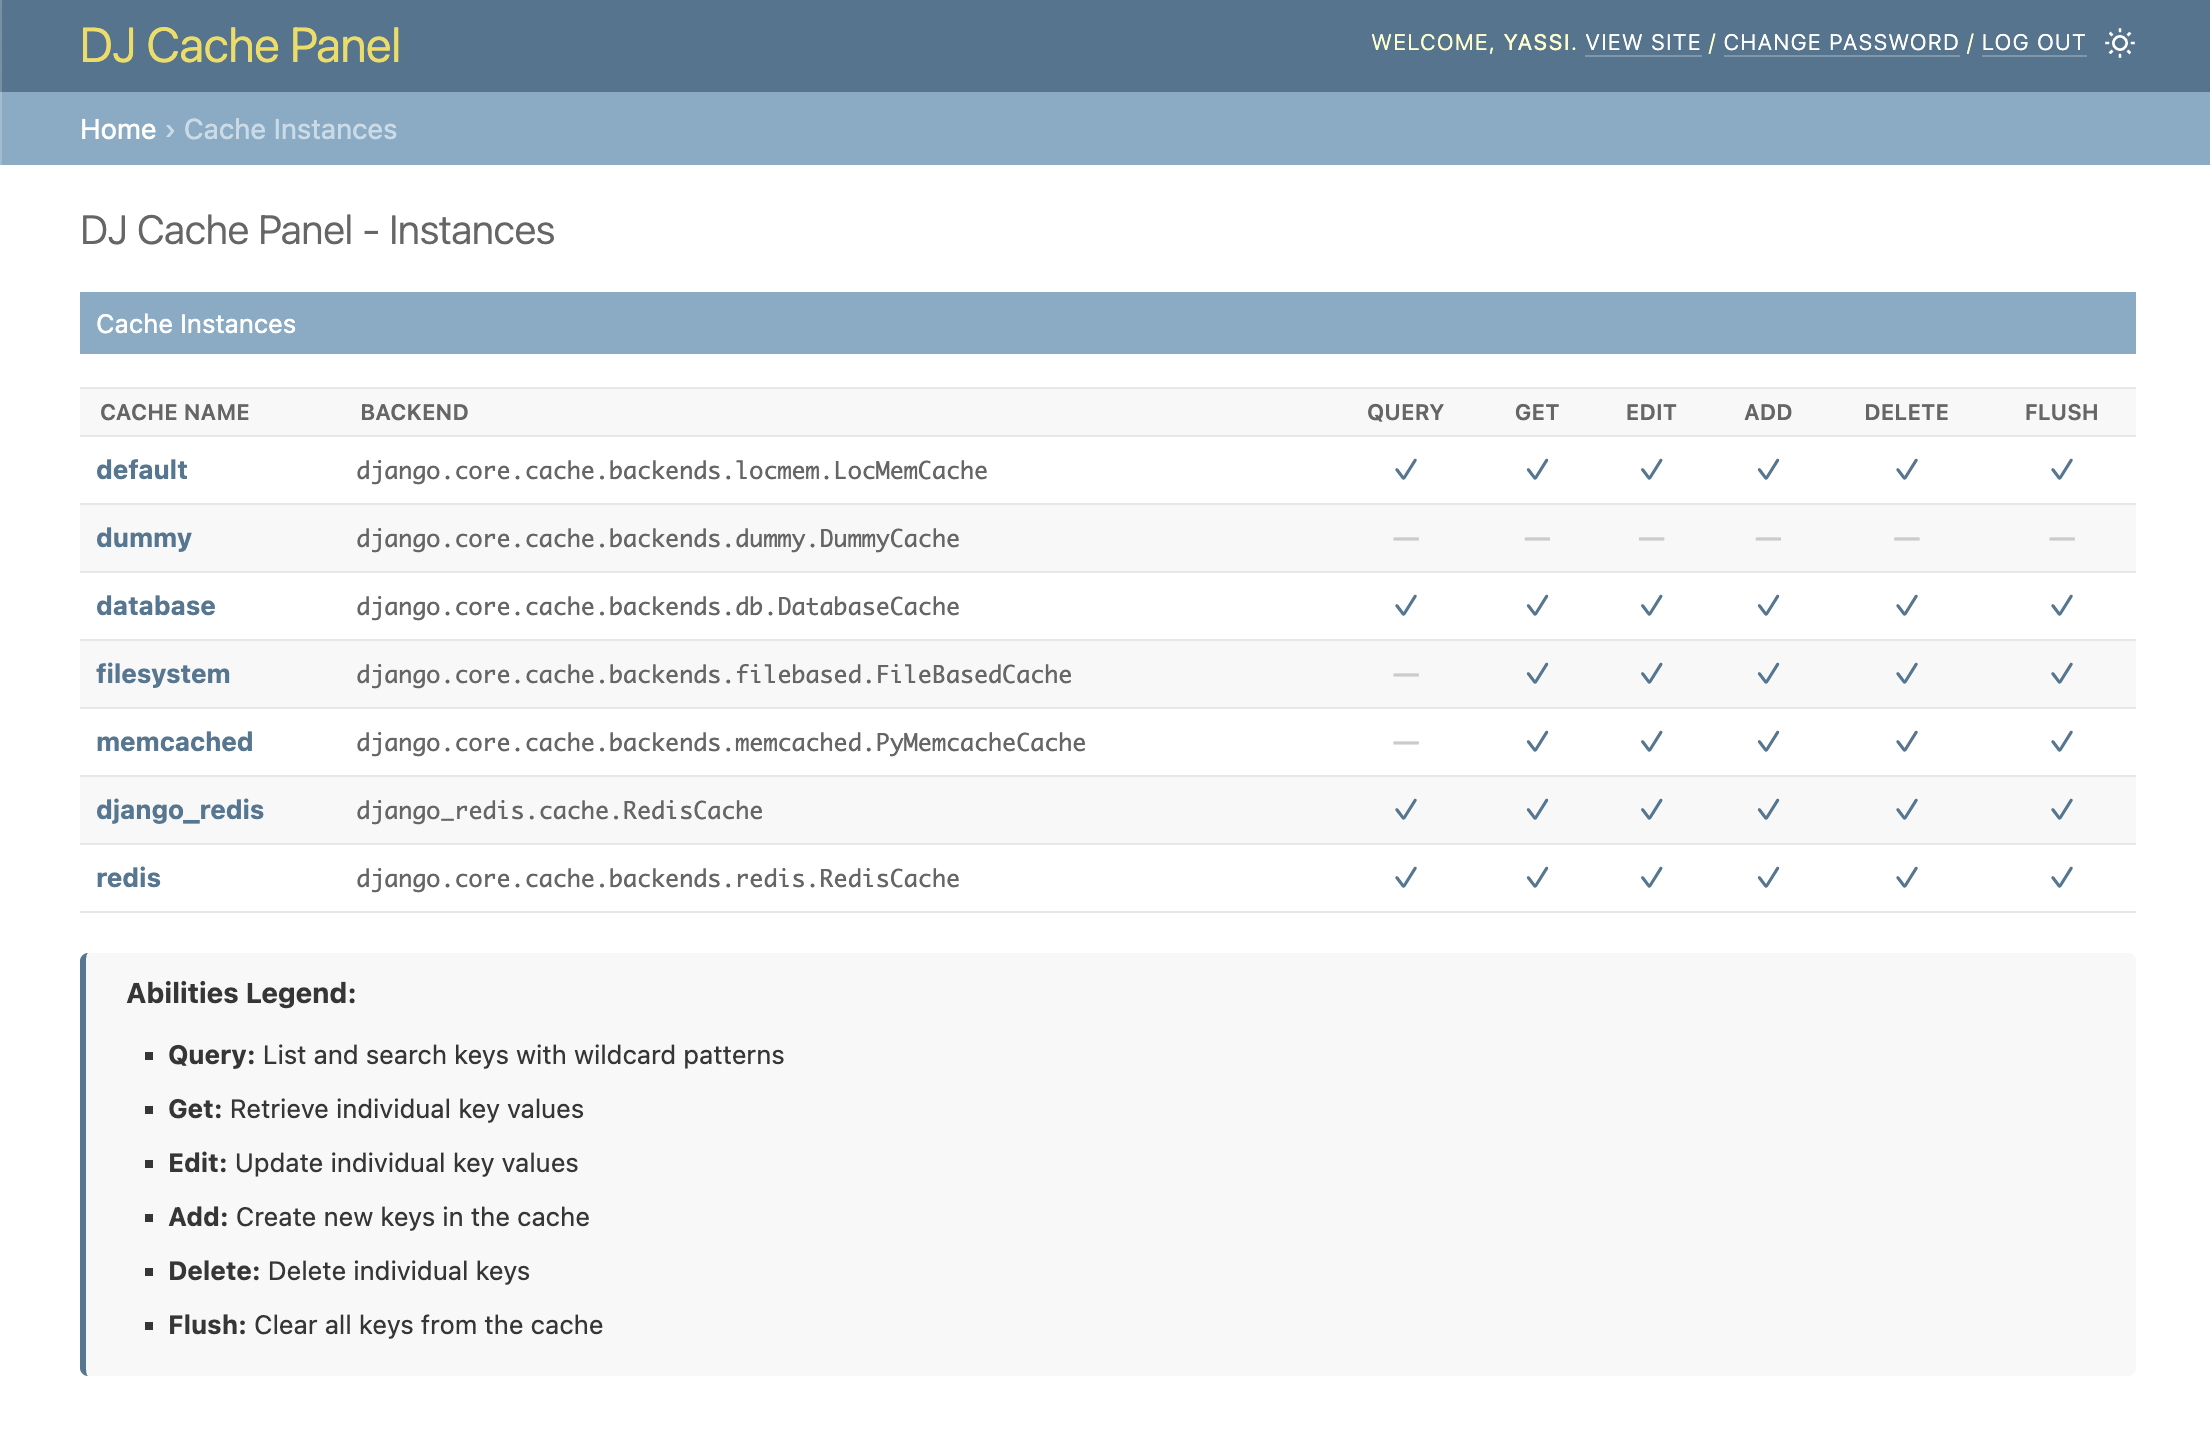
Caches Overview
Get a list of all your caches as well as the allowed capabilities for each cache
Key Search

Key Edits/Adds

Installation
1. Install the Package
pip install dj-cache-panel
Optional: Valkey Support
Django Cache Panel supports Valkey cache backend as an optional dependency. Valkey requires Python 3.10+.
# Install with Valkey support
pip install dj-cache-panel[valkey]
This installs:
django-valkey- Valkey cache backend for Django
2. Add to Django Settings
Add dj_cache_panel to your INSTALLED_APPS:
INSTALLED_APPS = [
    'django.contrib.admin',
    'django.contrib.auth',
    'django.contrib.contenttypes',
    'django.contrib.sessions',
    'django.contrib.messages',
    'django.contrib.staticfiles',
    'dj_cache_panel',  # Add this line
    # ... your other apps
]
3. Configure Cache Instances
Django cache panel will use the CACHES setting normally defined in django projects
Additionally, you can also define some extra settings for extending or changing behavior of the existing cache panels.
Note: these are advanced settings; the vast majority of django projects will not need to define any of these
DJ_CACHE_PANEL_SETTINGS = {
    # CSS: load built-in styles and/or inject your own
    "LOAD_DEFAULT_CSS": True,
    # Static paths are relative to app's static/ dir (e.g. 'myapp/css/overrides.css'
    # for a file at myapp/static/myapp/css/overrides.css). Full URLs also accepted.
    "EXTRA_CSS": [],

    # Optional: completely replace the default backend-to-panel mapping
    # "BACKEND_PANEL_MAP": {}
    #
    # Optional: extend or override specific backend-to-panel mappings
    # Panel classes can be specified as:
    #   - Simple class name (e.g., "RedisCachePanel") - for built-in panels
    #   - Full module path (e.g., "myapp.panels.CustomCachePanel") - for custom panels
    "BACKEND_PANEL_EXTENSIONS": {
        # Example: Map a custom backend to a custom panel class
        # "myapp.backends.CustomCache": "myapp.panels.CustomCachePanel",
        # Example: Override a built-in backend mapping
        # "django.core.cache.backends.redis.RedisCache": "myapp.panels.MyRedisCachePanel",
    },
    # Optional: per-cache settings overrides
    # Typically used to lock down a cache instance to only certain abilities
    "CACHES": {
        "redis": {
            "abilities": {  # Optional: override the abilities for this cache instance
                # "query": True,
                # "get_key": True,
                # "delete_key": True,
                # "edit_key": True,
                # "add_key": True,
                # "flush_cache": True,
            },
        }
    },
}
4. Include URLs
Add the Cache Panel URLs to your main urls.py:
from django.contrib import admin
from django.urls import path, include

urlpatterns = [
    path('admin/dj-cache-panel/', include('dj_cache_panel.urls')),  # Add this line
    path('admin/', admin.site.urls),
]
5. Run Migrations and Create Superuser
python manage.py migrate
python manage.py createsuperuser  # If you don't have an admin user
6. Access the Panel
-
Start your Django development server:
python manage.py runserver
-
Navigate to the Django admin at
http://127.0.0.1:8000/admin/ -
Look for the "DJ_CACHE_PANEL" section in the admin interface
-
Click "Manage Cache keys and values" to start browsing your cache instances
License
This project is licensed under the MIT License. See the LICENSE file for details.
Development Setup
If you want to contribute to this project or set it up for local development:
Prerequisites
- Python 3.9-3.14 (valkey requires 3.10+)
- Redis, Valkey, and Memcached servers running locally (or use Docker)
- Git
- Docker (recommended for simplified setup)
It is recommended that you use docker since it will automate much of dev env setup
1. Clone the Repository
git clone https://github.com/yassi/dj-cache-panel.git
cd dj-cache-panel
2a. Set up dev environment using virtualenv
python -m venv venv
source venv/bin/activate  # On Windows: venv\Scripts\activate

# Install base package and development dependencies
make install

# Or manually
pip install -e .
pip install -r requirements.txt
2b. Set up dev environment using docker
# Default setup with Python 3.10
make docker_up

# Or with different Python version
PYTHON_VERSION=3.11 make docker_up

# Then open a shell
make docker_shell
Environment Variables:
PYTHON_VERSION=3.11- Use specific Python version for Docker (default: 3.10)
3. Set Up Example Project
The repository includes an example Django project for development and testing
cd example_project
python manage.py migrate
python manage.py createsuperuser
4. Populate Test Data (Optional)
An optional CLI tool for populating cache keys automatically is included in the example django project in this code base.
python manage.py populate_redis
This command will populate your cache instance with sample data for testing.
6. Run the Development Server
python manage.py runserver
Visit http://127.0.0.1:8000/admin/ to access the Django admin with Cache Panel.
7. Running Tests
The project includes a comprehensive test suite. You can run them by using make or by invoking pytest directly:
# Test in Docker container
make test_docker

# Test with specific Python version
PYTHON_VERSION=3.11 make test_docker

# Test without Docker (requires redis, valkey, memcached services running)
make test_local
Note: When using python 3.10 or greater you can enable valkey support by using the django-valkey package