Weakly-Supervised Object Detection with Attention Maps
A web-based annotation tool and training pipeline for weakly-supervised object detection using image-level labels and count annotations.
📸 Examples
Attention Map Visualization
 The model's attention heatmaps showing where it detects different object classes
SAM Segmentation with Attention Guidance
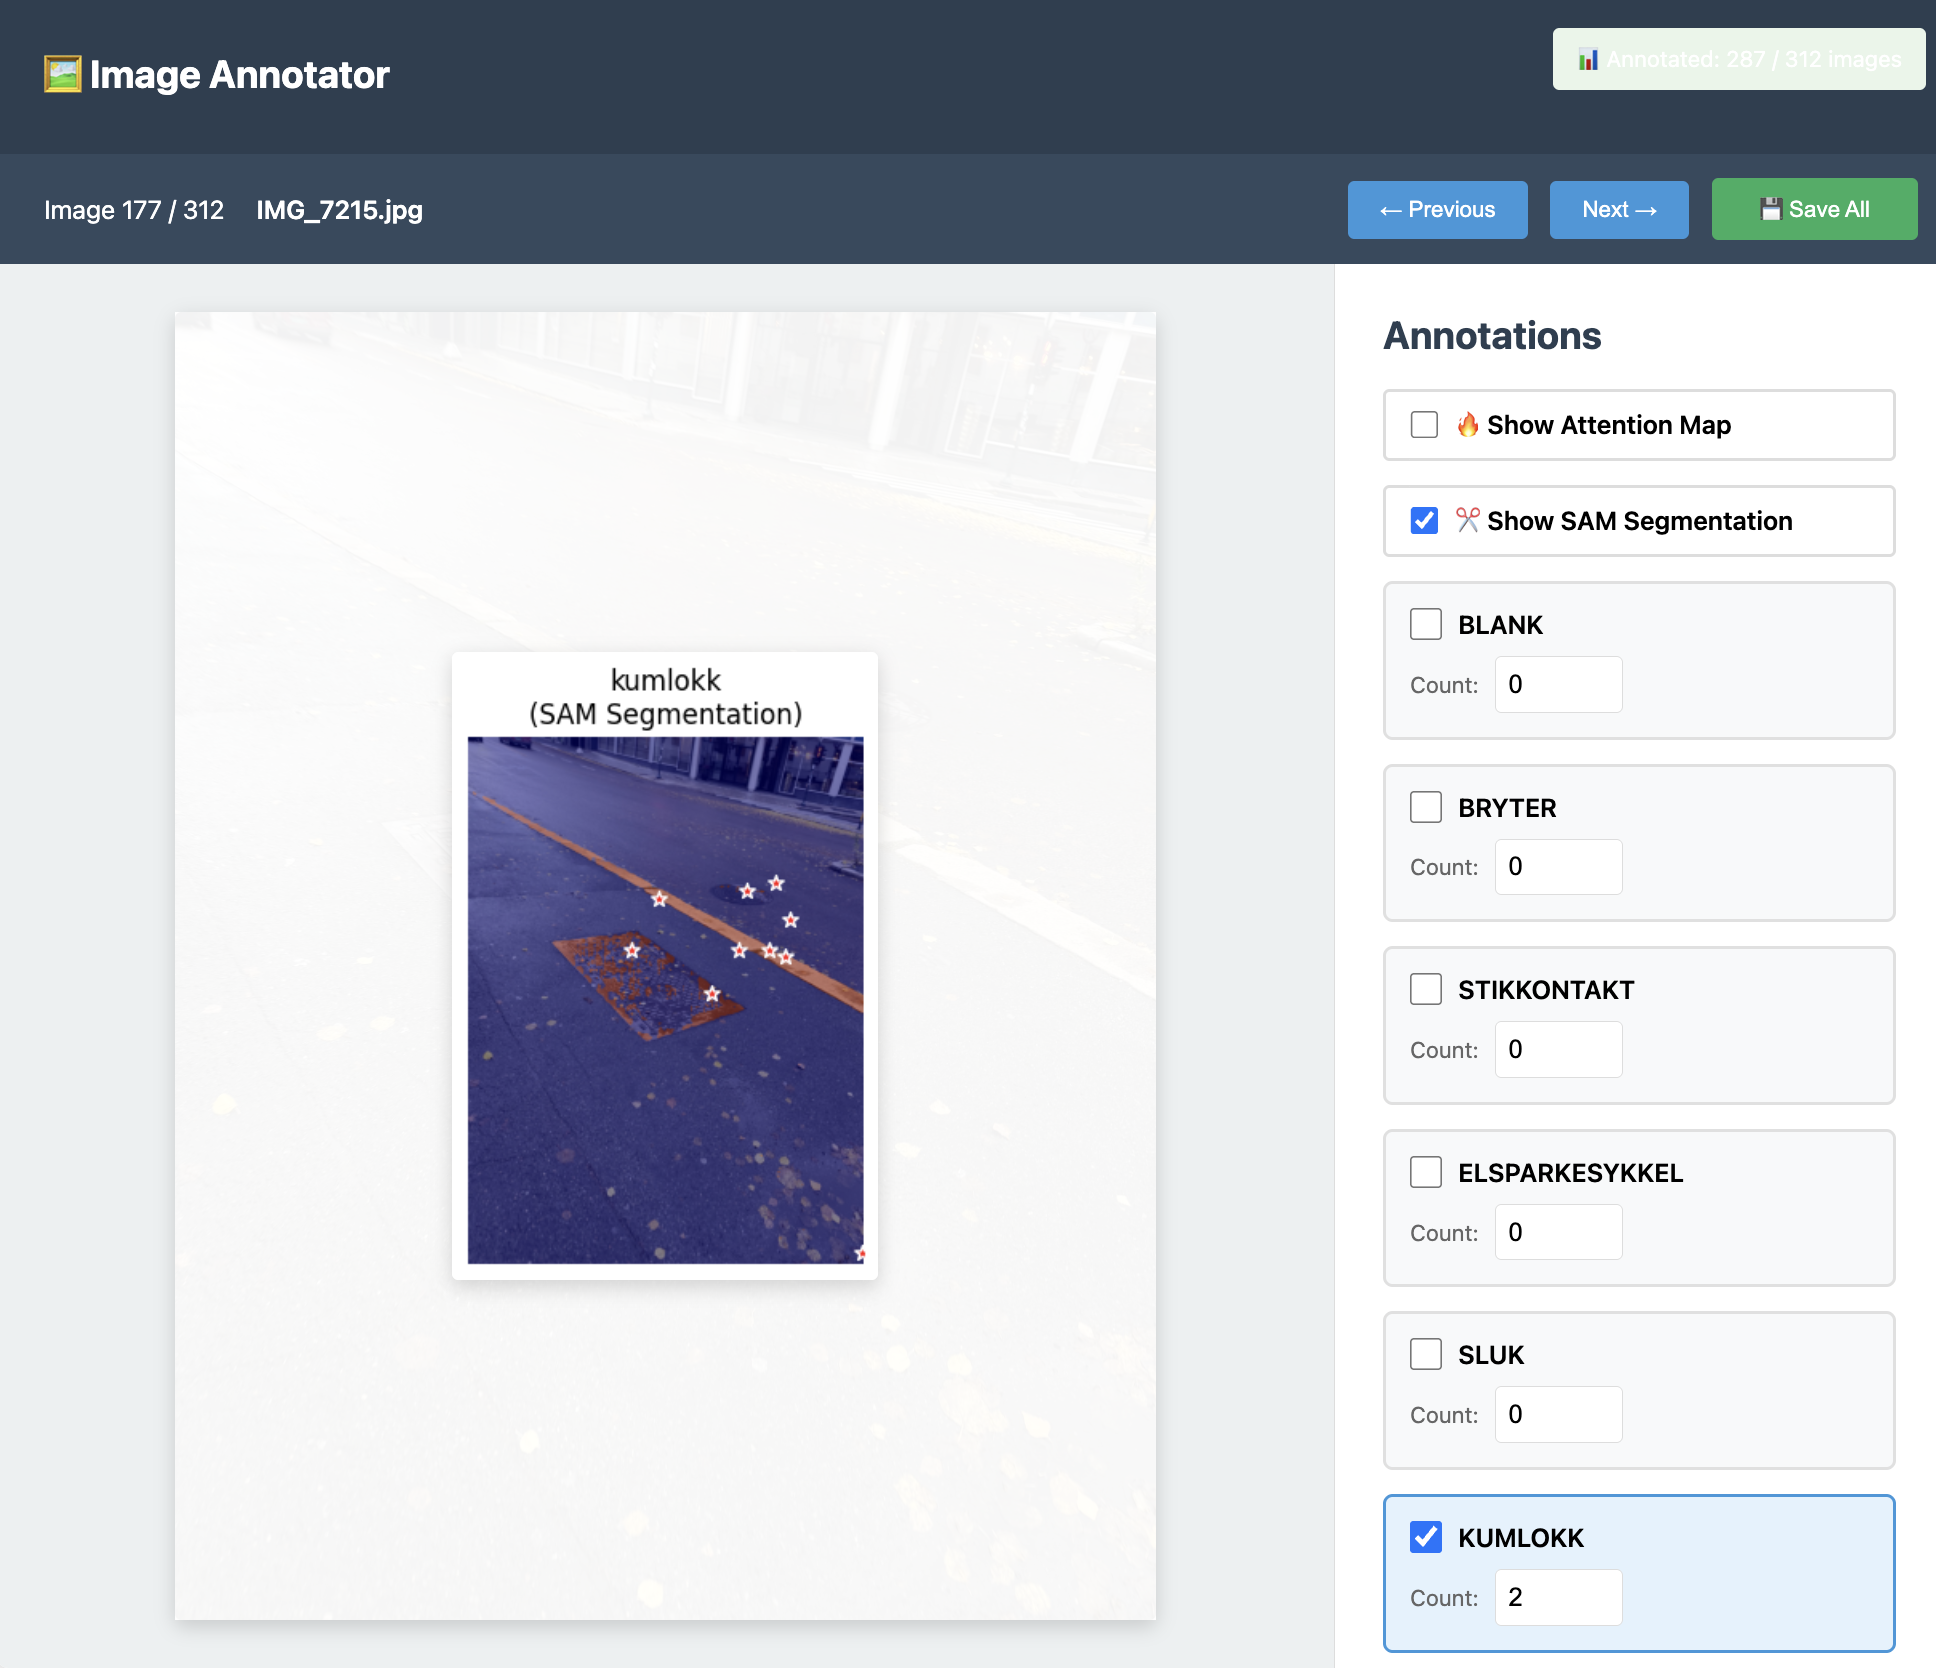 Precise segmentation masks generated by SAM using attention maps as prompts
📋 Overview
This project allows you to:
- Annotate images with class labels and object counts (no bounding boxes needed!)
- Train a deep learning model that learns to localize objects from weak supervision
- Visualize attention maps showing where the model "looks" for each class
- Export annotated datasets for further use
🚀 Quick Start
1. Install Dependencies
pip3 install flask torch torchvision pillow numpy matplotlib
Or if you have a requirements.txt:
pip3 install -r requirements.txt
2. Add Your Images
Place your images in the input/ folder:
cp /path/to/your/images/*.jpg input/Supported formats: .jpg, .jpeg, .png, .bmp
3. Run the Annotation Tool
Start the web-based annotation interface:
Then open your browser and go to:
4. Annotate Your Images
The annotation interface allows you to:
Basic Workflow
- View images: Navigate through images using arrow keys (←/→) or Next/Previous buttons
- Select classes: Check the boxes for classes present in the image
- Set counts: Enter the number of objects for each class (e.g., 3 outlets, 2 drains)
- Auto-save: Annotations are saved automatically as you work
- Manual save: Click "Save All" to ensure everything is persisted
Keyboard Shortcuts
←orP: Previous image→orN: Next imageCtrl+S: Save all annotationsSpaceor0: Toggle "blank" classB: Toggle "bryter" (switch)K: Toggle "stikkontakt" (outlet)E: Toggle "elsparkesykkel" (e-scooter)S: Toggle "sluk" (drain)M: Toggle "kumlokk" (manhole cover)1-9: Set count for active class
Tips
- If an image contains no objects of interest, just leave all counts at 0 or check "blank"
- You can annotate partially - the tool tracks which images have been annotated
- The progress indicator shows "Annotated: X / Y images" in the top right
5. Train the Model
Once you have annotated enough images (recommended: 50+ images minimum), train the model:
Training options:
# Basic training with default settings
python3 train.py

# Specify number of epochs
python3 train.py --epochs 50

# Adjust batch size (reduce if out of memory)
python3 train.py --batch-size 4

# Change learning rate
python3 train.py --lr 0.0001
What happens during training:
- The model learns from image-level labels and counts
- Creates a weakly-supervised detector that localizes objects
- Saves the best model to
output/model.pth - Generates training plots in
output/training_plots.png
Training progress:
Epoch [10/30], Loss: 2.3456, Count MAE: 1.23
Epoch [20/30], Loss: 1.2345, Count MAE: 0.89
...
✓ Training complete! Model saved to output/model.pth
6. View Attention Maps & Segmentation
After training, restart the annotation tool:
Now you'll see visualization options in the annotation panel:
🔥 Attention Maps
Check "Show Attention Map" to visualize where the model is looking for each class!
Attention maps show:
- Hot spots (red/yellow) where the model detects objects
- Cool areas (blue) with low confidence
- Separate heatmap for each class
- Predicted counts for each class
✂️ SAM Segmentation (Optional)
For precise object segmentation, install Segment Anything Model (SAM):
pip install segment-anything
Download a SAM checkpoint and place it in the output/ folder:
# Download SAM ViT-H checkpoint (2.4GB)
wget https://dl.fbaipublicfiles.com/segment_anything/sam_vit_h_4b8939.pth -P output/

# Or use smaller models:
# ViT-L (1.2GB): sam_vit_l_0b3195.pth
# ViT-B (375MB): sam_vit_b_01ec64.pth
Restart app.py, and you'll see "Show SAM Segmentation" toggle!
SAM segmentation workflow:
- Annotate first: Mark classes present in the image (set count > 0)
- Click SAM toggle: SAM will segment ONLY the classes you annotated
- Attention guides SAM: Your model's attention map tells SAM where to look
- Precise masks: SAM creates accurate segmentation boundaries
Why this approach works:
- Your annotations = which classes to segment (ground truth)
- Attention map = where to find those classes (model guidance)
- SAM = precise segmentation tool (combines both inputs)
- Red stars show attention-guided prompt points given to SAM
📁 Project Structure
attention_with_dataset/
├── app.py                      # Web annotation tool
├── train.py                    # Training script
├── inference.py                # Run inference on new images
├── dynamic_dataset.py          # Dataset loader
├── input/                      # Your images go here
│   ├── IMG_001.jpg
│   ├── IMG_002.jpg
│   └── ...
├── data/
│   └── annotations/
│       └── annotations.json    # Saved annotations
├── output/                     # Training outputs
│   ├── model.pth              # Trained model
│   └── training_plots.png     # Loss/accuracy plots
└── templates/
    └── index.html             # Auto-generated UI
🔄 Workflow Summary
1. Add images → input/
2. Run app.py → Annotate images
3. Run train.py → Train model
4. Run app.py again → View attention maps
5. Add more images → Repeat!
📸 Adding New Images
Option 1: Add to Existing Dataset
Simply copy new images to the input/ folder:
cp /path/to/new/images/*.jpg input/Then restart app.py and annotate the new images.
Option 2: Batch Import
If you have many images:
# Copy all images at once
cp -r /path/to/image/folder/*.jpg input/

# Or use a loop for different formats
for img in /path/to/images/*.{jpg,png}; do
    cp "$img" input/
done
Option 3: Reduce Image Sizes (Recommended)
If your images are large, compress them first to save disk space:
# This was done using the reduce_images.py script
# which converts images to JPEG and reduces file size by ~75-85%
Note: If you convert images from PNG to JPG after annotation, make sure to update annotation references (already handled in this project).
🎯 Annotation Best Practices
How Many Images?
- Minimum: 50 images per class
- Good: 100-200 images per class
- Excellent: 500+ images per class
Quality Tips
- Be consistent: Count all visible objects, even partial ones
- Verify counts: Double-check your counts before moving to next image
- Handle occlusion: Count partially visible objects if >50% visible
- Background images: Include images with no objects (all counts = 0)
- Variety: Include different angles, lighting, distances
Class Balance
Try to have roughly equal numbers of images for each class. If one class has 200 images and another has 20, the model may perform poorly on the underrepresented class.
🔧 Customizing Classes
To change the classes, edit app.py:
# Line 37 - Change these to your classes
CLASSES = ["blank", "bryter", "stikkontakt", "elsparkesykkel", "sluk", "kumlokk"]
Change to:
CLASSES = ["person", "car", "bicycle", "dog", "cat"]
Also update keyboard shortcuts (lines 918-936) if desired.
🧪 Running Inference
To run the trained model on new images:
python3 inference.py --image path/to/image.jpg
This will:
- Load the trained model
- Generate attention maps
- Display predicted counts for each class
- Save visualization to
output/inference_result.png
Batch inference:
# Process all images in a folder
python3 inference.py --folder path/to/images/
📊 Understanding the Model
Architecture
- Backbone: ResNet-based feature extractor
- Attention: Learns spatial attention maps for each class
- Counting: Integrates attention to predict object counts
- Supervision: Trained only on image-level counts (no bounding boxes!)
Loss Function
The model optimizes:
- Count loss: MSE between predicted and true counts
- Attention regularization: Encourages focused, localized attention
Output
For each image and class:
- Density map: Spatial probability distribution of objects
- Count: Predicted number of objects (sum of density map)
- Attention overlay: Visualization of where model is looking
🐛 Troubleshooting
Issue: "No images found"
Solution: Add images to input/ folder and refresh the browser
Issue: Annotations not showing after restart
Solution: Annotations are saved to data/annotations/annotations.json. Check if the file exists and contains your data.
Issue: Out of memory during training
Solution: Reduce batch size:
python3 train.py --batch-size 2
Issue: Model not loading in app.py
Solution: Make sure output/model.pth exists. Train the model first with python3 train.py
Issue: Poor attention maps
Solution:
- Annotate more images (100+ per class)
- Train for more epochs:
python3 train.py --epochs 50 - Check annotation quality - are counts accurate?
Issue: Images changed from PNG to JPG
Solution: Already handled! Annotation files automatically updated to reference .jpg instead of .png
📚 Advanced Usage
Data Augmentation
The training pipeline includes augmentation:
- Random horizontal flips
- Color jittering
- Random crops
- Normalization
Edit dynamic_dataset.py to customize augmentation.
Composite Images
Create 2x2 grids of images for efficient annotation:
python3 augment_composite.py
This combines 4 images into larger grids, useful for small objects.
Model Architecture
To modify the model architecture, edit train.py:
- Change backbone network
- Adjust attention mechanism
- Modify loss functions
- Add regularization
🎓 Citation
If you use this tool for research, please cite:
Weakly-Supervised Object Detection with Count Annotations
Morten Punnerud-Engelstad
2025
📝 License
Code License
MIT License - see LICENSE file for details.
Copyright (c) 2025 Morten Punnerud-Engelstad
Model and Dependencies Licenses
This project uses the following pre-trained models and libraries, each with their own licenses:
PyTorch & TorchVision
- License: BSD 3-Clause License
- Usage: ResNet backbone, model training infrastructure
- Attribution: Copyright (c) 2016-present, Facebook Inc. (Meta)
- Link: https://github.com/pytorch/pytorch/blob/main/LICENSE
ResNet Models (via TorchVision)
- License: BSD 3-Clause License
- Pre-trained weights: Trained on ImageNet, used under TorchVision license
- Attribution: Kaiming He et al., "Deep Residual Learning for Image Recognition"
- Link: https://github.com/pytorch/vision/blob/main/LICENSE
Segment Anything Model (SAM) - Optional Feature
- License: Apache License 2.0
- Usage: Optional segmentation refinement feature
- Attribution: Meta AI Research
- Link: https://github.com/facebookresearch/segment-anything/blob/main/LICENSE
- Note: SAM is an optional enhancement and not required for core functionality
Important: Any trained models you create using this tool inherit the licensing terms of:
- Your training data (ensure you have rights to use your images)
- The pre-trained backbone models (ResNet under BSD-3)
- This codebase (MIT License)
Commercial Use: All components (PyTorch, ResNet, SAM, MIT license) permit commercial use. Ensure your training data also permits your intended use case.
🤝 Contributing
Contributions welcome! Please:
- Fork the repository
- Create a feature branch
- Submit a pull request
📧 Contact
For questions or issues, please create an issue.
Happy annotating! 🎉