![]()
A CLI tool for freedivers
to create depth & time overlay videos
from dive computers or any manual logs.


↘ Quick Links ↙
Features • Installation • Usage • No Dive Computer? • How It Works • Contribution • License • Contact
↘ Share the project's link to your friends ↙
✨ Features
Why use depthviz?
- 🎥 Stunning Depth Overlays – Turn dive logs into smooth, real-time depth displays.
- 💻 Works Anywhere – Runs on Windows, macOS, and Linux.
- 📊 Dive Log Friendly – Supports Apnealizer, Garmin, Suunto, Shearwater, and even manually recorded logs!
- 🎨 Fully Customizable – Adjust fonts, colors, decimal places, stroke width, and more.
- 🔗 Easy Video Integration – Works with CapCut, Premiere Pro, and other editors.
- ⚡ Smart Depth Smoothing – Automatically fills in missing data for a seamless and natural depth display. Includes zero-based depth mode to smoothly estimate a 0m start if your dive log starts underwater.
Tip
Perfect for performance freedivers tracking PBs or analyzing technique. Overlay your data and see every moment of your dive!
🌟 Like depthviz?
If you like depthviz and find it useful, please give it a shiny 
Get early access to new open-source projects, exclusive insights, and sneak peeks at upcoming depthviz features! 🚀
I’d love to see your diving stories or videos made with depthviz! Share your creations by tagging @noppanut15 or using #depthviz.
See you in the deep! 🌊😊
🛠️ Installation
Prerequisites
- Python 3.9 to 3.13
Download Python • How to install Python - pipx – the recommended tool for installing Python CLI tools
How to install pipx
Install depthviz
Open your terminal and run:
Upgrade
When a new version is available, update with:
Check your current version:
🚀 Usage
🏁 First Time Using depthviz?
Start with this quick example:
depthviz -i my_dive.fit -s garmin -o overlay.mp4
- 📂
-i: Your dive log file - 🔍
-s: Data source (garmin,suunto, etc.) - 🎬
-o: Name of output video
For full customization, keep reading! 🚀
📌 Step 1: Prepare Your Dive Data
- 🙆 With a Dive Computer:
Export your dive log from your dive computer or diving application. (see Supported Dive Log Formats below). - 🙅 No Dive Computer?
You can record your dive manually (details in No Dive Computer?).
📌 Step 2: Generate the Overlay
Run this command to create your depth overlay video from your dive log:
depthviz -i YOUR_DIVE_LOG -s DATA_SOURCE -o OUTPUT_VIDEO.mp4
Example (Garmin dive log):
depthviz -i 123456_ACTIVITY.fit -s garmin -o my_dive_overlay.mp4
| Option | Short | Values | Description |
|---|---|---|---|
--input |
-i |
File path | Path or filename to your dive log file. |
--source |
-s |
apnealizer,shearwater,garmin,suunto,manual |
The data source. (See the Supported Dive Log Formats for details.) |
--output |
-o |
File path | Path or filename for the output video. (must end with .mp4) |
📂 Supported Dive Log Formats
| Source | Description | File type |
|---|---|---|
apnealizer |
Exported logs from the Apnealizer app. |
CSV |
shearwater |
Logs from Shearwater dive computers. |
XML |
garmin |
Logs from Garmin dive computers. |
FIT |
suunto |
Logs from Suunto dive computers. |
FIT |
manual |
Manually entered depth logs. |
CSV |
⚙️ Advanced Customization Options
View Advanced Options
Want more control? Use these optional parameters:
| Option | Values | Default | Description |
|---|---|---|---|
-d or --decimal-places |
0, 1, or 2 |
0 |
Number of decimal places in the depth overlay. |
--depth-mode |
raw or zero-based |
raw |
raw shows the actual depth; zero-based forces the overlay to start/end at 0m. See Raw vs Zero-Based |
--no-minus |
- | - | Removes the minus sign from depth values (e.g., 10m instead of -10m). |
--font |
File path | Default font | Path to a custom font file for the text. |
--bg-color |
Color name or hex code | black |
Background color (e.g., green, '#000000'). |
--stroke-width |
Positive integer | 5 |
Thickness of the text outline for better visibility. |
Example Command with Advanced Options
Example of generating a depth overlay video named mydive.mp4 using data from 123456_ACTIVITY.fit exported from Garmin Connect:
depthviz \
    -i 123456_ACTIVITY.fit -s garmin -o mydive.mp4 \
    --depth-mode zero-based \
    --decimal-places 1 \
    --no-minus \
    --bg-color green \
--font ~/Downloads/YourCustomFont.ttf- Set the depth display mode to zero-based to adjust the depth to start and end at 0m. (Learn more about Zero-Based Depth Mode)
- The depth values will be displayed with one decimal place.
- The minus sign will be hidden.
- The background color will be set to green for chroma keying.
- A custom font file at
~/Downloads/YourCustomFont.ttfwill be used for the text.
Tip
Use the --decimal-places option to control the precision of the depth display (e.g., --decimal-places 1 displays depths like -12.5m)
⏱️ Time Overlay Video

You can also generate a time overlay video as a separate video that displays the time elapsed during the dive. It will be exported in the same directory as the depth overlay video.
| Option | Values | Description |
|---|---|---|
--time |
- | Create a time overlay video. |
Example Command with Time Overlay
Example of generating a depth overlay video named mydive.mp4 and a time overlay video by adding the --time option:
depthviz -i 123456_ACTIVITY.fit -s garmin -o mydive.mp4 --time
The time overlay video will be automatically generated and saved in the same directory as the depth overlay video with the filename
mydive_time.mp4.
📌 Step 3: Integrate with Your Footage

Import the generated depth overlay and time overlay (if used) into your video editing software. Remove the background color. Adjust position of the overlays to suit your video style.
🎓 Watch a quick tutorial: How to import overlays in CapCut.
Tip
🎨 Chroma Keying: If you want to remove the background color from the overlay, use the chroma key effect in your video editor. You can use the --bg-color option to set the background color to match your video editor's chroma key color. Using --bg-color green is a common choice.
🚫 No Dive Computer?
No dive computer? No problem! You can still create a depth overlay! Simply record key moments of your dive (using depth markers on your rope, for example) and prepare a CSV file with two columns:
- Time: in seconds
- Depth: in meters
Example Manual Input File:
| Time | Depth |
|---|---|
| 0 | 0 |
| 6 | 5 |
| 12 | 10 |
| 19 | 15 |
| 26 | 10 |
| 33 | 5 |
| 39 | 0 |
Example Command:
depthviz -i manual_input.csv -s manual -o output_video.mp4
Tip
For a simple dive, recording just three points (start, maximum depth, end) is enough. depthviz will interpolate the values for a smooth depth profile!
Important
For more complex dives (e.g., dives with significant variations in descent/ascent rate or bottom time), more data points are recommended.
Tip
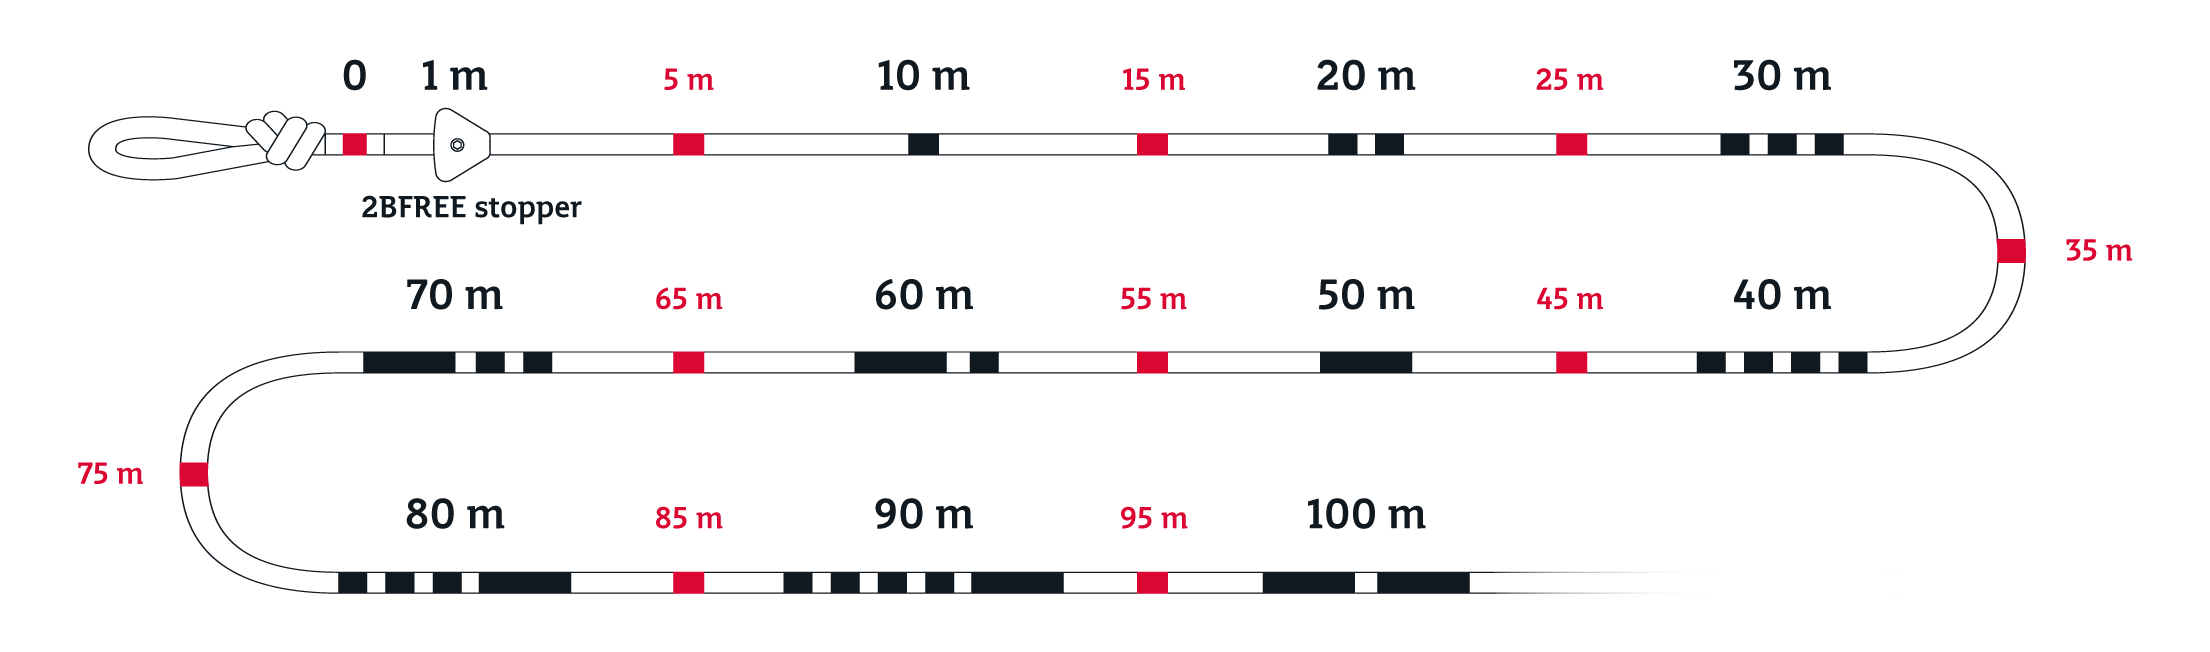
Freediving rope with depth markers can help you record key moments of your dive.
💡 Raw vs Zero-Based Mode

depthviz offers two ways to display depth:
| Mode | Best For | Description |
|---|---|---|
raw (Default) |
Accuracy, Dive Analysis | Shows actual recorded depth. Your dive might start at -0.3m, -0.5m, etc. if the dive computer didn’t record at the surface. (left figure) |
zero-based |
Aesthetic Video Overlays | Adjusts depth to start and end at 0m for a smoother display. Assumes a 1m/s descent/ascent rate for the missing surface portion. (right figure) |
Tip
- Use
rawmode if accuracy matters (e.g., dive analysis). - Use
zero-basedif your dive log starts/ends underwater but you want a clean 0m start/end. (e.g., social media videos)
🧠 How It Works
depthviz transforms your dive log data into an overlay video that visually tracks your depth in real time. It supports multiple dive computer formats and even allows manual data input, making it a versatile tool for freedivers looking to analyze and improve their performance.
🔬 Understanding Depth Calculation
Dive computers record either depth directly or pressure, which depthviz converts into depth using fluid statics principles. Understanding this process helps ensure accurate depth visualization.
↘️ Calculating Hydrostatic Pressure
Underwater pressure consists of atmospheric pressure (collected during the surface interval or dive start) and hydrostatic pressure. To determine hydrostatic pressure:
Hydrostatic pressure increases with depth due to the weight of the water above, making it a key factor in depth calculations.
↘️ Converting Pressure to Depth
Once hydrostatic pressure is known, depth can be calculated using the formula:
Where:
- h = Depth in meters
- ρ = Water density (EN13319 standard: 1019.7 kg/m³, standard for dive computers)
- g = Gravity (9.80665 m/s²)
Note
Water density varies between saltwater and freshwater, which can affect depth accuracy. Custom density settings are planned for future updates.
📊 Handling Missing Data
Dive computers record data at different rates, which may result in gaps in data due to device limitations, battery-saving settings, or inconsistent logging intervals. To create a smooth depth profile, depthviz applies Linear Interpolation to estimate missing values.
To estimate missing depth values, depthviz uses the following formula:
Where:
- d = Estimated depth
- t = Missing timestamp
- (t₀, d₀) and (t₁, d₁) = Known data points
This ensures a smooth transition between recorded depth values.
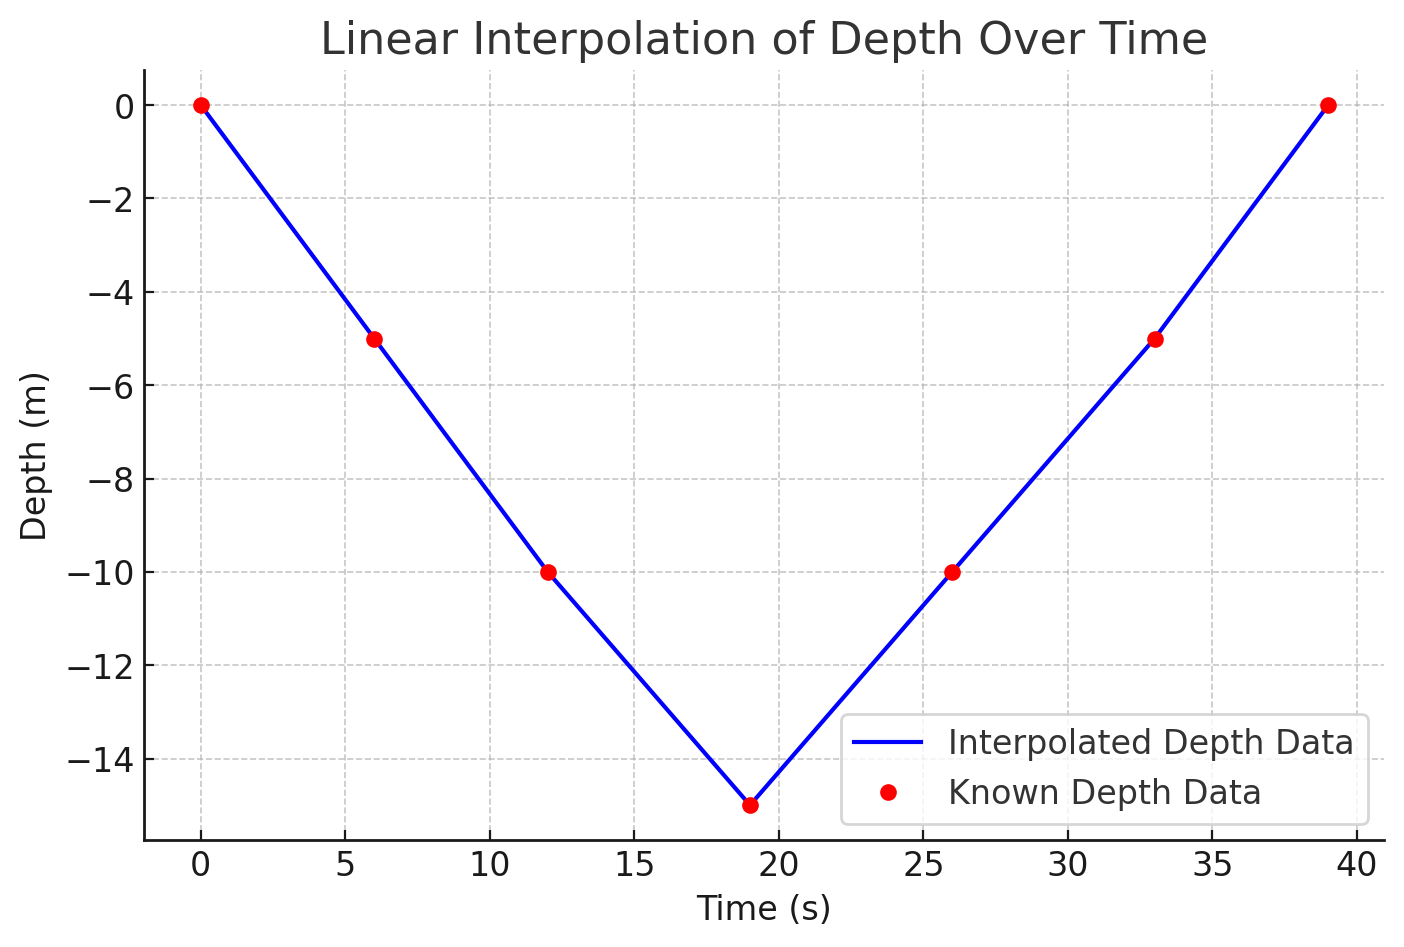
Example: If your dive log records 5m at 6s and jumps to 10m at 12s,
depthvizestimates intermediate depths at 7s, 8s, etc., for a seamless display.
🎥 Creating the Overlay Video
Once the data is processed, depthviz:
✅ Smooths depth values, ensuring natural and fluid transitions between recorded points.
✅ Applies display settings, including color, font, and stroke width, for full customization.
✅ Generates an overlay video, ready for integration with your dive footage.
This functionality allows freedivers to analyze their performance, track progress, and create engaging underwater visuals effortlessly. Whether for personal improvement, training analysis, or social media sharing.
📦 What's Inside depthviz?
Every depthviz release includes a Software Bill of Materials (SBOM) in CycloneDX format, providing full transparency into its dependencies. Whether you're a developer, a security-conscious freediver, or just curious, you’ll find everything under the hood.
💡 What’s an SBOM? (Click to expand)
An SBOM is like a blueprint of depthviz—a complete list of every package it depends on. It helps with:
- ✅ Security: Identify known vulnerabilities in dependencies
- ✅ Transparency: See exactly what’s inside
depthviz - ✅ Reliability: Ensures
depthvizremains stable and up-to-date
The SBOM is generated by the GitHub Actions workflow using the cyclonedx-python library.
You can download the latest SBOM from the release artifacts.
🌱 Contribution
Want to make depthviz even better? Whether it’s fixing bugs, adding features, or improving dive computer support, every contribution helps!
🔧 Contribute Code or Ideas
- Found a bug? Open an issue so it can be fixed!
- Have a feature idea? Share it in Discussions or open an issue.
- Ready to code? Fork the repo and submit a pull request.
📖 Before contributing, please read CONTRIBUTING.md for guidelines on reporting issues, submitting pull requests, and coding standards.
⌚ Help Expand Dive Computer Support
Is your dive computer not supported yet? You can help change that! By sharing a sample dive log file, you’ll help depthviz analyze its format and add support in future updates.
To contribute your dive log, check out the guide in Donate My Dive. Every log helps make depthviz better for all freedivers! 🌊💙
🙌 Credits & Contributors
depthviz wouldn’t be possible without our amazing community and the open-source projects it relies on.
See AUTHORS.md for a list of contributors, maintainers, and dependencies that help power this project.
⚖️ License
depthviz is free and open-source software licensed under the Apache License 2.0, created and supported by Noppanut Ploywong with ❤️ for fellow freedivers.
📬 Contact
- Have Questions or Ideas? Join the Discussions.
- Found a Bug or Have a Feature Request? Open an issue.
- Need to Reach Out Directly? Contact the maintainer at noppanut.connect@gmail.com.
Contributions and feedback are always appreciated! 🌊✨