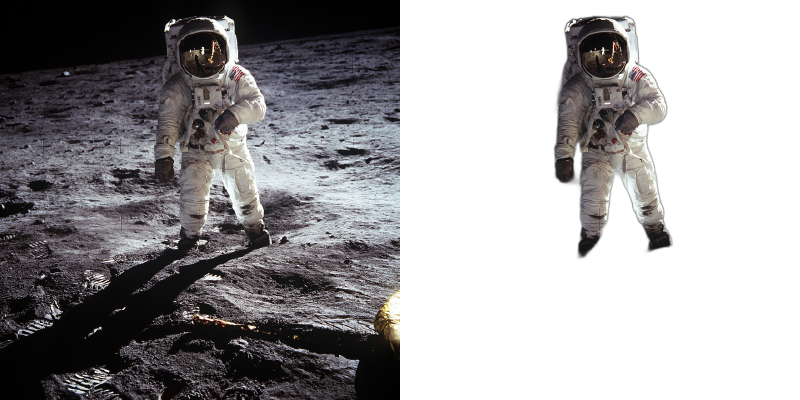
BackgroundRemover is a command line tool to remove background from image and video using AI, made by nadermx to power https://BackgroundRemoverAI.com. If you wonder why it was made read this short blog post.
Requirements
-
python >= 3.6
-
python3.6-dev #or what ever version of python you use
-
torch and torchvision stable version (https://pytorch.org)
-
ffmpeg 4.4+
-
To clarify, you must install both python and whatever dev version of python you installed. IE; python3.10-dev with python3.10 or python3.8-dev with python3.8
How to install torch and ffmpeg
Go to https://pytorch.org and scroll down to INSTALL PYTORCH section and follow the instructions.
For CPU-only (default):
pip3 install torch torchvision --index-url https://download.pytorch.org/whl/cpu
For GPU (CUDA) support:
# For CUDA 11.8
pip3 install torch torchvision --index-url https://download.pytorch.org/whl/cu118

# For CUDA 12.1
pip3 install torch torchvision --index-url https://download.pytorch.org/whl/cu121
Visit https://pytorch.org/get-started/locally/ to find the correct command for your CUDA version.
To install ffmpeg and python-dev:
sudo apt install ffmpeg python3.6-dev
Installation
To Install backgroundremover, install it from pypi
pip install --upgrade pip
pip install backgroundremover
Please note that when you first run the program, it will check to see if you have the u2net models, if you do not, it will pull them from this repo
It is also possible to run this without installing it via pip, just clone the git to local start a virtual env and install requirements and run
python -m backgroundremover.cmd.cli -i "video.mp4" -mk -o "output.mov"
and for windows
python.exe -m backgroundremover.cmd.cli -i "video.mp4" -mk -o "output.mov"
Installation using Docker
git clone https://github.com/nadermx/backgroundremover.git
cd backgroundremover
docker build -t bgremover .
# Basic usage (models will be downloaded on each run)
alias backgroundremover='docker run -it --rm -v "$(pwd):/tmp" bgremover:latest'

# Recommended: Persist models between runs to avoid re-downloading
mkdir -p ~/.u2net
alias backgroundremover='docker run -it --rm -v "$(pwd):/tmp" -v "$HOME/.u2net:/root/.u2net" bgremover:latest'

# For video processing: Increase shared memory to avoid multiprocessing errors
alias backgroundremover='docker run -it --rm --shm-size=2g -v "$(pwd):/tmp" -v "$HOME/.u2net:/root/.u2net" bgremover:latest'
Note for Docker video processing: Video processing uses multiprocessing which requires adequate shared memory. If you encounter errors like OSError: [Errno 95] Operation not supported, use --shm-size=2g (or higher) or --ipc=host when running the container.
GPU Acceleration
BackgroundRemover automatically detects and uses your GPU if available, which provides significant speed improvements (typically 5-10x faster than CPU).
To verify GPU is being used:
python3 -c "import torch; print('GPU available:', torch.cuda.is_available()); print('GPU name:', torch.cuda.get_device_name(0) if torch.cuda.is_available() else 'N/A')"Troubleshooting GPU issues:
- GPU not detected: Ensure you installed the CUDA-compatible version of PyTorch (see installation instructions above)
- Out of memory errors: Reduce GPU batch size with
-gb 1flag - Slow performance on CPU: Install CUDA-compatible PyTorch for GPU acceleration
- CUDA version mismatch: Match your PyTorch CUDA version with your system's CUDA installation
The tool will automatically fall back to CPU if GPU is not available or encounters errors.
Usage as a cli
Image
Remove the background from a local file image
backgroundremover -i "/path/to/image.jpeg" -o "output.png"
Supported image formats: .jpg, .jpeg, .png, .heic, .heif (HEIC/HEIF support requires pillow-heif)
Process all images in a folder
You can now remove backgrounds from all supported image or video files in a folder using the --input-folder (-if) option. You can also optionally set an output folder using --output-folder (-of). If --output-folder is not provided, the outputs will be saved in the same input folder, prefixed with output_.
Example: Folder of Images
backgroundremover -if "/path/to/image-folder" -of "/path/to/output-folder"
This will process all .jpg, .jpeg, .png, .heic, and .heif images in the folder and save the results to the output folder.
Advance usage for image background removal
Alpha Matting for Better Edge Quality:
By default, backgroundremover produces soft, natural edges. For some use cases (like cartoons, graphics, or sharp-edged objects), you may want sharper edges or better edge refinement.
# Enable alpha matting for refined edges
backgroundremover -i "/path/to/image.jpeg" -a -o "output.png"

# Adjust erosion size for sharper/softer edges (default: 10)
# Smaller values (1-5) = sharper, harder edges (good for cartoons/graphics)
# Larger values (15-25) = softer, more natural edges (good for portraits)
backgroundremover -i "/path/to/image.jpeg" -a -ae 5 -o "output.png"
Alpha matting parameters:
-a- Enable alpha matting-af- Foreground threshold (default: 240)-ab- Background threshold (default: 10)-ae- Erosion size (1-25, default: 10) - controls edge sharpness-az- Base size (default: 1000) - affects processing resolution
Change the model for different subjects:
# For humans/people - most accurate for human subjects
backgroundremover -i "/path/to/image.jpeg" -m "u2net_human_seg" -o "output.png"

# For general objects - good all-around model (default)
backgroundremover -i "/path/to/image.jpeg" -m "u2net" -o "output.png"

# Faster processing - lower accuracy but quicker
backgroundremover -i "/path/to/image.jpeg" -m "u2netp" -o "output.png"
Output only the mask (binary mask/matte)
backgroundremover -i "/path/to/image.jpeg" -om -o "mask.png"
Replace background with a custom color
# Replace with red background
backgroundremover -i "/path/to/image.jpeg" -bc "255,0,0" -o "output.png"

# Replace with green background
backgroundremover -i "/path/to/image.jpeg" -bc "0,255,0" -o "output.png"

# Replace with blue background
backgroundremover -i "/path/to/image.jpeg" -bc "0,0,255" -o "output.png"
Replace background with a custom image
# Replace background with another image
backgroundremover -i "/path/to/image.jpeg" -bi "/path/to/background.jpg" -o "output.png"
Use with pipes (stdin/stdout)
You can use backgroundremover in Unix pipelines by reading from stdin and writing to stdout:
# Read from stdin, write to stdout
cat input.jpg | backgroundremover > output.png

# Use with other tools in a pipeline
curl https://example.com/image.jpg | backgroundremover | convert - -resize 50% smaller.png

# Equivalent explicit syntax
backgroundremover -i - -o - < input.jpg > output.png
Note: Pipe mode assumes image input (not video).
Run as HTTP API Server
You can run backgroundremover as an HTTP API server:
# Start server on default port 5000
backgroundremover-server

# Specify custom host and port
backgroundremover-server --addr 0.0.0.0 --port 8080
API Usage:
# Upload image via POST
curl -X POST -F "file=@image.jpg" http://localhost:5000/ -o output.png

# Process from URL via GET
curl "http://localhost:5000/?url=https://example.com/image.jpg" -o output.png

# With alpha matting
curl "http://localhost:5000/?url=https://example.com/image.jpg&a=true&af=240" -o output.png

# Choose model
curl "http://localhost:5000/?url=https://example.com/image.jpg&model=u2net_human_seg" -o output.png
Parameters:
a- Enable alpha mattingaf- Alpha matting foreground threshold (default: 240)ab- Alpha matting background threshold (default: 10)ae- Alpha matting erosion size (default: 10)az- Alpha matting base size (default: 1000)model- Model choice:u2net,u2netp, oru2net_human_seg
Video
remove background from video and make transparent mov
backgroundremover -i "/path/to/video.mp4" -tv -o "output.mov"
Process all videos in a folder
You can now remove backgrounds from all supported image or video files in a folder using the --input-folder (-if) option. You can also optionally set an output folder using --output-folder (-of). If --output-folder is not provided, the outputs will be saved in the same input folder, prefixed with output_.
Example: Folder of Videos to Transparent .mov
backgroundremover -if "/path/to/video-folder" -of "/path/to/output-folder" -tv
You can also combine additional options:
backgroundremover -if "videos" -of "processed" -m "u2net_human_seg" -fr 30 -tv
- Uses the
u2net_human_segmodel - Overrides video framerate to 30 fps
- Outputs transparent
.movfiles into theprocessed/folder - Supported video formats:
.mp4,.mov,.webm,.ogg,.gif - Output files will be named like
output_filename.extin the output folder
remove background from local video and overlay it over other video
backgroundremover -i "/path/to/video.mp4" -tov -bv "/path/to/background_video.mp4" -o "output.mov"
remove background from local video and overlay it over an image
backgroundremover -i "/path/to/video.mp4" -toi -bi "/path/to/background_image.png" -o "output.mov"
remove background from video and make transparent gif
backgroundremover -i "/path/to/video.mp4" -tg -o "output.gif"
Make matte key file (green screen overlay)
Make a matte file for premiere
backgroundremover -i "/path/to/video.mp4" -mk -o "output.matte.mp4"
Video Playback and Compatibility
Important: Transparent .mov outputs default to ProRes 4444 (prores_ks with yuva444p10le) which provides 10-bit color with alpha channel and excellent compatibility with professional video editors (DaVinci Resolve, Premiere, Final Cut Pro). You can switch codecs with --alpha-codec if needed.
Examples:
# Smaller WebM with alpha (if your tools support it)
backgroundremover -i "video.mp4" -tv --alpha-codec libvpx-vp9 -o "output.webm"

# Legacy qtrle codec (lossless but very large files)
backgroundremover -i "video.mp4" -tv --alpha-codec qtrle -o "output.mov"
Recommended video players:
- mpv (https://mpv.io) - Best support for transparent videos (Linux, Mac, Windows)
- QuickTime Player (Mac) - Native support on macOS
- DaVinci Resolve / Adobe Premiere - Full support in video editors (may need to enable alpha channel in properties)
Common issues:
- VLC: May not display transparency correctly - shows distorted colors or green/purple tint
- Windows Media Player: Limited transparency support
- Web browsers: Limited support for ProRes codec
Workarounds if your player doesn't support transparency:
-
Convert to WebM with VP9 (better compatibility):
ffmpeg -i output.mov -c:v libvpx-vp9 -pix_fmt yuva420p output.webm
-
Add a colored background (for testing):
ffmpeg -f lavfi -i color=white:s=1920x1080 -i output.mov -filter_complex 'overlay=0:0' -c:v libx264 output_with_bg.mp4 -
Use the transparent GIF output instead (simpler but lower quality):
backgroundremover -i "video.mp4" -tg -o "output.gif"
Advance usage for video
Change the framerate of the video (default is set to 30)
backgroundremover -i "/path/to/video.mp4" -fr 30 -tv -o "output.mov"
Set total number of frames of the video (default is set to -1, ie the remove background from full video)
backgroundremover -i "/path/to/video.mp4" -fl 150 -tv -o "output.mov"
Change the gpu batch size of the video (default is set to 1)
backgroundremover -i "/path/to/video.mp4" -gb 4 -tv -o "output.mov"
Change the number of workers working on video (default is set to 1)
backgroundremover -i "/path/to/video.mp4" -wn 4 -tv -o "output.mov"
Note: Using high worker counts (>4) may cause ConnectionResetError or crashes on some systems due to multiprocessing limitations. If you experience errors, reduce the number of workers or use -wn 1. The optimal number depends on your CPU cores and available RAM.
change the model for different background removal methods between u2netp, u2net, or u2net_human_seg and limit the frames to 150
backgroundremover -i "/path/to/video.mp4" -m "u2net_human_seg" -fl 150 -tv -o "output.mov"
As a library
Remove background image
from backgroundremover.bg import remove

def remove_bg(src_img_path, out_img_path):
    model_choices = ["u2net", "u2net_human_seg", "u2netp"]
    f = open(src_img_path, "rb")
    data = f.read()
    img = remove(data, model_name=model_choices[0],
                 alpha_matting=True,
                 alpha_matting_foreground_threshold=240,
                 alpha_matting_background_threshold=10,
                 alpha_matting_erode_structure_size=10,
                 alpha_matting_base_size=1000)
    f.close()
    f = open(out_img_path, "wb")
    f.write(img)
    f.close()
Generate only a binary mask
from backgroundremover.bg import remove

f = open("input.jpg", "rb")
data = f.read()
mask = remove(data, model_name="u2net", only_mask=True)
f.close()

f = open("mask.png", "wb")
f.write(mask)
f.close()
Replace background with custom color
from backgroundremover.bg import remove

f = open("input.jpg", "rb")
data = f.read()
# Use RGB tuple for background color (255, 0, 0) = red
img = remove(data, model_name="u2net", background_color=(255, 0, 0))
f.close()

f = open("output.png", "wb")
f.write(img)
f.close()
Replace background with custom image
from backgroundremover.bg import remove

# Read input image
with open("input.jpg", "rb") as f:
    input_data = f.read()

# Read background image
with open("background.jpg", "rb") as f:
    bg_data = f.read()

# Remove background and composite over background image
result = remove(input_data, model_name="u2net", background_image=bg_data)

# Save result
with open("output.png", "wb") as f:
    f.write(result)
Troubleshooting
"EOFError: Ran out of input" or Model Loading Errors
If you see errors like EOFError: Ran out of input or model loading failures:
Cause: The model file download was corrupted or interrupted.
Solution:
# Delete the corrupted model file
rm ~/.u2net/u2net.pth
# Or for other models:
rm ~/.u2net/u2netp.pth
rm ~/.u2net/u2net_human_seg.pth

# Then run backgroundremover again - it will re-download the model
backgroundremover -i "your-image.jpg" -o "output.png"
Prevention: The tool now automatically validates and retries failed downloads, but if you have an old corrupted model from a previous version, you'll need to delete it manually.
Background Not Removed or Parts Missing
If the background is not being removed properly, or parts of your subject are disappearing:
-
Try a different model:
- Use
u2net_human_segfor people/portraits - Use
u2net(default) for general objects - The model choice significantly affects results
- Use
-
Adjust alpha matting:
- Enable with
-aflag for better edge detection - Adjust threshold values
-afand-abif parts are incorrectly classified
- Enable with
-
Check your input:
- Ensure good lighting and contrast between subject and background
- Avoid backgrounds that are similar in color to your subject
- Consider manually cropping to include more recognizable background
Transparency Issues or Strange Colors
If the output video shows distorted colors, green/purple tint, or transparency isn't working:
- Check your video player - See the "Video Playback and Compatibility" section above
- Use a recommended player like mpv or QuickTime Player
- Convert to a different format if needed (see WebM conversion examples)
Large Output File Sizes
The transparent .mov files use ProRes 4444 codec and will be larger than the input. ProRes 4444 provides much better compression than the previous qtrle codec while maintaining 10-bit color with alpha:
- File sizes are significantly smaller than qtrle but still larger than standard video
- This is expected for high-quality transparency preservation
- Use
--alpha-codec libvpx-vp9with.webmoutput for smaller files if your tools support it
Poor Quality or Inaccurate Results
Background removal quality depends on:
- Input quality - Higher resolution and better lighting improve results
- Subject complexity - Simple, well-defined subjects work best
- Model limitations - AI models may struggle with:
- Very similar colors between subject and background
- Complex hair/fur details
- Transparent or reflective objects
- Unusual subjects the model wasn't trained on
Tips for better results:
- Use
u2net_human_segspecifically for human subjects - Enable alpha matting with
-afor complex edges - Ensure good contrast between subject and background when capturing
- Try different alpha matting parameters (
-ae,-af,-ab)
Testing
Currently, this project does not have automated test cases. Testing is done manually using sample images and videos.
Manual Testing
To test backgroundremover functionality:
Test Image Background Removal:
# Basic test
backgroundremover -i "test_image.jpg" -o "output.png"

# Test with alpha matting
backgroundremover -i "test_image.jpg" -a -ae 15 -o "output.png"

# Test mask generation
backgroundremover -i "test_image.jpg" -om -o "mask.png"

# Test custom background color
backgroundremover -i "test_image.jpg" -bc "0,255,0" -o "output.png"
Test Video Processing:
# Test transparent video
backgroundremover -i "test_video.mp4" -tv -o "output.mov"

# Test matte key
backgroundremover -i "test_video.mp4" -mk -o "matte.mov"

# Test transparent GIF
backgroundremover -i "test_video.mp4" -tg -o "output.gif"
Test HTTP Server:
# Start server
backgroundremover-server --port 5000

# Test with curl (in another terminal)
curl -X POST -F "file=@test_image.jpg" http://localhost:5000/ -o output.png
Contributing Tests
Automated tests using pytest or unittest would be a valuable contribution to this project. Test cases should cover:
- Image processing with different formats (JPG, PNG, HEIC)
- Video processing with different codecs
- CLI argument validation
- HTTP API endpoints
- Model loading and inference
- Error handling
Todo
Completed
- ✅ HTTP API server (use
backgroundremover-server) - ✅ Comprehensive documentation and troubleshooting
- ✅ Docker support with model persistence
- ✅ HEIC/HEIF image format support
- ✅ Pipe support (stdin/stdout)
- ✅ Custom background colors and images
- ✅ Binary mask output
- ✅ Folder batch processing
In Progress / Future Features
- Support for additional models (ISNet, BiRefNet, U2Net cloth segmentation)
- CoreML support for Apple Silicon acceleration
- Standalone executable (no Python installation required)
- Automated test suite
- Real-time background removal for video streaming
- Convert logic from video to image to utilize more GPU on image removal
- Ability to provide feedback on results to improve training datasets
- Support for custom/user-provided models
- Google Colab notebook
Contributions welcome! See open issues for details.
Pull requests
Accepted
If you like this library
Give a link to our project BackgroundRemoverAI.com or this git, telling people that you like it or use it.
Reason for project
We made it our own package after merging together parts of others, adding in a few features of our own via posting parts as bounty questions on superuser, etc. As well as asked on hackernews earlier to open source the image part, so decided to add in video, and a bit more.
References
- https://arxiv.org/pdf/2005.09007.pdf
- https://github.com/NathanUA/U-2-Net
- https://github.com/pymatting/pymatting
- https://github.com/danielgatis/rembg
- https://github.com/ecsplendid/rembg-greenscreen
- https://superuser.com/questions/1647590/have-ffmpeg-merge-a-matte-key-file-over-the-normal-video-file-removing-the-backg
- https://superuser.com/questions/1648680/ffmpeg-alphamerge-two-videos-into-a-gif-with-transparent-background/1649339?noredirect=1#comment2522687_1649339
- https://superuser.com/questions/1649817/ffmpeg-overlay-a-video-after-alphamerging-two-others/1649856#1649856
License
- Copyright (c) 2021-present Johnathan Nader
- Copyright (c) 2020-present Lucas Nestler
- Copyright (c) 2020-present Dr. Tim Scarfe
- Copyright (c) 2020-present Daniel Gatis
Code Licensed under MIT License Models Licensed under Apache License 2.0