A python library for visualizing tensors from torch, jax, tensorflow, numpy, etc. Helps with learning and debugging in notebooks and other contexts. It's built on top of the graphics backend, chalk.
If you want to practice your tensor skills, try Tensor Puzzles 2. It's a notebook with a collection of hands-on pytorch puzzles. And yes, it uses tensordiagram 😃. If you're interested in learning modern ML engineering, check out qaggle.
why
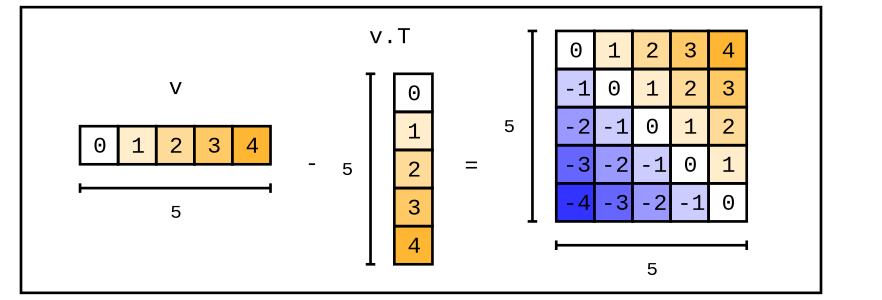
Debugging deep learning code is hard—especially when it's foreign, because it's hard to imagine tensor manipulations, e.g. F.conv2d(x.unsqueeze(1), w.transpose(-1, -2)).squeeze().view(B, L, -1) in your head. Printing shapes and tensor values only gets you so far. tensordiagram lets me easily represent tensors visually, inside python code, notebooks, and interpreter sessions.
Other python libraries for creating tensor diagrams are either too physics and math focused, not notebook-friendly, limited to visualizing single tensors, and/or serve a wider purpose (so have a steep learning curve).
install
pip install tensordiagram
Separately, you'll need to install cairo for PNG rendering and Image objects:
# might need to install the base library first on debian
sudo apt-get install libcairo2-dev

# cairo python bindings + Pillow for Image objects
pip install ".[cairo]"
Or, for SVG rendering and Image objects:
# includes cairosvg + Pillow for Image objects
pip install ".[svg]"
intro
For an in-depth guide, refer to this notebook.
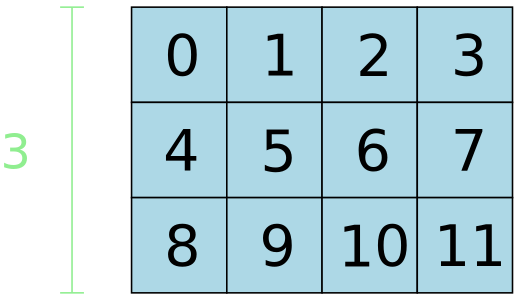
import numpy as np
import tensordiagram as td

tensor = np.arange(12).reshape(3, 4)
diagram = td.to_diagram(tensor)

The diagram can be saved using render_png or render_svg:
diagram.render_png("output.png", height=300)
Alternatively, render to a PIL Image object instead of saving to disk:
# Render to a PIL Image object
img = diagram.to_image_png(height=300)  # Returns PIL.Image.Image

# Or use the generic to_image() method (uses PNG by default)
img = diagram.to_image(height=300)

# Can also render via SVG and convert to Image
img = diagram.to_image_svg(height=300)
Style and annotate diagrams:
diagram \
  .fill_values() \
  .fill_color("lightblue") \
  .annotate_dim_size(dim=0, color="lightgreen")
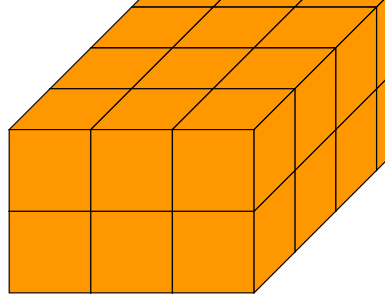
3d tensor:
papaya = "#ff9700"

tensor = np.arange(24).reshape((2, 3, 4))
diagram = td.to_diagram(tensor).fill_color(papaya)
Combine tensor and chalk diagrams for intricate outputs:
import random
import torch

color_names = [ "red", "blue", "green", "purple", "orange", "pink", "cyan"]

def random_colors_tensor(shape):
  colors_array = np.empty(shape, dtype=object)
  for index, _ in np.ndenumerate(colors_array):
    colors_array[index] = random.choice(color_names)
  return colors_array

color_tensor = random_colors_tensor(shape=(2, 3, 4))

# tensors
t = torch.arange(24).reshape((2, 3, 4))
slice_1 = t[0, :, :].unsqueeze(0)
slice_2 = t[:, 1, :].unsqueeze(1)

# tensor diagrams
t_d = td.to_diagram(t).fill_color(lambda idx, v: color_tensor[idx])
slice_1_d = td.to_diagram(slice_1).fill_color(lambda idx, v: color_tensor[idx])
slice_2_d = td.to_diagram(slice_2).fill_color(lambda idx, v: color_tensor[idx[0], 1, idx[2]])

# chalk diagrams
diagrams = []
for d in [t_d, slice_1_d, slice_2_d]:
  diagrams.append(d.to_chalk_diagram().center_xy())

# composite diagram
composite = chalk.hcat(diagrams, 1.0)

# add background + display
composite = composite.pad(1.5).center_xy()
env = composite.get_envelope()
chalk.set_svg_height(300)
chalk.rectangle(env.width * 0.8, env.height).fill_color(Color("white")) + composite.translate(dx=env.width * 0.1, dy=0)

For more examples and documentation, refer to this guide.
dev
test
setup
Visual regression tests compare rendered output against reference images stored in fixtures/.
To generate or update reference images:
# all reference images
python tests/generate_references.py --all

# list reference images
python tests/generate_references.py --list

# select reference images
python tests/generate_references.py 3d_tensor styled_gradient
run
All tests:
deploy
main package (tensordiagram)
- update version in
pyproject.tomland commit git tag vX.X.Xgit push origin vX.X.X(auto-triggers gh action for publishing to PyPI)- create a new gh release with the tag
mcp package (tensordiagram-mcp)
- update version in
mcp/pyproject.tomland commit git tag mcp-vX.X.Xgit push origin mcp-vX.X.X(auto-triggers gh action for publishing to PyPI)- create a new gh release with the tag
license
MIT