🌊 fluid.sh
Autonomous AI Agents for Infrastructure
Make Infrastructure Safe for AI
Features • Quick Start • Demo • Documentation
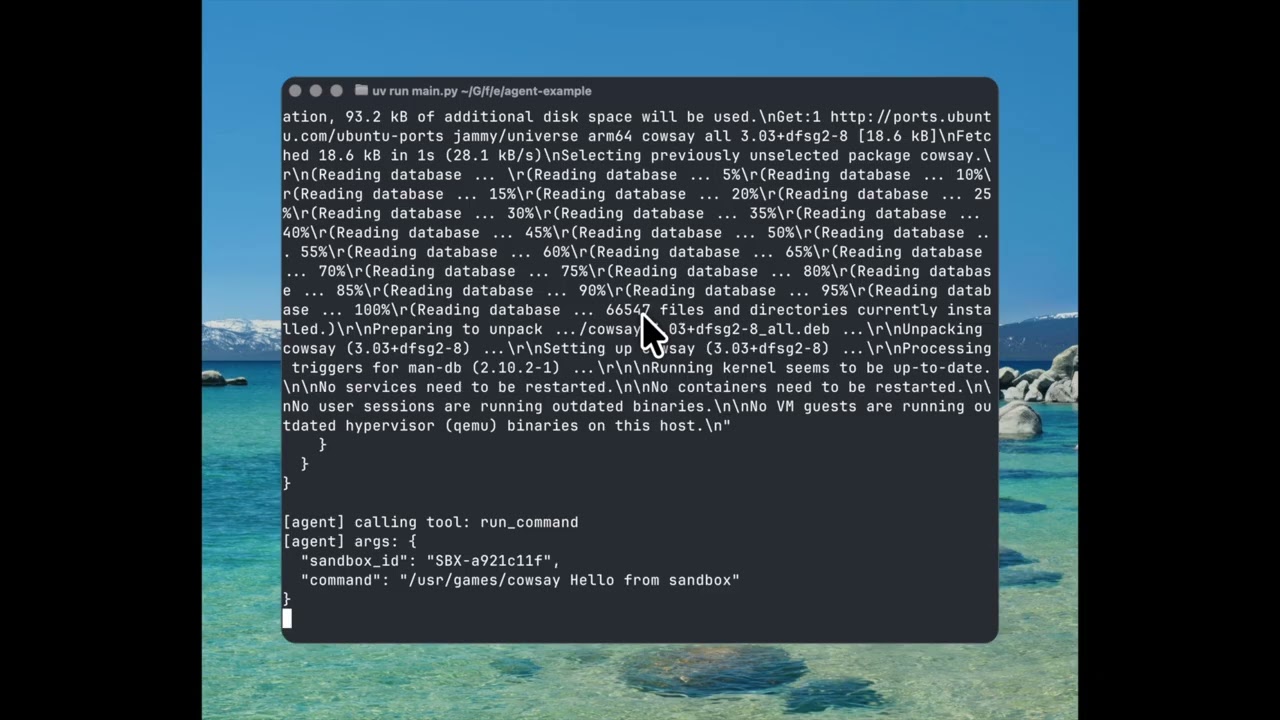
Demo
Problem
AI agents are ready to do infrastructure work, but they can't touch prod:
- Agents can install packages, configure services, write scripts—autonomously
- But one mistake on production and you're getting paged at 3 AM to fix it
- So we limit agents to chatbots instead of letting them do the work
Solution
fluid.sh lets AI agents work autonomously in isolated VMs, then a human approves before anything touches production:
┌─────────────────────────────────────────────────────────────────────────┐
│                    Autonomous AI Sysadmin Workflow                      │
│                                                                         │
│  ┌─────────┐     ┌─────────────────┐     ┌──────────┐     ┌──────────┐  │
│  │  Agent  │────►│  Sandbox VM     │────►│  Human   │────►│Production│  │
│  │  Task   │     │  (autonomous)   │     │ Approval │     │  Server  │  │
│  └─────────┘     └─────────────────┘     └──────────┘     └──────────┘  │
│                         │                      │                        │
│                    • Full root access     • Review diff                 │
│                    • Install packages     • Approve Ansible             │
│                    • Edit configs         • One-click apply             │
│                    • Run services                                       │
│                    • Snapshot/restore                                   │
└─────────────────────────────────────────────────────────────────────────┘
Features
| Feature | Description |
|---|---|
| Autonomous Execution | Agents run commands, install packages, edit configs—no hand-holding |
| Full VM Isolation | Each agent gets a dedicated KVM virtual machine with root access |
| Snapshot & Restore | Checkpoint progress, rollback mistakes, branch experiments |
| Human-in-the-Loop | Blocking approval workflow before any production changes |
| Diff & Audit Trail | See exactly what changed, every action logged |
| Ansible Export | Auto-generate playbooks from agent work for production apply |
| Tmux Integration | Watch agent work in real-time, intervene if needed |
| Python SDK | First-class SDK for building autonomous agents |
SDK Example
from virsh_sandbox import VirshSandbox

client = VirshSandbox("http://localhost:8080")
sandbox = None

try:
    # Agent gets its own VM with full root access
    sandbox = client.sandbox.create_sandbox(
        source_vm_name="ubuntu-base",
        agent_id="nginx-setup-agent",
        auto_start=True,
        wait_for_ip=True
    ).sandbox

    run_agent("Install nginx and configure TLS, create an Ansible playbook to recreate the task.", sandbox.id)

    # NOW the human reviews:
    # - Diff between snapshots shows exactly what changed
    # - Auto-generated Ansible playbook ready to apply
    # - Human approves → playbook runs on production
    # - Human rejects → nothing happens, agent tries again

finally:
    if(sandbox):
        # Clean up sandbox
        client.sandbox.destroy_sandbox(sandbox.id)
🏄 Quick Start
Prerequisites
virsh-sandbox is setup to be ran on a control plane on the same network as the VM hosts it needs to connect with. It will also need a postgres instance running on the control plan to keep tack of commands run, sandboxes, and other auditting.
If you need another way of accessing VMs, open an issue and we will get back to you.
Installation
The recommended deployment model is a single control node running the virsh-sandbox API and PostgreSQL, with SSH access to one or more libvirt/KVM hosts.
Architecture Overview
+--------------------+        SSH        +------------------+
| Control Node       |----------------->| KVM / libvirt    |
|                    |                  | Hosts            |
| - virsh-sandbox    |                  |                  |
| - PostgreSQL       |                  | - libvirtd       |
+--------------------+                  +------------------+
The control node:
- Runs the
virsh-sandboxAPI - Stores audit logs and metadata in PostgreSQL
- Connects to hosts over SSH to execute libvirt operations
The hypervisor hosts:
- Run KVM + libvirt only
- Do not run agents or additional services
Requirements
Control Node
- Linux (x86_64)
- systemd
- PostgreSQL 14+
- SSH client
Hypervisor Hosts
- Linux
- KVM enabled
- libvirt installed and running
- SSH access from control node
Network
- Private management network between control node and hosts
- Public or tenant-facing network configured on hosts for VMs
Production Installation (Recommended)
This method installs a static binary and runs it as a systemd service. No container runtime is required.
1. Import the GPG public key
# Import from keyserver
gpg --keyserver keys.openpgp.org --recv-keys B27DED65CFB30427EE85F8209DD0911D6CB0B643

# OR import from file
curl https://raw.githubusercontent.com/aspectrr/fluid.sh/main/public-key.asc | gpg --import
2. Download release assets
VERSION=0.0.4-beta
wget https://github.com/aspectrr/fluid.sh/releases/download/v${VERSION}/virsh-sandbox_${VERSION}_linux_amd64.tar.gz
wget https://github.com/aspectrr/fluid.sh/releases/download/v${VERSION}/checksums.txt
wget https://github.com/aspectrr/fluid.sh/releases/download/v${VERSION}/checksums.txt.sig
3. Verify signature and checksum
# Verify GPG signature
gpg --verify checksums.txt.sig checksums.txt

# Verify file checksum
sha256sum -c checksums.txt --ignore-missing
4. Extract and install
tar -xzf virsh-sandbox_${VERSION}_linux_amd64.tar.gz
sudo install -m 755 virsh-sandbox /usr/local/bin/
System User and Directories
Create a dedicated system user and required directories:
useradd --system --home /var/lib/virsh-sandbox --shell /usr/sbin/nologin virsh-sandbox

mkdir -p /etc/virsh-sandbox \
         /var/lib/virsh-sandbox \
         /var/log/virsh-sandbox

chown -R virsh-sandbox:virsh-sandbox \
  /var/lib/virsh-sandbox \
  /var/log/virsh-sandbox
Filesystem layout:
/usr/local/bin/virsh-sandbox
/etc/virsh-sandbox/config.yaml
/var/lib/virsh-sandbox/
/var/log/virsh-sandbox/
PostgreSQL Setup
PostgreSQL runs locally on the control node and is bound to localhost only.
Create Database and User
CREATE DATABASE virsh_sandbox;
CREATE USER virsh_sandbox WITH PASSWORD 'strong-password';
GRANT ALL PRIVILEGES ON DATABASE virsh_sandbox TO virsh_sandbox;
Ensure PostgreSQL is listening only on localhost:
listen_addresses = '127.0.0.1'
Configuration
Create the main configuration file:
vim /etc/virsh-sandbox/config.yaml
Example:
server:
  listen: 127.0.0.1:8080

database:
  host: 127.0.0.1
  port: 5432
  name: virsh_sandbox
  user: virsh_sandbox
  password: strong-password

hosts:
  - name: kvm-01
    address: 10.0.0.11
  - name: kvm-02
    address: 10.0.0.12
SSH Access to Hosts
The control node requires SSH access to each libvirt host.
Recommended approach:
- Generate a dedicated SSH key for
virsh-sandbox - Grant limited sudo or libvirt access on hosts
sudo -u virsh-sandbox ssh-keygen -t ed25519
On each host, allow execution of virsh via sudo or libvirt permissions.
systemd Service
Create the service unit:
vim /etc/systemd/system/virsh-sandbox.service
[Unit]
Description=virsh-sandbox control plane
After=network.target postgresql.service

[Service]
User=virsh-sandbox
Group=virsh-sandbox
ExecStart=/usr/local/bin/virsh-sandbox \
  --config /etc/virsh-sandbox/config.yaml
Restart=on-failure
RestartSec=5
LimitNOFILE=65536

[Install]
WantedBy=multi-user.target
Enable and start:
systemctl daemon-reload
systemctl enable virsh-sandbox
systemctl start virsh-sandbox
Verifying the Installation
Check service status:
systemctl status virsh-sandbox
Basic health checks:
virsh-sandbox status
virsh-sandbox hosts list
Upgrade Strategy
- Download the new binary
- Verify checksum
- Replace
/usr/local/bin/virsh-sandbox - Restart the systemd service
PostgreSQL migrations are handled automatically on startup.
Uninstallation
systemctl stop virsh-sandbox
systemctl disable virsh-sandbox
rm /usr/local/bin/virsh-sandbox
rm /etc/systemd/system/virsh-sandbox.service
(Optional) Remove data and user:
userdel virsh-sandbox
rm -rf /etc/virsh-sandbox /var/lib/virsh-sandbox /var/log/virsh-sandbox
⛵ Contributing Quickstart
Prerequisites
- mprocs - For local dev
- Docker & Docker Compose - For containerized deployment in production
- libvirt/KVM - For virtual machine management
- macOS:
- libvirt -
brew install libvirt - socket_vmnet -
brew install socket_vmnet
- libvirt -
30-Second Start
# Clone and start
git clone https://github.com/aspectrr/fluid.sh.git
cd fluid.sh
mprocs

# Services available at:
# API:      http://localhost:8080
# Web UI:   http://localhost:5173
Platform Setup
Mac
You will need to install libvirt and socket_vmnet on Mac:
# Install Lima and libvirt client
brew install libvirt socket_vmnet

# Set up SSH CA (Needed for Sanbox VMs)
cd fluid.sh
./virsh-sandbox/scripts/setup-ssh-ca.sh --dir .ssh-ca

# Set up libvirt VM (ARM64 Ubuntu)
cd fluid.sh
./virsh-sandbox/scripts/reset-libvirt-macos.sh

# Verify connection
virsh -c "$LIBVIRT_URI" list --all

# Start services
mprocs
What happens:
- A SSH CA is generated and then is used to build the golden VM
- libvirt runs on the machine and is queried by the virsh-sandbox API
- Test VMs run on your root machine
Architecture:
┌─────────────────────────────────────────────────────────────────────┐
│                     Apple Silicon Mac                               │
│  ┌─────────────────┐                                                │
│  │ virsh-sandbox   │                                                │
│  │ API + Web UI    │────►  ┌──────────────────────────────────┐     │
│  │                 │       │     libvirt/QEMU (ARM64)         │     │
│  │ LIBVIRT_URI=    │       │  ┌──────────┐  ┌──────────┐      │     │
│  │ qemu+tcp://     │       │  │ sandbox  │  │ sandbox  │ ...  │     │
│  │ localhost:16509 │       │  │ VM (arm) │  │ VM (arm) │      │     │
│  └─────────────────┘       │  └──────────┘  └──────────┘      │     │
│                            └──────────────────────────────────┘     │
│                                                                     │
└─────────────────────────────────────────────────────────────────────┘
Create ARM64 test VMs:
./virsh-sandbox/scripts/reset-libvirt-macos.sh
Default test VM credentials:
- Username:
testuser/ Password:testpassword - Username:
root/ Password:rootpassword
Linux x86_64 (On-Prem / Bare Metal)
Direct libvirt access for best performance:
# Install libvirt and dependencies (Ubuntu/Debian)
sudo apt update
sudo apt install -y \
    qemu-kvm qemu-utils libvirt-daemon-system \
    libvirt-clients virtinst bridge-utils ovmf \
    cpu-checker cloud-image-utils genisoimage

# Or on Fedora/RHEL
sudo dnf install -y \
    qemu-kvm qemu-img libvirt libvirt-client \
    virt-install bridge-utils edk2-ovmf \
    cloud-utils genisoimage

# Enable and start libvirtd
sudo systemctl enable --now libvirtd

# Add your user to libvirt group
sudo usermod -aG libvirt,kvm $(whoami)
newgrp libvirt  # or log out and back in

# Verify KVM is available
kvm-ok

# Create image directories
sudo mkdir -p /var/lib/libvirt/images/{base,jobs}

# Create environment file
cat > .env << 'EOF'
LIBVIRT_URI=qemu:///system
LIBVIRT_NETWORK=default
DATABASE_URL=postgresql://virsh_sandbox:virsh_sandbox@localhost:5432/virsh_sandbox
BASE_IMAGE_DIR=/var/lib/libvirt/images/base
SANDBOX_WORKDIR=/var/lib/libvirt/images/jobs
EOF

# Start the default network
sudo virsh net-autostart default
sudo virsh net-start default

# Verify
virsh -c qemu:///system list --all

# Start services
docker-compose up --build
Architecture:
┌─────────────────────────────────────────────────────────────────────┐
│                    Linux x86_64 Host                                │
│                                                                     │
│  ┌─────────────────┐  ┌─────────────────┐  ┌─────────────────────┐  │
│  │ virsh-sandbox   │  │   PostgreSQL    │  │    Web UI           │  │
│  │ API (Go)        │  │   (Docker)      │  │    (React)          │  │
│  │ :8080           │  │   :5432         │  │    :5173            │  │
│  └────────┬────────┘  └─────────────────┘  └─────────────────────┘  │
│           │                                                         │
│           │ LIBVIRT_URI=qemu:///system                              │
│           ▼                                                         │
│  ┌──────────────────────────────────────────────────────────────┐   │
│  │                    libvirt/KVM (native)                      │   │
│  │                                                              │   │
│  │   ┌──────────────┐  ┌──────────────┐  ┌──────────────┐       │   │
│  │   │  sandbox-1   │  │  sandbox-2   │  │  sandbox-N   │  ...  │   │
│  │   │  (x86_64)    │  │  (x86_64)    │  │  (x86_64)    │       │   │
│  │   └──────────────┘  └──────────────┘  └──────────────┘       │   │
│  └──────────────────────────────────────────────────────────────┘   │
└─────────────────────────────────────────────────────────────────────┘
Create a base VM image:
# Download Ubuntu cloud image
cd /var/lib/libvirt/images/base
sudo wget https://cloud-images.ubuntu.com/jammy/current/jammy-server-cloudimg-amd64.img

# Create test VM using the provided script
./virsh-sandbox/scripts/setup-ssh-ca.sh --dir [ssh-ca-dir]
./virsh-sandbox/scripts/reset-libvirt-macos.sh [vm-name] [ca-pub-path] [ca-key-path]
Default test VM credentials:
- Username:
testuser/ Password:testpassword - Username:
root/ Password:rootpassword
Linux ARM64 (Ampere, Graviton, Raspberry Pi)
Native ARM64 Linux with libvirt:
# Install libvirt and dependencies (Ubuntu/Debian ARM64)
sudo apt update
sudo apt install -y \
    qemu-kvm qemu-utils qemu-efi-aarch64 \
    libvirt-daemon-system libvirt-clients \
    virtinst bridge-utils cloud-image-utils genisoimage

# Enable and start libvirtd
sudo systemctl enable --now libvirtd

# Add your user to libvirt group
sudo usermod -aG libvirt,kvm $(whoami)
newgrp libvirt

# Create environment file
cat > .env << 'EOF'
LIBVIRT_URI=qemu:///system
LIBVIRT_NETWORK=default
DATABASE_URL=postgresql://virsh_sandbox:virsh_sandbox@localhost:5432/virsh_sandbox
BASE_IMAGE_DIR=/var/lib/libvirt/images/base
SANDBOX_WORKDIR=/var/lib/libvirt/images/jobs
EOF

# Start the default network
sudo virsh net-autostart default
sudo virsh net-start default

# Start services
docker-compose up --build
Download ARM64 cloud images:
cd /var/lib/libvirt/images/base
sudo wget https://cloud-images.ubuntu.com/jammy/current/jammy-server-cloudimg-arm64.img
Architecture is the same as x86_64 but with ARM64 VMs.
Default test VM credentials:
- Username:
testuser/ Password:testpassword - Username:
root/ Password:rootpassword
Remote libvirt Server
Connect to a remote libvirt host over SSH or TCP:
# SSH connection (recommended - secure)
export LIBVIRT_URI="qemu+ssh://user@remote-host/system"

# Or with specific SSH key
export LIBVIRT_URI="qemu+ssh://user@remote-host/system?keyfile=/path/to/key"

# TCP connection (less secure - ensure network is trusted)
export LIBVIRT_URI="qemu+tcp://remote-host:16509/system"

# Test connection
virsh -c "$LIBVIRT_URI" list --all

# Create .env file
cat > .env << EOF
LIBVIRT_URI=${LIBVIRT_URI}
LIBVIRT_NETWORK=default
DATABASE_URL=postgresql://virsh_sandbox:virsh_sandbox@localhost:5432/virsh_sandbox
EOF

# Start services
docker-compose up --build
Remote server setup (on the libvirt host):
# For SSH access, ensure SSH is enabled and user has libvirt access
sudo usermod -aG libvirt remote-user

# For TCP access (development only!), configure /etc/libvirt/libvirtd.conf:
#   listen_tls = 0
#   listen_tcp = 1
#   auth_tcp = "none"  # WARNING: No authentication!
# Then restart: sudo systemctl restart libvirtd
Project Structure
virsh-sandbox/
├── virsh-sandbox/          #    Main API server (Go)
│   ├── cmd/api/            #    Entry point
│   ├── internal/           #    Business logic
│   └── scripts/            #    Setup scripts
├── web/                    #    React frontend
│   └── src/                #    Components, hooks, routes
├── sdk/                    #    Python SDK
│   └── virsh-sandbox-py/   #    Auto-generated client
├── examples/               #    Example implementations
│   └── agent-example/      #    AI agent with OpenAI
└── docker-compose.yml      #    Container orchestration
API Reference
Sandbox Lifecycle
| Method | Endpoint | Description |
|---|---|---|
POST |
/v1/sandboxes |
Create a new sandbox |
GET |
/v1/sandboxes/{id} |
Get sandbox details |
POST |
/v1/sandboxes/{id}/start |
Start a sandbox |
POST |
/v1/sandboxes/{id}/stop |
Stop a sandbox |
DELETE |
/v1/sandboxes/{id} |
Destroy a sandbox |
Command Execution
| Method | Endpoint | Description |
|---|---|---|
POST |
/v1/sandboxes/{id}/command |
Run SSH command |
POST |
/api/v1/tmux/panes/send-keys |
Send keystrokes to tmux |
POST |
/api/v1/tmux/panes/read |
Read tmux pane content |
Snapshots
| Method | Endpoint | Description |
|---|---|---|
POST |
/v1/sandboxes/{id}/snapshots |
Create snapshot |
GET |
/v1/sandboxes/{id}/snapshots |
List snapshots |
POST |
/v1/sandboxes/{id}/snapshots/{name}/restore |
Restore snapshot |
Human Approval
| Method | Endpoint | Description |
|---|---|---|
POST |
/api/v1/human/ask |
Request approval (blocking) |
Security Model
Isolation Layers
- VM Isolation - Each sandbox is a separate KVM virtual machine
- Network Isolation - VMs run on isolated virtual networks
- SSH Certificates - Ephemeral credentials that auto-expire (1-10 minutes)
- Human Approval - Gate sensitive operations
Safety Features
- Command allowlists/denylists
- Path restrictions for file access
- Timeout limits on all operations
- Output size limits
- Full audit trail
- Snapshot rollback
SSH Host Key Verification
The control node connects to hypervisor hosts via SSH. You must configure proper host key verification to prevent man-in-the-middle attacks.
Required: Configure ~/.ssh/config on the control node:
# /home/virsh-sandbox/.ssh/config (for the virsh-sandbox user)

# Global defaults - strict verification
Host *
    StrictHostKeyChecking yes
    UserKnownHostsFile ~/.ssh/known_hosts

# Hypervisor hosts - explicitly trusted
Host kvm-01
    HostName 10.0.0.11
    User root
    IdentityFile ~/.ssh/id_ed25519

Host kvm-02
    HostName 10.0.0.12
    User root
    IdentityFile ~/.ssh/id_ed25519
Pre-populate known_hosts before first use:
# As the virsh-sandbox user, add each host's key
sudo -u virsh-sandbox ssh-keyscan -H 10.0.0.11 >> /home/virsh-sandbox/.ssh/known_hosts
sudo -u virsh-sandbox ssh-keyscan -H 10.0.0.12 >> /home/virsh-sandbox/.ssh/known_hosts

# Verify the fingerprints match your hosts
sudo -u virsh-sandbox ssh-keygen -lf /home/virsh-sandbox/.ssh/known_hosts
Warning: Never use StrictHostKeyChecking=no in production. This disables host verification and exposes you to MITM attacks.
Documentation
- Docs from Previous Issues - Documentation on common issues working with the project
- Scripts Reference - Setup and utility scripts
- SSH Certificates - Ephemeral credential system
- Agent Connection Flow - How agents connect to sandboxes
- Examples - Working examples
Development
To run the API locally, first build the virsh-sandbox binary:
# Build the API binary
cd virsh-sandbox && make build
Then, use mprocs to run all the services together for local development.
# Install mprocs for multi-service development
brew install mprocs  # macOS
cargo install mprocs # Linux

# Start all services with hot-reload
mprocs

# Or run individual services
cd virsh-sandbox && make run
cd web && bun run dev
Running Tests
# Go services
(cd virsh-sandbox && make test)

# Python SDK
(cd sdk/virsh-sandbox-py && pytest)

# All checks
(cd virsh-sandbox && make check)
Contributing
- Fork the repository
- Create a feature branch
- Make changes with tests
- Run
make check - Submit a pull request
All contributions must maintain the security model and include appropriate tests.
License
MIT License - see LICENSE for details.
Made with ❤️