mini-film is a complete photo-to-review-to-publish workflow for photographers
who want film-emulation output without opening Lightroom. It watches an inbox of
RAW, JPEG, HEIC, and TIFF files, develops images through RawTherapee when profiles are
configured, applies user-supplied film profiles and grain, serves a live review UI,
records ratings/tags/notes, and publishes the final selection with metadata
preserved.
The fastest way in is the desktop app:
With no command, mini-film opens the native app wizard for the usual
daemon/review settings, profile selection, mounted-camera auto-import, Nikon WTU
ingest, lens corrections, output folders, and publishing defaults. The app
remembers the last successful setup, starts the same daemon pipeline used by the
CLI, waits for the embedded review server, and then opens the review UI in a
webview. Terminal output is still kept when launched from a shell, so
long-running processing stays inspectable. mini-film app remains available as
the explicit command form.
For scripted use, every part of the workflow is still available as CLI commands:
apply, batch, daemon, panorama, sampler, pp3, info, nikon, and
update.
Screenshots
Main review view:
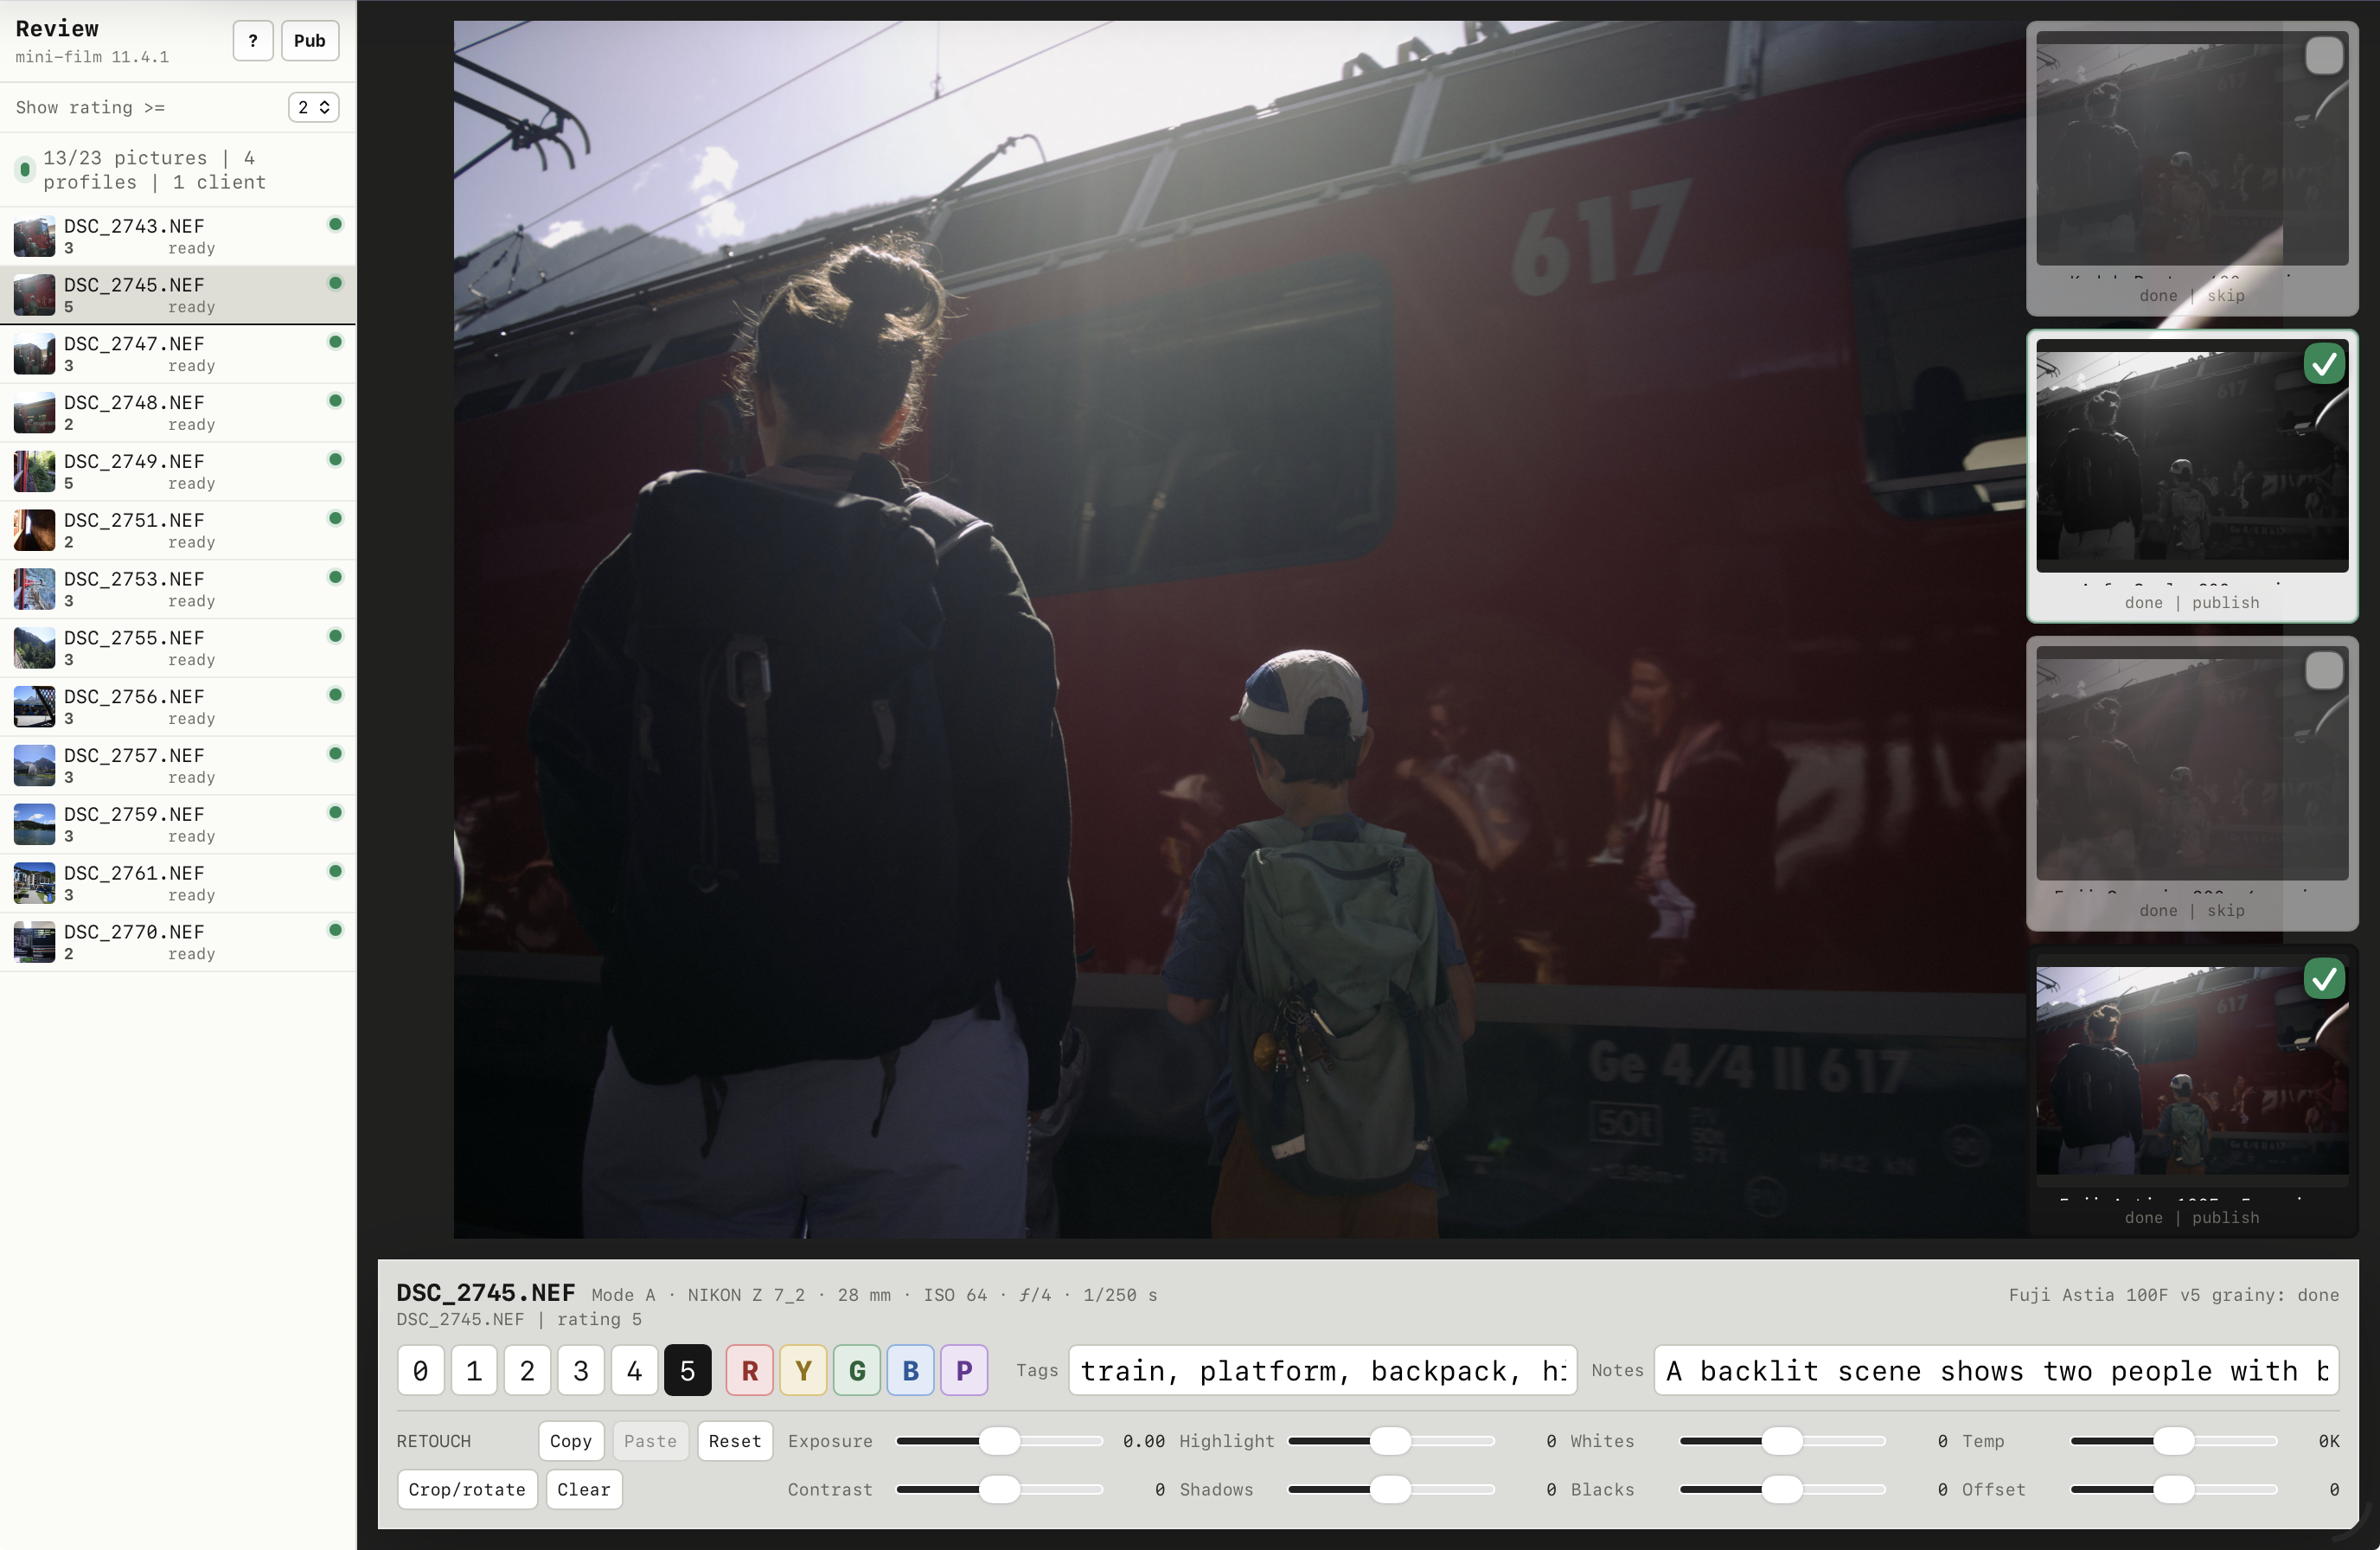
Publishing workflow:
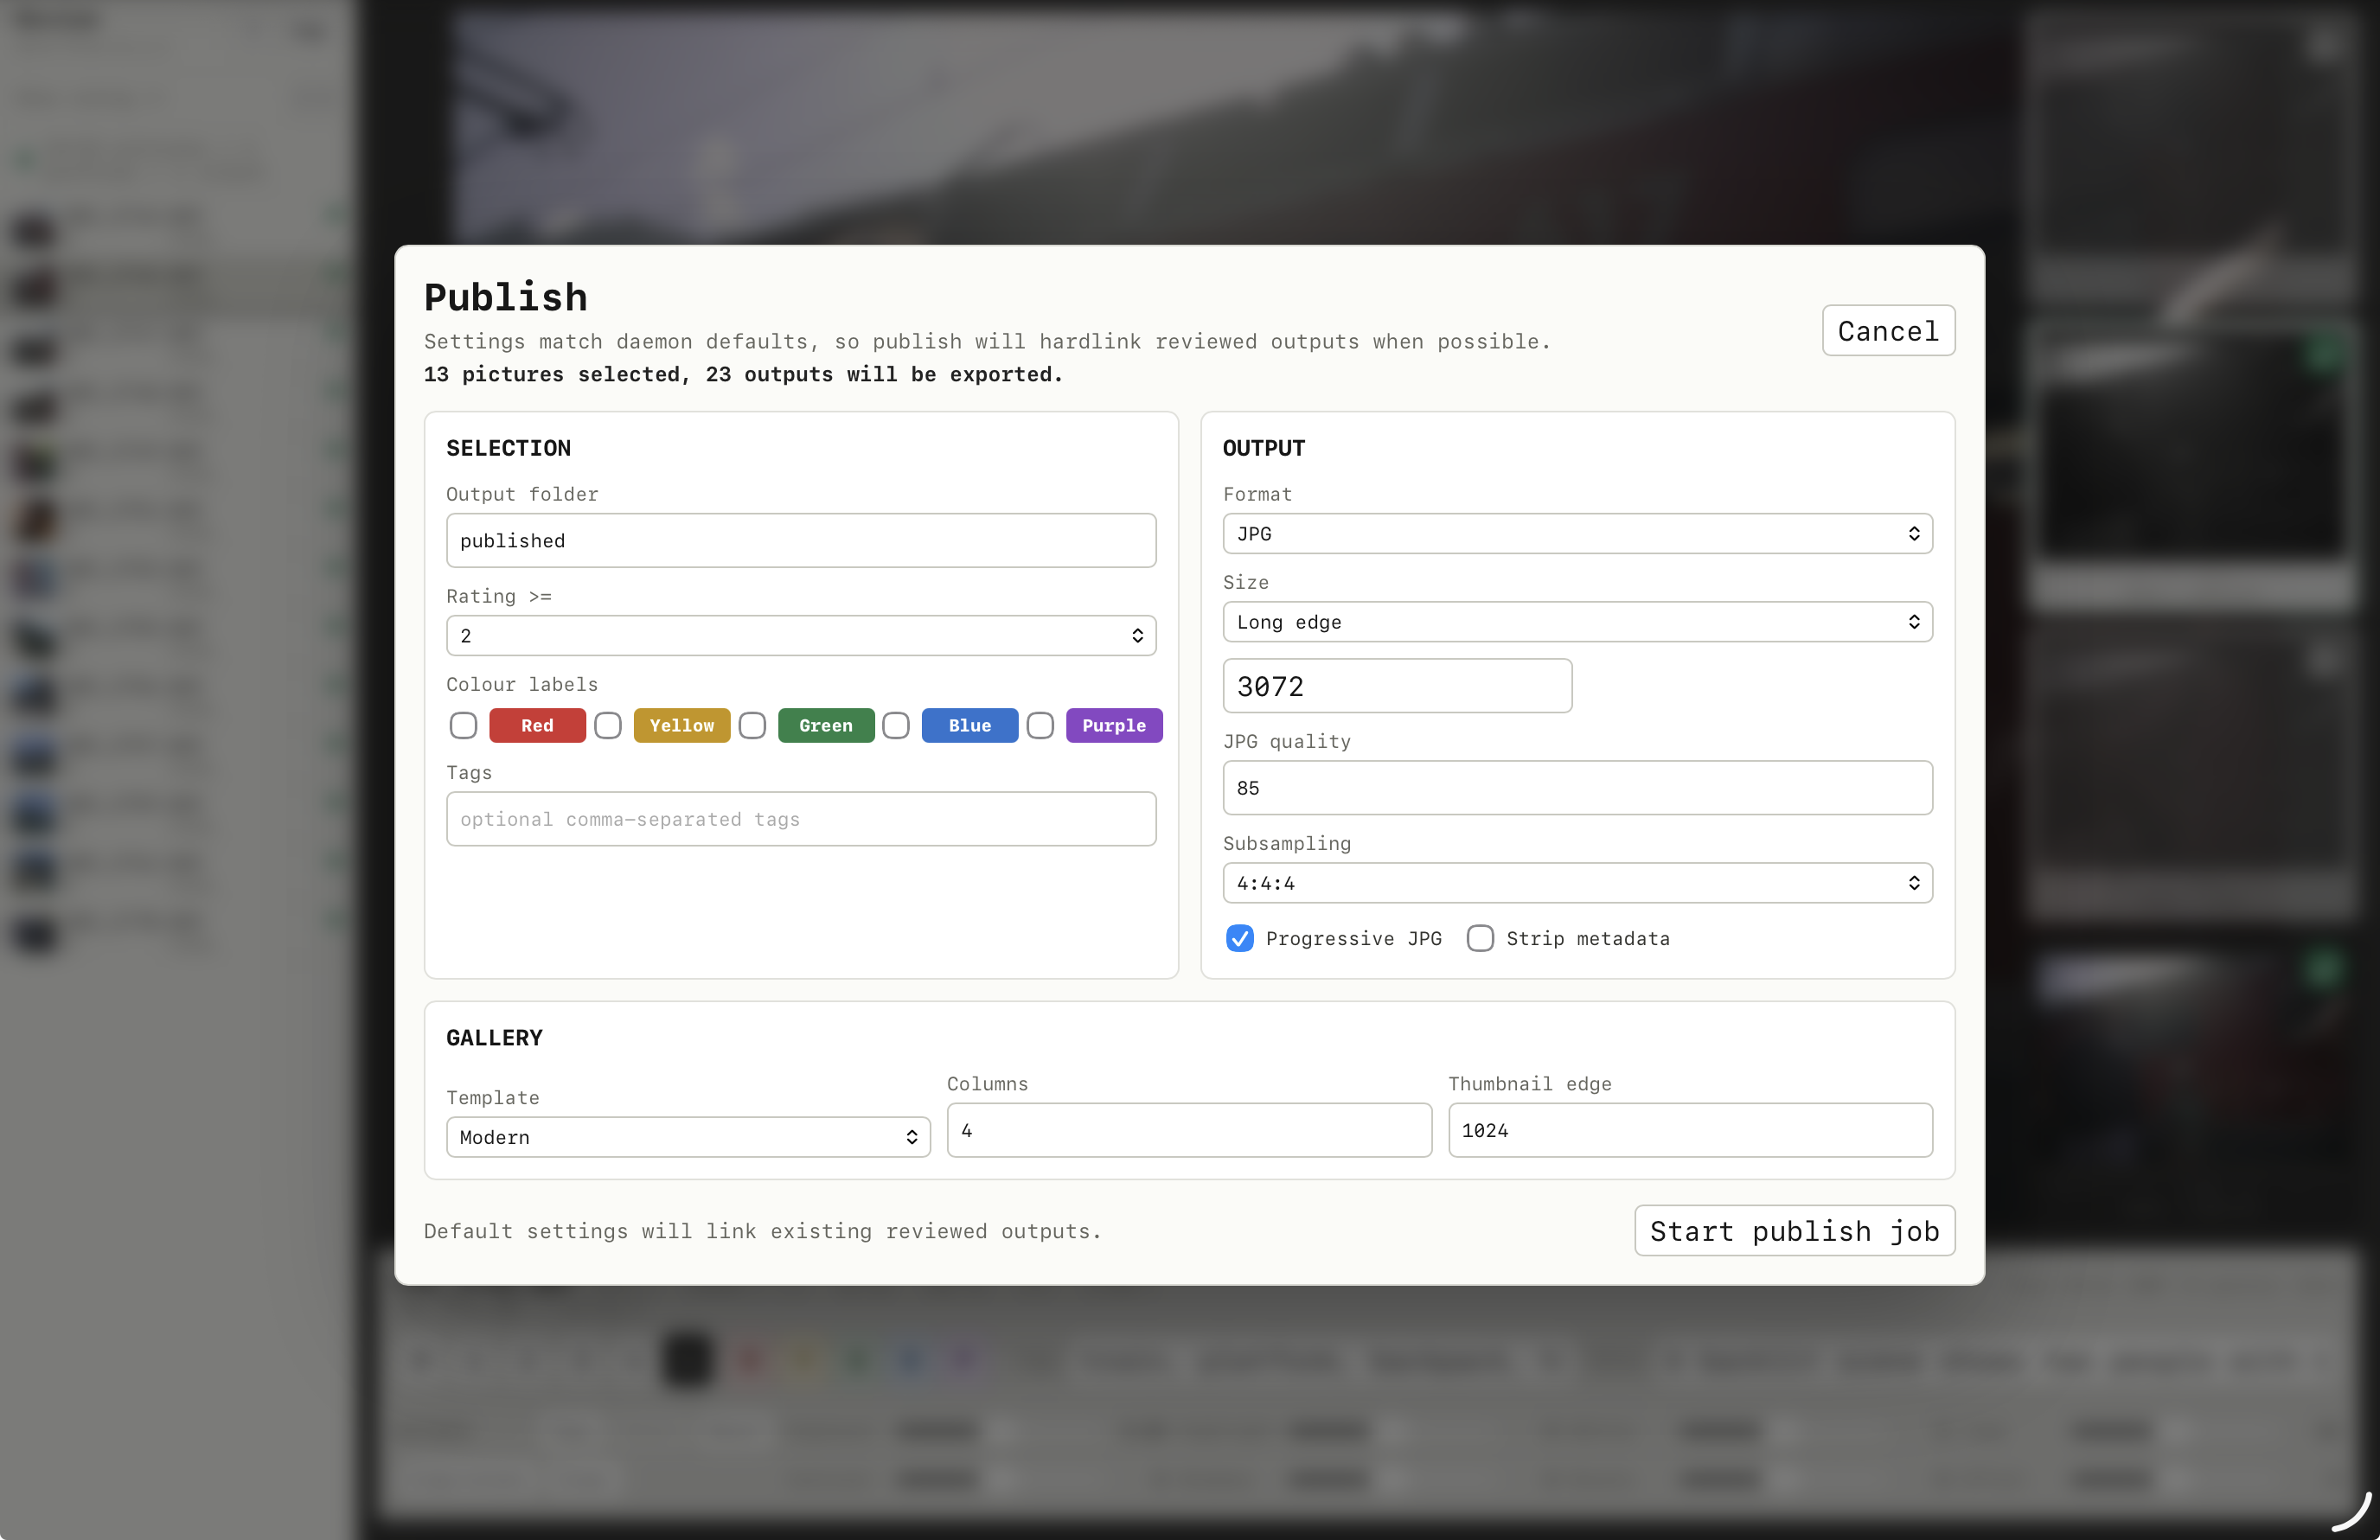
Available shortcuts:
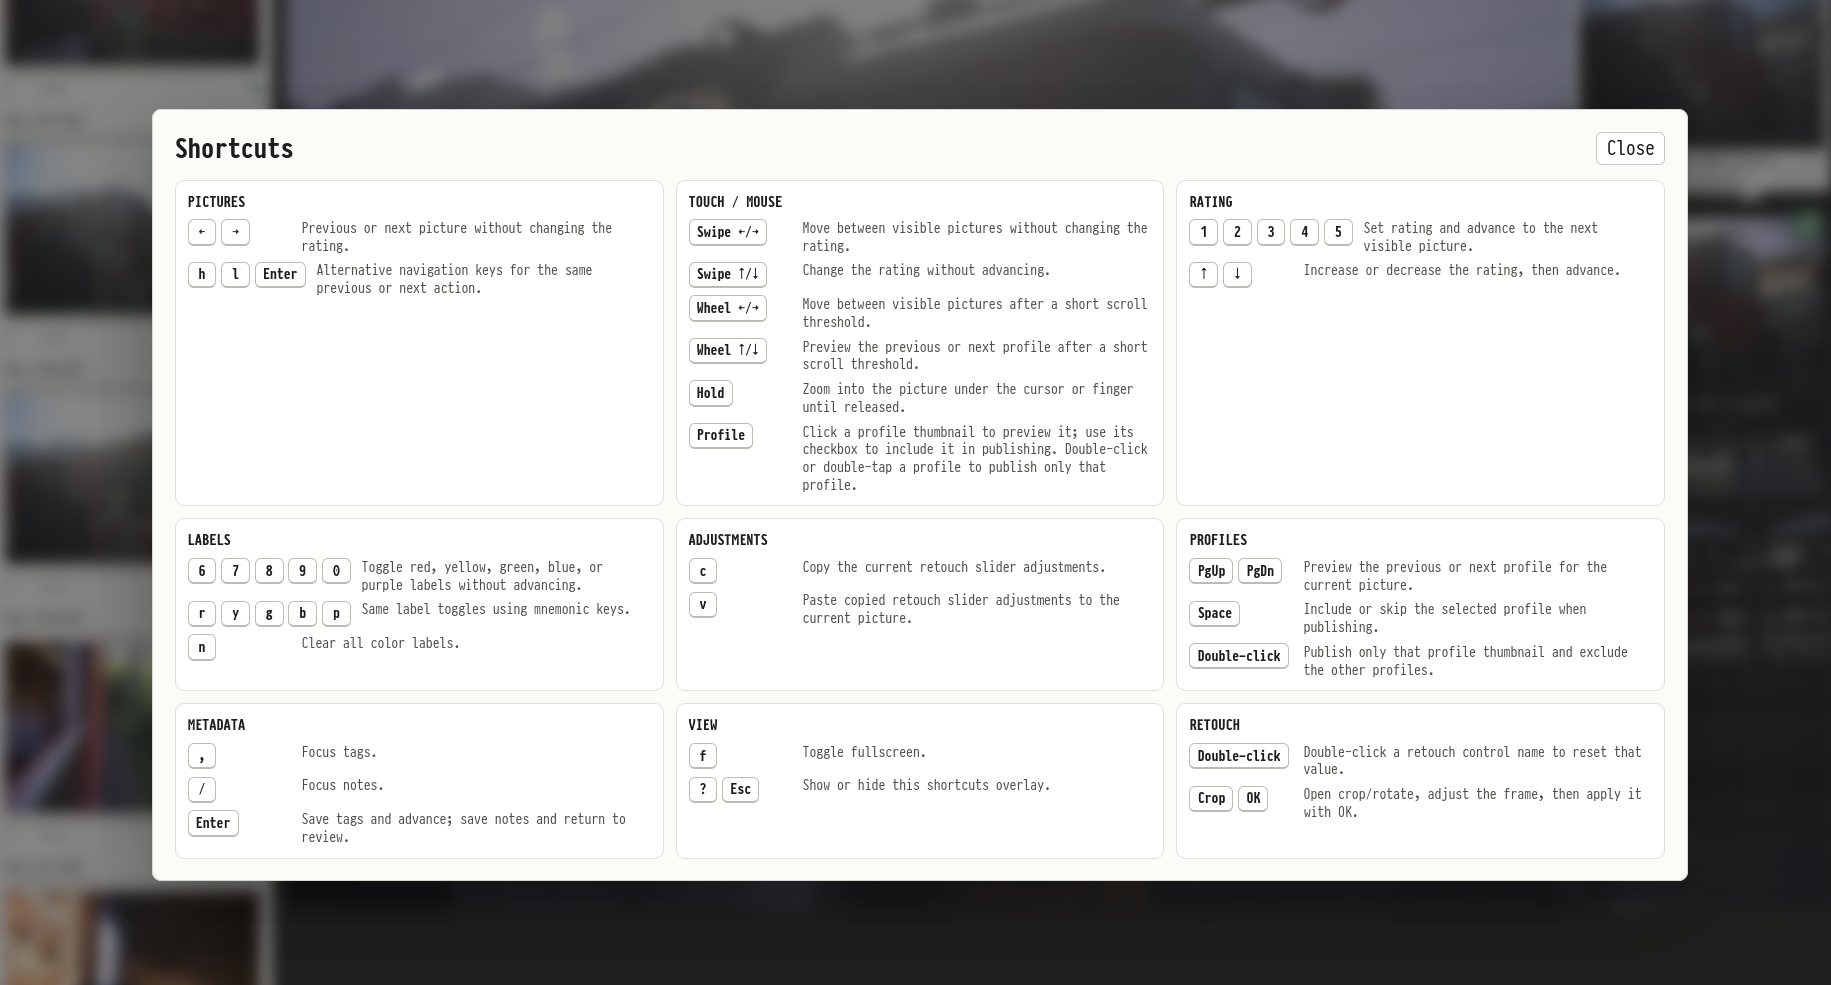
Top Features
- Single-binary desktop workflow:
mini-filmprovides a Tauri launcher with native directory pickers, a structured profile tree, saved options, network sharing toggle, Nikon WTU IP input, and system light/dark theme. - Live review and publish workflow: run
daemonon an inbox folder, open the browser UI, review new pictures as they arrive, rate/tag/label them in multiple passes, compare profile variants, and publish the final selection with live job progress. The review workflow is optimized for fast keyboard operation, while still supporting mouse, touch, and tablet use. - Mixed RAW and processed-file input: batch, daemon, review, and publish can take RAW files plus existing JPEG/HEIC/TIFF files. Explicit profiles apply to all standalone inputs; without a profile, rendered inputs keep their existing look and skip RawTherapee. In daemon output, untouched processed originals and straight-out-of-camera sidecars are managed symlinks back to the input tree.
- Panorama workflow: select ordered pictures in live review, compare four projection previews, and render a full-resolution 16-bit TIFF that immediately re-enters the normal review and profile workflow.
- Live profile sampler: compare the current picture across the XMP emulation library, then add selected profiles to one picture or the whole review without restarting the daemon.
- Optional Codex review assist: let Codex analyze small embedded RAW previews after rendering finishes and fill tags, notes, or initial ratings while the live review UI shows the same queued/processing status indicators.
- Film emulation from user-supplied profiles: apply XMP emulation presets,
Hald CLUT PNGs, or RawTherapee
.pp3files; convert Adobe Camera Raw / Lightroomcrs:RGBTableprofile XMPs into cached 16-bit Hald PNGs. - Nikon WTU ingest: pair with Nikon Connect-to-PC / Wireless Transmitter Utility mode over built-in camera Wi-Fi and feed transferred RAW and JPEG files directly into the daemon inbox.
- Mounted-camera auto-import: on Linux,
daemon --auto-importcontinuously discovers mounted GVfs PTP/GPhoto2 and MTP cameras, imports every card into the flat inbox with durable duplicate tracking, and feeds arrivals into the normal review pipeline. - Batch, sampler, and gallery output: process whole folders, render profile sampler sheets, and generate modern static HTML galleries.
- RAW pipeline extras: automatic Adobe Standard DCP matching and optional
lens LCP matching with
RawTherapee histogram-matched tone fallback, deterministic film grain,
optional neutral film diffusion and highlight glow, optional high-ISO color
denoise, optional RawTherapee lens corrections with a Lensfun fallback,
metadata copyback with
exiftool, 8-bit JPEG output, and 16-bit Zip-compressed TIFF output.
Profile Library
mini-film does not include film profiles or emulations. It works with XMP, Hald, and PP3 profiles already present on disk, including profiles created by the user or obtained from commercial film-emulation products.
For XMP preset libraries, point --profiles-root at a directory with:
profiles/     # internal RGBTable profile XMPs
emulations/   # user-facing emulation preset XMPs
Quick Start
Apply one profile to one RAW, JPEG, HEIC, or TIFF image:
mini-film apply input.RAW \
  --profile 'Classic Film' \
  --profiles-root /path/to/profile-library \
  --output output.jpg
Batch-process a folder, accepting RAW plus JPEG/HEIC/TIFF inputs by default:
mini-film batch /path/to/photos /path/to/output \
  --profile 'Classic Film' \
  --profiles-root /path/to/profile-library \
  --long-edge 3840 \
  --progressive-jpeg
Use --input-raw-only or --input-jpg-only when a mixed input folder should be
filtered before processing. JPEG and HEIC are treated as the same processed-file
group for these filters; TIFF is accepted by the default unfiltered mode.
In the default mixed mode, a JPEG/HEIC with the same normalized stem in the same
folder as a RAW is treated as that RAW's straight-out-of-camera sidecar instead
of a separate picture. A trailing dash-number suffix is ignored for this match,
so DSC_8313-1.jpg pairs with DSC_8313-2.dng. The review UI shows it as an
unchecked straight out of camera profile thumbnail; if selected for publish,
its output uses the -sooc suffix. If the JPEG/HEIC reaches the review state
before the RAW, mini-film folds it into the RAW as soon as the RAW appears, and
performs the same cleanup when an existing SQLite review database is reopened.
Image files that are symlinks inside the input folder are treated like normal input files, including review and publish rerenders.
Run the live review workflow:
mini-film daemon /path/to/inbox /path/to/output \
  --profile 'Classic Film' \
  --profile 'Soft Fade' \
  --profiles-root /path/to/profile-library \
  --review-address 0.0.0.0:8090
Then open http://localhost:8090, review pictures as they are processed, and use
the publish wizard to export the final album.
Run the desktop wizard instead of writing the daemon command manually:
The app wizard defaults to ~/Pictures/Scratch/Inbox for input,
~/Pictures/mini-film for output, and MINI_FILM_PROFILES_ROOT or the selected
profiles root for profile lookup. It remembers the last successful setup in
~/.cache/mini-film/app-settings.json. On Linux, enable Auto-import mounted
cameras to use the same continuous GVfs PTP/MTP discovery as daemon
--auto-import.
Use Nikon WTU ingest with the same daemon:
mini-film daemon /path/to/inbox /path/to/output \
  --profile 'Classic Film' \
  --profiles-root /path/to/profile-library \
  --review-address 0.0.0.0:8090 \
  --nikon-wtu 192.168.1.50
Build
Source builds require Rust, Node.js 24 or newer, and npm on PATH. Cargo
automatically installs the locked frontend dependencies, lints and checks the
review UI's TypeScript, and bundles it into one JavaScript file embedded in the binary.
The first build needs access to the npm registry (or a populated npm cache).
Frontend sources, dependencies, and generated output are staged under Cargo's
OUT_DIR; builds do not create node_modules or generated assets in the
checkout. Unchanged builds reuse the staged dependencies and bundle.
Downloaded binaries need neither Node.js nor npm and serve the same review UI without external JavaScript files. This applies to both CLI and desktop builds.
The default build includes the Tauri desktop app so cargo run --release opens
the app from the normal binary. On Linux this requires the WebKitGTK development
packages used by Tauri. On Debian/Ubuntu/Linux Mint:
sudo apt-get install \
  libwebkit2gtk-4.1-dev \
  libjavascriptcoregtk-4.1-dev \
  libsoup-3.0-dev \
  libgtk-3-dev \
  libayatana-appindicator3-dev \
  librsvg2-dev \
  patchelf
To build the command-line binary without desktop GUI dependencies:
cargo build --release --no-default-features
Release builds stay portable across CPUs of the same architecture. Diffusion selects supported SIMD kernels at runtime and falls back to its scalar kernels when the required instruction set is unavailable. For a machine-local build, explicitly opt into all instructions supported by that machine:
RUSTFLAGS='-C target-cpu=native' cargo build --release --no-default-featuresGitHub releases publish both CLI artifacts and GUI artifacts. GUI artifact names
end in -gui before the platform extension, and GUI builds update from matching
-gui release assets.
The review UI lives in frontend/review/ as strict TypeScript and Preact TSX
modules. Each features/<tool>/ directory colocates its views, models, and
helpers; core/, session/, and viewer/ hold shared infrastructure.
To work on it independently of Rust:
npm ci --ignore-scripts --include=dev --include=optional
npm run typecheck:review
npm run lint:review
npm run build:review
npm run check:assets
npm run test:review-build
npx playwright install chromium webkit
npm run test:review
The review API's source of truth is a shared pure Rust wire-contract module.
Cargo exports request and response JSON Schemas, generates fresh TypeScript and
standalone response validators in OUT_DIR, and then checks and bundles the UI.
The checked-in generated contracts are an editor/standalone-build mirror, not a
substitute for Cargo generation. After changing a Rust wire DTO, run:
npm run contracts:generate
npm run contracts:check
The lightweight exporter does not build the application or recursively invoke its build script. Request and response schemas intentionally differ: Serde defaults may make an input optional while its output remains required/nullable. Malformed HTTP or SSE data cannot replace the last valid review state. Runtime response validators are precompiled; no schema compiler, external schema fetch, or dynamic code generation is needed in the browser.
The standalone build writes target/review-frontend/review/app.js; pass
-- --profile release to minify it. Cargo uses the same build helper for
cargo build, cargo run, tests, and release builds. GitHub CI installs Node 24
explicitly, caches npm downloads, runs frontend checks and browser tests, and
builds CLI and desktop binaries on Linux x64/ARM64, macOS ARM64, and Windows x64.
The desktop launcher, static galleries, sampler, and TV page retain their
existing embedded assets.
Browser checks cover debug and release bundles in Chromium and WebKit; pure
contract, geometry, and state-model tests run once. Accessibility checks cover
keyboard-only controls and WCAG AA scans. Visual comparisons use the pinned
mcr.microsoft.com/playwright:v1.63.0-noble image in CI. Each run first generates
temporary debug reference screenshots, then compares release and repeated debug
renders against those same-browser references. This checks bundle parity and
rendering determinism, not historical visual changes; behavior assertions remain
the independent regression check. Screenshots and build artifacts are never
checked into Git.
With Docker (or CONTAINER_ENGINE=podman) installed, run the same environment:
npm run test:review:visual
npm run test:review:visual -- review.spec.ts
The helper installs locked dependencies in an isolated workspace under
target/review-ci/run-*/, leaving the source checkout read-only. Reference
screenshots stay under target/review-visual; failures, diffs, and traces stay
under target/playwright-results, relative to that workspace or the checkout
when running Playwright directly. CI uploads these ignored artifacts on failure.
Release JavaScript is capped at 80 KiB gzip and
checked for external or computed dynamic imports. Scheduled npm advisory checks
are separate from deterministic Cargo builds.
The checked-in tsconfig.json files let TypeScript language servers discover
the browser project, Node-based tests, and Playwright configuration directly.
Neovim and other editors should use this checkout's installed TypeScript and
ESLint packages after npm ci. ESLint uses TypeScript's project service and
rejects unsafe values, unhandled promises, unused declarations, any, and
imperative h() views. Hook order and effect dependencies are also checked.
Unchecked indexed access, exact optional properties, exhaustive switches, and
non-null assertions are checked too. Generated validator JavaScript is compiler
output: it is formatted and freshness-tested rather than source-linted; its
generated TypeScript declarations and all consuming code remain strictly checked.
Cargo runs the same production lint and type checks;
npm run check:assets additionally checks tests and developer helpers. Warnings
fail the lint commands, and TypeScript/ESLint suppression comments are rejected.
Prettier uses a 120-column layout, and lint enforces that limit for TypeScript,
TSX, and developer JavaScript. The pre-commit hook automatically formats staged
frontend paths; formatting changes are left unstaged for review, preserving
partial staging. npm run format:assets formats the complete frontend on demand.
The review frontend uses provider-scoped Preact Signals for catalog, navigation, tool state, and per-picture drafts. Metadata keeps its 500 ms autosave delay; retouch keeps 1,200 ms. A shared navigation update does not discard another picture's pending edits. Failed saves retain an actionable error and require an explicit retry after refreshing server state; uncertain rating-and-advance or job-creation requests are not automatically replayed. This protects local edit ownership, not simultaneous writes from different browsers: the existing wire protocol has no conditional writes or causal revision ordering. Drafts remain in memory, not in a durable offline journal.
Review dialogs contain keyboard focus and return it to the triggering control on close. Background rating/navigation shortcuts are suspended while a dialog is open. Focus the picture and press Enter/Space to toggle zoom, or Escape to exit. Crop frames and handles accept arrow keys for one displayed-pixel movement or resizing, and Shift+arrows for ten pixels, retaining crop bounds and aspect constraints. Profile availability checkboxes use their own normal Space action.
Required external dependencies at startup for image-generation commands:
rawtherapee-cliconvert(ImageMagick/GraphicsMagick)exiftoolcodexonly when daemon review analysis is enabled with--codex
Nikon Z9 High Efficiency/High Efficiency* NEFs, and other RAW files that
RawTherapee reports it cannot decode, can use Adobe DNG Converter through Wine.
This fallback is optional until one of those files is encountered. mini-film
looks for Adobe DNG Converter in ~/.wine-dng-mini-film, ~/.wine, and other
~/.wine* prefixes, and looks for wine-stable or wine in PATH. Override
discovery with --adobe-dng-converter, --wine, and --wine-prefix, or with
MINI_FILM_ADOBE_DNG_CONVERTER, MINI_FILM_WINE, and
MINI_FILM_WINE_PREFIX.
When that Wine prefix contains
drive_c/ProgramData/Adobe/CameraRaw/CameraProfiles/Adobe Standard, mini-film
automatically indexes those DCPs for RAW development. It matches source EXIF
against each DCP's internal UniqueCameraModel, normalizing case and separators
so Nikon EXIF NIKON Z 7_2 matches Adobe's Nikon Z 7 2. Only profiles whose
internal name is Adobe Standard or Adobe Standard vN are eligible; the
highest version wins, while Camera Default and creative Camera/ styles are
ignored. Missing, unreadable, unmatched, or ambiguous catalogs are a quiet
fallback.
A matched RAW uses the Adobe DCP as RawTherapee's input profile, including its tone, look table, baseline exposure, and hue/saturation map with interpolated illumination. In that case mini-film does not add histogram matching. Without a match, the existing RawTherapee histogram-matched curve remains active. This is automatic with no DCP flag. DCP profiles are never applied to JPEG, HEIC, or TIFF inputs.
Adobe DNG Converter does not bake the camera DCP or an external LCP into the
converted pixels. Converted Nikon High Efficiency files therefore still use a
matched DCP for camera color. Embedded DNG OpcodeList3 corrections are not
selected by mini-film. Lens correction stays off unless --lens-corrections is
passed, then mini-film uses either a matching external LCP or RawTherapee's
Lensfun automatic matching, not both.
The fallback writes a same-stem .dng beside the source through a hidden
staging directory, verifies its lossless compression, raw-image digest, DNG
identity, dimensions, and OriginalRawFileName, preserves source filesystem
timestamps and permissions, and confirms the normal mini-film render before
permanently removing the replaced RAW. Existing validated DNGs are reused after
an interrupted run. Concurrent conversions use an OS-backed lock whose
ownership is released automatically if a daemon exits, so a restart does not
wait behind an orphaned marker.
Validation accepts zero-padded capture subseconds that
ExifTool emits as text instead of a JSON number, retaining their exact digits
for identity comparison. In daemon review mode the existing SQLite image row is
rebound to the DNG in place, so its image ID, ratings, labels, tags, notes,
retouch settings, profile selection, and related rows remain intact. A restart
also repairs a stored RAW path when its validated replacement DNG already
exists.
Panorama mode additionally requires the Hugin CLI suite: pto_gen, cpfind,
cpclean, pto_var, autooptimiser, pano_modify, hugin_executor, nona, and
enblend. The Panorama entry in review Tools stays hidden when that complete
suite is not available. Use --hugin-bin-dir or MINI_FILM_HUGIN_BIN_DIR when
those binaries are outside PATH.
The update command also requires curl for downloading the Lensfun database.
Panorama
Stitch an explicit ordered set of RAW, JPEG, HEIC, or TIFF sources from the CLI:
mini-film panorama left.NEF middle.NEF right.NEF \
  --matching automatic \
  --projection cylindrical \
  --output sweep.tif
Matching strategies are automatic, sequential, multi-row, and
flat-mosaic. Output projections are rectilinear, cylindrical,
equirectangular, and General Panini (panini). Source preparation and Hugin
run with --jobs N threads; the default is half of the available CPU threads.
The command validates every required Hugin executable before preparing any
source and fails without creating an output when the suite is incomplete.
In daemon review, the bottom of the picture sidebar contains a small Tools
section on desktop and tablet, with Crop/rotate, Sampler, and Panorama. Phone
layouts do not show Tools. Panorama appears only when Hugin is available. The wizard stores
projects, ordered source relationships, projection previews, progress, and
errors as normalized SQLite rows. Interrupted work is preserved across restarts.
Preview stitching uses auto-oriented images with a maximum 2048-pixel long edge
and renders all four projections for comparison. The selected final projection
is rebuilt from full-resolution, 16-bit RTv4_sRGB TIFF sources. RAW preparation uses as-shot
white balance, the normal camera tone and optional lens/denoise corrections, but
does not apply a creative profile, grain, retouch, or sharpening.
Final review panoramas are written collision-safely to
<input>/Panoramas/<name>.tif, then added to review as ordinary TIFF input so
film profiles and TIFF sharpening can be applied once. Reusable working files
live under <cache-root>/.mini-film-panoramas/; cache keys include source path,
size, modification time, preparation settings, mini-film pipeline version, and
Hugin tool versions. The application remains one binary; Hugin, RawTherapee,
ImageMagick/GraphicsMagick, and ExifTool remain external executables.
Coverage
Generate LCOV coverage locally (requires cargo-llvm-cov):
cargo install --locked cargo-llvm-cov
./scripts/coverage.sh
The script writes:
target/coverage/lcov.info
CI runs the same coverage step on every push/PR and uploads coverage-lcov as an artifact.
Update
Use update to manually refresh the mini-film executable from
https://github.com/alfanick/mini-film/releases and rebuild/update the local
Lensfun profile database in ~/.cache/mini-film/lensfun.
The command also mirrors Lensfun DB files into the platform default location used by RawTherapee.
Update behavior is not automatic. Run it explicitly when a new release is
expected or before long sessions. The binary refresh still requires this crate to
be built with --features github-update; the Lensfun database refresh does not.
Convert XMP Profiles To Hald
Convert one profile XMP:
cargo run --release -- hald \
  '/path/to/profile-library/profiles/Kodak Portra 400 normalised profile.xmp' \
  -o '../hald/Kodak Portra 400 normalised.hald.png' \
  --overwrite
Convert all profile XMPs under the parent directory:
cargo run --release -- hald /path/to/profile-library/profiles --overwrite
Ordinary emulation preset XMPs usually only reference a profile UUID and do not
contain the table payload; hald skips those in directory mode.
When -o/--output is omitted, hald writes generated Hald PNGs under
$HOME/.cache/mini-film/hald. Hald PNGs contain only the decoded RGBTable
lookup. Profile XMPs that include extra Camera Raw settings print
adjustments=pp3 or sharpening=pp3; those settings are handled through
generated RawTherapee profiles during apply, batch, and sampler.
Apply A Complete Film Recipe
Use a Lightroom emulation XMP that references an internal profile and defines grain:
cargo run --release -- apply input.RAW \
  --profile '/path/to/profile-library/emulations/Kodak Portra 400 warm grainy.xmp' \
  --profiles-root /path/to/profile-library \
  -o output.tif
If --profile is an emulation name, set --profiles-root to a folder that
contains emulations/ and profiles/:
cargo run -- apply \
  --output /home/alfanick/test.jpg \
  --profile 'Agfa Scala 200 + grainy' \
  --profiles-root /path/to/profile-library \
  /home/alfanick/Pictures/Lightroom/2026/05/03/DSC_1812-10.dng
output.tif / output.tiff is exported as 16-bit Zip-compressed TIFF.
cargo run --release -- apply input.RAW \
  --profile '/path/to/profile-library/emulations/Kodak Portra 400 warm grainy.xmp' \
  --profiles-root /path/to/profile-library \
  -o output.jpg
output.jpg / output.jpeg is exported as 8-bit JPEG.
Use a human-edited RawTherapee profile directly:
cargo run --release -- apply input.RAW \
  --profile edited-profile.pp3 \
  -o output.jpg
When --profile points at a .pp3, mini-film passes that PP3 directly to RawTherapee. If the PP3 contains a [Film Simulation] section, RawTherapee applies its referenced Hald during RAW development. PP3-only profiles do not carry mini-film grain metadata.
Output metadata behavior for apply, batch, daemon, and sampler:
- source EXIF/IPTC fields are copied from the input RAW to the output file using
exiftool(unless--strip-metadatais set) - generated outputs are annotated with Adobe-style XMP Camera Raw settings
(
XMP-crs) for resolved mini-film profile adjustments, sharpening, HSL, calibration, tone-curve, and grain values where mini-film has real structured data for the render - the XMP packet also records mini-film as the creator/converter and adds a
high-level
xmpMMhistory entry with the raw file, profile, linked profile, Hald or PP3 source, grain state, grain engine, grain seed, and grain-normalization reference, plus the effective diffusion method and parameters when enabled - an EXIF comment is written as
mini-film <version> usage=<command> profile=<profile-or-emulation>orprofile=nonewhen no profile was configured
For direct JPEG/HEIC/TIFF inputs without a profile, source metadata is copied from the rendered source and mini-film only adds its basic version/comment marker and review/publish metadata. Profiled JPEG/HEIC/TIFF outputs receive the same resolved profile, grain, and edit-history metadata as profiled RAW outputs.
Batch Apply
Process every supported RAW file (.dng, .nef, .cr2, .cr3, .arw, .raf, .orf, .rw2, etc.) plus JPEG/HEIC (.jpg, .jpeg, .heic, .heif) and TIFF (.tif, .tiff) files under an input directory and write JPGs or 16-bit TIFFs under an output directory:
cargo run --release -- batch \
  /home/alfanick/Pictures/Lightroom/2026/05/03 \
  /home/alfanick/batch-output \
  --profile 'Agfa Scala 200 + grainy' \
  --profiles-root /path/to/profile-library \
  --output-format jpg \
  --jobs 8
If the input directory does not exist, batch asks whether to create its full
directory tree. The output directory is created if it does not exist. Nested
input folders are preserved, and each input uses the same relative path with a
.jpg extension by default. Use --output-format tiff to write .tif files
through the 16-bit Zip-compressed TIFF path. With --profile, standalone JPEG/HEIC/TIFF inputs use the
same PP3, Hald, grain, retouch, and black-and-white profile pipeline as RAW.
JPEG goes directly to RawTherapee; HEIC is first auto-oriented into a 16-bit
Zip-compressed TIFF. A final PP3 layer disables standard, edge, microcontrast,
capture, and post-resize sharpening for JPEG/HEIC inputs because these files are
normally already sharpened in camera; output XMP also omits profile sharpening
fields for these inputs. TIFF permits resolved profile sharpening because a
panorama enters the pipeline before creative output sharpening. In daemon
review, a straight-out-of-camera rendition
also appears as a profile and is excluded from publish until selected. Without
--profile, compressed inputs retain the direct resize/crop/rotation and
metadata-copy path. Camera tone matching, automatic ISO denoise, and lens
corrections remain RAW-only. During folder discovery, a JPEG/HEIC with a matching
RAW is treated as its straight-out-of-camera sidecar; only the RAW receives
profile renders.
By default, batch processes half of the detected CPU threads at once. On a 16-thread CPU that means 8 files in parallel. Override it with --jobs N when tuning for a different machine, output format, or memory budget.
batch shows two progress bars:
- total batch progress across files
- current file progress across RAW decode/Hald/grain or compressed-file export steps
Batch Gallery
Pass --gallery to generate a gallery HTML from all successful batch outputs:
mini-film batch \
  /home/alfanick/Pictures/Lightroom/2026/05/03 \
  /home/alfanick/batch-output \
  --profile 'Agfa Scala 200 + grainy' \
  --gallery modern \
  --gallery-columns 4 \
  --gallery-thumbnail-long-edge 1024
--gallery accepts one of modern, soft, compact, hero, phone, or all.
Template intent:
modern: masonry-like variable-cards layout with generous spacing and hero-like first-look cadencesoft: editorial light look with warm spacing and caption emphasiscompact: dense compact grid for quick scanninghero: story-focused layout with a large leading tile and balanced follow-upsphone: iOS/iPadOS photos style, dense square tilesall: render all five templates
Batch gallery options are folder-friendly and reuse the existing batch output tree
(including subdirectories). For a single template, the gallery is written as
<output>/index.html and uses <output>/thumbnails/.
--gallery all renders all five gallery templates into:
<output>/modern/index.html<output>/soft/index.html<output>/compact/index.html<output>/hero/index.html<output>/phone/index.html
The template run reuses shared gallery assets under <output>/thumbnails/ so
switching layouts does not reprocess or regenerate thumbnails.
Daemon
Run a long-lived watcher that applies optional profiles whenever new files
arrive in an input folder. If no --profile is provided, each RAW is developed
once with RawTherapee defaults and JPEG/HEIC/TIFF inputs are converted directly.
When profiles are provided, each standalone RAW, JPEG, HEIC, or TIFF gets one output
per profile. Prepared HEIC TIFFs are reused from
<cache-root>/.mini-film-profile-inputs/heic-v1/ across profile and retouch renders.
If a matching RAW exists, its JPEG/HEIC sidecar is never profiled separately.
mini-film daemon \
  /home/alfanick/Pictures/Lightroom/inbox \
  /home/alfanick/Pictures/mini-film-output \
  --profile 'Agfa Scala 200 + grainy' \
  --profile 'Portra 400' \
  --profiles-root /path/to/profile-library \
  --debounce-seconds 1 \
  --jobs 8 \
  --output-format jpg
The command validates configured profiles on startup, so mistyped --profile
values fail immediately. If the input directory does not exist, it asks whether
to create its full directory tree. It then watches the input directory
recursively, waits for the file to be reported as completed by the watcher (or
a short fallback window when that signal is not available), and writes each
result into:
<raw relative structure>/<profile stem>/<raw stem>.<ext>
Without --profile, daemon output uses the raw-relative structure directly:
<raw relative structure>/<raw stem>.<ext>
For example, /in/2026/05/03/DSC_1864-14.dng with profiles Foil and Classic
becomes:
/out/2026/05/03/Foil/DSC_1864-14.jpg/out/2026/05/03/Classic/DSC_1864-14.jpg
If profile resolution fails for any selector, startup stops with a clear error.
daemon processes input files in parallel and defaults to half the available
CPU threads unless --jobs is set.
When live review is enabled, startup EXIF and camera maker-note indexing runs with all available CPU threads. Metadata reads are cached by source path, size, and modification time so queueing multiple profiles does not invoke ExifTool again for the same unchanged image.
Live Review
Add --review-address to expose a browser-based review UI while the daemon is
running:
mini-film daemon \
  /home/alfanick/Pictures/Lightroom/inbox \
  /home/alfanick/Pictures/mini-film-output \
  --profile 'Classic Film' \
  --profile 'Soft Fade' \
  --profiles-root /path/to/profile-library \
  --review-address 0.0.0.0:8090 \
  --gallery modern
The review server assets are compiled into the binary, so a release executable
does not need HTML/CSS/JS files next to it. The UI is live: the daemon records
new RAW, JPEG/HEIC, and TIFF files immediately, extracts an embedded camera preview when
available, then updates the browser over server-sent events as each render moves
from queued to processing to done. When no profiles are configured, the review UI
shows the developed RawTherapee-default output without a profile rail and direct
JPEG/HEIC inputs hide profile and retouch controls. With explicit profiles,
standalone JPEG/HEIC inputs expose the same profile rail, retouch controls,
black-and-white filters, and publish selection as RAW. Their camera rendition
appears in the rail as straight out of camera, unchecked for publish by
default. Daemon never copies an untouched JPEG/HEIC/TIFF into its normal output
tree. A direct compressed input is represented by a managed symlink at its
relative output path; a RAW sidecar or the camera rendition of a profiled
compressed input is a managed symlink under the sooc profile directory.
Links preserve the source media extension, with .jpg and .jpeg normalized
to .jpg. Startup replaces old generated copies and repairs stale links after
the input folder moves. Crop/rotation variants use files in the temporary review
cache, so the base original link remains intact.
Pending full-resolution daemon renders are reprioritized dynamically whenever the current picture, selected profile, rating filter, rating, or profile availability changes. Only enabled creative profiles participate; SOOC remains eligible and can be the main profile when selected. For each profiled picture, the main profile is its selected enabled profile, falling back to its first enabled profile. A direct compressed picture's sole managed-link job is its main render. The daemon dispatches pending work in this order:
- the main profile of the current picture;
- the remaining eligible profiles of the current picture;
- the main profile of the other pictures visible under the current rating filter, in image order;
- the remaining eligible profiles of those visible pictures, in image order;
- the main profile of pictures outside the current rating filter, in image order;
- the remaining eligible profiles of those remaining pictures, in any order.
Changing review state affects the next dispatch but does not interrupt a render that is already processing. High-quality rerenders triggered by retouch or profile-sidebar edits use a separate, debounced execution lane. Pending work whose debounce has expired follows the same six-level priority order within that reserved retouch lane, but executes independently from the daemon render lane.
On restart, review reuses a completed profile render only when its RAW pipeline and final export settings still match. Changing JPEG quality, resize or long-edge bounds, subsampling, metadata stripping, or progressive JPEG mode queues affected profile and retouch outputs again. Source-derived camera previews, compressed thumbnails, and originals remain cached.
For standalone JPEG/HEIC, ordered background thumbnail and preview pipelines
start at discovery time and run concurrently with managed-link installation.
Each converter uses half of the available CPU threads; one thumbnail worker and
two preview workers keep review throughput high without overwhelming metadata
discovery. Jobs follow capture time and then file name, and each derivative
becomes available to the browser as soon as its cache file lands. The sidebar
uses progressive 512-pixel quality-55 thumbnails; the main viewer uses
progressive 2048-pixel quality-82 previews. In JPEG-only reviews it preloads the
next three previews at viewport sizes up to 2048 pixels and the next three
originals above that threshold. Both tiers are cached under
<cache-root>/.mini-film-review-previews/compressed-v1/. Direct compressed images
request the original input only when the loupe activates or the browser
viewport is larger than 2048 pixels; profiled compressed images use the
selected profile render for the main viewer and loupe. Holding the primary
mouse button or a touch shows the nearby loupe until release. On desktop,
double-clicking the picture toggles a full-view zoom that follows the mouse
cursor; double-click again or press Escape to leave it. In the desktop and
tablet layouts, direct
JPEG/HEIC inputs hide the unavailable Retouch section. RAW inputs paired with a
straight-out-of-camera JPEG/HEIC keep that section in place and disable it while
the straight-out-of-camera profile is selected, so switching profiles does not
shift the page layout. In the phone layout, direct JPEG/HEIC inputs hide the
unavailable Retouch action. All JPEG/HEIC inputs expose a Save Photo action for
the untouched source file. On
secure origins it opens the native file-share sheet, including iOS's Save Image
action; on plain LAN HTTP it opens the correctly typed original image for
Safari's image-save actions. The first
--profile is the default selected look for RAW and standalone compressed files
when profiles are configured. All configured profile variants are available and
selected for publish by default. A profile thumbnail's checkbox controls its
availability for that picture and keeps publish selection aligned; double-click
or double-tap a thumbnail to make it the only available profile.
Hover the filename in the review panel to see the source file size, pixel
dimensions, and megapixel count rounded to one decimal place.
The picture sidebar omits the final image extension and shows the camera model
as muted text when EXIF model metadata is available, using compact Nikon Z names
such as Z8, Z9, and Z7ii.
When the source metadata contains a shutter count, hover the camera name in the
same panel to see Shutter count: N. Hover the focal length to see the lens
name when it is available. Hover the shutter speed to see the shutter mode and,
when enabled, silent photography. Hover the PSAM mode to see the release mode.
When Nikon Auto ISO is active, hover ISO to see Auto ISO <= ISO N with the
configured upper limit.
Nikon continuous-shooting series are grouped into collapsed stacks in the picture sidebar when their MakerNote burst identity is available. The grouping uses the recorded burst start and shot order rather than capture-time guesses; converted DNGs and paired camera JPEGs remain part of the same logical series. The stack shows the current member while navigating through a collapsed series, and its chevron reveals the individual pictures. The stack and first visible member show their normal capture date/time; later visible members show their precise elapsed time from that first picture when capture subseconds are available. Under a rating filter, the stack count shows visible versus total pictures and expansion lists only the visible members, which also becomes the elapsed-time anchor. When only one member remains visible, it appears as a normal picture row without stack controls. Expansion is shared between connected browsers and persisted in the review catalog. Ratings, profiles, retouching, rendering, and publishing remain independent for every picture in the stack.
Multiple browsers can use the review page at the same time. The current picture and minimum rating filter are server-owned shared state, so every browser shows the same review position. Navigation, filter changes, keyboard ratings, and rating-button clicks update that shared state and are replicated to every connected browser through the server-sent event stream. At the end of a pass, the shared filter moves to the next rating level.
When a complete PragmataPro Mono Liga family is installed under
~/.fonts, mini-film automatically converts its regular, bold, italic, and
bold-italic faces to cached WOFF2 files under
~/.cache/mini-film/web-fonts/. The desktop wizard, live review, and TV view
then use those content-addressed web fonts with long-lived browser caching.
Missing or unusable font files leave the existing font fallbacks unchanged.
The proprietary font is never embedded in the mini-film binary or copied into
standalone sampler pages and published galleries.
Review data, panorama projects, shared browser position, and burst expansion are
persisted in <input>/mini-film-review.sqlite as normalized relational rows.
The output path
<output>/mini-film-review.sqlite is a managed symlink to that catalog, and
<output>/originals is a managed symlink to the complete input folder. On the
first mini-film 21.1 open, an existing regular catalog and any SQLite
WAL/journal companions are moved from output to input before SQLite opens; if
different catalogs exist in both locations, mini-film stops without modifying
either one. Subsequent daemon starts repair the catalog and originals links
when the input folder has moved.
The active database does not keep an opaque JSON copy of the review store.
SeaORM models own the schema and a migration ledger applies future database
changes automatically. Media paths in SQLite are stored relative to their input
or output/cache root, while the settings row records the last absolute roots
used to open the database. The roots supplied to daemon or review-publish are
authoritative, so an input tree and output tree can be moved and reopened at
their new locations without rewriting review data or cached-output
relationships. Existing schema-v15 absolute paths are converted transactionally
on first open; an unmappable path stops migration instead of being discarded.
Mounted-camera auto-import provenance uses the same catalog, with separate
relational rows for physical devices, cards/storages, capture groups, imported
assets, and remote source sightings.
Review caches use a catalog-specific system temporary directory, normally
/tmp/mini-film.XXXXXX; its absolute path is stored as cache_root in
review_settings. On the first mini-film 21.2 open, legacy .mini-film-*
cache directories and retouch files are moved out of output before workers
start. Old shared gallery thumbnails become ordinary <output>/thumbnails/
assets, and no .mini-film-* directories remain anywhere in output. Everything
under cache_root is optional: deleting the directory loses no ratings, edits,
profile choices, or panorama project state. The next open recreates the same
root when possible, and each missing derivative is generated on demand.
On its first open, mini-film 18 validates a normalized schema-v11
database from the final 17.x release, creates the one-time
mini-film-review.sqlite.pre-seaorm-v11 backup without overwriting an existing
backup, adopts the database, and verifies that every reconstructed review value
still matches. SQLite integrity and foreign-key checks must also pass.
Mini-film 18 does not read legacy mini-film-review.json state or SQLite schema
versions 1 through 10. It rejects either format without modifying it; run the
final mini-film 17.x release once to convert that state to normalized SQLite v11,
then open it with mini-film 18. A human-readable audit trail of review, render,
and publish state changes is appended to <output>/history.txt. Together those
files make it possible to restart the daemon, reopen the browser, and continue
the multi-pass culling flow where it stopped. A typical pass is to rate
everything 0 or 1, filter to >= 1, rate the survivors higher, and repeat
until the final subset is ready.
The review workflow is optimized for keyboard operation. Press ? in the
browser UI to show the shortcuts overlay. § rates 0 and advances, 1-5
rates and advances, arrow up/down changes the rating and advances, left/right
navigates without rating, h toggles the luma/RGB histogram in the workspace's
top-left corner on desktop, and i toggles camera focus points over the main
picture. Nikon AF area rectangles and 81-point phase-detect records are read
from MakerNotes, normalized through EXIF orientation, and transformed through
the active non-destructive crop and rotation. Pictures whose camera recorded no
focus location show no rectangles. PageUp/PageDown cycles the profile preview
for the current picture, Space enables or disables the selected profile, and
Escape leaves the tags or notes field without advancing. Double-click or
double-tap a profile thumbnail to make only that profile available. 6, 7,
8, 9, and 0 toggle red, yellow, green, blue, and purple
labels without advancing; r, y, g, b, and p provide the same mnemonic
label toggles. c copies the current retouch slider adjustments, and v pastes
them onto another picture. While crop mode is open, r rotates the selected
crop ratio instead of toggling the red label.
The review UI stores rating, label, tags, notes, active preview profile, and
per-picture profile availability used by review and publish. RAW and explicitly profiled
JPEG/HEIC inputs support per-picture
retouch controls for exposure, contrast, highlights, shadows, whites, blacks,
as-shot color temperature, clarity, rotation, and crop. Contrast adjusts
RawTherapee's global Exposure contrast, while Clarity adjusts signed Local
Contrast. The temperature control is
centered on the camera's Kelvin value, and hovering Temperature shows the
camera white-balance mode when available. Tint is centered on the camera's
green/magenta white-balance fine-tune value. Moving either white-balance control
generates an effective custom RawTherapee white balance from those as-shot
values. Exposure, contrast, highlights, shadows, whites, blacks, and clarity
display the combined source-profile and emulation values for the selected
profile plus any manual per-picture adjustment. Manual edits remain stored as
deltas, so changing the selected profile updates those slider baselines without
applying profile values twice. Crop/rotate is opened from the sidebar Tools section on desktop and
tablet; Clear, Cancel, and OK join the rotation and aspect-ratio bar only while
crop mode is open. Direct JPEG/HEIC inputs without a profile do not expose
retouch controls. The browser applies a fast draft preview while edits are being
made, then queues a high-quality mini-film render and swaps in
the finished output when it is ready. Each ready profile card includes a DL
link; hovering it shows the rendered JPEG size in MB before downloading. Crop
and rotation are persisted with the review state and are used by publish
rerenders. Reopening crop mode shows an
uncropped camera preview or original SOOC image, with the finished crop aligned
over it, so an existing crop can be expanded or repositioned without losing the
discarded area. Crop ratios can be locked to the auto-oriented original frame,
Free, 4:3, 5:4, A3/A4, 1:1, 16:10, 21:9, 3:1, 4:1, 5:1,
or 6:1; press r in crop mode to swap a locked ratio's orientation. The
Free preset lets each crop edge move independently. The A3/A4 preset uses the shared ISO
A-series sqrt(2):1 paper ratio. The editable frame is constrained to the
largest black-corner-free area after rotation, so neither crop handles nor the
published result can include rotation triangles. Profile variants whose combined
source and emulation saturation is effectively black-and-white show None, Y,
O, R, and G filter controls beside the selected profile name. Those
black-and-white filter choices are stored per picture/profile variant and are
used by review and publish rerenders. Generated retouch and black-and-white
filter variants are cached under <cache-root>/.mini-film-retouch/ so returning
to an already rendered variant swaps immediately.
Completed RAW renders show DCP used, LCP used, or DCP + LCP used beside
the selected profile name according to the profiles actually applied. Hover the
text to see the exact DCP and LCP filenames recorded for that render.
Click the selected profile name to open the film simulation info overlay; it
shows profile identity, camera Active D-Lighting metadata for the current RAW,
and a compact summary of generated or direct PP3 adjustment sections. Its
collapsible Complete PP3 section shows and downloads every PP3 layer applied
to that picture/profile in RawTherapee command-line order, including generated
retouch, black-and-white filter, ISO denoise, lens correction, and either the
matched Adobe DCP or auto-matched curve adjustment when active.
The Sampler tool is shown when the configured profile library contains XMPs
under emulations/. It prepares one reusable, auto-oriented 512-pixel 16-bit
neutral TIFF for the current RAW, JPEG, HEIC, or TIFF, plus a progressive JPEG
only for browser display. RAW preparation uses the normal camera tone,
denoising, and lens corrections without a creative profile or sharpening.
Sampler profiles cannot add sharpening to JPEG/HEIC sources; TIFF sources may
use profile sharpening. Current review retouch, white balance, crop, and
rotation are intentionally excluded from sampling.
Profile names use the same multi-level trie grouping as the sampler command,
including deeper film-speed and version branches. Sections start collapsed;
the deepest sections containing profiles enabled by the command line or a
previous Sampler selection open automatically, together with the ancestor path
needed to reveal them. Thumbnail rendering is asynchronous on half of the
available CPU threads: tiles currently visible in the sampler are queued first,
the direct tiles in each expanded section next, and collapsed branches continue
in the background. Current makes a rendered profile available only to the
active picture; All applies it to existing pictures and makes it the default
for future pictures. Command-line profiles are preselected and their All
setting is locked. Sampler-added profiles and both availability scopes are
stored in SQLite, survive daemon restarts even when omitted from later CLI
arguments, and use the ordinary full-resolution render path after selection.
Reusable inputs and thumbnails live under
<cache-root>/.mini-film-sampler/review-sampler-v2-adobe-dcp/; review HTML,
CSS, and JavaScript remain embedded in the single executable.
Optional Codex analysis can run after each image has a review preview and its configured renders have finished. RAW inputs use the embedded camera preview; JPEG/HEIC inputs get a temporary 640-pixel analysis preview instead of sending the full-resolution output. Two Codex analyses run in parallel:
mini-film daemon \
  /path/to/inbox \
  /path/to/output \
  --profile 'Classic Film' \
  --profiles-root /path/to/profile-library \
  --review-address 0.0.0.0:8090 \
  --codex tags,note
--codex without a value defaults to tags only. Explicit values are
comma-separated: tags, note, rating, or all. Tags are normalized into the
same tag field used by manual review. Notes are one-sentence descriptions.
Ratings use a conservative 0 to 3 scale where 0 means technically
unusable, 1 technically correct, 2 interesting, and 3 truly good. Manual
edits always win: once a user changes tags, notes, or rating, later Codex
results do not overwrite that field. Camera ratings imported from RAW metadata,
including Nikon in-camera star ratings exposed by ExifTool as Rating or
Nikon/XMP rating tags, are protected from Codex rating updates too. While
analysis is queued or running, the existing review sidebar status dot/text and
the main profile status line show the Codex state.
The default model is gpt-5.4-mini, and review analysis runs it with isolated
low reasoning so unrelated user Codex settings do not make tagging slower or
incompatible. Override the model or binary path with:
--codex-model gpt-5.4-mini
--codex-binary codex
--codex-timeout 45
Publishing opens a wizard that acts as a browser frontend for a spawned
mini-film review-publish job. The wizard can filter by rating, color label,
and tags; optionally export only the first/main profile while excluding SOOC;
choose a relative album folder inside the daemon output directory;
select JPG/TIFF output, original size or resize options, JPEG
quality/subsampling/progressive mode, grain engine and normalization settings,
and an optional gallery template.
Publish jobs run in parallel with the daemon job count, which defaults to half
the available CPU threads, and stream live progress back to every open review
browser.
The default publish settings match the daemon render settings, so publishing
uses hardlinks to the already-reviewed outputs when possible and falls back to
symlinks if hardlinks are not available. If output settings differ, mini-film
rerenders the selected pictures from the original RAW, JPEG, or HEIC inputs
through the normal apply pipeline before building the gallery. Changing the
grain engine, normalization reference, or normalization enabled state in the
publish wizard therefore also requires a rerender.
Published outputs are flat under the chosen album folder:
<output>/<album>/<raw stem>.<ext>
<output>/<album>/<raw stem>-<profile stem>.<ext>
With no daemon --profile, published files use <raw stem>.<ext>. Otherwise,
the first daemon --profile is treated as the default profile and does not add a
profile suffix. Additional selected profiles add -<profile stem>. If a gallery
template is chosen in the wizard, publish renders an index.html gallery in the
album folder using the same templates as batch. Supported templates are
modern, soft, compact, hero, phone, and all. When publishing
finishes, the review wizard shows both Open gallery and Download gallery;
the download is one portable ZIP containing the HTML, gallery assets,
thumbnails, and full published images.
Published JPGs are annotated with review metadata through exiftool: rating,
label, tags, published profile, notes, and a mini-film version/comment marker.
The source RAW metadata and mini-film XMP edit metadata copied during normal
output generation are preserved unless --strip-metadata is used.
The same publish operation can be run directly from the CLI:
mini-film review-publish \
  --state /home/alfanick/Pictures/mini-film-output/mini-film-review.sqlite \
  --input-root /home/alfanick/Pictures/Lightroom/inbox \
  --output-root /home/alfanick/Pictures/mini-film-output \
  --album published/final \
  --min-rating 3 \
  --label green \
  --gallery modern
--state may use either the canonical catalog in the input folder or its
managed output symlink; both must resolve to the catalog for the supplied roots.
On Linux, daemon can import from cameras already mounted by GVfs:
mini-film daemon \
  /home/alfanick/Pictures/Lightroom/inbox \
  /home/alfanick/Pictures/mini-film-output \
  --review-address 127.0.0.1:8090 \
  --auto-import
--auto-import watches session D-Bus mount events and also reconciles the GVfs
mount directory periodically, so cameras connected before or during the daemon
run are discovered. PTP/GPhoto2 mounts and MTP mounts are supported, including
multiple cameras and multiple cards per camera. mini-film does not mount,
unmount, delete, or modify anything on a camera. The desktop session must mount
the device under $XDG_RUNTIME_DIR/gvfs; non-Linux builds reject this option
with a clear error.
Camera RAW and JPEG files are copied directly into the flat daemon input folder. One transfer worker runs per physical camera, serializing that camera's cards; different cameras import concurrently. The command line shows a dynamically added byte-progress bar per camera. Transfers use a hidden same-filesystem staging file, verify source size and modification time before and after copying, sync the result, preserve its modification time, and publish without replacing an existing destination.
Duplicate detection never hashes image contents. Within one physical camera,
the same case-insensitive filename and exact modification time is enough to
identify the same asset even when it appears on multiple cards. RAW/JPEG files
for the same capture share one destination stem. Across cameras, or when a
filename is reused with a different modification time, mini-film skips only a
strong EXIF match: ImageUniqueID, or capture time/subseconds/offset plus camera
serial. If EXIF differs or cannot establish identity, both files are preserved
with -1, -2, and later numeric suffixes. Existing inbox files with the same
filename and modification time are adopted on first use, which makes enabling
auto-import safe for an established inbox.
If Adobe DNG fallback later replaces an imported unsupported Nikon NEF, the catalog retains the original camera filename and records the validated DNG as its active successor. A later camera scan therefore does not reimport the removed NEF. Interrupted transfers leave no final partial image and are retried on a later reconciliation.
Daemon can also ingest files from a Nikon camera configured for Connect-to-PC / Wireless Transmitter Utility style transfer. Start the camera's connection wizard, make sure the computer can reach the camera address, then point mini-film at that address. mini-film drives the Nikon pairing/auth step, downloads RAW and JPEG files into the watched inbox, and processes them with the normal daemon queue:
mini-film daemon \
  /home/alfanick/Pictures/Lightroom/inbox \
  /home/alfanick/Pictures/mini-film-output \
  --profile 'Classic Film' \
  --profiles-root /path/to/profile-library \
  --nikon-wtu 192.168.1.50
The Nikon WTU receiver is native PTP/IP over TCP port 15740; it does not use
external camera-control tools. During first-time setup it requests the camera's
pairing code, accepts the wizard, completes pairing, reconnects, and then waits
for transferred RAW/JPEG objects. JPEGs follow the normal daemon rules: they are
reviewed directly when standalone, or merged as the straight-out-of-camera
sidecar when a matching RAW arrives. Unsupported transfer objects are consumed
silently so they do not block the camera's transfer queue. mini-film persists a
stable initiator GUID in $HOME/.cache/mini-film/nikon-wtu-guid unless
--nikon-wtu-guid is provided, and records successful camera pairings in
$HOME/.cache/mini-film/nikon-wtu-pairings.json. Later daemon runs reuse the
cached camera/name/GUID identity and go straight to transfer mode. If a camera
was previously paired to a different identity, remove that pairing on the camera
or reuse the same computer name/GUID with --nikon-wtu-name and
--nikon-wtu-guid.
Profile Sampler Contact Sheet
sampler renders one thumbnail per XMP file from emulations/ and builds a structured contact sheet grouped by shared profile-name prefixes. For example, Kodak profiles are shown under progressively deeper headings like Kodak, Kodak Portra, Kodak Portra 400, and Kodak Portra 400 Grainy; indentation makes the level visible. Each thumbnail is developed with its profile-specific generated RawTherapee .pp3 files, including Film Simulation for the Hald, which applies the LUT during RAW development, before the grain stage. Like batch, sampler renders half of the detected CPU threads in parallel by default; override with --jobs N. Thumbnail longest edge defaults to 512 px:
--jobs 8
--thumbnail-long-edge 768
--jpg-quality 92
--no-grain
Sampler grain normalization uses each developed thumbnail's actual width and
height at the grain stage. Its existing small-thumbnail grain-amount
attenuation remains a separate sampler-specific adjustment;
--no-normalize-grain disables spatial normalization but does not disable that
amount attenuation.
HTML sampler output renders each profile both without diffusion and with medium
multi-scale mist, sharing one 16-bit profile development and the same
deterministic grain seed. The profile-only thumbnail is shown first. Click it to
open the larger preview, click the larger preview to toggle diffusion, and hold
either size to show the neutral original until release. The overlay also shows
Focus, Highlights, and Shadows as square 100% crops. Their locations are
detected once from the neutral original, using camera focus metadata when
available and the frame center otherwise, and stay aligned across every
profile. The crops switch with the main profile, diffusion, and original view
without creating separately rendered images. An explicitly enabled
--diffusion setting customizes the diffusion-on comparison; static JPEG
sampler sheets retain their existing single-render behavior.
Sampler renders are reused only while their content-and-settings cache entries
are at most 24 hours old. --no-cache bypasses sampler image and analysis cache
reads and writes, forcing all thumbnails and previews to be rendered again.
Use a non-default convert binary or write a progressive sampler JPEG with:
--convert /path/to/convert
--progressive
JPEG Export Options
apply, batch, and daemon support the same final JPG controls. batch and daemon also accept
--output-format jpg|tiff; TIFF batch output is written as 16-bit Zip-compressed .tif.
sampler supports --jpg-quality, --jpeg-subsampling, --strip-metadata, and
--progressive for generated sampler JPEGs, and accepts .jpg/.jpeg or .html
outputs (HTML mode produces a clickable gallery with lazy thumbnails).
--jpg-quality 90
--long-edge 3000
--jpeg-subsampling s444
--progressive-jpeg
--strip-metadata
Resize options:
--resize 3000x3000>passes explicit GraphicsMagick resize geometry.--long-edge 3000constrains the longest edge to 3000 px.--max-width 3000constrains width only.--max-height 2000constrains height only.--max-width 3000 --max-height 2000constrains both dimensions.
Use one resize mode at a time: --resize, --long-edge, or --max-width/--max-height.
JPEG subsampling values:
s444: best quality, no chroma subsamplings422: balanced horizontal chroma subsamplings420: smaller files with horizontal and vertical chroma subsampling
Profile Selection
--profile is optional for apply, batch, daemon, and the desktop app. If
it is omitted entirely, mini-film asks RawTherapee to develop the RAW with its
default settings and does not apply Hald, PP3, profile adjustments, or
profile-derived grain. When provided, --profile accepts:
- a Hald PNG path
- a RawTherapee
.pp3path - an emulation XMP path containing
crs:Lookplus optional grain settings - an emulation name, searched under
emulations/using case-insensitive fuzzy matching - a generated Hald name, searched under
--hald-dir, which defaults to$HOME/.cache/mini-film/hald
RGBTable XMPs under profiles/ are internal lookup tables. apply, batch, and sampler do not use them as user-facing emulations; they are only used to resolve linked crs:Look UUID/name references from emulation XMPs. mini-film generates or reuses a cached Hald from the linked profile under $HOME/.cache/mini-film/hald, generates temporary RawTherapee .pp3 files for supported XMP adjustments and Film Simulation, lets RawTherapee apply the Hald, then applies the emulation grain settings.
Profile Info
Print parsed details for a user-facing emulation or an internal RGBTable profile:
cargo run --release -- info \
  'Polaroid 600 v3 grainy' \
  --profiles-root /path/to/profile-library
info resolves emulation names under emulations/, direct emulation XMP paths, direct internal profile XMP paths, internal profile names under profiles/, and cached Hald PNGs under --hald-dir. For emulations, it prints the preset identity, linked Look, linked internal RGBTable profile, cached Hald path, profile-side tone/color/sharpening adjustments, and emulation-side grain/adjustments.
RawTherapee PP3 Output
Print the generated RawTherapee PP3 for a profile:
cargo run --release -- pp3 \
  'Polaroid 600 v3 grainy' \
  --profiles-root /path/to/profile-library \
  --output polaroid-600-v3.pp3
pp3 uses the same profile/emulation resolver as info. It writes to /dev/stdout by default, or to --output. The output contains the RawTherapee adjustment profile sections that mini-film would pass to rawtherapee-cli, followed by the Film Simulation section pointing at the cached Hald PNG.
Nikon Picture Control Output
Fit an emulation XMP, internal RGBTable XMP, or Hald PNG into a Nikon classic .NCP Picture Control:
cargo run --release -- nikon \
  'Polaroid 600 v3 grainy' \
  --profiles-root /path/to/profile-library \
  --output polaroid-600-v3.ncp \
  --report polaroid-600-v3.ncp.txt
The nikon command writes a real classic NCP file using a neutral base Picture Control plus a fitted 257-point user-defined luminosity curve. It also estimates coarse saturation, hue, and sharpening fields from the profile. Use --name 'Short Name' to set the in-camera Picture Control name; NCP names are ASCII and short, so mini-film sanitizes and truncates them.
This is necessarily lossy. Nikon classic NCP does not store a full 3D LUT, RGBTable, Hald CLUT, or grain model. Color-specific film behavior is compressed into a 1D luma curve plus coarse sliders. Use the optional report to inspect mean/max luma and color error before trusting the result.
Processing Split
RawTherapee handles:
- RAW development and Hald CLUT application through Film Simulation
- camera JPEG tone response, including visible Nikon Active D-Lighting effects, through RawTherapee histogram matching
Exposure2012;Contrast2012maps to RawTherapee Exposure contrast;Blacks2012,Shadows2012,Highlights2012, andWhites2012map directly to RawTherapee Tone Equalizer bands 0, 1, 3, and 4, with its midtones band 2 left neutralSaturation,VibranceToneCurvePV2012and per-channelToneCurvePV2012Red/Green/BlueParametricShadows/Darks/Lights/Highlightsand split points- HSL
HueAdjustment*,SaturationAdjustment*,LuminanceAdjustment* - calibration-style
RedHue/RedSaturation,GreenHue/GreenSaturation,BlueHue/BlueSaturation Clarity2012as signed RawTherapee Local Contrast with radius 80 and neutral darkness/lightness levels- profile sharpening fields in generated
.pp3files:Sharpness,SharpenRadius,SharpenDetail,SharpenEdgeMasking
Source-profile sharpening is applied before emulation sharpening. Explicit
emulation sharpening overrides the source, but an emulation that omits
sharpening preserves an explicit source setting. The minimal 5/0.6/10/0
fallback is added only when neither layer defines sharpening. These settings
apply to RAW and TIFF renders; JPEG/HEIC profile renders append a final PP3
override that disables every RawTherapee sharpening stage.
mini-film internally handles:
- resolving emulation XMPs to internal RGBTable XMPs under
profiles/ - decoding RGBTable payloads and generating RGBTable-only Hald PNGs
- optional film-like diffusion after simulation and before grain
- procedural grain from Lightroom grain fields
ImageMagick/GraphicsMagick convert handles:
- final resize, bit depth, metadata stripping, JPEG quality/subsampling, progressive JPEG, TIFF Zip compression, and TIFF/JPEG encoding
- structured sampler contact sheet rendering from mini-film's generated SVG layout
Film Diffusion
Film-like diffusion is an optional mini-film stage after the RawTherapee/profile
simulation and before grain. It is off by default and uses a 16-bit TIFF
intermediate when enabled, including for final JPEG output. The look is neutral:
it does not add colored or warm halation. Enabled renders explicitly request
RawTherapee's RTv4_sRGB output profile, decode that transfer curve to linear
sRGB for diffusion, then restore the output ICC profile after export.
Choose one of two renderers:
multi-scale-mistis the default and blends six resolution-normalized blur scales for gentle global softness and broad highlight spread.edge-aware-glowreduces fine luminance detail while preserving major edges, then redistributes bright highlight energy through a neutral veiling-glare point-spread function.
The implementation is independently calibrated from the published descriptions in ProMist-5K, Local Laplacian Filters, the fast local-Laplacian approximation, and Spencer et al.'s glare model. No paper code or training/dataset material is bundled.
Use a preset or override its parameters independently:
--diffusion subtle
--diffusion medium --diffusion-method edge-aware-glow
--diffusion strong --diffusion-softness 60 --diffusion-glow 35 --diffusion-intensity 250
--diffusion medium --diffusion-softness-radius 175 --diffusion-glow-radius 275
--diffusion medium --diffusion-method edge-aware-glow --diffusion-highlight-reach 75
Presets are off, subtle, medium, and strong. They retain the selected
renderer and set all diffusion parameters:
| Preset | Softness | Glow | Softness radius | Glow radius | Intensity | Edge-aware reach |
|---|---|---|---|---|---|---|
off |
0 | 0 | 100% | 100% | 100% | 50 |
subtle |
25 | 25 | 100% | 150% | 150% | 50 |
medium |
50 | 50 | 150% | 225% | 225% | 60 |
strong |
75 | 75 | 200% | 300% | 300% | 70 |
--diffusion-softness and --diffusion-glow accept 0..100.
--diffusion-softness-radius and --diffusion-glow-radius accept 50..400,
and --diffusion-intensity accepts 25..300; these three values are
percentages of the renderer's calibrated radius or strength. Spatial radii use
the same 12 MP reference principle as normalized grain, so a 48 MP intermediate
uses twice the radius of a 12 MP intermediate before the radius percentage is
applied. --diffusion-highlight-reach accepts 0..100 and only affects
edge-aware-glow; higher values bloom a wider range of highlights. The review
wizard hides this control for multi-scale-mist. Every explicit flag overrides
the corresponding preset value.
In daemon review, the near-fullscreen Diffusion wizard previews both methods with a full-frame before/after view and three paired detail views: the recorded camera focus area, a high-contrast highlight, and a broad highlight. The focus view uses the camera AF region after crop and rotation, falling back to the picture center when no recorded AF region remains visible. Highlight views are selected automatically and kept fixed while diffusion controls change, making softness, radius, intensity, and glow easier to compare. The wizard groups the sliders into Softening, Highlights, and Overall controls; Highlight reach is shown only for the edge-aware renderer.
The Diffusion tool button is dark when effective diffusion is enabled for the selected picture/profile.
The wizard offers two sampler-style scopes. Apply to current changes only the current picture/profile pair. Apply to all makes the setting the current profile's default for every existing and future picture, replacing prior per-picture diffusion overrides for that profile. Current and all-profile settings can be reset independently; otherwise the daemon command-line default is inherited. Before/after previews and detail views reuse a cached, 2048-pixel, pre-grain profile render, so changing diffusion controls never compounds or previews grain twice.
Diffusion Benchmarks
The Criterion diffusion benchmark uses deterministic 16-bit RGB gradients,
fine checker texture, and a bright highlight. Image construction, cloning, and
the reported full-buffer checksum are outside the timed render. The default run
covers 2048x1365 review previews and the 4000x3000 12 MP reference with one
thread and all available threads. It measures both medium renderers, the two
edge-aware stages separately at 12 MP, and an nproc/2 batch of concurrent
previews. This comprehensive run can take several minutes:
cargo bench --bench diffusion --no-default-features
Use a Criterion filter for a quick preview smoke measurement:
cargo bench --bench diffusion --no-default-features -- \
  'diffusion/preview-2048x1365/all-'
Enable the 8256x5504, 45.4 MP cases explicitly because they require much more time and memory:
MINI_FILM_DIFFUSION_BENCH_FULL=1 \
  cargo bench --bench diffusion --no-default-features
Criterion prints pixels per second and a confidence interval around each time
estimate. It also stores detailed reports under target/criterion/. Save and
compare named baselines with:
cargo bench --bench diffusion --no-default-features -- \
  --save-baseline portable-before
cargo bench --bench diffusion --no-default-features -- \
  --baseline portable-before
To compare a portable build with the former machine-native build policy, save a
separate native baseline by setting RUSTFLAGS explicitly:
RUSTFLAGS='-C target-cpu=native' \
  cargo bench --bench diffusion --no-default-features -- \
  --save-baseline native-before
Build once before measuring peak resident memory, then wrap a filtered case
with GNU time so its Maximum resident set size describes one renderer and
size rather than the complete benchmark matrix:
cargo bench --bench diffusion --no-default-features --no-run
/usr/bin/time -v cargo bench --bench diffusion --no-default-features -- \
  'diffusion/reference-4000x3000/all-'
RAW Development
mini-film uses RawTherapee as its only RAW engine. TIFF outputs and explicit --keep-intermediate runs render a 16-bit TIFF intermediate with:
rawtherapee-cli -q -Y [-p generated.pp3 ...] -o intermediate.tif -t -b16 -c input.RAW
JPEG-bound apply, batch, and sampler runs ask RawTherapee for an 8-bit JPEG intermediate instead:
rawtherapee-cli -q -Y [-p generated.pp3 ...] -o intermediate.jpg -j95 -js3 -c input.RAW
Sampler also adds a temporary RawTherapee resize profile so each RAW development produces a thumbnail-sized JPEG instead of a full-size TIFF.
When a Nikon RAW carries ActiveD-Lighting, mini-film keeps that MakerNote value
in review metadata and shows it in the film simulation overlay. The embedded
camera JPEG already includes Nikon's proprietary rendering, so the auto-matched
curve derives its tonal effect from the camera output. Mini-film does not stack
an additional synthetic D-Lighting curve on top of that match.
Use a non-default RawTherapee binary path with:
--rawtherapee /path/to/rawtherapee-cli
Grain
Lightroom grain fields are read from preset XMPs:
crs:GrainAmountcrs:GrainSizecrs:GrainFrequency
Grain is rendered internally after RawTherapee. TIFF outputs use the 16-bit
grain path; JPEG outputs use the optimized 8-bit grain path. The default engine
is legacy, mini-film's older additive procedural renderer.
By default, mini-film normalizes the engine's spatial grain structure against a 12-megapixel reference so the same profile keeps a comparable grain scale across source resolutions. For the image dimensions that enter the grain stage, the engine uses:
linear_scale = sqrt(actual_grain_stage_pixels / (reference_mpix * 1_000_000))
At the default 12 MP reference, a 3 MP grain-stage image uses 0.5x, a 12 MP
image uses 1x, and a 48 MP image uses 2x. The scale is applied to the
engine's spatial grain structure after its size/frequency mapping; grain amount
and deterministic seed are unchanged.
The actual grain-stage dimensions are the dimensions of the image mini-film
passes to the grain renderer. For normal apply, batch, daemon, review, and
publish rendering, that is the RawTherapee intermediate. Final export resizing
with --resize, --long-edge, --max-width, or --max-height happens after
grain and therefore does not change the normalization calculation. Sampler is
different because RawTherapee develops its thumbnail-sized intermediate before
grain.
Set another positive reference size with:
Disable spatial normalization and use the engine's unscaled spatial mapping with:
The desktop launcher exposes the same setting as a checked Normalize grain
control with an editable Grain Reference MPix value, defaulting to 12.
RFGR remains available as an opt-in engine. It is an original implementation
derived from the algorithm described in Newson, Faraj, Galerne, and Delon's IPOL
paper "Realistic Film Grain Rendering": an inhomogeneous Boolean model of random
disks, Gaussian filtering, and Monte Carlo sampling. It uses the existing
Lightroom-style amount,size,frequency controls, not new RFGR-specific knobs.
The implementation is derived from the paper's described algorithm and is not
copied from IPOL's GPL source archive.
RFGR engines detect visually monochrome developed images and switch to a shared luminance grain path, so black-and-white exports do not get independent RGB grain speckles.
For visual reference, see the grain engine comparison PDF.
Disable grain with:
Set deterministic variation with:
When using a Hald PNG directly, pass grain manually:
or use a preset:
--grain-preset light
--grain-preset medium
--grain-preset heavy
Select the default legacy renderer explicitly with:
For a much faster cached approximation of the RFGR look, use:
rfgrfast builds a seeded stochastic coverage cache for each RGB channel and
blurs it once instead of running the full per-pixel Monte Carlo disk sampler.
It still uses the same amount,size,frequency controls and the same
time-based or explicit grain seed flow, so batch/daemon/review outputs get
per-picture variation rather than reusing one fixed texture.
Select the exact RFGR engine explicitly with:
RAW Tone Matching
Every RAW render explicitly asks RawTherapee to generate an auto-matched tone
curve from the camera's embedded JPEG. Mini-film appends a partial PP3 layer
with HistogramMatching=true and CurveFromHistogramMatching=false after the
selected profile layers, so the behavior does not depend on the user's
RawTherapee preferences and a stale stored curve is not reused. This is the
same histogram-matching switch used by RawTherapee's bundled
Auto-Matched Curve - ISO Low/Medium/High profiles; mini-film handles ISO-based
denoising separately. JPEG and HEIC profile inputs do not receive RAW histogram
matching.
RawTherapee requires an adequately sized embedded preview for matching. If a RAW has no usable preview, RawTherapee falls back to a linear curve.
Color Noise Reduction
Since v3.1, mini-film can generate a short temporary RawTherapee pp3 block for
directional pyramid color denoising when source EXIF ISO is above a threshold.
- Controlled by
--color-noise-iso-thresholdonapply,batch,daemon, andsampler. - Default threshold is
1600. - Set to
0to disable color-noise processing. - The ISO is read from raw EXIF; when no ISO is available, the step is skipped.
The thresholds use stepped levels:
ISO >= 25_600: very strong color-denoiseISO >= 6_400: strongISO >= 1_600: moderate (default threshold)- below threshold: skipped
The denoise block is appended as an extra generated [Directional Pyramid Denoising]
section in the RawTherapee profile chain, after emulation/RAW adjustments and film
simulation and before mini-film procedural grain.
Example:
--color-noise-iso-threshold 1600   # default
--color-noise-iso-threshold 0      # disable
RawTherapee Lens Corrections
Mini-film does not add RawTherapee lens corrections unless --lens-corrections
is passed to apply, batch, sampler, daemon, panorama, or RAW
review-publish rerenders. JPEG, HEIC, and TIFF inputs never receive DCP, LCP,
or Lensfun RAW corrections.
Enable the default correction set or select a subset with:
--lens-corrections
--lens-corrections all
--lens-corrections distortion,ca,vignetting
--lens-corrections off
Omitting the option disables lens corrections. Passing it without a value enables all supported items. You can pass any subset of:
distortioncaorchromatic-aberrationvignetting/vignettealloffornoneto explicitly disable every correction
For each RAW, mini-film selects one mutually exclusive RawTherapee correction source in this order:
- a matching Adobe Camera Raw LCP profile;
- RawTherapee Lensfun automatic matching.
Adobe LCPs are matched from the source camera and lens EXIF. By default,
mini-film discovers the recursive
drive_c/ProgramData/Adobe/CameraRaw/LensProfiles/1.0 catalog beside the Adobe
DCP catalog in the configured Adobe DNG Converter Wine prefix, then in the
usual discovered Wine prefixes. MINI_FILM_LCP_ROOT overrides automatic
discovery, and --lcp-root /path/to/LensProfiles/1.0 overrides both.
The generated temporary PP3 [LensProfile] section uses LcMode=lcp with the
matched profile's absolute LCPFile, or LcMode=lfauto for Lensfun. Each mode
carries the requested switches:
[LensProfile]
LcMode=<lcp|lfauto>
LCPFile=<absolute path when LcMode=lcp>
UseDistortion=<true|false>
UseVignette=<true|false>
UseCA=<true|false>
Render and preview cache identities include the effective correction mode, the enabled correction subset, and the matched LCP's content fingerprint. Adding, removing, replacing, or changing the best-matching LCP therefore invalidates affected cached RAW renders and queues them again instead of reusing an output made with a different lens profile.
Caveat
This does not fully clone Adobe Camera Raw. It decodes and applies the profile RGB table, maps supported profile tone/color/sharpening fields into generated RawTherapee .pp3 files, uses RawTherapee for RAW development, and emulates Lightroom grain. Adobe-specific tone mapping, local contrast, sharpening, and camera matching may still differ.