We’re excited about a lot here at Ghost Inspector. One of the things we’re most excited about is our server stack — specifically, just how easy and affordable it has been to setup. I remember a time when you had to pay $100+/mo for a physical, dedicated machine at a data center. So to me, being able to instantly boot up $5/mo instances is still mind-boggling!
For that reason, I want to cover some basic configurations so that everyone can get rolling as easily as we did. This article makes some assumptions about your setup, but even if they don’t match exactly what you’re trying to do, there should be some useful tidbits below.
A note on hosting providers: We’ve had an excellent experience with our current host: Digital Ocean. The \$50/mo in the title is based on their current pricing scheme. However, because I want this article to be a “How To” and not a specific vendor promotion, I’m going to try to keep things as generic as possible. These instructions could be used at AWS, Linode, or any other provider.
A note on security and configuration: I’m covering a lot here and smoothing over some of the nitty gritty. If you’re planning to put together a real production stack, I encourage you to research each of these steps further so that you understand the security, performance and configuration settings across the entire setup.
Ok, let’s get started.
What does the stack look like?
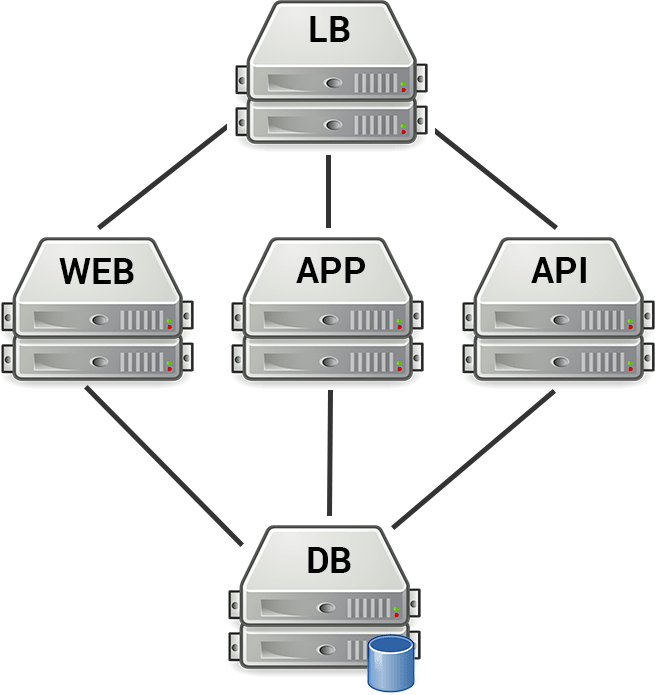
We’re going to have a promotional website (like the one you’re on right now), a web application, and an API. Those will be the 3 publicly accessible areas of our service, and we’ll need a group of servers for each of them. We’ll call them web, app and api. All of these servers will be interacting with our data, so we’ll need at least one database server. We’ll call that db. Lastly, we need to route public requests to the proper server. In other words, we need a load balancer. We’ll call it lb.
Ok, so we’ve got 5 server groups: web, app, api, db and lb. We want performance and redundancy across the board, so each group will have 2 servers. This gives us a total of 10 servers and an infrastructure that looks like this:
Let’s give these servers some hostnames:
Hardware & Software Needs
Everyone’s needs (and preferences) are going to vary. On the hardware side, a Linux instance with 512MB RAM will work for each of our 10 servers. Your actual needs may require something beefier.
On the software side, we’re going to opt for CentOS 6.5. This is purely a comfort-level decision. If you’re comfortable with Ubuntu, or some other distro, go with that. I’m sure the “yum” commands below could be ported over to “apt-get” commands and the configuration file locations could be easily tracked down.
Step #1 – Creating Our Base Snapshot
Most hosting providers offer you some kind of snapshot functionality. We’re going to configure our base system with the tools that all our of servers will need, then take a snapshot and use it as the base for each type of instance. Go ahead and create yourself an instance. You’ll want to login in with the root account, then immediately change the password.
Create a User Account with Sudo Privileges
It’s best to stay out of your root account, so I’d suggest creating a user account for yourself at this point and giving it sudo access. If you plan on using a private key for access (recommended), you should also set that up now. If you switch over to that user account at this point, most of the commands below will need a sudo in front.
Update Yum and Install Development Tools
Enable the Firewall
We’re going to use IPTables to lock down everything except port 22 (for SSH) and pings by default. The configuration file can be found at /etc/sysconfig/iptables. Here’s what our’s looks like:
Once you make your changes, you’ll need to restart IPTables:
Turn Off Postfix
Postfix is a mail server that’s running by default on CentOS. I prefer to send any email using an outside service like Mandrill, so I opt to shut this service down. You can leave it running, if you prefer.
That’s it for our initial base install. At this point, you can take a snapshot and move on to setting up specific machines.
Step #2 – Setting Up Our Database Server
Obviously database types can vary. For this article, we’re actually going to use 2 different types: MySQL (for our promotional site running WordPress) and MongoDB (for our application).
Install MySQL
The commands below will install MySQL, start it up, and set it to run when the system boots.
Now we need to set a password on the root account.
You should replace [PASSWORD-HERE] above with a secure password. You’ll also need to setup a user and database for the WordPress site to use. That process should look something like this:
Again, [PASSWORD-HERE] should be replaced with your new user’s password. The commands above give the name “wordpress” to both the user and the database. You can change that, if you’d like. You can also change 'wordpress'@'%' and pin it down to just the IP address of your web servers, but we’ll be limiting access in the firewall anyway.
Install MongoDB
Weirdly, CentOS still doesn’t have MongoDB in its yum repos, so we need to add it (official instructions). You need to create the file /etc/yum.repos.d/mongodb.repo and add this to it:
Save the file and we’re good to go. Now we can install Mongo, start it up, and configure it to run at boot.
If you want to enable authentication, please refer to the MongoDB Manual.
Configure Firewall
The last step is updating the firewall. We need to give the web servers access to MySQL and the rest of the machines access to MongoDB. We can update our /etc/sysconfig/iptables file like so:
Note that all the [XXX-##-IP] strings above need to be replaced with the IP addresses for those actual servers. Now we restart the firewall.
Setup Replication
We’ve setup our first database server. However, we want redundancy, so we’ve allocated a second instance. My suggestion is to duplicate the first database machine we just set up to create db-02, then follow tutorials for MySQL replication. and MongoDB replication. The full details of replication are bit beyond the scope of this tutorial, however there are great resources available. Note that you’ll likely need to add additional rules to the firewalls of your database machines so they can communicate.
Step #3 – Setting Up Our Load Balancer
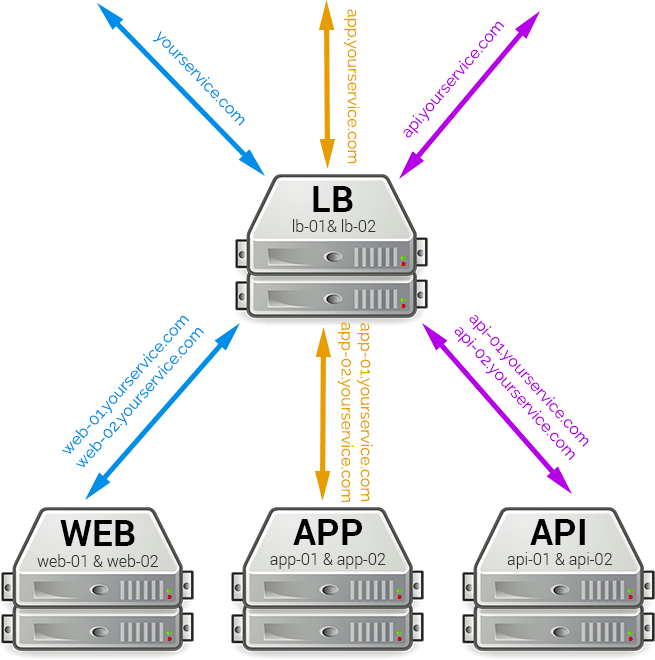
We’ll setup our load balancer next because that’ll give us a good picture of how this stack is going to operate. Again, we’re going to have 3 public facing areas of our product: the promotion website, the application, and the API. Let’s assume that they’ll be accessed at these domains:
- https://yourservice.com (Promotional website)
- https://app.yourservice.com (Application)
- https://api.yourservice.com (API)
All 3 of these domains will point to our load balancer, which will then split the traffic amongst our servers, like so:
Install Nginx
We’re going to use Nginx and the ngx_http_upstream_module module to accomplish this.
Like MongoDB, Nginx does not come packaged with CentOS so we’ll need add the repo for it first (official instructions). Create the file /etc/yum.repos.d/nginx.repo and add the following contents:
Now we can install Nginx with yum.
We’ll start it up and set it run when the server boots.
Ok, let’s configure Nginx to accept and distribute traffic for our domains. We’ll add a configure file at /etc/nginx/conf.d/lb.conf. Rather than explaining each step, I’ve added comments to the contents of the file:
As you can see, we have blocks for web, app and api. Each accepts traffic on the appropriate domain then sends it to the upstream block above which splits it between the servers. We need to restart Nginx to activate these changes.
Configure Firewall
Lastly, we need to open up port 80 on our load balancer’s firewall so we can accept incoming HTTP requests. You can update /etc/sysconfig/iptables as we have below (by adding the port 80 line).
Once you save, you need to restart IPTables:
Once we have this server fully configured, we’ll want to clone it to create lb-02.
Remember that we’re going to have 2 (load balanced) web servers here. We’ll configure one, then duplicate it via our hosting tools. We’re going to be using WordPress, so we’ll need to install PHP and Nginx.
Install PHP
CentOS still comes with an older 5.3.x version of PHP. I prefer to install 5.4.x from the webtatic.com repo. You’ll need to run this command to setup that repo:
You can stick with the 5.3 default installation, or install 5.5, if you’d like. Using the repo above, we’ll install PHP and some additional extensions like this:
We’re going to process PHP files with PHP’s FPM module which will communicate with Nginx. We need to start that up and set it to run at boot.
Install Nginx
Now let’s install Nginx. Just as we did on the load balancer, we need add the repo for it first (official instructions). Create the file /etc/yum.repos.d/nginx.repo and add the following contents:
Now we can install Nginx with yum.
We’ll start it up and set it run when the server boots.
Before we configure Nginx, we’ll want to setup the website files. For this article, we’ll be using WordPress. At this point, you can grab a copy of the software and place it on your server. Where you do this is up to you. For the configuration below, I’m going to assume that you place it in /var/www/html. I won’t walk through the specifics of installing WordPress, but you will need to use the MySQL database connection information from the database section above in your wp-config.php file.
Ok, WordPress is installed. Now we need to configure our domain and enable the php-fpm module. Create the file /etc/nginx/conf.d/web.conf and add the contents below.
The configuration above accepts requests for yourservice.com and serves up your WordPress setup. The block at the bottom tells Nginx to filter all .php files through the php-fpm service. Let’s restart Nginx to activate it.
At this point, it’s a good idea to poke around both your PHP and Nginx configurations to ensure that they are optimal. There are lots of tweaks that can be implemented on the Nginx side, like gzipping or adding rewrite functionality for WordPress. I’m not going to cover those tweaks here, but I encourage you to research and experiment.
Configure Firewall
As was the case with our load balancer, we need to open up port 80 on the firewall so the server can accept incoming HTTP requests. You can update /etc/sysconfig/iptables as we have below (by adding the port 80 line).
Once you save, you need to restart IPTables:
Once we have this server fully configured, we’ll want to clone it to create web-02.
Step #5 – Setting Up Our Application Servers
We’ll have 2 load balanced application servers, so again, I prefer to configure one, then duplicate it. There’s not a whole lot of specifics that I can give you in this step, so I will try to generalize.
You’ll want to use your base snapshot to create a new instance, then install any necessary software. Perhaps it’s a NodeJS app. Maybe it’s written in Python. This step assumes you’re capable of installing the necessary software and loading up your application.
Once your application is installed, you can configure it to use db-01.yourservice.com and db-02.yourservice.com (the database servers we setup above). You’ll also want to configure the app to listen on port 3000, since we’ve configured our load balancers to forward requests there.
The last step will be to open up port 3000 so that the load balancers can access it. You can update /etc/sysconfig/iptables as we have below where [LB-01-IP] is your load balancers’ IP addresses.
Once you save, you need to restart IPTables:
Now that all your setup and configuration is done, you can duplicate your instance so that you have app-01.yourservice.com and app-02.yourservice.com running your application on port 3000 — just as we specified in the load balancer.
Step #6 – Setting Up Our API Servers
This step is exactly like the step above, only this time, you’re setting up your API application. As specified in the load balancer section, we’ll have 2 instances running our API server at api-01.yourservice.com and api-02.yourservice.com. The API server will listen on port 3001. Once you’ve got your API servers up and running, you need to give the load balancers access, just as we did in the step above. Make sure you open port 3001 this time, instead of port 3000.
Flip the Switch. Bring it to Life.
We’re done! You just need to point the yourservice.com, app.yourservice.com and api.yourservice.com domains to your load balancers’ IP addresses to make the service accessible. You’ll want to add two DNS records for this — one to each load balancer. This ensures redundancy.
If you’ve been following along step by step, your infrastructure should be ready to go — and by “ready to go”, I mean that the basics are in place and you likely have lots of tweaking and testing to do.
If you run into any problems along the way, please use the comment section below and we’ll try to give you a hand. Good luck!