Documentation Index
Fetch the complete documentation index at: https://docs.z.ai/llms.txt
Use this file to discover all available pages before exploring further.
Switching Models in Claude Code
Step 0 Claude Code default configuration
By default, Claude Code maps its internal model environment variables to GLM models as follows:
ANTHROPIC_DEFAULT_OPUS_MODEL:GLM-4.7ANTHROPIC_DEFAULT_SONNET_MODEL:GLM-4.7ANTHROPIC_DEFAULT_HAIKU_MODEL:GLM-4.5-Air
Step 1 Update the default configuration
For Windows Users
Locate the configuration file at ~/.claude/settings.json, as shown below:
For macOS Users
Method 1: In the terminal, run vim ~/.claude/settings.json to open and edit the file. When you’re done, press Esc, type :wq, and save your changes.
Method 2: In Finder, choose Go → Go to Folder, then enter ~/.claude/settings.json to locate and edit the configuration file.
You can also ask directly in Claude Code:
To use GLM-5.1, add or replace the following environment variables in settings.json:
  {
    "env": {
      "ANTHROPIC_DEFAULT_HAIKU_MODEL": "glm-4.5-air",
      "ANTHROPIC_DEFAULT_SONNET_MODEL": "glm-5.1",
      "ANTHROPIC_DEFAULT_OPUS_MODEL": "glm-5.1"
    }
  }
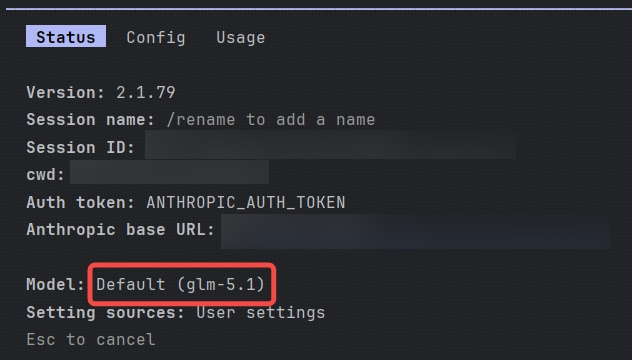
Step 2 Confirm that the model has been switched
Open a new terminal window and run claude to launch Claude Code. Then type /status in Claude Code to verify the current model:
Switching Models in OpenClaw
For users who are already using OpenClaw and cannot switch to glm-5.1 by selecting a provider model directly you can update the configuration manually after completing the provider setup in the previous step.
Step 1 Update the default configuration
Locate the configuration file at ~/.openclaw/openclaw.json, as shown below:
In ~/.openclaw/openclaw.json, add the glm-5.1 model to the models.providers.zai.models array.Append the following object after the last model in the array. Be sure to include a comma if required by JSON syntax:
{
  "id": "glm-5.1",
  "name": "GLM-5.1",
  "reasoning": true,
  "input": [
    "text"
  ],
  "cost": {
    "input": 0,
    "output": 0,
    "cacheRead": 0,
    "cacheWrite": 0
  },
  "contextWindow": 204800,
  "maxTokens": 131072
}
Then update the default model under agents.defaults.model.primary:
Change it to:
"primary": "zai/glm-5.1",
Next, under agents.defaults.models, add:
Step 2 Updated configuration reference
Below are reference snippets showing what the updated configuration should look like:
models.providers.zai.modelssection:
"models": [
  {
    "id": "glm-5",
    "name": "GLM-5",
    "reasoning": true,
    "input": ["text"],
    "cost": {"input": 0, "output": 0, "cacheRead": 0, "cacheWrite": 0},
    "contextWindow": 204800,
    "maxTokens": 131072
  },
  {
    "id": "glm-4.7",
    "name": "GLM-4.7",
    "reasoning": true,
    "input": ["text"],
    "cost": {"input": 0, "output": 0, "cacheRead": 0, "cacheWrite": 0},
    "contextWindow": 204800,
    "maxTokens": 131072
  },
  {
    "id": "glm-5.1",
    "name": "GLM-5.1",
    "reasoning": true,
    "input": ["text"],
    "cost": {"input": 0, "output": 0, "cacheRead": 0, "cacheWrite": 0},
    "contextWindow": 204800,
    "maxTokens": 131072
  }
]
agents.defaults.model.primarysection:
"model": {
  "primary": "zai/glm-5.1",
  "fallbacks": ["zai/glm-4.7"]
}
- agents.defaults.models section:
"models": {
  "zai/glm-5": {"alias": "GLM"},
  "zai/glm-4.7": {},
  "zai/glm-5.1": {}
}
After making these changes, restart the gateway by running: openclaw gateway restart
Once restarted, you should be able to use the glm-5.1 model directly. You can run openclaw tui in the terminal to enter the chat interface, where you should see that glm-5.1 is now in use.
Using Cline as an example:
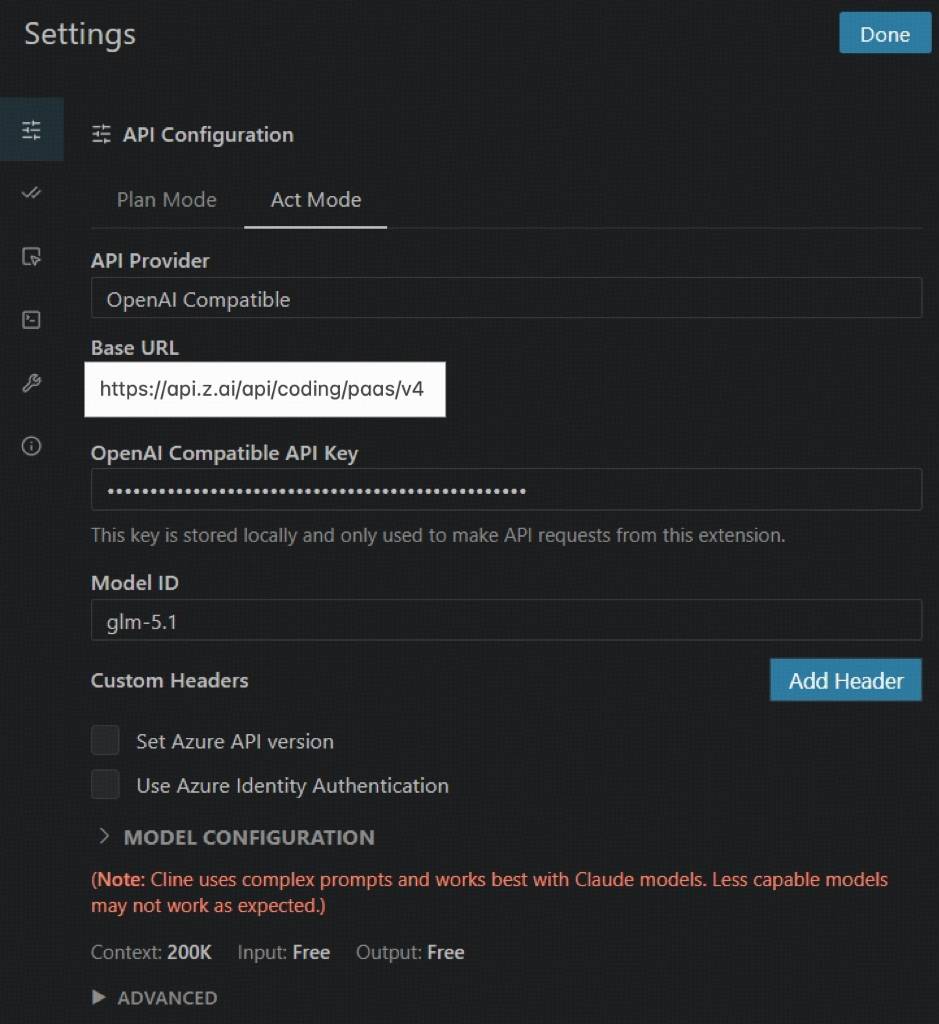 Please use the following settings:
- API Provider:Select OpenAI Compatible
- Base URL:Enter https://api.z.ai/api/coding/paas/v4
- API Key:Enter your Z.AI API key
- Model:Choose Custom Model and enter the model name, such as glm-5.1 or glm-5
- Other settings:
- Uncheck Support Images
- Set Context Window Size to 200000
- Adjust temperature and any other parameters based on your task requirements