(This article is a bit disjointed, since I didn’t have a particular goal in mind. Think of this post as a collection of experiments.)
A long time ago, while I was researching to solve a difficult problem at work, I came across a Cloudflare blog post. The blog post author combined 2 Linux network stack features (anyIP and transparent IP) to “bind” a socket to all 65535 ports on a network interface, without the usual side effects.
I took elements of that design, combined the technique with my own spin, and successfully implemented it in my product. It solved the problem at work and made many people (mostly the shareholders) happy.
This post is not (entirely) about that.
The fact is, since that day, a burning question had been on my mind- how many open ports can a Shodan IP scan shows?
A lot, it turns out.

For whatever reason, my ISP does not enforce 1 public IP per internet connection. This means hypothetically I can have unlimited public IPv4 addresses (the most I’ve ever used is 6 IPs, but just like unlimited internet, unlimited is unlimited damn it). This is perfect for testing.
Let’s host a residential public internet host and see what kinds of traffic it would receive.
The setup is such-
A new network namespace will be created. Most people use Docker to containerize their experiment, but in most cases Docker just adds to the complexity. We will instead use network namespace here. Containerization is necessary since when we set the forward-all-ip iptable rule, we will lose network connectivity to the host.
A network adapter, directly connected to the public internet, is re-assigned to the network namespace. This is much simpler than creating a bridge, then assigning a pairing veth to bring connectivity to the namespace. Don’t forget to enable the local loopback interface as well. Note that I am using ‘ip netns exec’ to execute the shell commands in the context of the netns1 namespace.
My ISP uses DHCP to assign public IP. I am using Debian and its default dhcp client: dhcpcd.
Enable kernel support for IP forwarding and disable Reverse Path filtering.
Add the iptables rule that marks every incoming MANGLE packet with tproxy-mark flag, and forward it to the TPROXY. Not that I am literally forwarding all incoming packet, without modifying its header/content, to 127.0.0.1:1234.
If the server is long running, the ISP’s DHCP lease renew request would get redirected as well. In that case, add a rule to exclude the DHCP request. I don’t think tproxy-mark is needed here but I just set it to a different flag.
By default, there is no default routing table for tproxy-mark packets. Create a new routing table that will forward all (0.0.0.0) packets to the local loopback interface, and tell iptable to have all fwmark=1 packets use that routing table.
Finally, I wrote a Python script that create a socket, set its socket option use IP_Transparent, and Bob’s your uncle.
(Technically I wrote the base script and a LLM tidied it up.)
(Yes my public IP is in the video. I’ve since stopped using that IP.)
For UDP, the setup is a bit different.
First of all, the iptable forwarding rule needs to match UDP packets instead of TCP packets.
Secondly, since UDP is a stateless protocol. Its socket is a dumb send/receive object. If you try to reuse the UDP socket to reply (ie. send), you will find that
The source IP is incorrect.
The UDP socket can only reply back to the port it is binded to (ie. 127.0.0.1:5678).
Problem #1 can be solved with the socket option IP_RECVORIGDSTADDR. For #2 we will work around it in part 2.
I let the 2 scripts ran for a week. The result is the Shodan screenshot above.
Why can’t you just port forward all 65535 ports on the firewall?
NAT would overwrite the incoming IP address. Also what’s the fun of that?
Does your ISP care that you are running every service known to man on your local machine?
Seemingly no.
Did you do any analysis on the scanners?
I was planning to, but then something happened (Part 2.5).
If I am getting paid, I would use this to implement, say a mitm proxy, or a honeypot system that supports multiple protocol and claim I have created a all-new intrusion detection system capable of detecting every network attack known to mankind.
But we don’t do serious here, so…
I give you, Bad Apple Over UDP.
(ASCII art taken from here.)
The concept is simple- we will use the destination port number as the frame selector. Then the ‘client’ (netcat on loop) can just sequentially request each frame and dump the UDP packet to the terminal. You can also play the video on reverse, skip every 4th frame, or skip any particular 2hu character you don’t like.
To work around the UDP response socket issue, every time the server replies, it creates a new socket object and binds the socket to the real destination IP+port number. Since the request already hole-punched the NAT firewalls along the way, the response can re-use the ‘tunnel’. This is not very efficient, but it works.
So I finished the server, amused myself for a bit, then went to sleep. I woke up the next day to find myself to this….
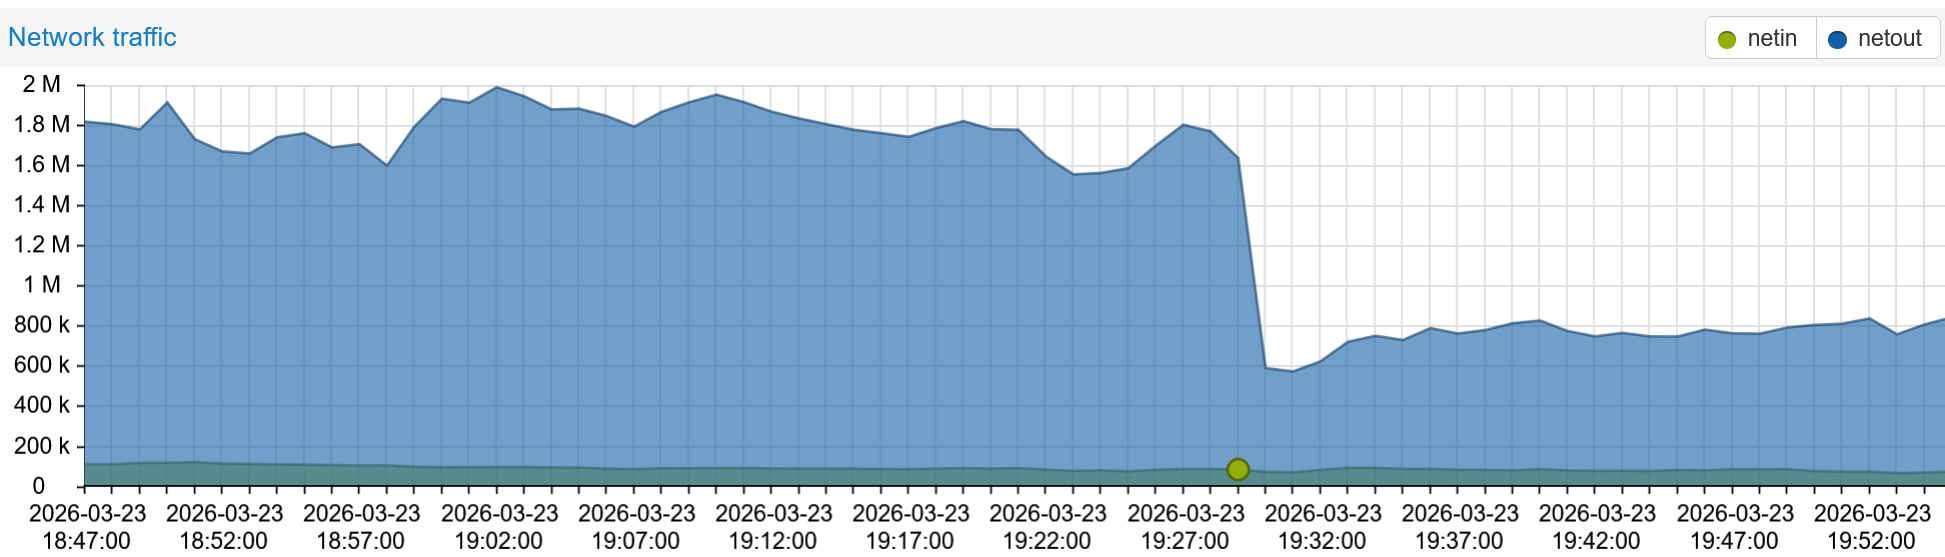
My home internet traffic was reaching 2 MB/s downstream. After I checked to make sure my servers weren’t downloading anything, I logged into my BadAppleOverUDP instance and found it was handling 3000 requests per second from 3 IPs around the world. My Proxmox host CPU utilization was maxed out at 100%.
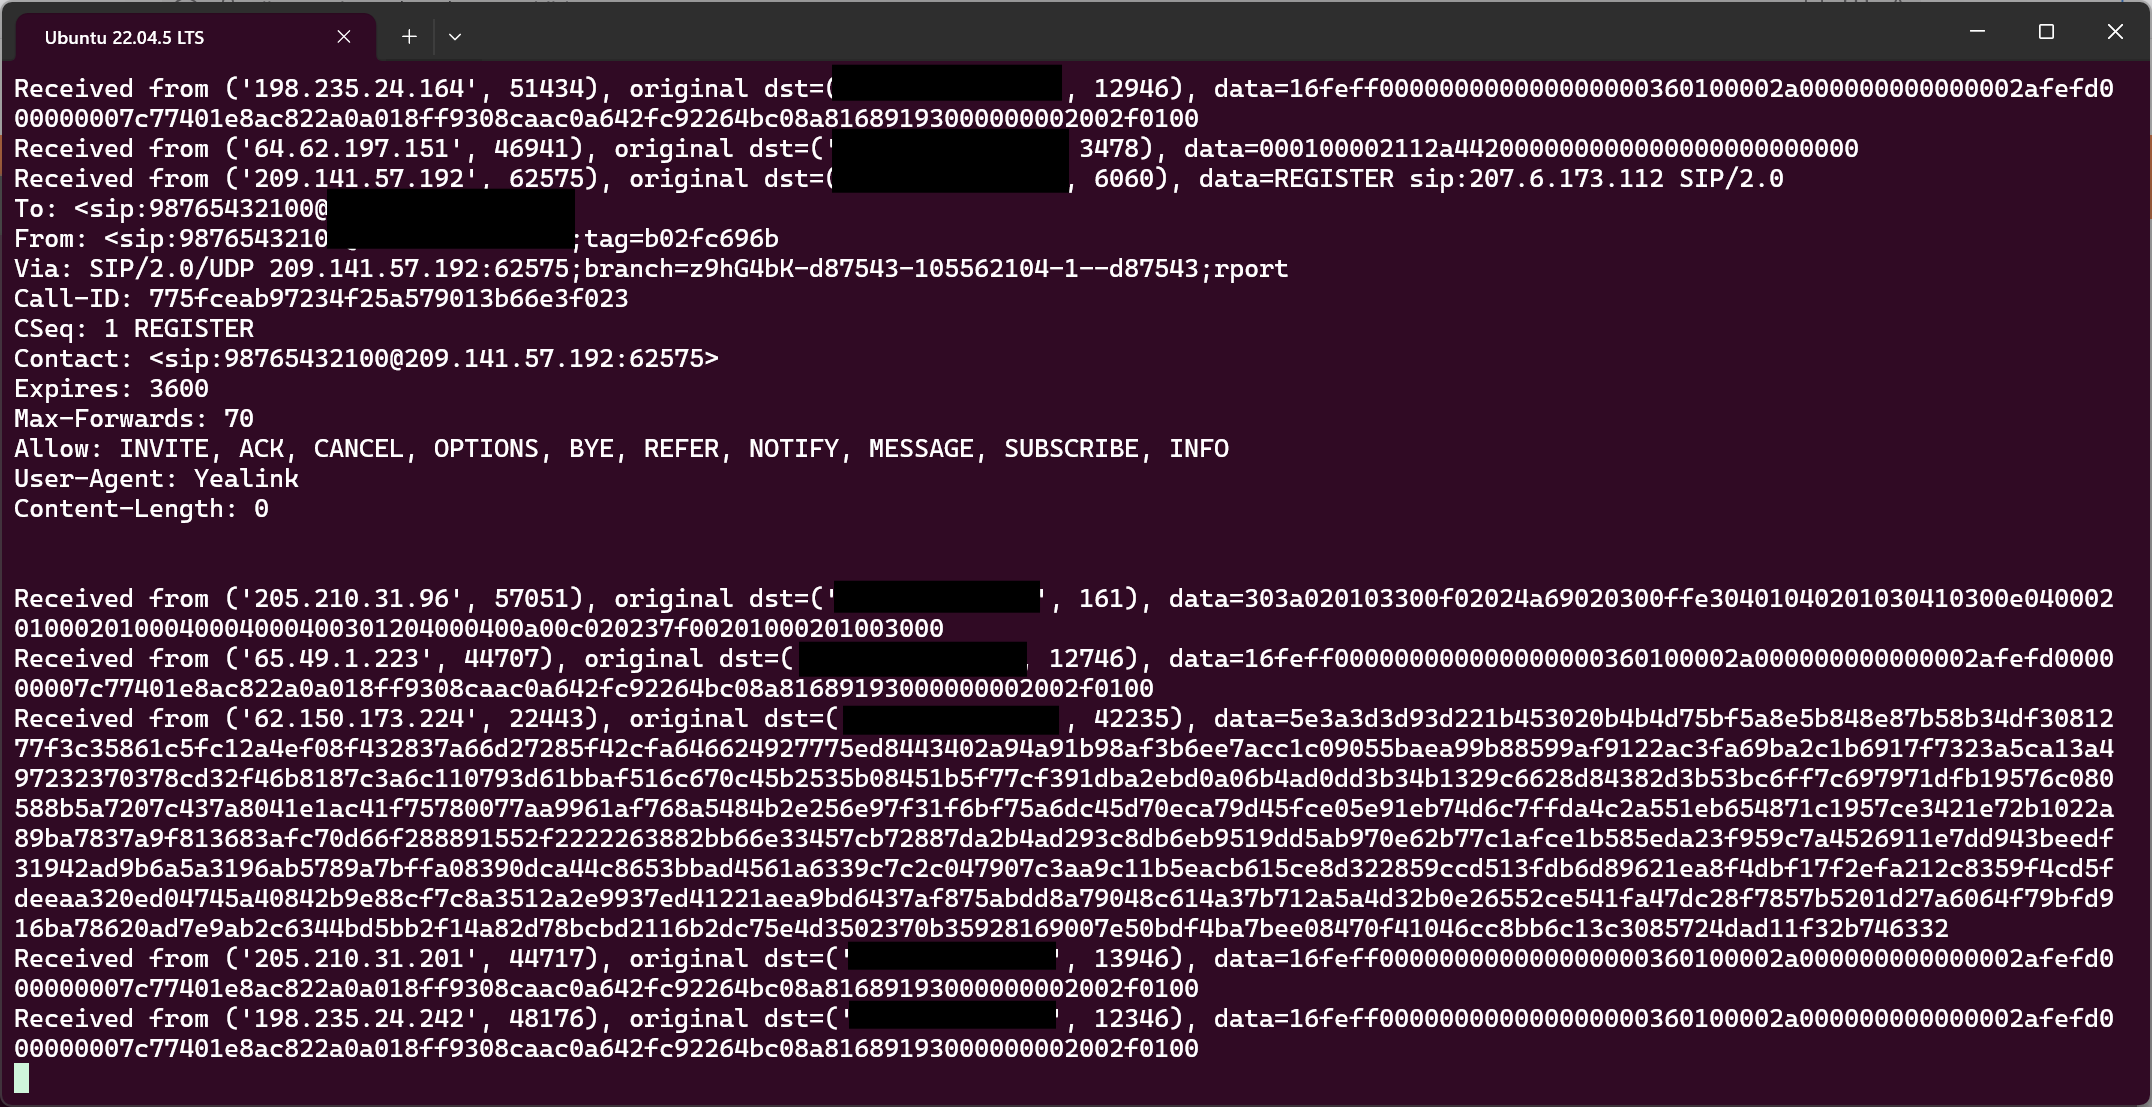
I had to go on a trip soon, so I didn’t have time to do a technical analysis. I also didn’t think my ISP would appreciate the traffic I was receiving. I quickly added traffic logging to the script (syslog/rsyslog/VictoriaLogs/Ghafana), let it ran for a few more hours to capture the data, then shut everything off. I suspect the unusual ASCII characters in the Bad Apple ASCII frames fooled some poorly-written scanners into thinking an XML or SIP server is running.
I will go though the log in another time.
<Saved for future separate post>
Back in my childhood days, an exposed desktop (running Windows 95-Me) on the internet was considered unwise. SMB open share virus drop, TCP sync flood attacks, and just general nuisances could ruin one’s day very quickly. Windows XP SP2 finally added a built-in firewall, but by then, NAT firewall is so common that it’s actually cumbersome to set your desktop loose on the internet.
Since it’s the age of AI, can I put a LLM behind the honeypot and let the LLM handle the communication. The system prompt would setup the LLM to act as a security researcher agent running a honeypot system, and that the LLM should respond to each incoming communications in a way that aids its purpose as a security researcher (ie. collect data from attackers.)
In other word, can I forgo the design of building a fake system, and just let the LLM figure out how to fake a real system?
Yes, yes you can.
Originally the script responds to any incoming messages, regardless if the message is HTTP or not. However my local LLM was not fast enough to handle the amount of requests. Therefore I added a is_http check so that only HTTP requests would be handle by the LLM.
A few issues exist in the script
The TCP connection is closed after the server responded. For long-running TCP protocols such as SSH, this effectively prevents the attacker from executing any commands.
The timestamp in the respond is not the current timestamp, since the respond is fabricated by the LLM agent.
It is not entirely clear if the LLM agent can handle binary data. The LLM seems to be able to reply to some, but it is not clear if the LLM can do so consistently. Maybe it’s a model size limitation.
Related to the TCP session closing issue, it is not possible to definitively say which TCP sessions from the same IP are related to each other.
I don’t have enough GPUs in my local LLM system to handle every scanner attempt. I did the next best thing- ask the LLM agent to look at past scanner requests and build a honeypot system based on the past requests.
After the LLM examined the scanner traffic, it created detection plugins for the following systems:
NETGEAR DGN2200 Firmware/1.0.0.29 plugin
Web vulnerability scanner honeypot plugin
MikroTik Neighbor Discovery Protocol (MNDP) honeypot plugin
PostgreSQL database honeypot plugin
SOCKS5 proxy honeypot plugin
TLS/SSL scanner honeypot plugin
LLM-based catch-all fallback plugin from Part 3
The honeypot can load and unload plugins at runtime. This allows for live patching a plugin without taking down the whole system.
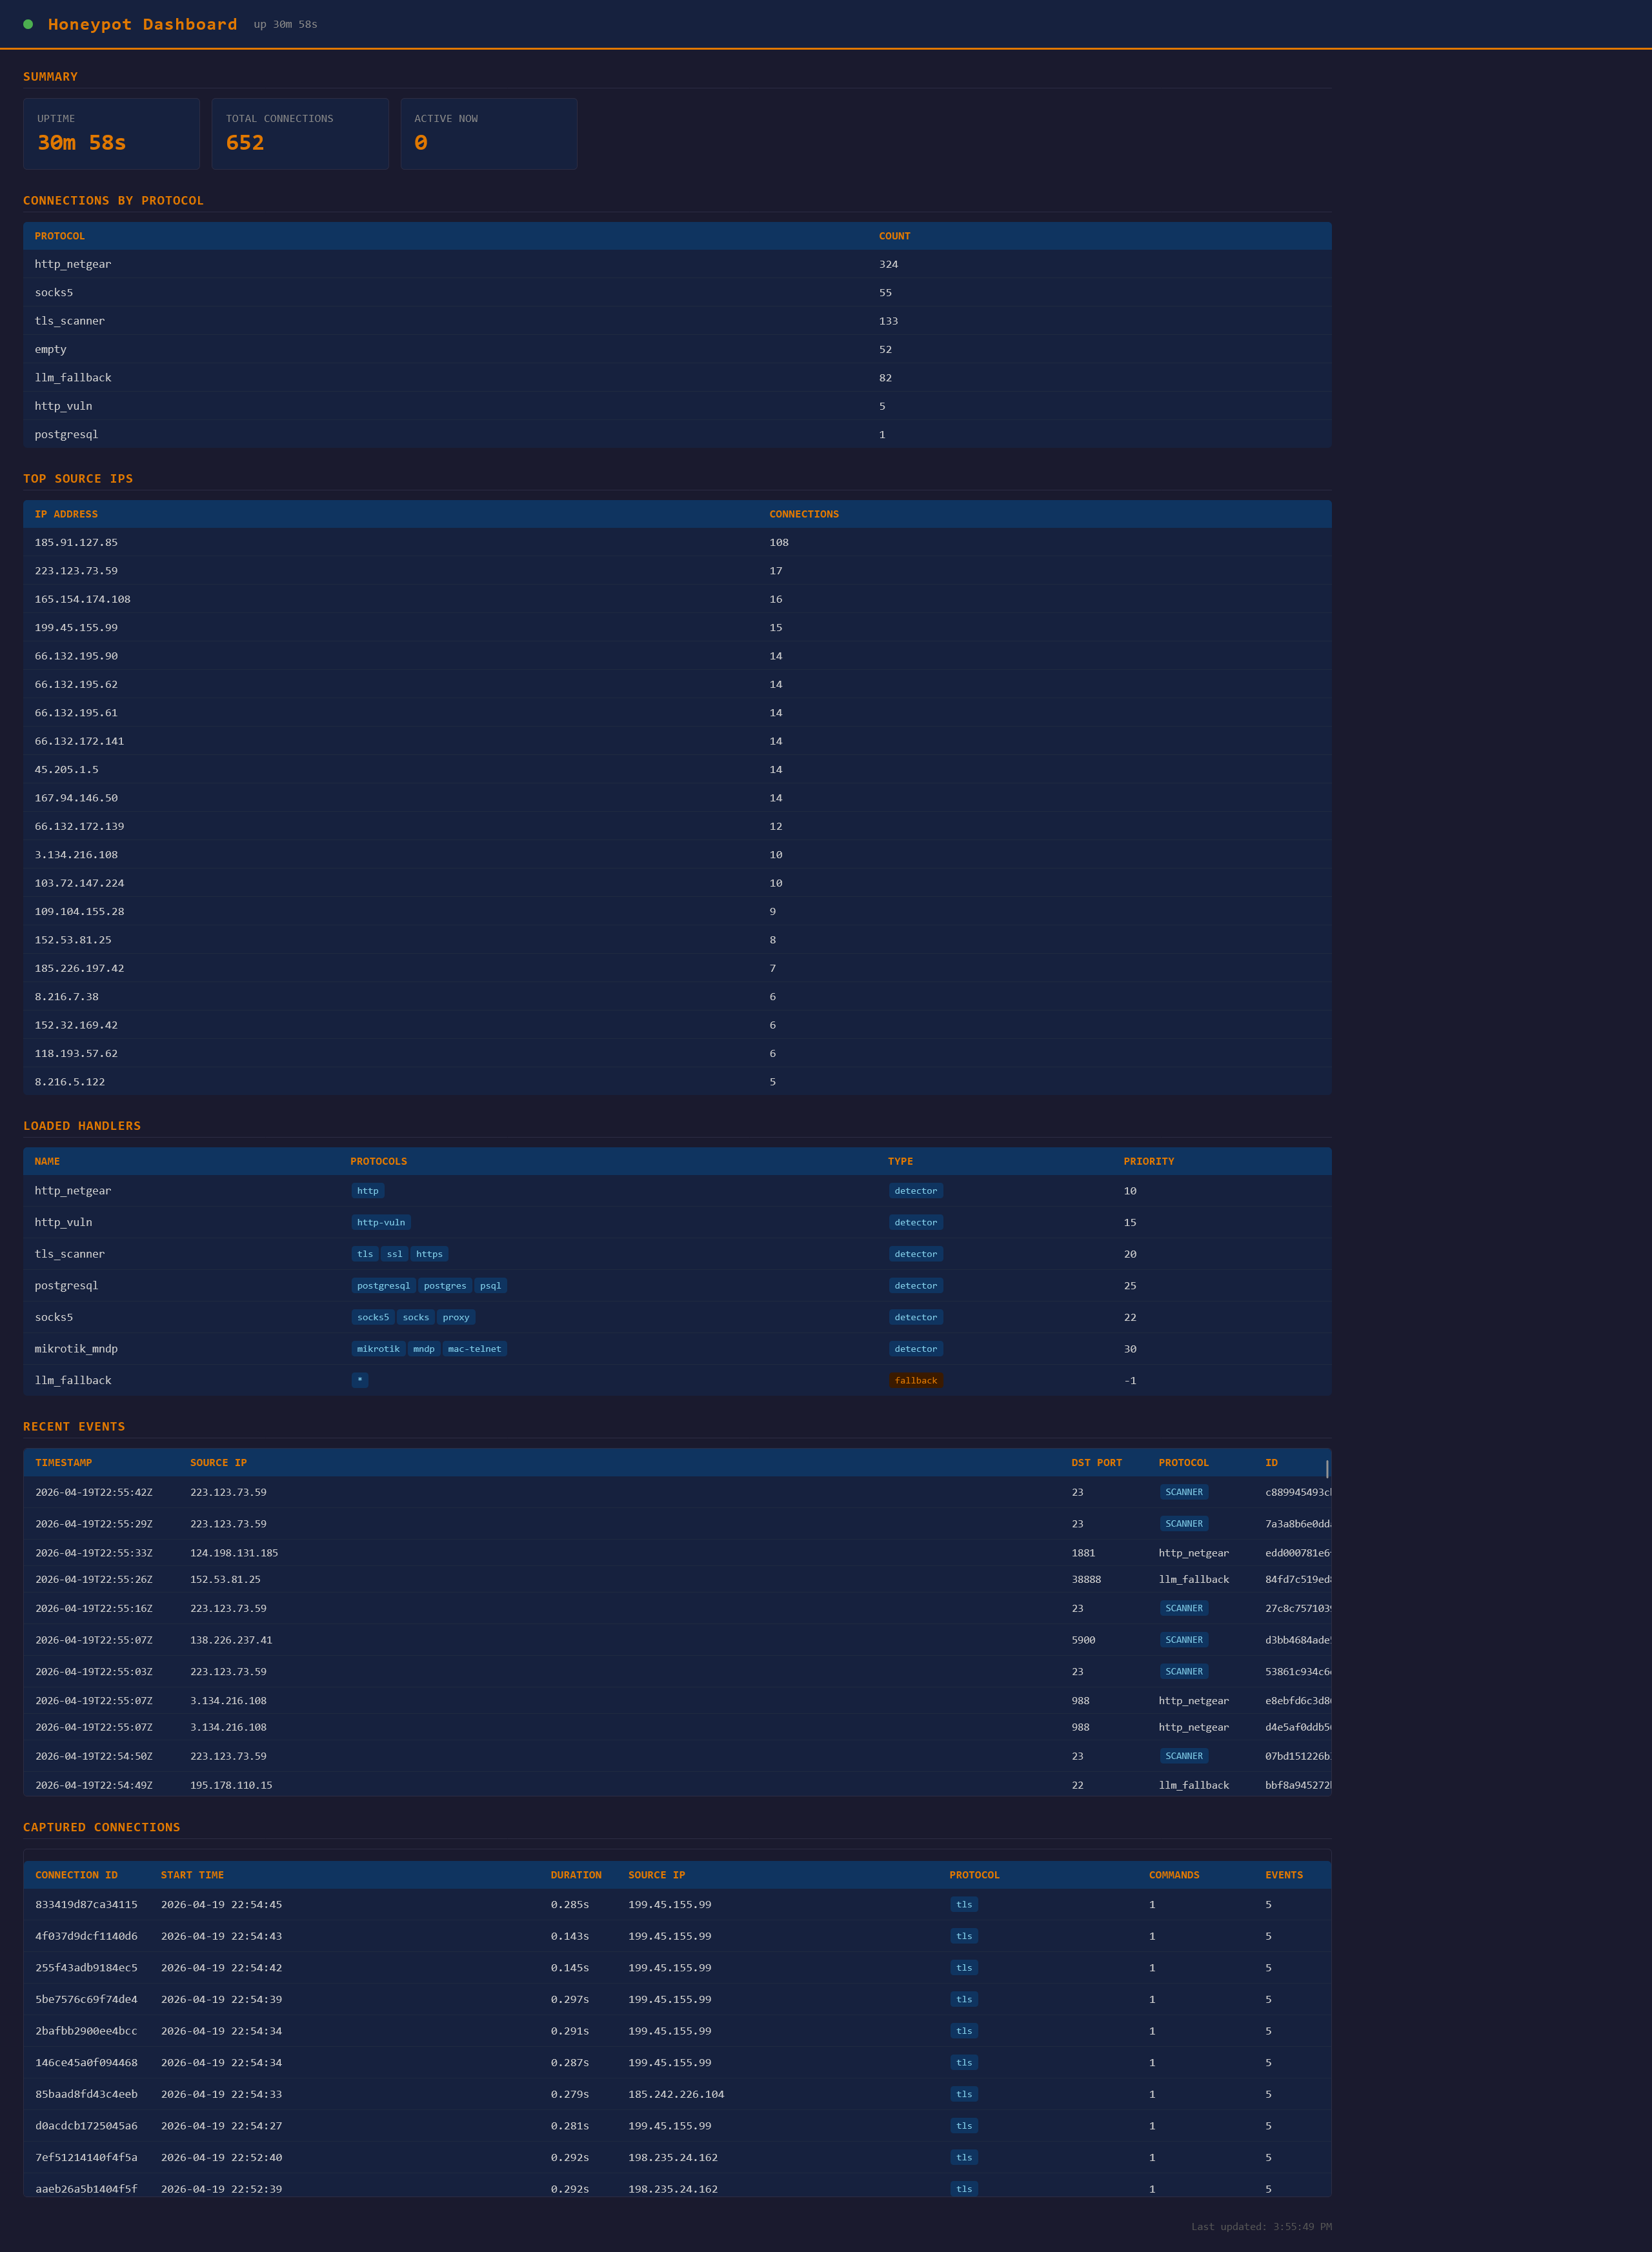
The honeypot has a simple HTTP interface for monitoring its activities:
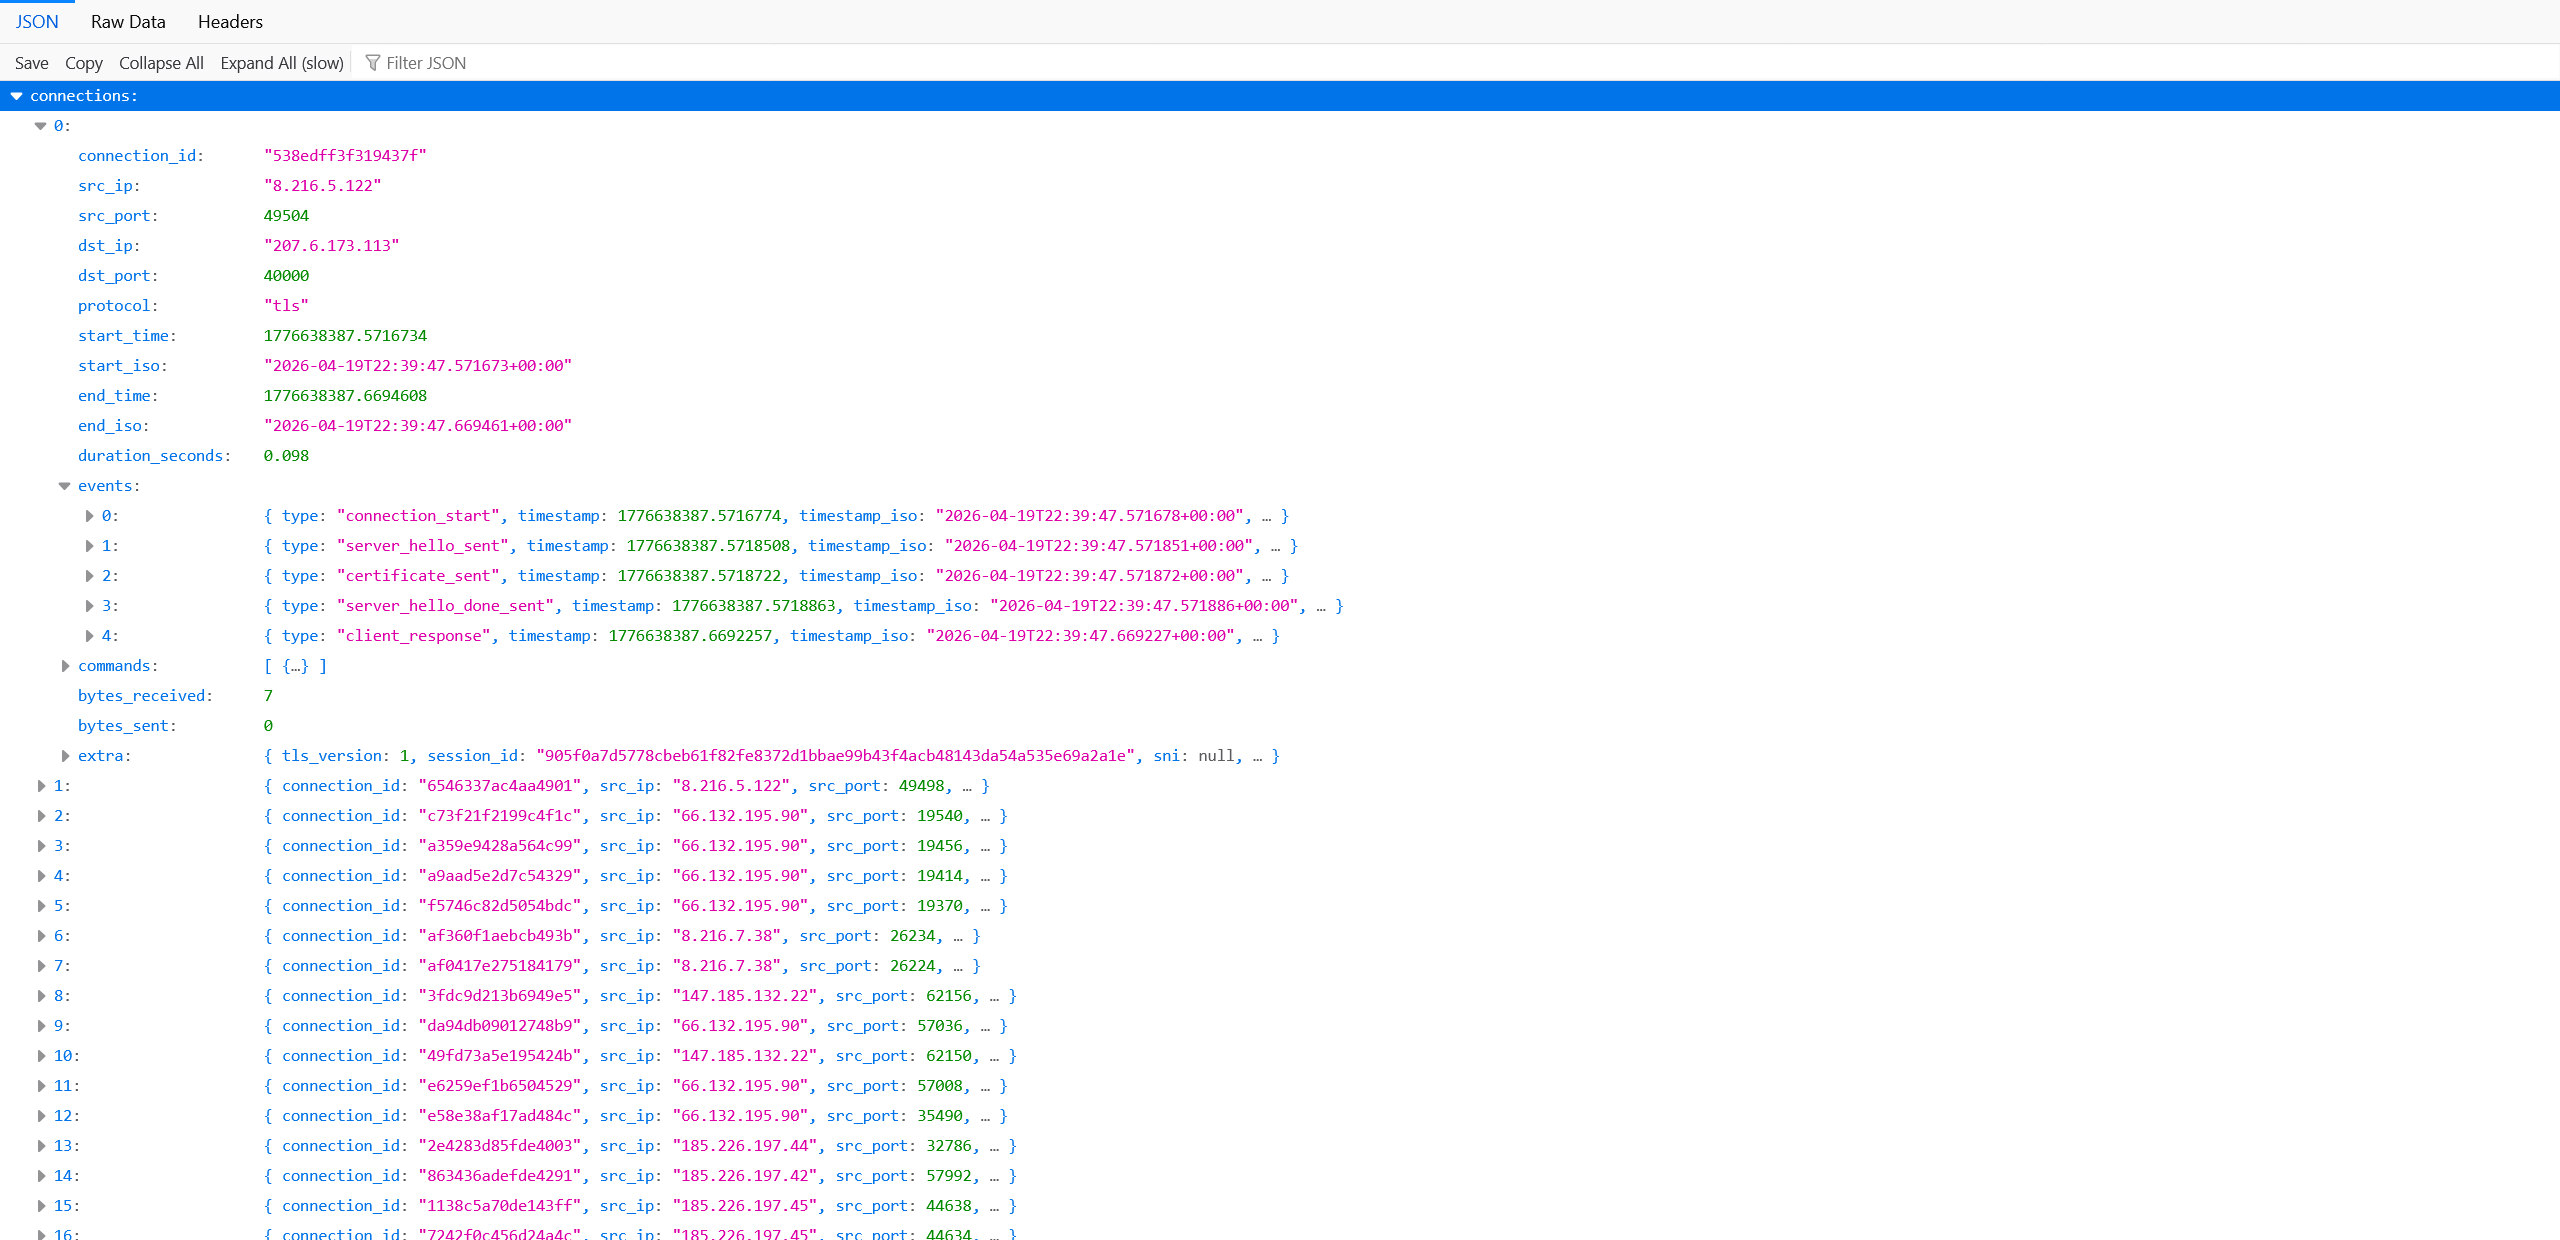
There is also a read only JSON interface for accessing connection metadata:
With LLM, it’s very easy to create a new plugin or modify the existing one. You don’t even need to design it- just tell the LLM to look at the incoming scanner traffic and decide which plugins to create next.
Some obvious improvement one can make:
Have LLM handles the full lifetime of a scanner TCP session.
Use a more powerful LLM model. Qwen3.5 9b is the biggest model I could use on Geforce RTX 3090, and it tends to hallucinate and spews out its duty (as a security honeypot agent) when it encounters traffic it doesn’t understand.
Monitor UDP traffic as well. This might be difficult as UDP is session-less, so it’s not entirely clear when the honeypot should abandon a scanner session.
See if the honeypot can dynamically steer the action of the scanners (eg. by showing bait files with reverse shell when executed in the attacker’s environment.)
Find out what triggered the DDoS condition and report those IPs to their IP owner.
The LLM can monitor the output of the honeypot’s unhandled traffic, and dynamically create new plugins base on what it sees in the incoming traffic. New plugin is loaded it into the sandbox, and voila- you now have a honeypot system that can handle every protocol in the world (that the LLM can understand).
It’s fun to see the LLM comes up with all kinds of seemingly-vulnerable services as replies. I would find myself gazing at the output, and they actually gave me some ideas on how to make the honeypot system more convincing to the attacker.
That’s all folks. I hope you find this blog post useful enough to start your own experimentation.
Have fun!