![]()
Chipify
![]()
![]()
(c) 2026 Santiago Hofwimmer BSc
Institute for Integrated Circuits and Quantum Computing, Johannes Kepler University (JKU), Linz, Austria
[!WARNING] This repository is a Work in Progress.
[!IMPORTANT] It is recomended to use the IIC-OSIC-TOOLS container. Otherwise, you have to install Ngspice, Xschem and IHP-Open-PDK manually as prerequisites.
[!IMPORTANT] Currently, only the IHP-Open-PDK is fully supported, but more will follow soon
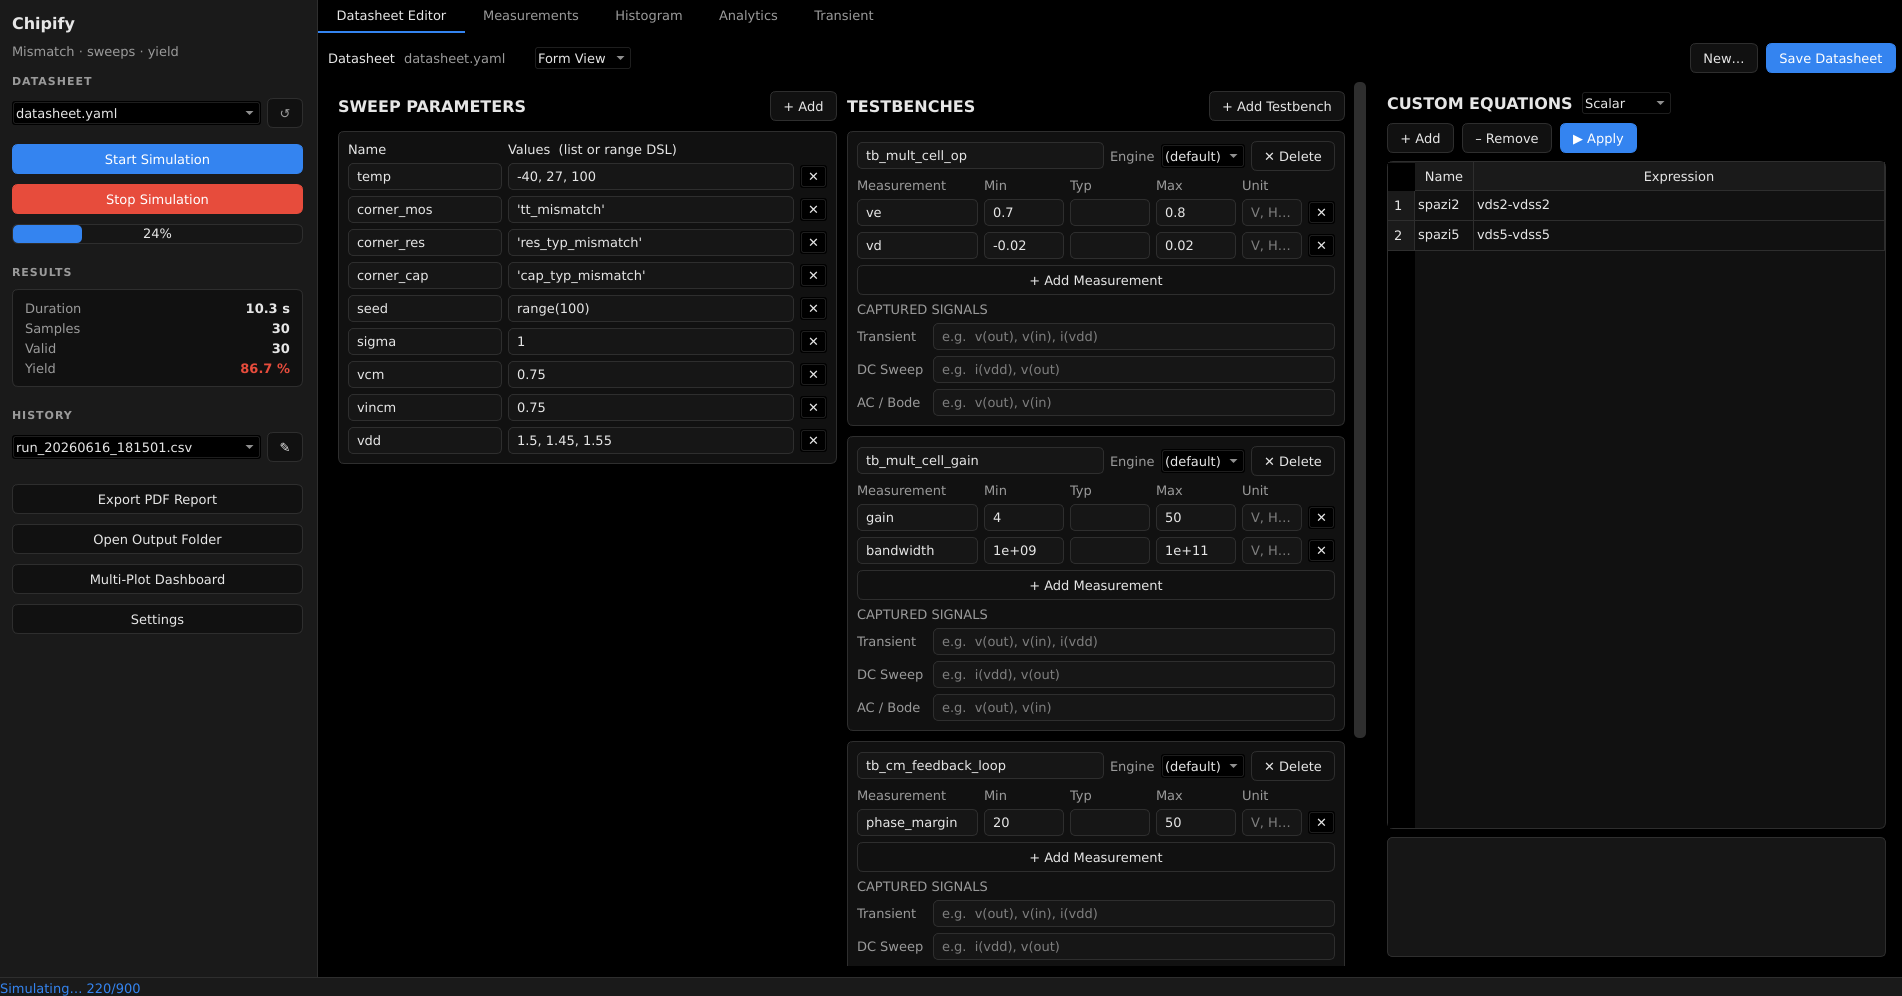
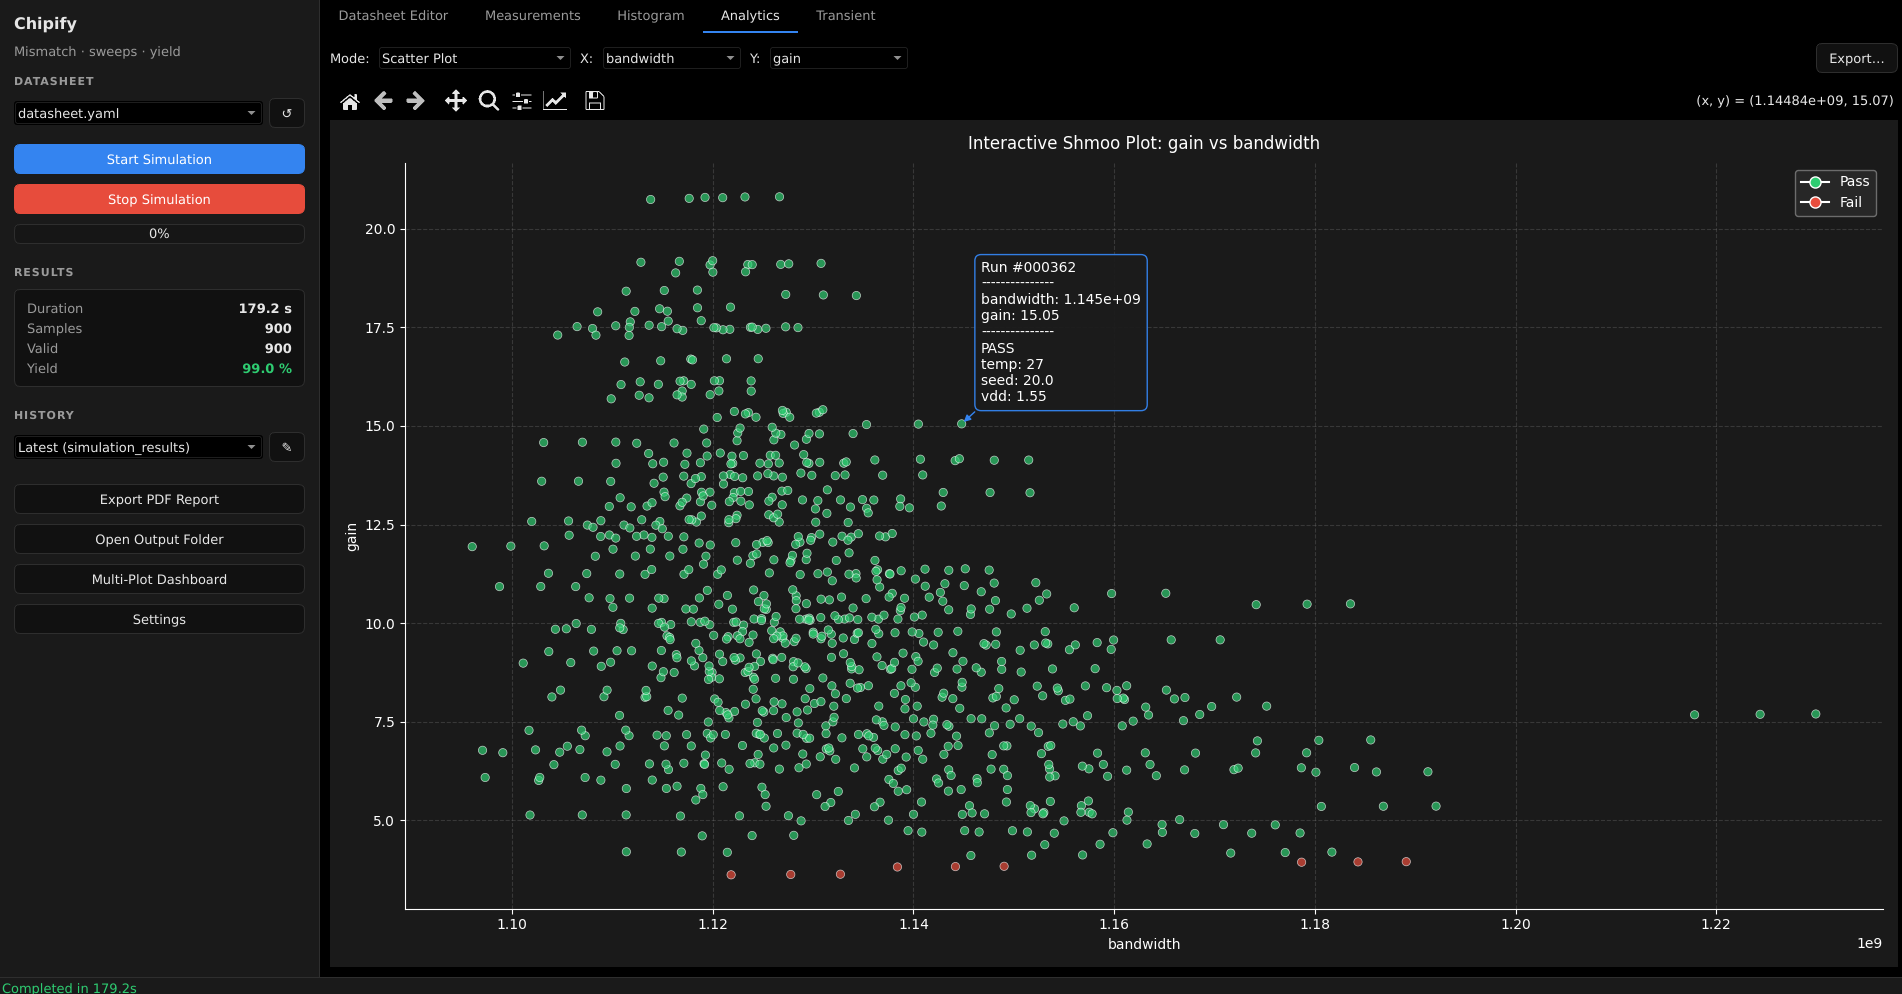
Chipify is a high-performance EDA (Electronic Design Automation) tool for mismatch simulations, parameter sweeping, and yield analysis. It wraps Xschem (schematic capture) and Ngspice (circuit simulation) to automate Monte-Carlo and corner sweeps, run them in parallel, and turn the raw results into plots, yield matrices, and reports.
It ships with both a PySide6 (Qt) desktop GUI and a headless CLI, plus a plugin system for custom plots, reports, and expressions.
Features
- Parallel sweeps — multiprocessing pool runs Monte-Carlo / corner cases across all cores.
- Datasheet-driven — describe parameters, tests, and pass/fail specs in a single YAML file.
- Range DSL —
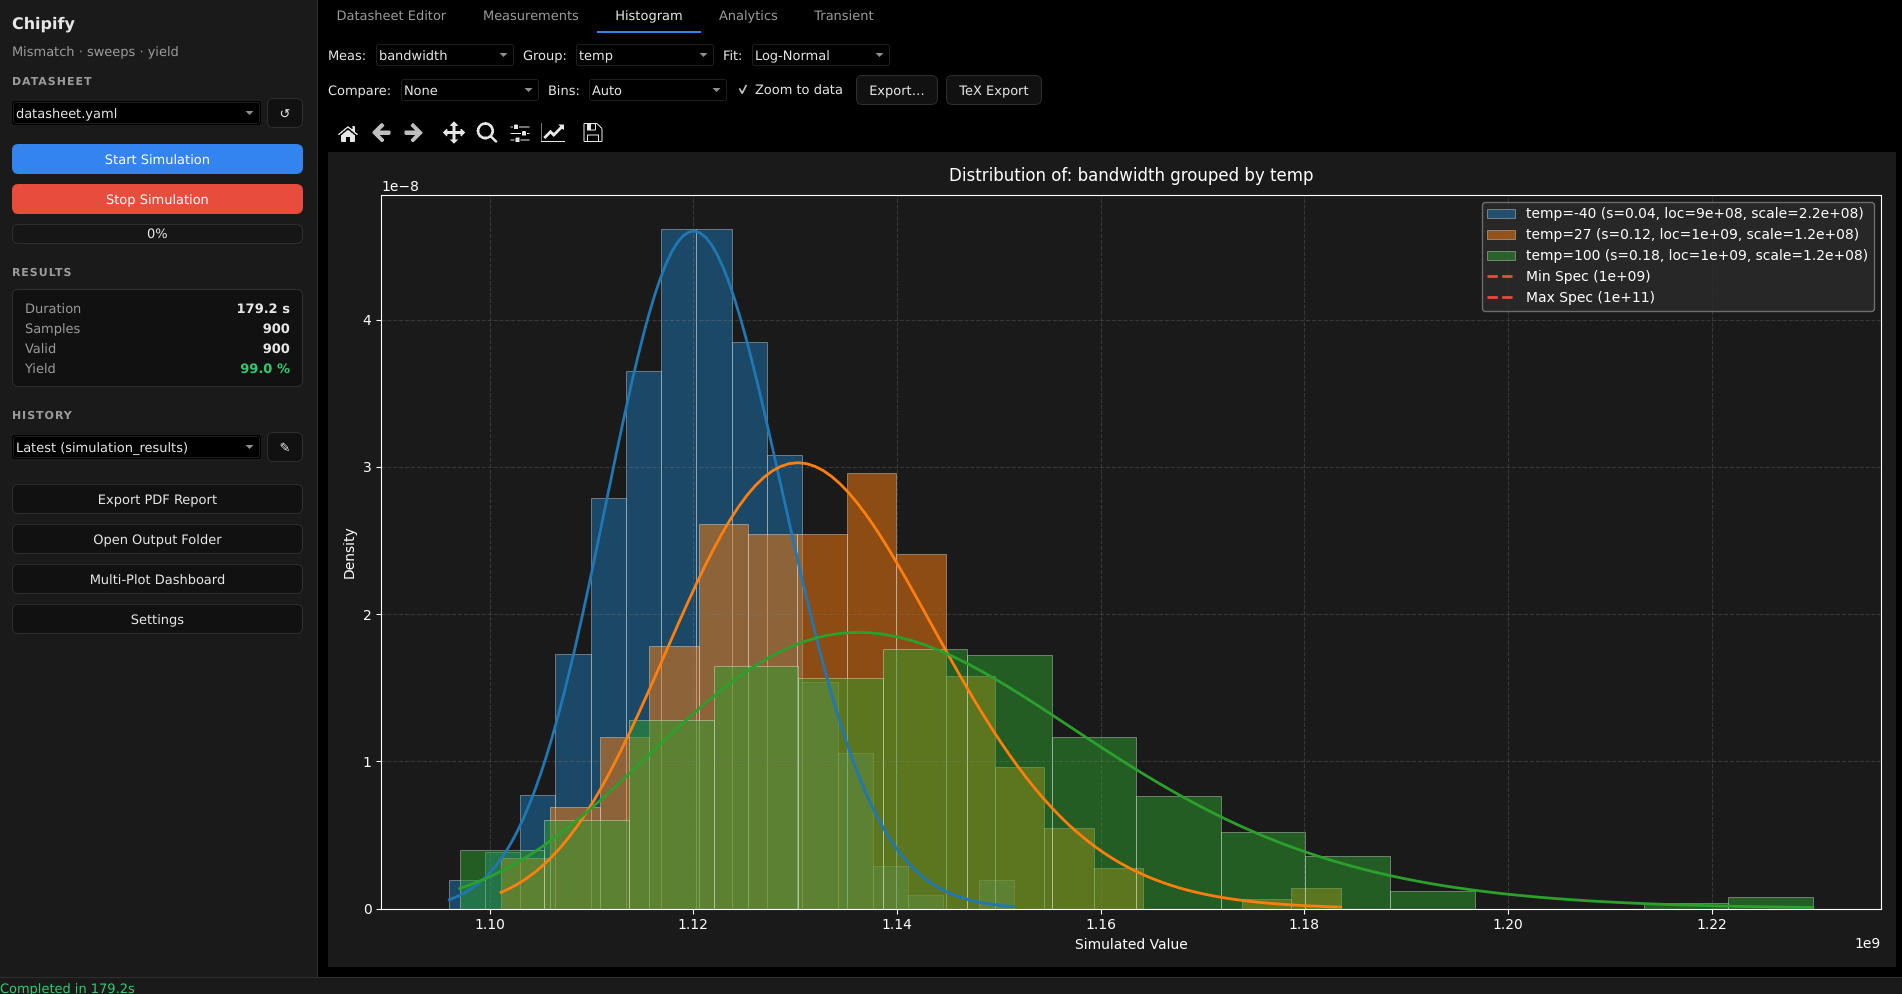
range,linspace, andlogspaceparameter sweeps (safely parsed, noeval). - Yield & statistics — pass/fail yield, histograms with distribution fits, corner yield matrices.
- Safe custom expressions — derive new metrics with a sandboxed evaluator (no arbitrary code execution).
- Reports — export to PDF, Markdown, and LaTeX; PNG/SVG plot exporters.
- Pluggable — add your own plots, reports, expressions, and exporters (see PLUGINS.md).
- Multi Plot Dashboard - arrange a selection of plots on a second window.

Prerequisites
Chipify is a wrapper around external EDA tools, so these must be installed and
available on your PATH:
- Python 3.11+
- Ngspice — the SPICE simulator
- Xschem — schematic capture / netlist generation
- (optional) VACASK + PyOPUS — alternative simulation backend
- (Linux) PySide6 system libraries — Qt needs a few shared libraries that
pip can’t install:
libegl1/libgl1(libEGL.so.1/libGL.so.1) are dlopened when Qt is imported — required even for the headless test suite. Without them you getImportError: libEGL.so.1: cannot open shared object file.libxcb-cursor0(Qt ≥ 6.5) is needed by thexcb/XWayland platform for the on-screen GUI; without it a Wayland session falls back to native Wayland, where dropdown menus don’t close on selection.
install.shinstalls all of these automatically on Debian/Ubuntu; elsewhere install them with your package manager (e.g.apt install libegl1 libgl1 libxcb-cursor0). System libraries can’t be declared insetup.py/pyproject.toml, so they’re handled byinstall.sh.
It is highly recommended to install and run Chipify inside the IIC-OSIC-TOOLS docker container. This way, all the required tools plus a bunch of open source PDKs are already installed.
Installation
git clone https://github.com/santihofi/chipify.git
cd chipify

python -m venv venv
# Linux/macOS:
source venv/bin/activate
# Windows (PowerShell):
venv\Scripts\Activate.ps1

pip install .
Optional extras:
pip install ".[fast]"     # numexpr — vectorized transient-equation evaluation
pip install ".[vacask]"   # PyOPUS — VACASK simulation backend
For development, install in editable mode: pip install -e .
(On Linux/macOS, install.sh is a one-line convenience wrapper for the venv + install steps above.)
Quick start
Desktop GUI
This opens the desktop application where you can edit datasheets, launch sweeps, and explore results interactively.
Headless CLI
See examples/datasheet.yaml for a documented
datasheet template (and examples/README.md for how to run
it). Place your datasheet YAML in the input folder (datasheets/ by default), then:
chipify-cli -c my_design.yaml          # run a single datasheet
chipify-cli --batch ./datasheets       # run every *.yaml in a directory
chipify-cli -c my_design.yaml --json   # also print a JSON summary (handy for CI)
chipify-cli -c my_design.yaml --markdown report.md
Results are written to the output folder (out/ by default), including
simulation_results.csv and any generated reports. Run chipify-cli --help
for the full list of options.
Configuration
User preferences are stored in settings.json in the directory you launch
Chipify from (CPU cores, simulator engine, theme, live plotting, …). The file
is created/updated by the GUI’s settings dialog. Custom equations live in the
datasheet YAML (equations: / transient_equations:), not in settings.json.
Folder paths
By default Chipify uses this layout under the working directory:
| Folder | settings.json key |
Default |
|---|---|---|
| Input datasheets | in_dir |
datasheets/ |
| Simulation output | out_dir |
out/ |
Model files (*.lib/*.mod/*.inc staged for simulation) |
work_dir |
work/ |
| Testbench files | tb_dir |
tb/ |
To relocate any of them, set the corresponding key in settings.json to an
absolute or relative path, e.g.:
{
  "out_dir": "results",
  "in_dir": "/data/chipify/datasheets"
}
Any key that is missing or blank falls back to its default. Paths are resolved when Chipify starts, so changes take effect on the next launch.
Running the example project
A source follower example is included. to run the example, navigate to /chipify/examples/source_follower and run chipify in this directory. You can select between two datasheets describing a corner case and a mismatch simulation.
Project layout
chipify/            # engine (no GUI-toolkit deps)
  cli.py            # CLI entry point + GUI launcher
  simulator.py      # multiprocessing simulation engine
  schema.py         # datasheet validation + range DSL
  expression.py     # sandboxed expression evaluation
  settings.py       # project folder paths (configurable via settings.json)
  app_config.py     # persistent preferences + logging
  data_loader.py    # results loading / pass-fail / history (shared, headless)
  uikit/            # toolkit-agnostic GUI-support layer (state, services, plugin facade)
  gui_qt/           # PySide6 (Qt) desktop GUI (tabs / controllers / workers / widgets)
tests/              # pytest suite for the core engine + GUI smoke tests
See context.md for the full architecture overview and PLUGINS.md for the plugin API.
Development
pip install -e .
pytest                                   # run the test suite
python -m mypy chipify/settings.py       # strict type-checking (see pyproject.toml)
License
Licensed under the Apache License 2.0.