
Ever since the iPhone came out in 2007 and almost instantaneously overshadowed the Mac, both in terms of sales and development resources, Apple has been making the Mac a bit more like the iPhone. Sure, a few features have moved the other way—the iPad has gradually gotten a bit more Mac-like as it has become powerful enough to do Mac-like things—but a big piece of every macOS release this decade has been “here’s all the stuff Apple brought over from iOS this year.”
Catalina moves macOS further and more decisively in the direction of iOS than ever; for the first time, third-party code written for iOS and iPadOS can run on the Mac with relatively few changes. At the same time, Apple remains adamant that the Mac and iOS/iPadOS are separate platforms that differ in ways that go beyond the underlying processor architecture or the primary input mechanism.
Catalina also draws clearer lines between the two platforms than we’ve gotten before. Apple has both said and done things that only make sense if the Mac will still be able to run whatever code you want for the foreseeable future, even as the default settings and security mechanisms become more locked-down and iOS-y. The overwhelming success of the iPhone indicates that most people are fine with Apple’s restrictions most of the time. But the slew of new desktop hardware we’ve gotten in the last couple of years suggests that Apple understands that a valuable, vocal chunk of the Mac user base (and the developers who drive the iPhone’s and iPad’s success) still wants powerful hardware that runs more flexible software.
Despite continued angst about what it means for apps to be “Mac-like,” the Mac will continue to be the Mac, distinct from the iPhone and the iPad. Keep that in mind as we dig into Catalina, which changes a whole lot of stuff about how Macs work while still aiming to preserve what people like about them.
Table of Contents
System requirements and compatibility
After dropping a pretty long list of older Macs in Mojave last year, Catalina leaves compatibility alone with one minor exception. Just about anything that will run Mojave will run Catalina:
- MacBook (Early 2015 or newer)
- MacBook Air (Mid 2012 or newer)
- MacBook Pro (Mid 2012 or newer)
- Mac mini (Late 2012 or newer)
- iMac (Late 2012 or newer)
- iMac Pro (2017)
- Mac Pro (Late 2013)
For the most part, support for Catalina continues to be tied to support for the Metal graphics and compute API, and making it easier for developers to port their iOS apps to the Mac is probably the justification.
But we’ve reached the end of the line for the old, pre-trash-can Mac Pro, regardless of how much you’ve upgraded yours in the last decade. While Mojave would run on old 2010 and 2012 Mac Pros with upgraded Metal-compatible graphics cards, Catalina will not. And while you may be able to trick Catalina into booting on these systems with minor modifications, Apple has apparently stripped out older drivers needed to make some Wi-Fi adapters and graphics cards work properly in those Mac Pros.
Apple maintains, as it has for the last few macOS releases, that the system requirements for any given version of macOS loosely lines up with its hardware policies for “vintage” and “obsolete” products. Anything discontinued more than seven years ago, as these old Mac Pros were, is considered obsolete, and the company will guarantee neither hardware nor software support for those Macs. Regarding the Mac Pros in particular, there’s also been some speculation that Apple doesn’t want to continue to support them because Intel isn’t releasing microcode updates for those processors to mitigate some of the hardware-level security flaws that have been disclosed in the last year or two.
The removal of support is unfortunate, given that there’s no reason why that Mac Pro hardware couldn’t run Catalina if its GPU were up to snuff; Apple is also dropping those old Mac Pros just in time to sell you a brand-new, tower-style Mac Pro for several thousand dollars. This feels too convenient to be a total coincidence, but it’s unlikely to affect many people at this point.
Even among the Macs that can run Catalina, a small handful of features are only officially supported on newer devices. The new Sidecar feature, which lets you use an iPad as an external monitor via a wired or wireless connection, requires a Mac with hardware acceleration for HEVC video encoding. That means you need a sixth-generation (Skylake) or newer Intel processor in your Mac (and/or an Apple T2, which can handle HEVC encoding).
- MacBook (Early 2016 or newer)
- MacBook Air (2018 or newer)
- MacBook Pro (2016 or newer)
- Mac Mini (2018 or newer)
- 27-inch iMac (Late 2015 or newer)
- 21.5-inch iMac (2017 or newer)
- iMac Pro (2017)
Apple Watch unlocking and WPA3 Wi-Fi encryption support requires a Mac with 802.11ac support. That covers any Mac released in 2013 or later; the 2012 Macs on the Catalina support list are the only ones that still use 802.11n adapters.
What should I do with my unsupported Mac?
If you’ve got an older Mac that you’re still happy with, you have some options. The easiest is to continue running either High Sierra or Mojave, depending on what version your Mac supports. Apple typically supports the previous two versions of macOS with security updates and new Safari versions, so High Sierra should be supported for another year, and Mojave should have two years of patches left. Apple may make some changes to iCloud or other services that break certain functionality (changes to the Notes and Photos apps have, in the past, been unable to sync correctly with older versions of macOS and iOS). But the operating system itself and most third-party apps will continue to work fine—and you’ll still be reasonably secure.
Another, less-satisfying option is to install another operating system. Nothing should keep Windows 10 or most Linux distributions from running on these Macs, though you may have trouble finding modern drivers for the oldest systems. The home version of Neverware’s CloudReady operating system can turn most older Macs into ersatz Chromebooks, which is a decent fit for computers with older processors and 2GB or 4GB of RAM. All of these will take you out of Apple’s software ecosystem (aside from the limited browser-based iCloud apps and iCloud for Windows), but they’ll keep your old computers (relatively) secure and functional.
When Mojave dropped support for a bunch of Macs last year, it prompted some enthusiasts to develop workarounds that would make the operating system (mostly) work on older unsupported systems. DosDude1’s Mojave Patcher Tool is probably the easiest and most extensively documented, and he has been working on a Catalina patcher that seems to support most of the same systems with most of the same caveats. I wouldn’t recommend this for most people; at best these Macs suffer from minor graphics, camera, and trackpad issues, and some older AMD Radeon GPUs will essentially refuse to run the software at all. I can’t speak to which features these Macs are missing, or whether they’ll be able to run Catalyst apps at all. But if you’ve got an older Mac you just can’t give up, this is something you can try.
Branding, installation, and free space
The state of California has 842 miles of coastline, more than 3,000 lakes, dozens of small islands, multiple distinct biomes, and at least one noteworthy estuary. It’s the nation’s third-largest state by land area, its first-largest by population, and if it were its own country it would be the world’s fifth-largest economy. If you were to decide, say, to name your operating system releases after California locations, you’d have an unbelievably large and diverse group of locations to choose from.
So why are the people who name macOS releases so obsessed with rocks?
Save for Mavericks, which used beach-y wave iconography, all of the other California-themed macOS releases have been all about rocks. Yosemite is a park known for its hiking and rock climbing, and El Capitan is a reference to a specific rock within that park. Both Sierra and High Sierra are named for the same mountain range (mountains are big rocks). The desert-themed Mojave almost breaks the cycle, but deserts are full of sand, and sand is mostly little tiny rocks. The desktop wallpaper was a mountain of sand, small rocks piled together in imitation of a big rock; in some ways, it is the rockiest of all. And then we come to Catalina.
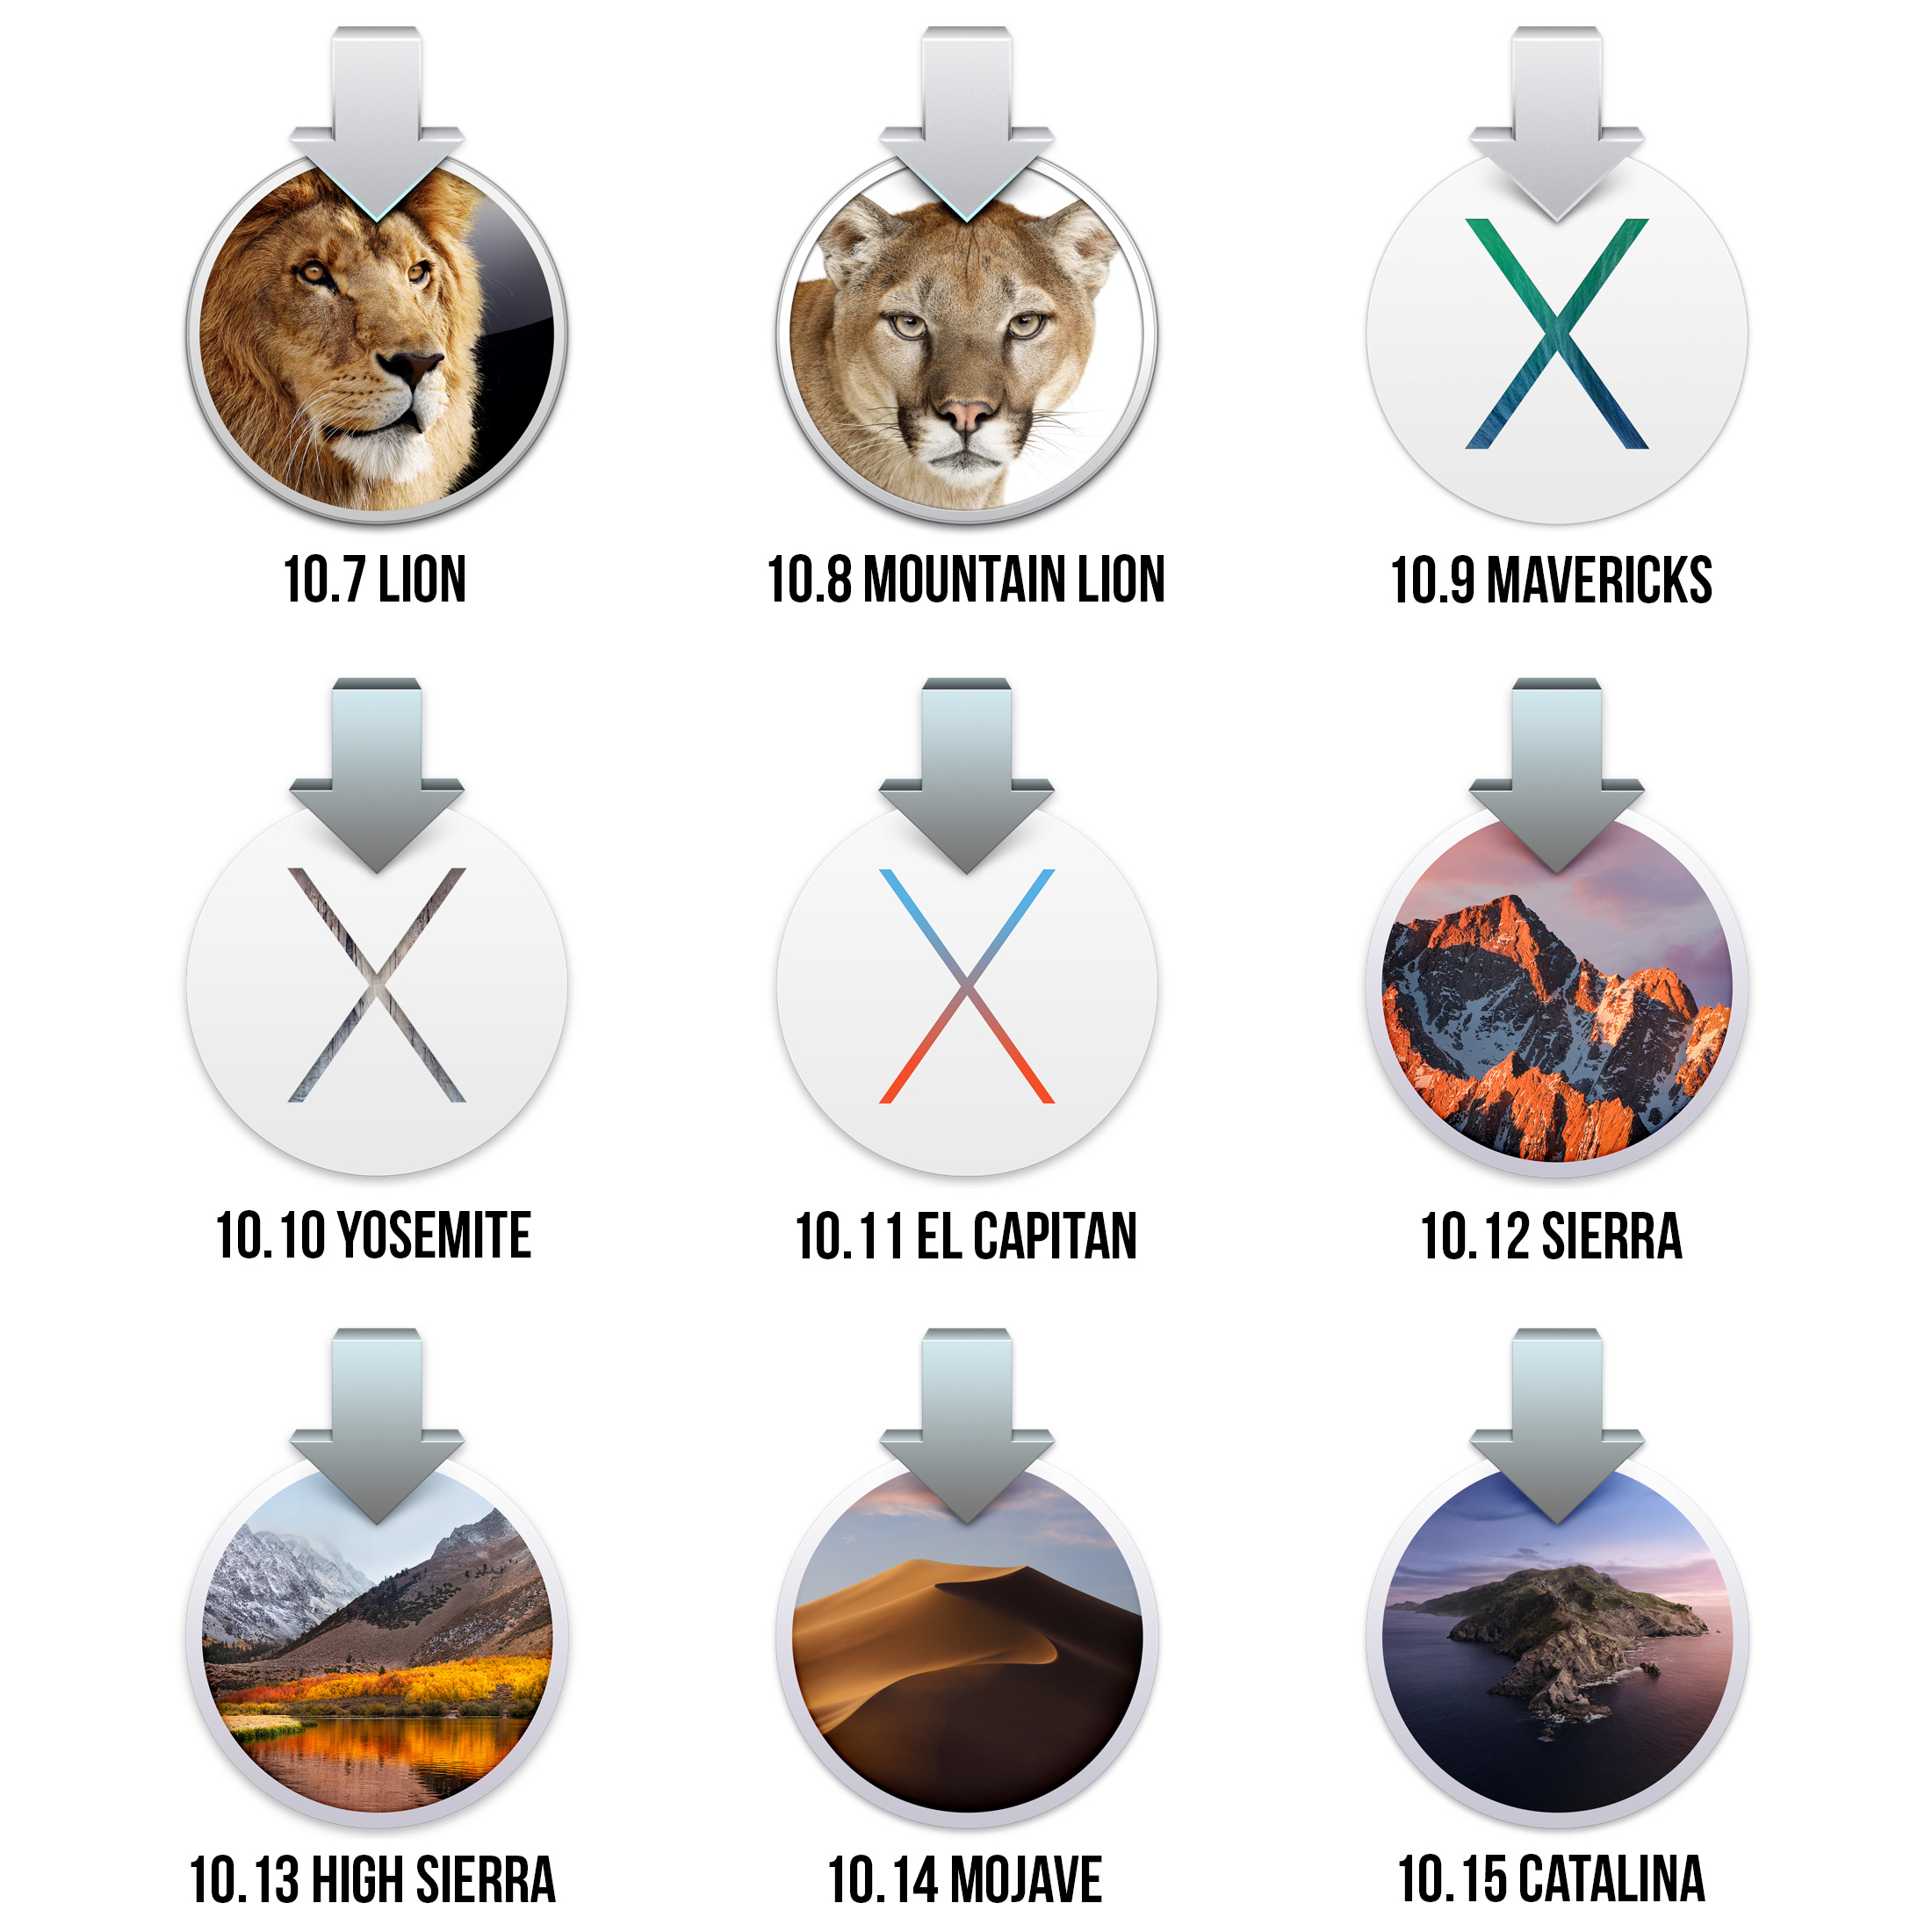
Downloadable macOS installers through the ages. Credit: Andrew Cunningham
Santa Catalina is a small, sparsely populated island off of California’s southwestern coast. It’s only 22 miles long from end to end, and the branding Apple uses appears to be a head-on photo of its western tip. It is, at least, a rock with water around it. But, nevertheless, rocks.
Does this rock fixation have something to do with macOS’ status as the bedrock of Apple’s ecosystem, the small-but-vital chunk of its business from which iPhone and iPad apps spring? Is it a reference to the operating system’s rock-solid Unix foundation? It’s hard to say. But I challenge the Mac team to come up with a name for next year’s release that references a forest or a field or something else green and growing.
The install process for Catalina is mostly the same as for Mojave; download the installer from the Mac App Store and then run it to upgrade. It’s still possible to create a USB installer for Catalina if you’ve got a slow Internet connection and a lot of Macs to upgrade, but that feature is slowly becoming less convenient than it used to be since Macs with the Apple T2 chip can’t boot from external media by default and any Mac with a T1 or T2 typically needs to connect to the Internet during setup anyway so it can download and install updates for the BridgeOS software that makes them work.
A fresh, fully indexed installation of Mojave 10.14.6 takes up 15.1GB of space on a 2018 Mac Mini (counting the main OS volume and the recovery volume but not the volume used for virtual memory), and its installer is 6.05GB in size. The GM build of Catalina has an 8.09GB installer—a fairly large increase—but takes up the same 15.1GB of space (again, not including the VM partition). The read-only system partition accounts for about 10.6GB of that, while the data partition is only 3.8GB to start.
The end of 32-bit apps (and other removals)
Mac hardware and macOS made the jump from 32 bits to 64 bits a long time ago, but Catalina will be the very first version of macOS that is totally unable to run 32-bit software. For (what I hope will be) the last time, let’s review the Mac’s entire 64-bit timeline from start to finish:
- June 2003: The PowerPC G5 CPU is the first 64-bit-capable chip to show up in a Mac, and with Mac OS X 10.3 Panther, it can theoretically address up to 8GB of RAM.
- April 2005: Mac OS X 10.4 Tiger allows for 64-bit processes under the hood—they can be spun off from another process or run via the Terminal.
- June 2005: Apple announces that it will begin using Intel processors, which are still primarily 32-bit. Whoops!
- August 2006: Apple launches the Intel Mac Pro with a 64-bit Woodcrest CPU; mainstream 64-bit Core 2 Duo Macs follow shortly afterward.
- October 2007: Mac OS X 10.5 Leopard launches with actual support for regular 64-bit apps; Universal Binaries can run on 32-bit and 64-bit Intel and PowerPC machines, covering four architectures within a single app. Unlike Windows, Apple never ships separate 32- and 64-bit versions of Mac OS X.
- August 2009: Mac OS X 10.6 Snow Leopard still runs on 32-bit chips, but for the first time everything from the apps to the OS kernel supports 64-bit operation. Snow Leopard’s 64-bit capabilities are a major component of Apple’s marketing push, which infamously includes “no new features.” However, most systems still default to loading the 32-bit kernel.
- July 2011: Mac OS X 10.7 Lion drops support for 32-bit Intel CPUs (Snow Leopard had already ended all support for PowerPC systems). Older Macs continue to default to the 32-bit kernel and 32-bit drivers, but new Macs introduced in this era typically default to the 64-bit kernel.
- July 2012: OS X 10.8 Mountain Lion boots into the 64-bit kernel by default on all systems that support it, including a few that previously defaulted to the 32-bit kernel. In the process, a few 64-bit systems with 32-bit graphics drivers and 32-bit EFIs are dropped from the support list.
- June 2017: Apple announces macOS 10.13 High Sierra and says it’s the last release that will run 32-bit apps “without compromise.”
- January 2018: All new apps submitted to the Mac App Store need to be 64-bit only.
- April 2018: High Sierra’s 10.13.4 update begins warning users about “not optimized” (read: 32-bit) apps the first time they’re launched.
- June 2018: All new apps and updates to existing apps submitted to the Mac App Store need to be 64-bit only. Apple announces macOS Mojave, which will be the last version of the OS to run 32-bit code.
- September 2018: Apple releases Mojave. 32-bit software continues to run but with more frequent and aggressive nag messages than High Sierra.
- June 2019: Apple announces macOS Catalina, which makes good on Apple’s promise to drop 32-bit software support.
- October 2019: Catalina is released. 32-bit apps no longer run on the latest version of macOS.
Assuming nothing changes about Apple’s typical macOS update practices, Mojave will stop getting security updated when macOS 10.17 is released in the fall of 2021. At that point, no currently supported version of macOS will be able to run 32-bit software. And a few longstanding components of macOS haven’t made the jump to 64-bit. These include anything related to the legacy QuickTime Player 7 app, the InkServer handwriting-recognition service (now replaced, more or less, by Sidecar and its Apple Pencil support), the old Apple-maintained Java 6 Runtime, and the long-deprecated Carbon API and any apps built using it.
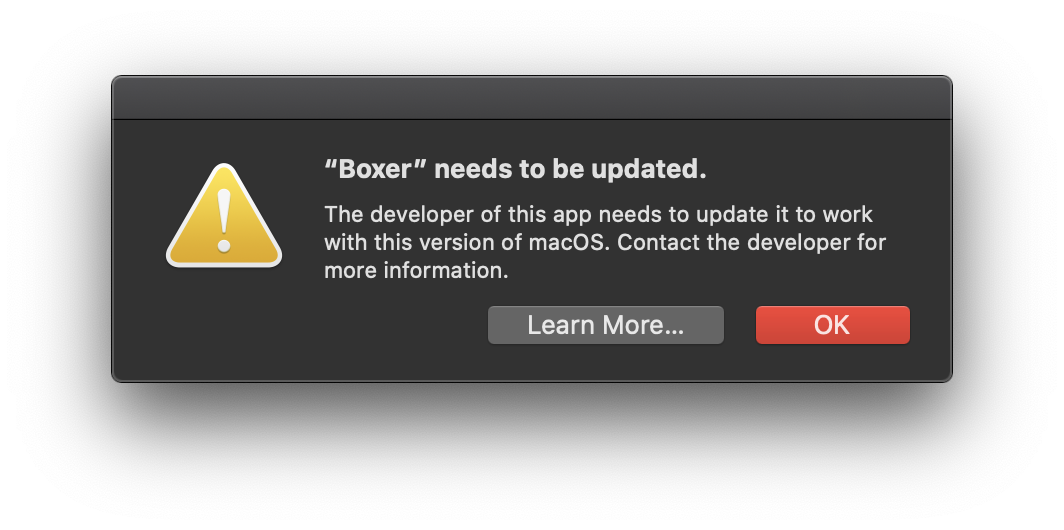
32-bit apps will refuse to run on Catalina. Credit: Andrew Cunningham
Apple was careful not to surprise anyone with Catalina’s removal of 32-bit support, and the company has been projecting its plans for over two years now. Most developers took the hint, and even software like Audacity and Zoom that was still 32-bit as I wrote the Mojave review last year is 64-bit now—though larger, more complicated apps might still be hung up on old 32-bit dependencies that need to be either updated or replaced. 32-bit apps will remain installed on your Mac, but their icons will be crossed out. Trying to run those apps will only result in a prompt that your software is out of date as well as a link to the Apple support page about 32-bit software.
If you want to check to see which of your Mac’s apps are still 32-bit, open the System Information app and scroll down to Legacy Software. Affected apps and components of otherwise 64-bit apps will appear organized by developer, or under a separate heading if they’re from the Mac App Store. The Catalina installer will also warn you about 32-bit apps before you start the upgrade.
The impact of the 32-bit decision will be felt disproportionately. Regular users are unlikely to notice or care—or, at least, it will be reasonably easy to find replacement or updated versions of older apps that support 64-bit. Creative professionals, on the other hand—people who work with images, video, or audio, or folks who rely on expensive (and not always new) external equipment may run into problems with apps, or plugins, or drivers. Community-maintained open-source software is likely to lag behind software maintained by large companies. If you’re holding on to older versions of these pro software packages before the whole professional software industry shifted to yearly subscriptions with rolling updates, those apps may not have 64-bit compatibility and certainly won’t have it added in an update. And while I don’t think macOS is the gaming platform of choice for many people, tons of older games (and, as of this writing, the regular Steam client) are 32-bit only and are extremely unlikely to be updated.
OpenGL and OpenCL
OpenGL and OpenCL were officially deprecated in Mojave last year, though that’s a little misleading since it implies that Apple had been actively maintaining and updating its support for those standards. In Catalina, as in every macOS version going all the way back to Mavericks, the macOS OpenGL implementation is stuck at version 4.1 (2010), and the OpenCL version is stuck at 1.2 (2011). This means that apps that still rely on those APIs on macOS will continue to run, provided they’ve been updated to meet the 64-bit-only requirement. But you shouldn’t be developing new Mac apps that rely on OpenGL or CL for anything important.
Apple also isn’t directly supporting newer replacement standards like Vulkan. Instead, the company is opting to direct developers toward its own proprietary Metal API for both graphics and GPU computing. But that doesn’t mean there’s no hope for cross-platform developers—the MoltenVK translation layer, which maps Vulkan API calls to Metal ones, is actively being used in several prominent apps, and the results are promising. In both Dota 2 and the Dolphin GameCube and Wii emulator, MoltenVK often performs significantly better than OpenGL while saving developers the trouble of adding and maintaining Metal support. It’s not totally without bugs (and as those Dota 2 benchmarks from Phoronix show, still not quite as fast as Vulkan running on Linux or Windows 10), but MoltenVK is still a big improvement over OpenGL.
Dashboard is dead
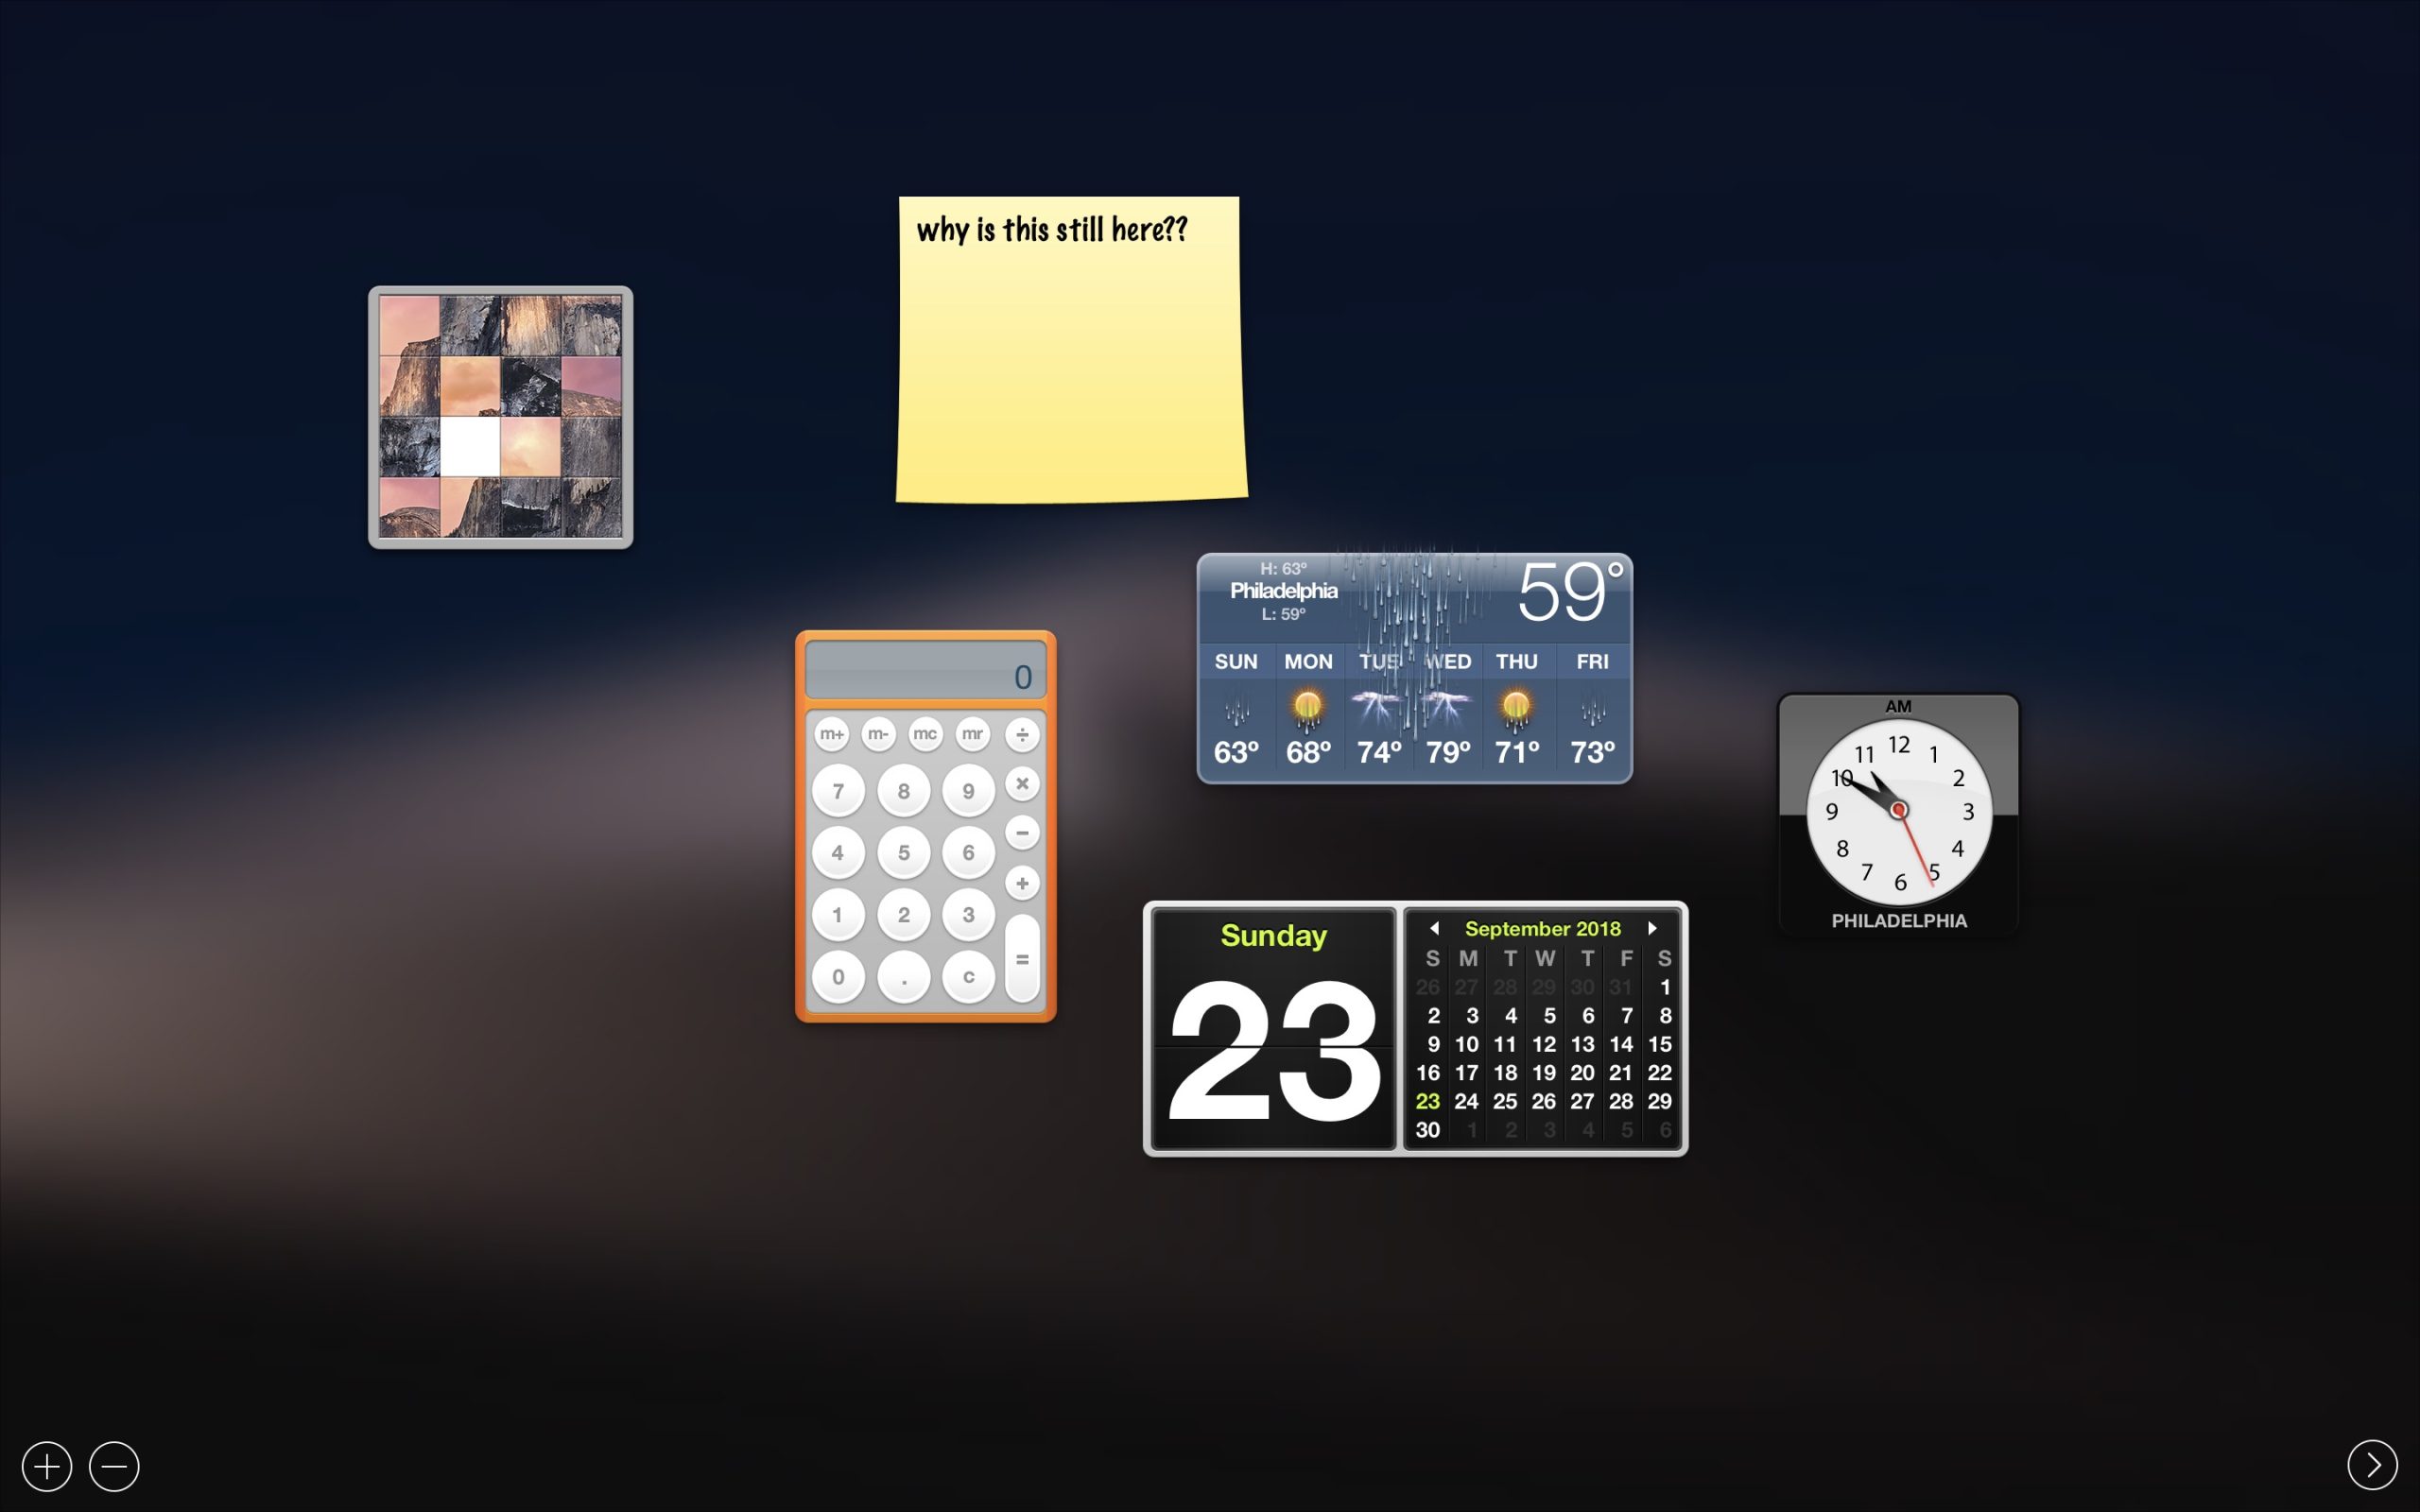
The Dashboard in Mojave. Goodnight, sweet prince. Credit: Andrew Cunningham
Catalina finally kills the Dashboard, a feature introduced 14 years ago in version 10.4 and updated infrequently and sporadically since then—it was the only place in Mojave where the old Scott Forstall-era software design language was still readily visible. Dashboard has been disabled by default since macOS Yosemite in 2014, but it has soldiered on, partially broken and unnoticed, until now.
The bulk of Dashboard’s widgets (including the weather, calendar, world clock, and calculator) could already be replicated in the Today view in the Notification Center. If you had sticky notes stored in Dashboard, upgrading to Mojave moves them to the Stickies app. I suspect a small faction of Dashboard die-hards will lament the demise of a treasured workflow or declare these substitutes to be Not Good Enough, but the rest of us won’t notice.
Python, Perl, and Ruby
For years now, Apple has shipped runtimes for the Python, Perl, and Ruby programming languages to allow users to run scripts written in those languages without performing any additional installs. But according to Apple’s release notes for developers, “future versions” of the operating system will stop including those runtimes by default (though they may still be able to download the runtimes on-demand, just as older versions of macOS could download the Rosetta PowerPC compatibility layer or Java when needed). Apple recommends that developers whose software relies on one or more of these runtimes ship their own runtimes alongside their apps.
Anyone who relies on the built-in versions Python, Perl, or Ruby can breeze through installation using Homebrew or other methods, and the versions that Apple ships usually sometimes trail the current stable releases by several versions. If you do choose to use the built-in versions, Catalina does include Python 3 by default, where older versions of the operating system only included Python 2.7 (still included, and still the default environment if you just run “python” from the Terminal, but Apple warns against using it).
New features: Finder and window management tweaks
After radically overhauling the Mac user interface with Dark Mode in Mojave last year, Catalina does almost nothing to shake things up. There is a new “auto” setting that will let your Mac use Light Mode during the day and switch automatically to Dark Mode at night, but otherwise things look and feel the same. The biggest change is to window management, and even that is mostly just an extension of features that were already available.
Hovering over the green stoplight button in any app now displays a pop-up menu with a few window management options. Apps that support Full Screen mode can be tiled to the left or right of the screen, which will gather all your other Full Screen windows on the other side so you can select a second app to use in Split View mode. Apps that don’t support Full Screen (or apps that do, if you press the Option key as you hover) can be sent to the left or right half of the screen without entering Full Screen mode. If you have a multi-monitor setup (or if you have a Sidecar-compatible iPad within range, whether you’re actively using it or not), this menu will bounce windows over to a different screen if you’d like. All of these window management options are also accessible from the Window menu in any app (though none of them have shortcut keys assigned by default).
The Full Screen app tiling was already present in Mojave if you clicked and dragged the green stoplight button in any Full Screen-compatible app—I am fully confident that almost nobody was aware of this functionality, but if you were, this behavior is no longer available in Catalina.
Other Finder changes are few and far between. Click the Markup button in a Quick Look window or anywhere else that supports Markup, and there’s a new button that will send images and documents over to your iPhone or iPad so you can mark it up with your fingers or an Apple Pencil (and changes are reflected in real time on the Mac’s screen). File metadata in the Finder’s column and gallery views has been rearranged to make it a little easier to read. And Apple has rebuilt the Open With menu in Finder (which carries over to Mail and Calendar, when opening attachments) so that it loads more quickly.
System Preferences, refreshed
Every macOS release has included its own tweaks to the System Preferences app—icons have moved around or gotten updated, text labels have disappeared or been tweaked—but overall, things have looked more or less the same since Mac OS X version 10.1 (!) separated the icons into four loosely related rows.
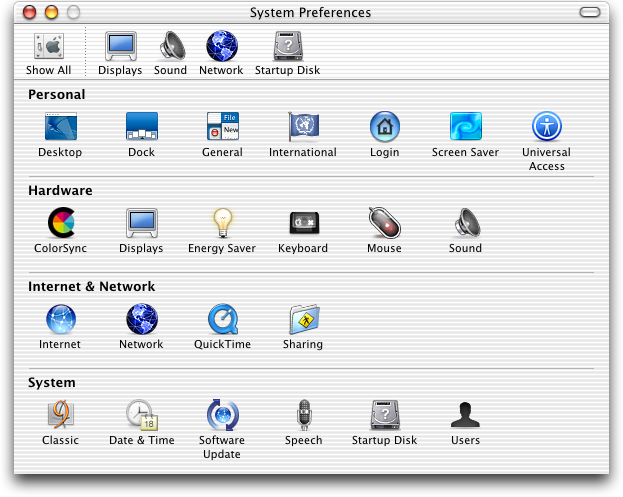
Between Puma and Mojave, the text labels disappeared, icons changed, items were added and removed and shuffled around, and a search function made things easier to find, but the basic organization of the icons was the same.
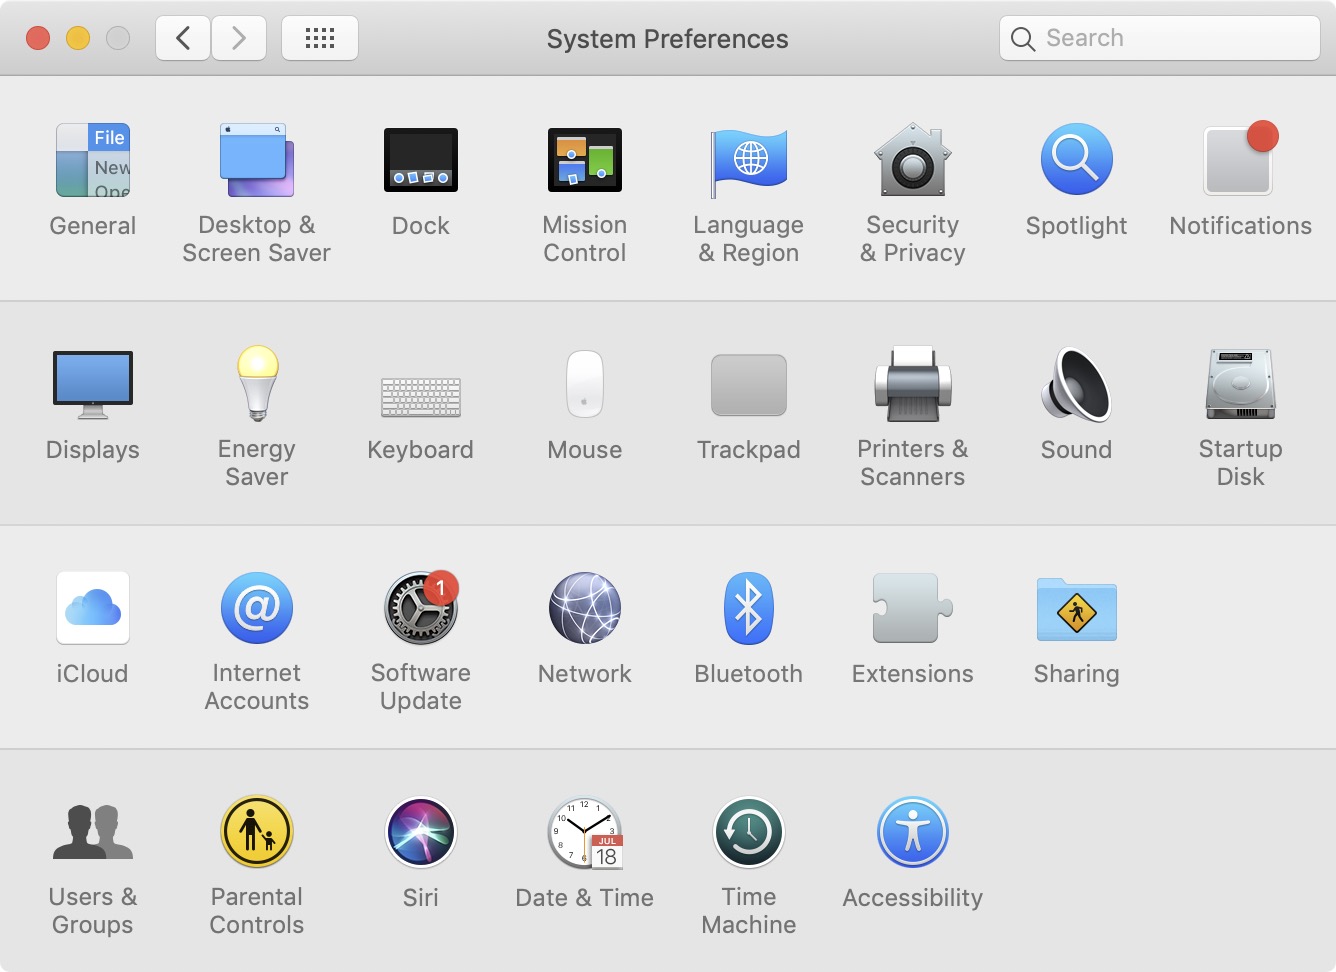
System Preferences in Mojave. Credit: Andrew Cunningham
System Preferences in Catalina has been broken up into three different sections. Your Apple ID and Family Sharing settings have been placed right at the top, as is the case in the iOS Settings app, and both panes have gotten a total overhaul.
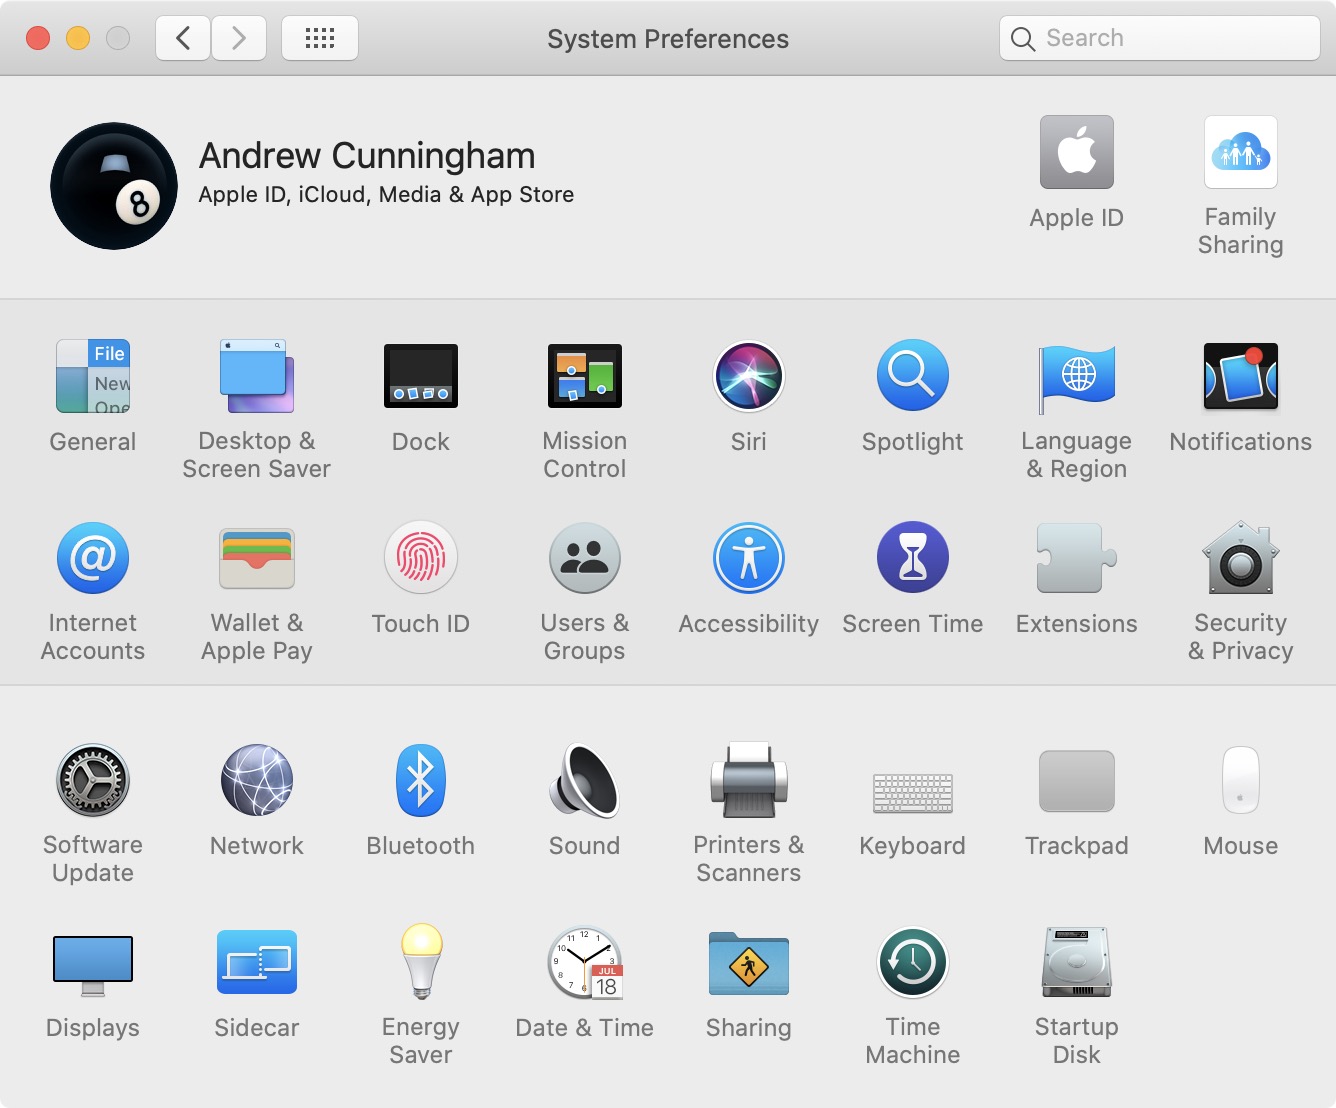
The rearranged System Preferences in Catalina. Credit: Andrew Cunningham
There’s not really anything in the new Apple ID pane that you couldn’t already see in the Mojave version of the iCloud pane, but it shows you all of your information with a fraction of the clicking—your iCloud settings and storage usage are still visible at the top level, and your list of signed-in devices is now immediately visible, too. Managing the rest of your account information is no longer in a separate tabbed menu but in several categories in the main preference pane. The new layout isn’t identical to the way that iCloud settings are presented in iOS, but it’s much closer than it was before.
The new iCloud settings. Andrew Cunningham
The Family Sharing preference pane is new, at least in the sense that it used to be a buried “Manage Family” button amongst the rest of the iCloud settings and is now a top-level menu item. From here, you can add, remove, and edit the details of individual family members’ accounts, as well as view and manage purchases and subscriptions, use location sharing, view shared Screen Time data, and set limits for your kids’ device usage.
Navigating most of the iCloud-related menus still feels slower than using the other preference panes, presumably because your Mac is actively reaching out to Apple’s servers to grab information in real-time rather than preloading anything. But the new layout should save clicks and make things easier to find, and it’ll be more familiar to people already accustomed to iOS or iPadOS.
Most of the other preference panes will look familiar; they’ve just been shuffled around. The middle section of System Preferences is populated primarily by preference panes that change settings related to the specific account that is currently logged in—though there are exceptions, like the system-wide user management in Users & Groups and FileVault and firewall settings in Security & Privacy. And the bottom section is mostly dedicated to hardware settings for networking, displays, printers, and audio devices as well as some system-wide settings for sharing, software updates, and Time Machine backups. These aren’t hard-and-fast distinctions—even with four separate icon groups instead of three, there was plenty of overlap. But it’s generally how things are organized now.
A few icons have been tweaked; the monitor icon for the Displays preference pane looks more like a Pro Display XDR than an old Apple Thunderbolt Display, with a slimmer bezel and a more squared-off, presumably $1,000 monitor stand. The Users & Groups preference pane gets a circular icon so that it matches better with the other predominantly circular System Preferences icons. And the Notifications icon is now a bit less abstract, showing what looks like a dock icon with a red notification badge rather than a blank gray square.
You might notice that one preference pane is missing entirely from Catalina: the Parental Controls pane from older versions of macOS is totally gone, replaced by Screen Time (or, at least, if you search for Parental Controls from the System Preferences search bar, Screen Time is the only thing that gets highlighted). If you have accounts with Parental Controls enabled, the Catalina upgrade completely removes those settings, leaving you with standard non-administrator accounts rather than managed accounts. Before you upgrade any Mac where you depend on managed local accounts, check to make sure Screen Time can do what you need it to do first.
Screen Time
Screen Time on the Mac is almost an exact replica of the feature Apple added to iOS 12 last year, just with a tweaked Mac user interface. If you’ve used it there, you know more or less what to expect. And if you were previously using the Mac’s Parental Controls to manage your kids’ computer usage, you’ll need to get used to Screen Time, since the old Parental Controls have been removed in favor of Screen Time’s app and usage limiting tools.
Screen Time functions both as a reporting tool and a limiting tool; by default when it’s on, all it does is passively track how much you’re using your devices, what apps you’re running, and how many notifications you’re getting. Like the iOS version, the macOS version can display usage information from other devices signed in to the same iCloud account, though this is disabled by default. But if you’re trying to impose limits on your own application usage or trying to limit someone else’s, Screen Time provides time limits for individual apps and categories of apps as well as controls for limiting purchases from Apple’s media stores and the kinds of websites that can be accessed.
The Mac’s app usage timing feels less flexible and less useful because the operating system doesn’t seem to be able to tell the difference between an app that is running and has focus and one that is simply open, somewhere. I’m not always using Messages or Mail or Slack when I’m using my Mac, but I do almost always have them open, so pretty consistently my browser and the apps I always have open (including the Finder) are all listed as running for the exact same amount of time. This is true even if the app’s windows are all minimized to the dock, or if the app is running but has no windows open. If you’re using Screen Time on the Mac to limit application usage, I can imagine someone who is used to the iOS rules (the app only counts against your time when you’re actively using it) being confused as to why they’ve run out of time on an app they used for two minutes and then forgot to quit or didn’t quit properly.
In addition to managing your own settings, Screen Time can be used to manage app limits and other settings for any kids in your iCloud Family Sharing family—those accounts all show up under a drop-down menu in the Screen Time preference pane. Since Screen Time is intended to replace the old Parental Controls, it would be nice if you could also manage other local accounts on your Mac, instead of needing to do everything through iCloud. You could always sign in to your kid’s local account and manage Screen Time settings from there, but I could see it being an issue for kids who want to have a sense of privacy and parents who trust them enough to give it to them (I have only been a parent for two months and thinking about all of this is already making my head spin). In any event, this is an edge case, and most people are likely to be fine with handling everything via iCloud anyway.
Voice Control
Voice Control’s status icon. Andrew Cunningham
Of all the accessibility features in macOS, Voice Control is the most transformative. It’s sort of an extension of the existing voice dictation features in the operating system, but it’s considerably more powerful—users can now control the entire operating system completely hands-free, using only their voices.
I’ll say upfront that my intent here isn’t to evaluate how good this feature is, as I do not have a disability and don’t have much context for how well accessibility features actually work on this or any other platform. I do aim to tell you how the feature works, and I can tell you how well it worked with my reasonably clear, not-strongly-accented English. If you do want to read a bit more about how the feature works as told by those who need it, Steven Aquino has an excellent piece at MacStories with a few different perspectives.
Setting up Voice Control is done in the Accessibility preference pane, under the “Motor” subheading. The first time you enable it, the operating system needs to do a small download before installing the feature. When it’s installed, a small overlay with a microphone icon appears in one corner of your primary display (it can be repositioned as you see fit) and floats above all of your windows; as you speak, what your Mac hears is displayed in small text above that overlay so you can see in real time whether your commands are being understood properly. The Sleep toggle will disable and enable the feature without turning it off.
Learning how to use Voice Control requires learning an extensive set of specific command words (click the Commands button to see them all), but you pick up the basics surprisingly quickly. Apple’s introduction video is actual a fairly typical (if idealized) example of how it can be used—to launch apps, dictate and correct text, and interact with apps. Mouse clicks can be simulated using either the “show numbers” command, which places a number next to every clickable element in an app and lets you specify a number to click on a thing, or the “show grid” command that lets you click anywhere on your screen. Sometimes, as when you right-click things or interact with the menu bar, Voice Control is smart enough to show numbers alongside each clickable element automatically so you can make a choice relatively quickly.
Just because full control of your computer via your voice is possible doesn’t mean the implementation is infallible. Even in a controlled demo with Apple, the mics built into your Mac are going to miss words or misunderstand them occasionally, and that will be especially true on older Macs without additional voice-canceling microphones. If you’ll be using Voice Control extensively, I’d probably recommend a high-quality headset to minimize errors. And I can’t account for how it works with a stronger accent, or in different languages, or if your speech is impaired (though Aquino writes that the feature worked fairly well even with a stutter). Adding new words via the Vocabulary menu in the Voice Control preferences can minimize errors for uncommon or easily misheard words that you use frequently.
Apps built using the Electron framework (like Slack, Spotify, and a bunch of others) are also problematic. While regular Mac apps don’t usually need to be updated for the “show numbers” command to work properly, as of this writing it’s not working in third-party browsers like Chrome or Firefox (Safari is fine). Because Electron is, at its heart, a wrapper for webpages rendered with the Chromium engine, the typical Electron app gives you almost nothing when you say “show numbers.” In Slack and Spotify, the only elements that were seen as clickable were the stoplight icons. Hopefully this is something that can be fixed as browsers and their engines are updated to take advantage of Catalina’s new features, but it’s not clear whether this will actually happen.
Voice Control is designed for those who are physically impaired—users that can’t or don’t want to use their hands for input via a keyboard and mouse or some version thereof—but who are fully sighted. So much of the way Voice Control works depends on you being able to see either small number icons or text badges or the status of a cursor and exactly where it is in a form field or a block of text. It’s the opposite of the VoiceOver screen reader, which helps with limited vision but assumes mostly unimpaired use of your arms and hands.
Apple indicated to me that Voice Control isn’t intended as an alternate input mechanism for non-disabled users (though I certainly found it useful in a pinch when I wanted to do something but one or both of my hands were full of baby). If you’re able to use a keyboard and mouse/trackpad or any facsimile thereof, they’ll still generally be faster and more accurate than using your voice. And Voice Control’s reliance on sight for most of its cues means that it’s not a great way to control your Mac from across a room, either.
Sidecar: Your iPad is a monitor now
Sidecar—the new feature that allows newer Macs to use iPads running iPadOS 13 as external displays—isn’t a new idea. Apps like Duet Display have made this sort of thing possible for years, and those apps don’t come with the hardware restrictions that Apple has placed on Sidecar. It’s a classic case of Sherlocking; Apple’s version might not do all the same things, but it does enough that most people aren’t going to need to pay for Duet Display anymore.
Sidecar doesn’t have to be new or innovative to be a good idea, and it’s convenient to have this feature built right into the operating system. And while you can use Sidecar as just a plain-old external display (albeit with restrictions, which we’ll cover in a minute), it can also be used to add touch controls, Touch Bar support, and Apple Pencil input to a Mac.
Compatibility
On the Mac end of the connection, Sidecar requires hardware support for HEVC/H.265 video encoding, since Sidecar operates not by sending a typical display signal to your iPad, but by sending a video stream over either Wi-Fi or a connected Lightning or USB-C cable. If you look at Activity Monitor, the process that seems to be handling the heavy lifting when Sidecar is active is actually “avconferenced,” the same process used for video streaming when you’re using FaceTime.
In Macs with an Apple T2 chip, HEVC encoding and decoding is one of the many things that chip can handle. In Macs without a T2, it’s handled by Intel’s Quick Sync video encoding engine, even on Macs with dedicated GPUs that can do their own HEVC encoding. Intel added HEVC support in the Skylake processor generation, which means Sidecar support is effectively limited to Macs built after late 2015 and 2016:
- MacBook (Early 2016 or newer)
- MacBook Air (2018 or newer)
- MacBook Pro (2016 or newer)
- Mac Mini (2018 or newer)
- 27-inch iMac (Late 2015 or newer)
- 21.5-inch iMac (2017 or newer)
- iMac Pro (2017)
Going with H.264 instead would have maximized compatibility, but since HEVC videos are about half as large as H.264 videos of similar quality, HEVC does make more sense if you’re trying to deliver low-latency video over a wireless connection.
On the iPad end, Apple tells me that Apple Pencil support is the limiting factor, not HEVC encoding or decoding. That means the 5th-generation iPad, which does support HEVC via the Apple A9 chip but doesn’t support the Apple Pencil, isn’t compatible with Sidecar. The iPad Air 2 and Mini 4 are excluded, too (early Catalina and iPadOS 13 betas did allow Sidecar on those tablets, but support was removed fairly early on).
A Sidecar display does appear to be a bit harder on your Mac’s GPU than a typical monitor, probably because it has to handle HEVC encoding on top of rendering the stuff on the screen. Below is a shot of the macOS GPU History monitor; the tall usage peak in the middle is when I quickly swiped between two full-screen apps on my iPad Air 3 connected via Lightning cable, and the smaller peaks on the left and right are when I performed an identical task on the internal display of a 2018 MacBook Air (the Air’s display is set to a higher resolution, too—2880×1800, compared to 2224×1668). Trying to do this without hardware HEVC acceleration would probably be a bad time.
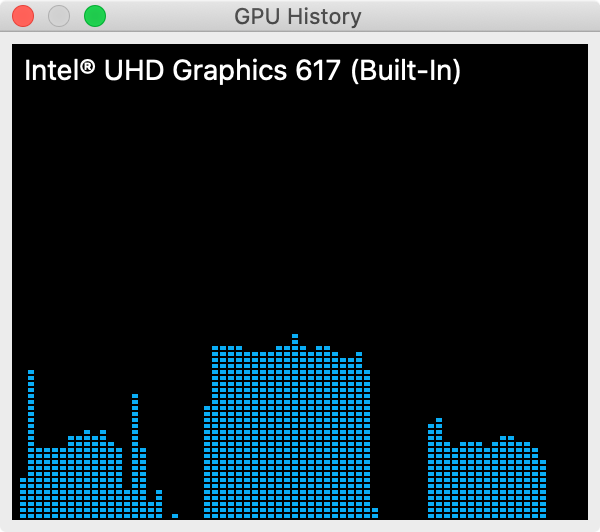
Because it’s also encoding an HEVC video stream, GPU activity on a Sidecar monitor is higher than on a regular monitor performing the same task, even if the regular monitor is set to a higher resolution.
Credit: Andrew Cunningham
Because it’s also encoding an HEVC video stream, GPU activity on a Sidecar monitor is higher than on a regular monitor performing the same task, even if the regular monitor is set to a higher resolution. Credit: Andrew Cunningham
Some Catalina beta users have had some success enabling Sidecar on unsupported Macs with Terminal commands, though it may not be possible in the final builds and doesn’t seem to work on all Macs in the first place (on my “old Mac” test system, a 2012 MacBook Air, the commands enabled the Sidecar preference pane after a restart, but I still couldn’t connect to anything). People with older Macs (or unsupported iPads) can continue using third-party software like Duet Display to enable similar functionality.
Using Sidecar
I tested Sidecar primarily on a 3rd-generation iPad Air and a 6th-generation iPad and a 2016 MacBook Pro, 2018 MacBook Air, and 2017 iMac. In all cases, I spent at least a little time testing the feature both wired and wirelessly.
Like Handoff and the Universal Clipboard and so many other features where an iDevice and a Mac talk to each other, Sidecar requires both of your devices to be signed in to the same Apple ID, even if you’ve connected your iPad to your Mac with a cable. This means multiple family members or coworkers can’t use a shared iPad for Sidecar unless their devices are using the same Apple ID. And because it uses the peer-to-peer Apple Wireless Direct Link (AWDL) to communicate rather than whatever Wi-Fi network you’re connected to, it requires your devices to have a reasonably good wireless connection. If the connection gets too weak, the iPad will show you an error message until you move back within range.
The Sidecar connection must be initiated from your Mac, either through the Sidecar preference pane in System Preferences, the AirPlay icon in the menu bar, or by sending an app window over to your iPad via the Window menu or by hovering over the green stoplight button—you can’t use it to connect to a Mac in another room or as a display for an otherwise headless Mac Mini. By default, your iPad will display a sidebar full of shortcuts and a Touch Bar strip across the left and bottom edges of the screen (respectively), but either or both bars can be repositioned or hidden from the preference pane if you’d prefer to maximize your screen space. The sidebar includes buttons for hiding and showing the menu bar and the dock, persistent keys for the Mac-specific control, option, and command keys as well as the Shift key and an undo button, a button that pulls up an iPhone-style software keyboard that can be moved anywhere you want it on the screen, and a button to disconnect from the Mac.

Move outside of the 20 or 30-foot range of Sidecar, and your connection may drop off until you move back into range. Credit: Andrew Cunningham
The Touch Bar works as it does on a Mac with a built-in Touch Bar, dynamically changing as you switch between tasks, though it only works for apps that are actually displayed on your iPad’s screen (and it doesn’t display the persistent system controls, like brightness and volume and media playback buttons, that you get on a built-in Touch Bar). The feature tends to assume that you’re working on a Mac with a built-in Touch Bar, even if you aren’t; The Touch Bar on your iPad’s screen won’t do anything if you’re working in a window on your Mac’s regular display; and trying to customize your pseudo-Touch Bar’s layout from within the Keyboards preference pane just doesn’t work. Even when you’re using your iPad as your main window, the customization controls show up on your Mac’s screen, and the normal behavior (where you click and drag buttons to the Touch Bar as though it was another, separate display) doesn’t do anything.
The sidebar and pseudo Touch Bar can be situationally useful if you’re actively holding the iPad as you use your Mac, like when you’re drawing with an Apple Pencil. But if you just want to use it as a regular external monitor, I always preferred to hide them and reclaim the extra screen space for apps.
Once you’re connected, your Mac treats the iPad pretty much the same way it treats any external display (though your Mac does know the difference between a Sidecar display and a real one; it shows up in System Information as a “virtual device”). It shows up in the Displays preference pane, and you can either choose to extend or mirror the displays, set either display as your main monitor, or tweak how your screens are arranged so that dragging windows and moving your mouse cursor between monitors works properly. There are a few limitations, though:
- Touch input doesn’t work as it does on iOS. You can’t, for example, click on things with your fingers, and you need to use two fingers if you want to scroll (though the new iPadOS gestures for things like copy, paste, undo, and redo all work). Outside of drawing apps, tapping the Apple Pencil works the same way as clicking and dragging with a mouse or touchpad; you can’t double-tap items to open them, but you can drag-and-drop files and images, or drag to highlight chunks of text.
- You can’t change your display’s scaling. Whether you want larger text or more desktop space, by default you’re stuck at normal 2x Retina scaling (so a 6th-gen iPad with a 2048×1536 display will always look like a sharper version of a 1024×768 display).
- Using Sidecar wirelessly, while it generally performs well enough for basic multitasking, can be a bit frame-y. It takes a lot longer to apply settings changes like hiding and showing the sidebar and Touch Bar.
- You can’t adjust color profiles.
- Your Mac’s sound can only come out of whatever speakers or headphones your Mac is connected to. You can’t use the iPad’s speakers or headphone jack to output Mac audio or the iPad’s microphone to record audio on your Mac.
Presumably because of the performance overhead of encoding multiple HEVC video streams at the same time, Sidecar can only work with a single iPad at a time. But that iPad doesn’t count toward the number of displays that your Mac’s GPU can drive at once (Intel’s GPUs are limited to three; AMD’s can drive up to six; Nvidia’s can handle four). A modern MacBook Air or Pro with an Intel GPU can drive its own external display, two external monitors, and a fourth Sidecar monitor at the same time.
Sidecar and iPad accessories
The Apple Pencil can be used as a pointing device in Sidecar, but drawing support may be its most appealing feature for artists who are already using Macs alongside drawing tablets from Wacom and other manufacturers. Any application that already supports drawing tablets should support Apple Pencil input via Sidecar. I primarily used Microsoft OneNote for testing, and Apple has shown Adobe apps like Photoshop and Illustrator in demos.
In OneNote, Apple Pencil tracking seemed pretty accurate, and the app respected the stylus’ pressure sensitivity just as iOS apps do. While the Pencil is definitely usable over a wireless connection in a pinch (or for quickly jotting something down), this is one case where you’ll definitely want to connect your iPad to your Mac with a cable for the best experience. When connected with a Lightning cable, I found that the tablet’s screen felt noticeably more responsive and a bit closer to the experience of drawing in a native iOS app.
If you use a keyboard with your iPad, whether it’s connected via Bluetooth or a Smart Connector, it functions as a normal Mac keyboard when you’re using Sidecar. The iPad keyboard can enter text into any active window, including the ones on your Mac’s native displays; the only difference is that function keys on the iPad’s keyboard (volume and media playback controls, Back and Home buttons, and so on) still control the iPad, not the Mac. So you can put text into any window you want, but if you’d like to adjust the Mac’s volume you’ve got to do it with a mouse or trackpad or with the keyboard connected to the Mac directly.
Catalyst: iPad apps come to the Mac
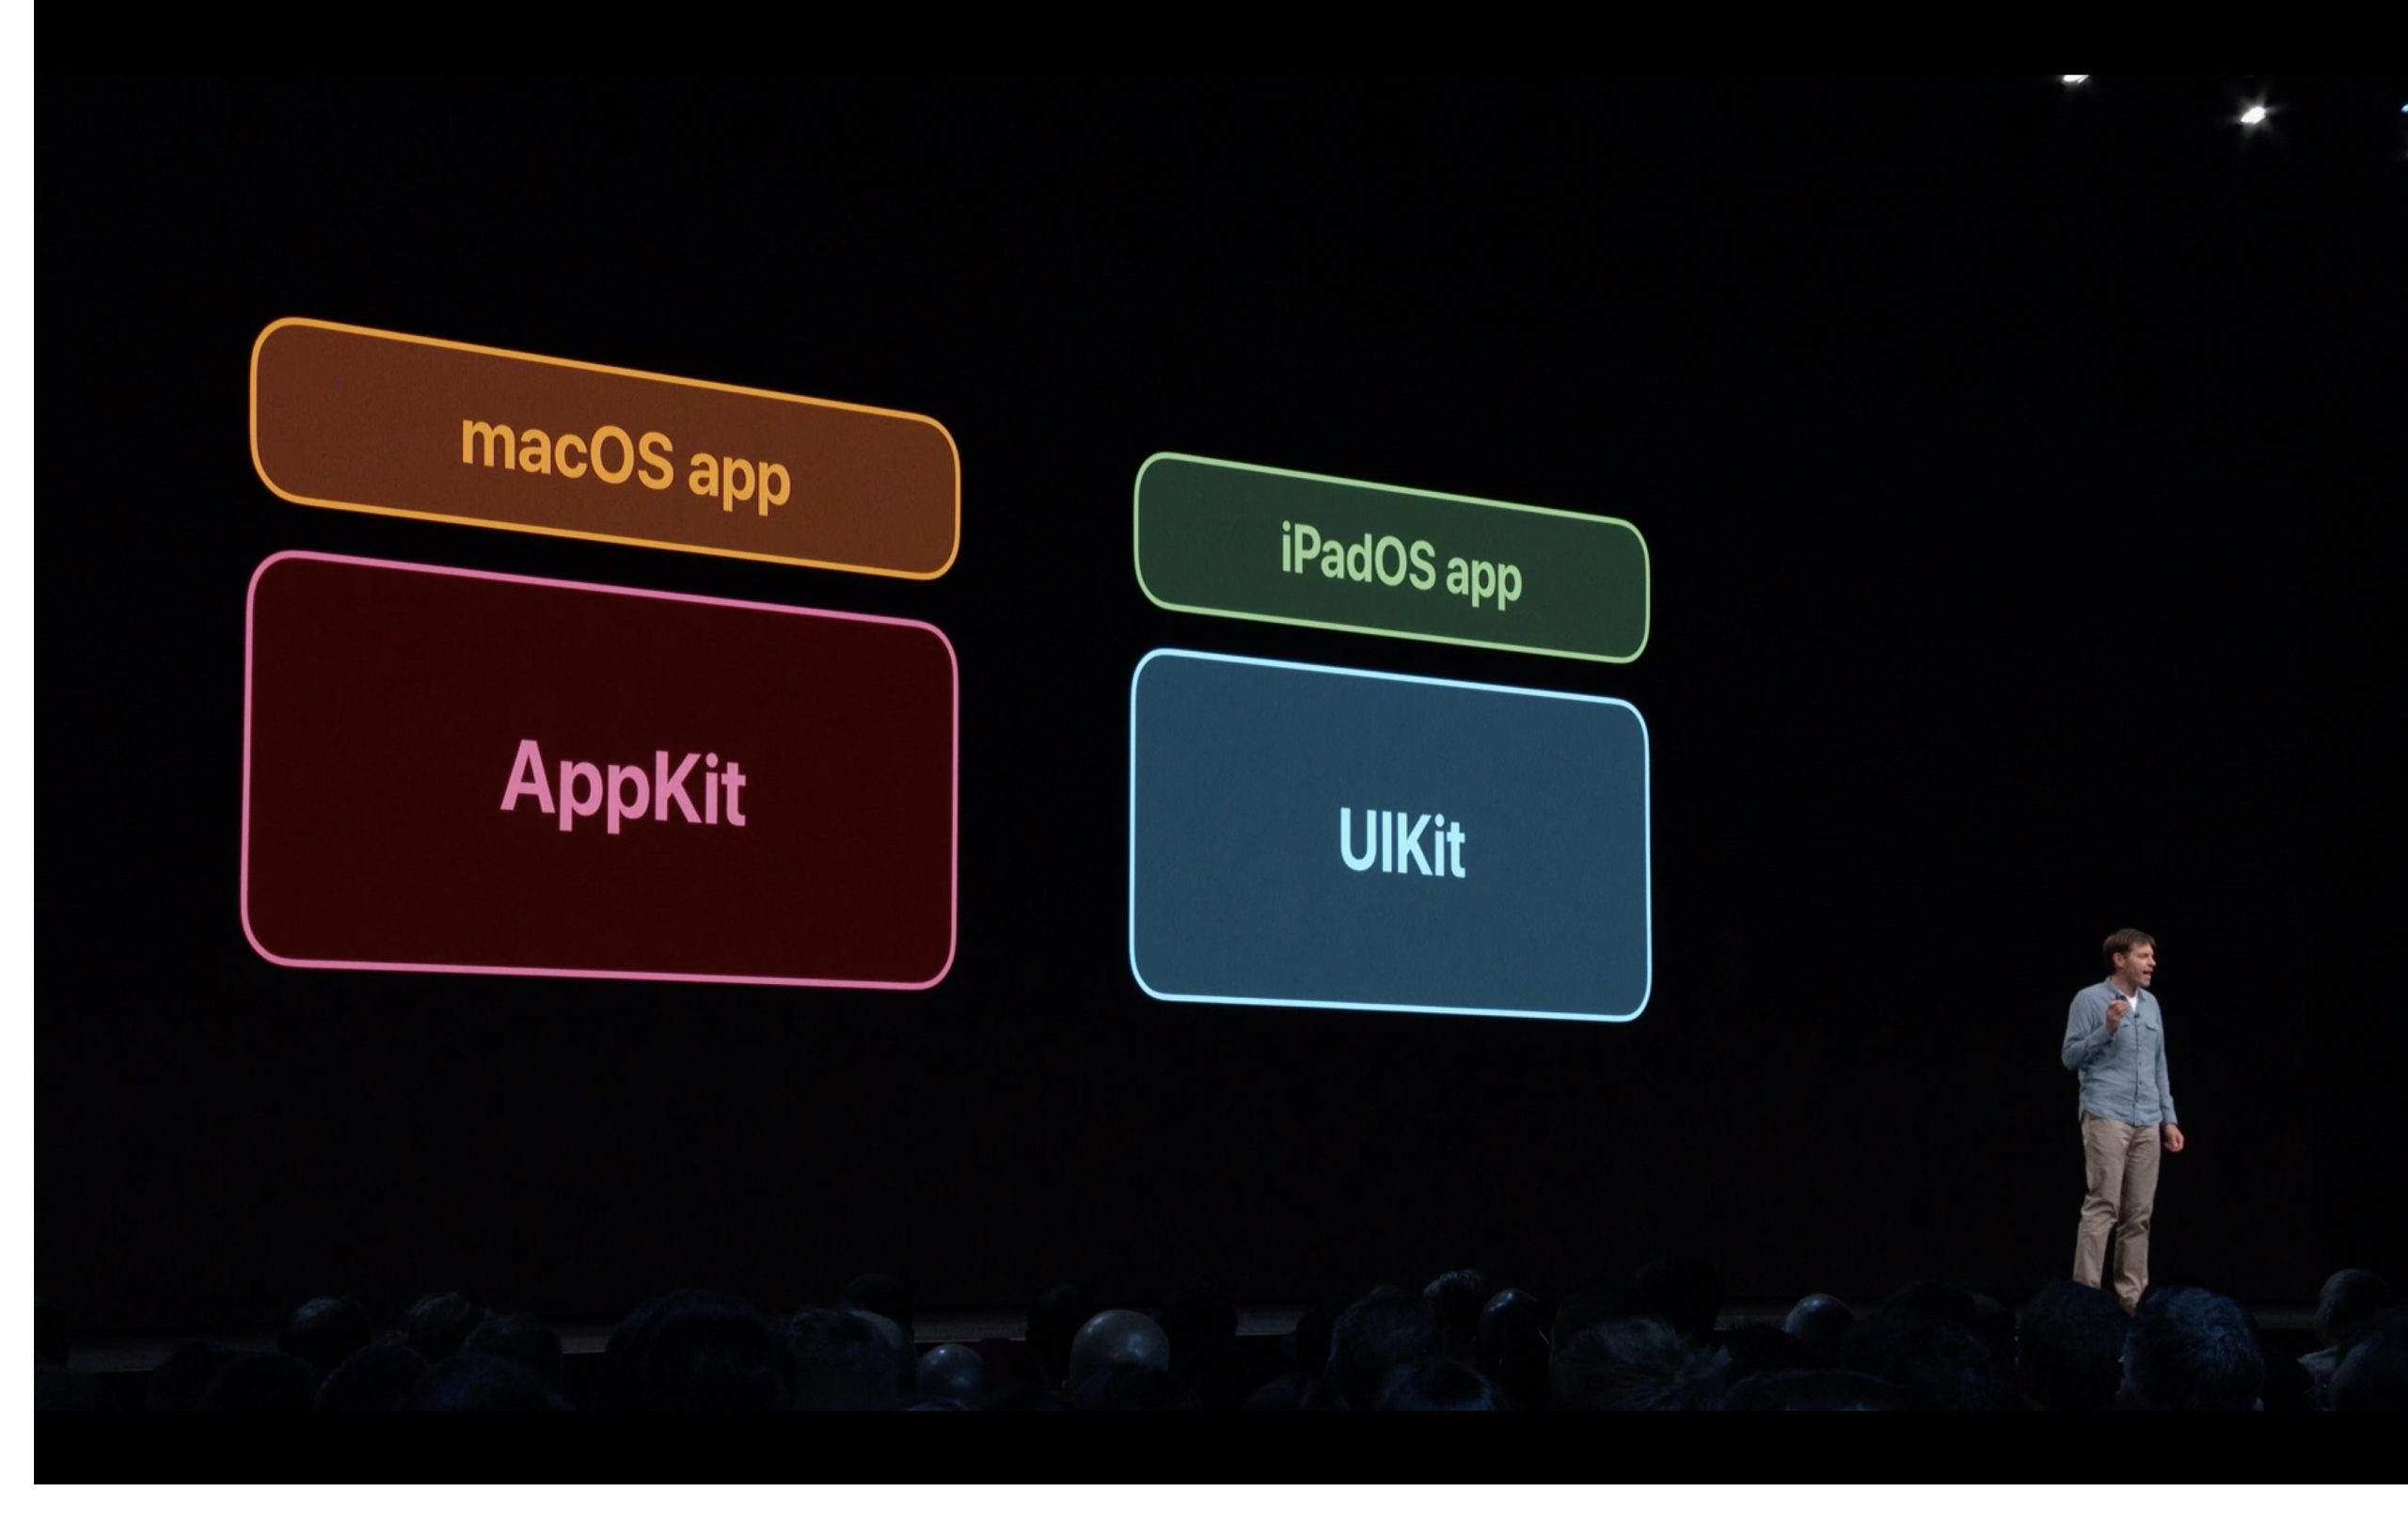
Apple talks about iPad apps on the Mac at WWDC 2019. Credit: Apple
“Catalyst” is the official, public name for the collection of technologies that will allow developers to port their iPadOS apps to the Mac (you may know it as “Marzipan,” which was widely reported as the internal codename for the project). We covered an earlier version of Catalyst in our Mojave review, since Apple previewed the technology by porting a small number of first-party iOS apps (News, Stocks, Voice Memos, and Home) to the Mac. We’ll cover the changes to those apps later—here, we’ll just focus on the changes to the foundational technology.
To recap, Catalyst works by mapping certain behaviors from UIKit, which is used to build iOS and iPadOS apps, to AppKit, which is used to build Mac apps. Using Catalyst, an app that already knows how to handle taps and swipes from a finger can in many circumstances automatically be adapted to handle clicking and scrolling from a trackpad. Apps can also take advantage of things like the menu bar and additional windows, things that are available on a Mac but not on iPads.
Note that Apple is specifically bringing iPad apps to the Mac, not iOS apps. If you’ve ever tried using most Android apps on a Chromebook (or a tablet, though Android tablets have been effectively dead for a while now), you know why you don’t want to run an app designed for a narrow, primarily vertical phone screen on a wide, primarily horizontal laptop screen. Modern iPad apps are, in theory, already designed to take advantage of landscape mode, and (if they support Split View) they’re already capable of dynamically adjusting how content is presented as you resize windows. You might still run into excessive whitespace and odd layouts if you’re using an iPad app full-screen on a 27-inch iMac, but on the vast majority of 13-inch laptop screens things won’t look bad.
Apple has done a bit of backend work in Catalina to make it more difficult to tell a UIKit app from an AppKit app. Launching the UIKit-based apps in Mojave spun up multiple processes in Activity Monitor, one “host” app and then the actual UIKit app that would be launched by the host app. Catalyst apps in Catalina just use a single process, which enables a slightly more seamless interaction between UIKit and AppKit code (developers can’t mix-and-match UIKit and AppKit, but apps can include separate AppKit bundles that do Mac-specific things that UIKit can’t handle). And Catalyst apps can continue running in the background once all their windows have been closed (though some apps still behave this way, going against decades of established Mac app behavior).
Most Catalyst apps still have clear tells, like the iOS-style dialog boxes and time picker in the Home app or the un-Mac-like pop-up menus in the Podcasts app. But Podcasts shows how the Catalina Catalyst apps can look and feel more like AppKit apps—the Music app is built on AppKit and Podcasts is built on UIKit, but at a glance the interfaces are really similar. As developer Steve Troughton-Smith notes, it can be “hard to tell the difference without disassembling” the apps to see what framework they’re actually using. Catalyst apps can even be distributed outside the Mac App Store, just like “real” Mac apps.
The downside to these improvements is that Catalyst apps will only run on Catalina—Apple isn’t backporting anything to Mojave or older versions of macOS. And It remains to be seen how forward and backward compatibility will work in future versions of macOS. Will Catalyst apps released today still work without modification in macOS 10.16, since it will presumably include iPadOS 14 features and its own modifications to the underlying Catalyst technology? Will Catalyst apps targeted toward macOS 10.16 be able to work on Catalina Macs? Per usual, Apple isn’t talking about its future plans that far in advance.
What developers are saying
Apple has talked up partnerships with established companies like Twitter and TripIt, who previewed their Catalyst apps at WWDC and spoke to Ars afterward to walk us through the process of porting an iPad app over to the Mac. For this review, I also spoke with multiple indie developers to try to get a better sense of how Catalyst was being received now that it had been available to play with for a few months.
If you’re a developer, whether you’re interested in Catalyst depends a lot on what apps you’ve already got. Developers with iPad apps who wanted to get an app on the Mac with relatively minimal effort are the main audience for Catalyst, and a bunch of apps in this vein should be available on or near day one. This includes apps like Twitter, TripIt, and GameLoft, and art apps like Vectornator, and productivity apps like Zoho Books, Post-It, and Good Notes. Developer Steve Troughton-Smith has a good Twitter thread of other independently developed Catalyst apps, too.
But Mac developers who already maintain AppKit apps are, by and large, happy to continue maintaining separate apps for the time being, and they are in no particular rush to unify their codebases. These developers are either staying away from Catalyst entirely (at least for the time being) or using it to experiment with smaller, simpler apps instead.
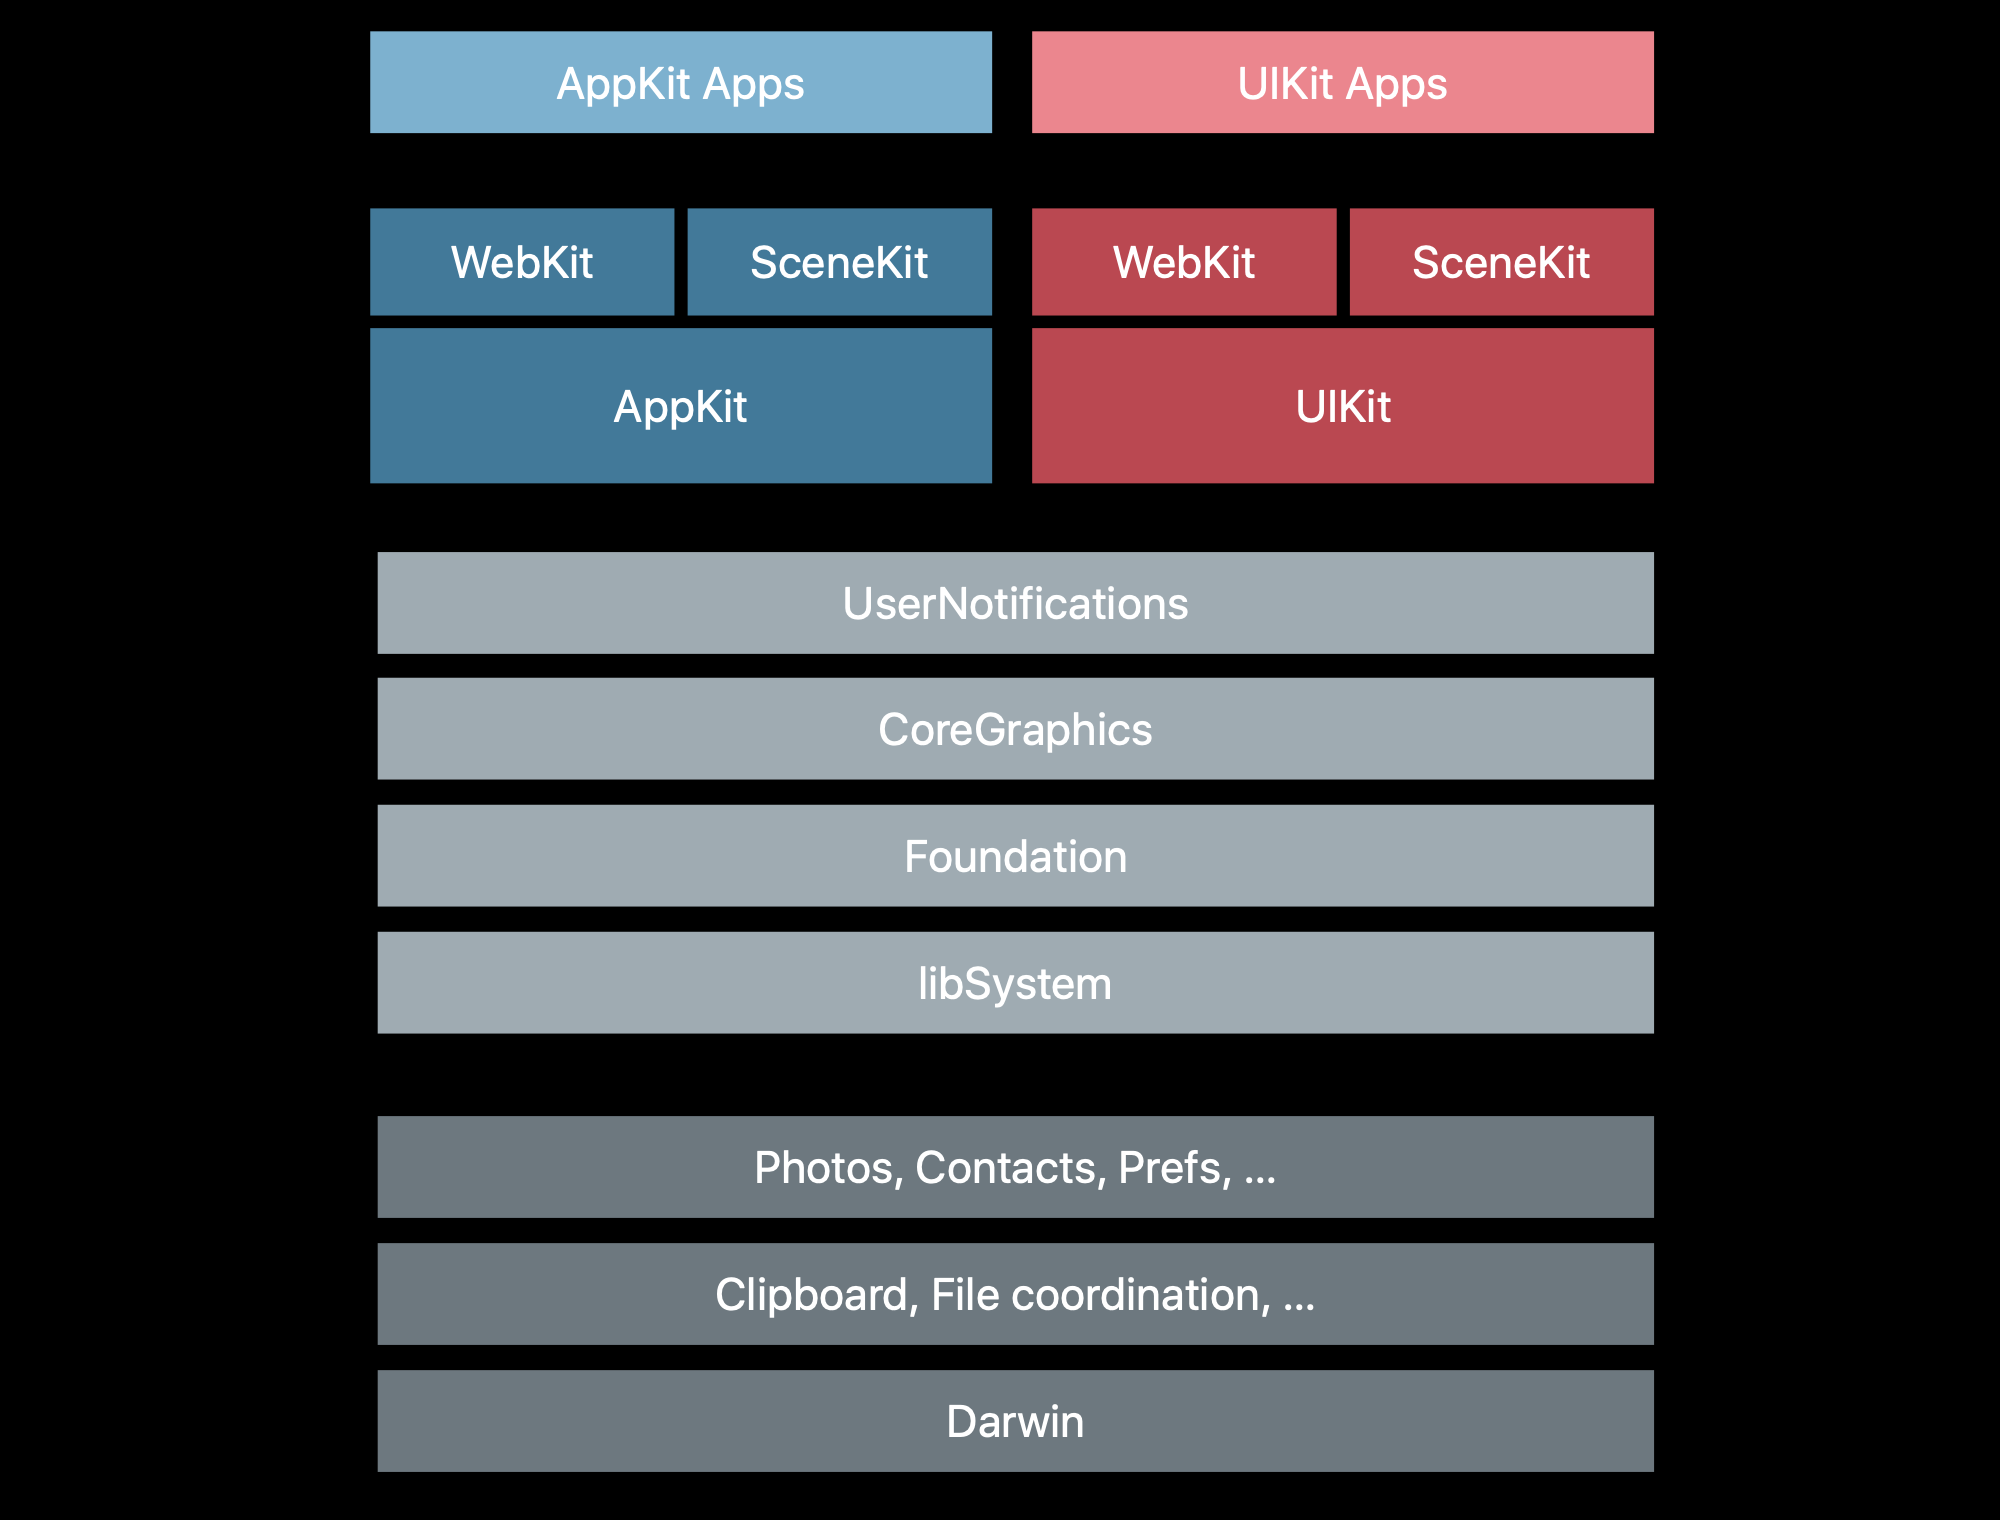
Catalyst lets iPadOS apps developed with UIKit run on the Mac alongside traditional Mac apps built using AppKit. Credit: Apple
Max Seelemann is the executive director of Ulysses, a Markdown-based text editor that currently offers similar-but-separate apps for the Mac, the iPad, and the iPhone. He said that while relatively simple iPad apps are pretty easy to translate, in most cases complex AppKit apps cannot easily be replaced by Catalyst versions.
“As long as an app has a lot of default components, default layout and default interactions on iPad, those will map well into default Mac behaviors and looks. As soon as an app starts to get complex and you customize things, Catalyst will likely become more of a roadblock,” Seelemann said. “There is a long list of gaps—it’s essentially everything that isn’t conceptually at home on iPad. Think of three-column split views, detachable popovers, the recently opened files menu, Time Machine file history browsing, etc. Some of these are doable with a lot of effort; some are just impossible without leaving the Catalyst APIs.”
James Thomson, developer of the cross-platform app PCalc, told me that he is planning to maintain the separate UIKit and AppKit versions of PCalc. But he is using Catalyst to port over a version of his smaller, previously-iOS-only 3D dice rolling app called Dice. He’s been generally impressed by the technology, and the developer points out that it has benefits even for iOS developers who don’t want to make Catalyst apps.
“They have done an awful lot to get it this far. A lot of the core code just works seamlessly,” Thomson said. “For example, one thing that has been difficult up until Catalina, is that 3D graphics haven’t been well supported in the simulator. So if you use Metal, or the advanced features of SceneKit, they haven’t worked. Which made development somewhat harder, because you always had to run your code on a real device. Now, not only is Metal supported in Catalyst apps, but it’s also available in the simulator. Which will make my day-to-day development work easier.”
Game developers don’t seem particularly interested in Catalyst at this point, though it’s certainly possible to port iOS games over to macOS using the technology (a couple months back, we spoke to developers at Gameloft Barcelona about Asphalt 9: Legends, one of the early Catalyst apps that Apple showed off at WWDC). Multiple developers indicated to me that middleware engines like Unreal and Unity already make it relatively easy to get games running across different platforms.
“Engines do most of the heavy lifting for cross-platform work already,” said Peter Curry, one of the cofounders of Mini Motorways and Mini Metro developer Dinosaur Polo Club. “A lot of what Catalyst does for developers (converting native UIKit views from iPadOS to macOS equivalents) aren’t useful for games as they don’t tend to use the native UI toolkits.”
Another possible Catalyst roadblock might currently be Apple’s documentation on the feature—namely, that there isn’t a whole lot of it. PCalc’s Thomson cited a few specific examples, echoing concerns I had seen among developers on Twitter.
“I think a lot of documentation effort has gone on things like SwiftUI, and not on Catalyst. A lot of the new Catalyst-only APIs, like the menu support, don’t really have any documentation at all,” Thomson said. “It’s not always difficult to work out, but with some things like how the new multiple-window API from the iPad translates to the Mac, I’ve run into problems where I don’t know if I’m hitting bugs, or I’m just doing it wrong. There’s very little discussion on the Apple developer forums or on the likes of Stack Overflow. Some developers have been discussing things on Twitter, and swapping tips there, and that’s been the best source of information. It does feel a bit like we’re treading unexplored ground.”
SwiftUI (or, the future of cross-platform apps)
If Apple has devoted more time to documenting SwiftUI than Catalyst, it’s because SwiftUI is probably going to be the more impactful technology for most developers going forward.
SwiftUI isn’t a complete replacement for AppKit or UIKit (or the tvOS version of UIKit, or the Apple Watch’s WatchKit). But it will give developers a way to write code one time and have that code displayed differently in different operating systems based on what looks and works best on each. A chunk of code that generates a drop-down menu or a radio bubble on macOS might generate a scrollable picker in iOS or iPadOS; a list of options in an iOS app might be transformed into a strip of Touch Bar controls on a Mac. With SwiftUI, developers can write platform-specific code on top of that connective tissue, optimizing their apps for each operating system’s strengths and weaknesses.
Seelemann believes that Catalyst is “transitional” technology and that SwiftUI is more forward-looking and flexible.
“SwiftUI’s big benefit over Catalyst is its composability,” he told Ars. “You can write the parts of an app that are identical between platforms in SwiftUI and then combine it with native elements where necessary. While with Catalyst one API designed for touch and mobile has to cover all cases even of a desktop interface, SwiftUI allows you to pick what’s best for each area.”
Apple pointedly doesn’t say that developers should just write one app that looks and acts the same across all operating systems, just like making a good Catalyst app requires more work than just checking a box in Xcode. And developers can adopt SwiftUI code alongside UIKit and AppKit code, just as they can add chunks of Swift code to an existing Objective-C app.
“While Catalyst is all-or-nothing, SwiftUI can be added gradually to existing Mac and iOS apps,” Seelemann said. “This will allow us to be more efficient and faster when adding new features beginning as soon as next fall.”
But the Swift example is instructive. SwiftUI is brand-new, which means that it’s not going to be capable of everything that AppKit and UIKit can do, and Apple is likely to make substantial changes every year for at least a few years. That means that, though developers do seem interested in SwiftUI and willing to try it out for new projects, most of them probably won’t go all-in on it until it’s more predictable.
“SwiftUI is younger than Catalyst as technology, and I expect possibly more updates for it next year,” said Danilo Bonardi, a developer at Shiny Frog who works on the cross-platform Bear text editor. “I can see it adopted as the way to go for the iOS development in 1 or 2 years, but Bear comes with a considerable UI codebase, and I don’t see us migrating to SwiftUI soon.”
This sense of caution leaves room for Catalyst’s melding of AppKit and UIKit to serve developers who want to get their iPad apps on the Mac, while at the same time giving developers with existing AppKit apps a reason to wait before overhauling their codebases.
All of this is to say, we are moving slowly toward a future where iOS, iPadOS, and macOS can all run a lot of the same apps, which will hopefully be to each platform’s benefit. But it’s going to be a slow, multi-step, multi-year process, and developers have a lot of reasons to wait and see how Apple’s various tools mature as the company responds to developer feedback. The Mac and the iPad are not going to reach application parity overnight.
iTunes no more: Music, Podcasts, and TV
There’s nothing Apple makes that people enjoy complaining about as much as iTunes (though the butterfly keyboard might come close). Most of that griping is well-earned. Over the years, iTunes has gone from local music player, MP3 store, and iPod-syncer to a gigantic, shambling piece of software that also handles Apple Music streaming, video and podcast downloads, iPhone and iPad updates and software management, and tons more. It’s impressive, in the sense that it has continued to add new stuff while still supporting the same basic local MP3 player/music store/iPod management that iTunes has handled for close to two decades. But it makes for an unwieldy piece of software, and it’s telling that iTunes’ core functionality is split up between five or six different apps on an iPhone or iPad, since Apple had the opportunity to rebuild everything from scratch for mobile.
Catalina splits iTunes’ core features out into four apps—Music, Podcasts, and TV handle the media stuff, while the Finder takes over management, system restores, and backups of iPods, iPhones, and other devices. Apple says iTunes will continue to exist as it currently is on Windows, and presumably the iTunes versions on older-but-still-supported macOS releases will continue to receive updates to fix security holes and keep them compatible with Apple’s media stores and streaming libraries. Apple has published a support document detailing the transition from iTunes to all these separate apps, but we’ll cover the basics here (with an emphasis on people who have been using iTunes for a long time to handle all their media, not just people who use it as a streaming client for Apple Music).
Music
Apple Music looks and works largely like it did before. Andrew Cunningham
Music is the app that comes the closest to being as complex and overloaded as iTunes was, and it actually does appear to be an AppKit app based on the same codebase as iTunes (the icon is near-identical, too, though it trades its colorful outer ring for a soft white gradient). Music still pulls triple duty as a local music library manager and CD ripper, a music store where you pay once for music files and music videos that you can then download forever (still called the “iTunes Store,” one of the few places where the old name appears to survive), and a client app for the a la carte Apple Music streaming service. It benefits from shedding the features it does lose, but there’s still a lot going on here.
Music puts Apple Music front-and-center rather than tacking it on to a manager for a local media library—the first time you open it, you’ll be asked to subscribe to Apple Music if you haven’t already, same as in Music on iOS. By default, Catalina doesn’t even offer access to the iTunes Store in the app’s sidebar, regardless of whether you’re using a fresh install or a library imported over from the Mojave version of iTunes. Head to Preferences and check the box to restore the iTunes Store and its familiar interface, including ads for new releases, curated lists, and charts.
The good news for anyone with an extensive, carefully curated iTunes library is that you’d be hard-pressed to identify any longstanding iTunes features that Apple has actually removed. Everything in the library I tested with survived an upgrade install from Mojave to Catalina, including all your metadata, old playlists, synced iCloud Music Library files, and even both versions of the old iTunes visualizer (if you spent any time in a college dorm in the early-to-mid 2000s, you are definitely familiar with the classic visualizer).
Some of those features are admittedly a bit buried, though. For example, Catalina still includes everything you need to enable classic iTunes library sharing, but it’s not available in the Music app’s preferences. Enabling library sharing is now handled from the new “Media Sharing” section in the Sharing preference pane of System Preferences. And accessing shared libraries is now hidden behind a drop-down menu, accessible by clicking the small arrow next to “Library” in the Music app’s sidebar.
Once you’ve found where everything is, though, there’s surprisingly little to say about the Music app, because the local library features and the Apple Music features all work just as they did before. Apple Music is more strongly emphasized than ever, but that shouldn’t surprise anyone—streaming is just the way that most people listen to most of their music now. But the fact that all of these other features, even the moved and hidden ones, survived the Great iTunes Divorce Proceeding of 2019 indicates that Apple wants to keep longtime iTunes users’ libraries intact. Upgrading your operating system, at least for now, doesn’t need to totally upend your listening habits.
Behind the scenes, the way your music library is stored has changed a bit. iTunes used a few different files to keep track of all your stuff; the main iTunes Library.itl file kept track of play counts, star ratings, and other stuff external to song metadata; album artwork and your actual songs were both kept in their own folders; and a couple of .itdb database files kept track of Genius playlists and “extras.”
Music sticks most of the non-music-file data into a single Music Library package, which contains those .itdb files plus a bunch of files with a new “.musicdb” extension to keep track of library data and other preferences. If you upgrade your iTunes library, your media is still stored in a folder labeled “iTunes.” If you import songs into a new library on a fresh Catalina install, they’re imported into a Media folder with the same file structure as the old iTunes folder. None of this really affects the way your library looks or plays in the Music app itself—it’s just a sign that Apple is rethinking the way your music is stored in addition to breaking iTunes up into separate apps.
Some apps that relied on the old iTunes library format may be broken until developers can issue fixes for Catalina; many DJ apps, for example, could read iTunes’ XML-based library files but can’t be used with Catalina’s Music app without updating. As always, check your important apps and make sure they officially support Catalina before updating.
Podcasts
Podcasts is a UIKit app, making it less a direct descendant of iTunes and more a Catalyst port of the existing Podcasts app on the iPad. Like the other first-party Catalyst apps, the Mac Podcasts app is laid out in the same basic way as the iPad app—the Listen Now page shows new episodes of podcasts you’ve subscribed to, the Library page shows all the shows you subscribe to and gives you a few different sorts options for them, and the Browse section is a combination of curated lists as well as popular shows.
But the app has been tweaked to make it more Mac-like, and visually it still intentionally evokes the iTunes interface. The playback controls and progress bar are situated at the top of the window and not the bottom, and a persistent sidebar (and always-present search bar) exposes all of your navigation options at once rather than hiding them behind multiple taps as the iPad app does.
Downloaded podcast episodes no longer appear in your iTunes library folder but in a more hidden cached folder at ~/Library/Group Containers/243LU875E5.groups.com.apple.podcasts/Library/Cache with an abstracted name that will prevent the file from showing up in a Spotlight search.
TV
If you’ve bought movies and TV shows through iTunes, the TV app is where you’ll go to find them. If you’ve seen this app on an iPhone, iPad, or Apple TV, you know what to expect here, though the version you get in macOS is inferior to the one on Apple TV and iDevices—not because the interface has changed, but because the way it pulls from third-party sources is different. The Mac’s version of the app has more in common with the version that Apple will be releasing for third-party hardware like the Fire TV, Roku, and other smart TVs than with the iOS and tvOS version of the app.
On the Apple TV or an iDevice, the TV app can see any compatible streaming app you have installed (HBO Now, PBS Kids, Hulu, and a host of others), and it will offer content available through those services. The Mac app offers a more limited subset of “Apple TV channels,” which include “HBO, Showtime, Starz, and more.” These channels, which offer subscriptions through the TV app, don’t require additional apps or logins, and (aside from some logo placement) they blend in with Apple’s iTunes Store offerings (and, soon enough, the original programming that Apple’s ludicrously large pile of cash is paying for).
Episodes from these channels can even be downloaded for offline viewing, the same as episodes you’ve paid for individually in the iTunes Store. All episodes are downloaded to your Movies folder as MP4-encoded HLS video files delivered in a bundle with a .movpkg extension. This bundle contains hundreds of tiny video files—normally you’d stream these from a server somewhere, downloading them in real-time as you watch the video. The .movpkg format just allows you to “stream” them locally, without a connection. The file can be played by the TV app itself but not by QuickTime; third-party players may be able to play parts of the video but not the important DRM-protected bits. For example, VLC could play the opening HBO advertisement from a Game of Thrones episode I downloaded, but it would freeze up before playing the episode itself. This is more or less how Apple handles DRM and offline playback for things downloaded from Apple Music.
Offline downloads are definitely a value-add for the TV app, since many of these providers’ own apps don’t allow it. The downside is, these channels work only in Apple’s TV app. If you have an existing HBO Now subscription, even if it’s already through iTunes, this won’t buy you access to HBO shows through this version of the TV app. (If you subscribe to both simultaneously, the Apple TV version is described as “HBO on Apple TV.”) And unlike subscriptions to other services purchased through Apple, you don’t have a login that will work in those providers’ own apps. Pay for HBO through the TV app, and you can only view HBO shows on other platforms with an Apple TV app, not any platform where HBO offers an HBO Now app.
This means that if you’ve got an existing Apple TV that’s set up with all of these services and you want to switch over to using Apple TV channels so you can watch stuff on the Mac or on that subset of third-party devices, you’ll need to unsubscribe and then re-subscribe through the TV app. That Apple doesn’t offer an easier, more automated way to do this, and that it’s not even immediately clear that this is what is happening unless you do some digging and try it yourself, makes for an uncharacteristically rough and annoying experience. I’m sure it has something to do with limitations imposed by content providers—the ability to offer downloads seems likely to come with distribution restrictions. But it seems engineered to tempt people to switch from using independent subscriptions (which Apple may or may not receive a cut of) to using subscriptions bought exclusively through Apple (which the company does receive a share of).
Long story short, I’m sure the TV app on the Mac will be a fine client for Apple’s own TV service, and it’s a decent portal to the video arm of the iTunes Store. But as a client for third-party streaming services—even compared to the versions of the same app on Apple’s other platforms—it falls short.
Syncing with Finder
At this point, most people have probably stopped connecting their iPhones and iPads to a computer running iTunes to install software updates or sync media or data (at this point, it’s weird to even think about needing to plug a new phone or tablet into a computer before you could start using it). But Internet-free iPods still exist. Devices still fail, putting them into recovery mode. Local backups are still useful if you don’t want to pay for extra iCloud space, or if you don’t want your device backups on Apple’s servers. People with local media libraries may still want to manage them manually, to give them some sense of control in a world that resists all efforts to impose order upon it. For all of those people, the Finder adopts most of the device management and syncing features that used to live in iTunes.
The Finder is a whole lot less annoying about it, which is nice—plugging an iPhone into a Mac would automatically launch iTunes, even if all you wanted to do was charge your phone, but a Catalina Mac treats an attached iPhone a bit more like a USB drive. It shows up in the Finder sidebar and in a few other apps, but it doesn’t automatically launch anything anymore (aside from the typical “trust this device” prompts you need to click through to confirm that you do in fact want your Mac to be able to talk to the phone in the first place).
The main device info screen in the Finder looks mostly like the same screen looked in iTunes, giving you information about the device, what software it’s running, how much storage is available, and what’s using that storage. You can update, restore, and backup the device with a few clicks, much like you could before. Tabs are available for each kind of file that can be stored on your phone, condensing screens that were still separate in iTunes under Mojave—your sync settings and all the files available for syncing live in the same tab now. iDevices still show up in the sidebars of the Music and TV apps but only to show you what media you’ve already synced to your phone. Clicking the Sync Settings button in either app just kicks you back to the Finder.
As with iTunes, Apple has made an admirable effort not to get rid of old functionality. Older, pre-iOS 13 iPhones and even old iPods can still be updated, wiped, and managed with Finder, just as they could in iTunes.
Other apps: Find My
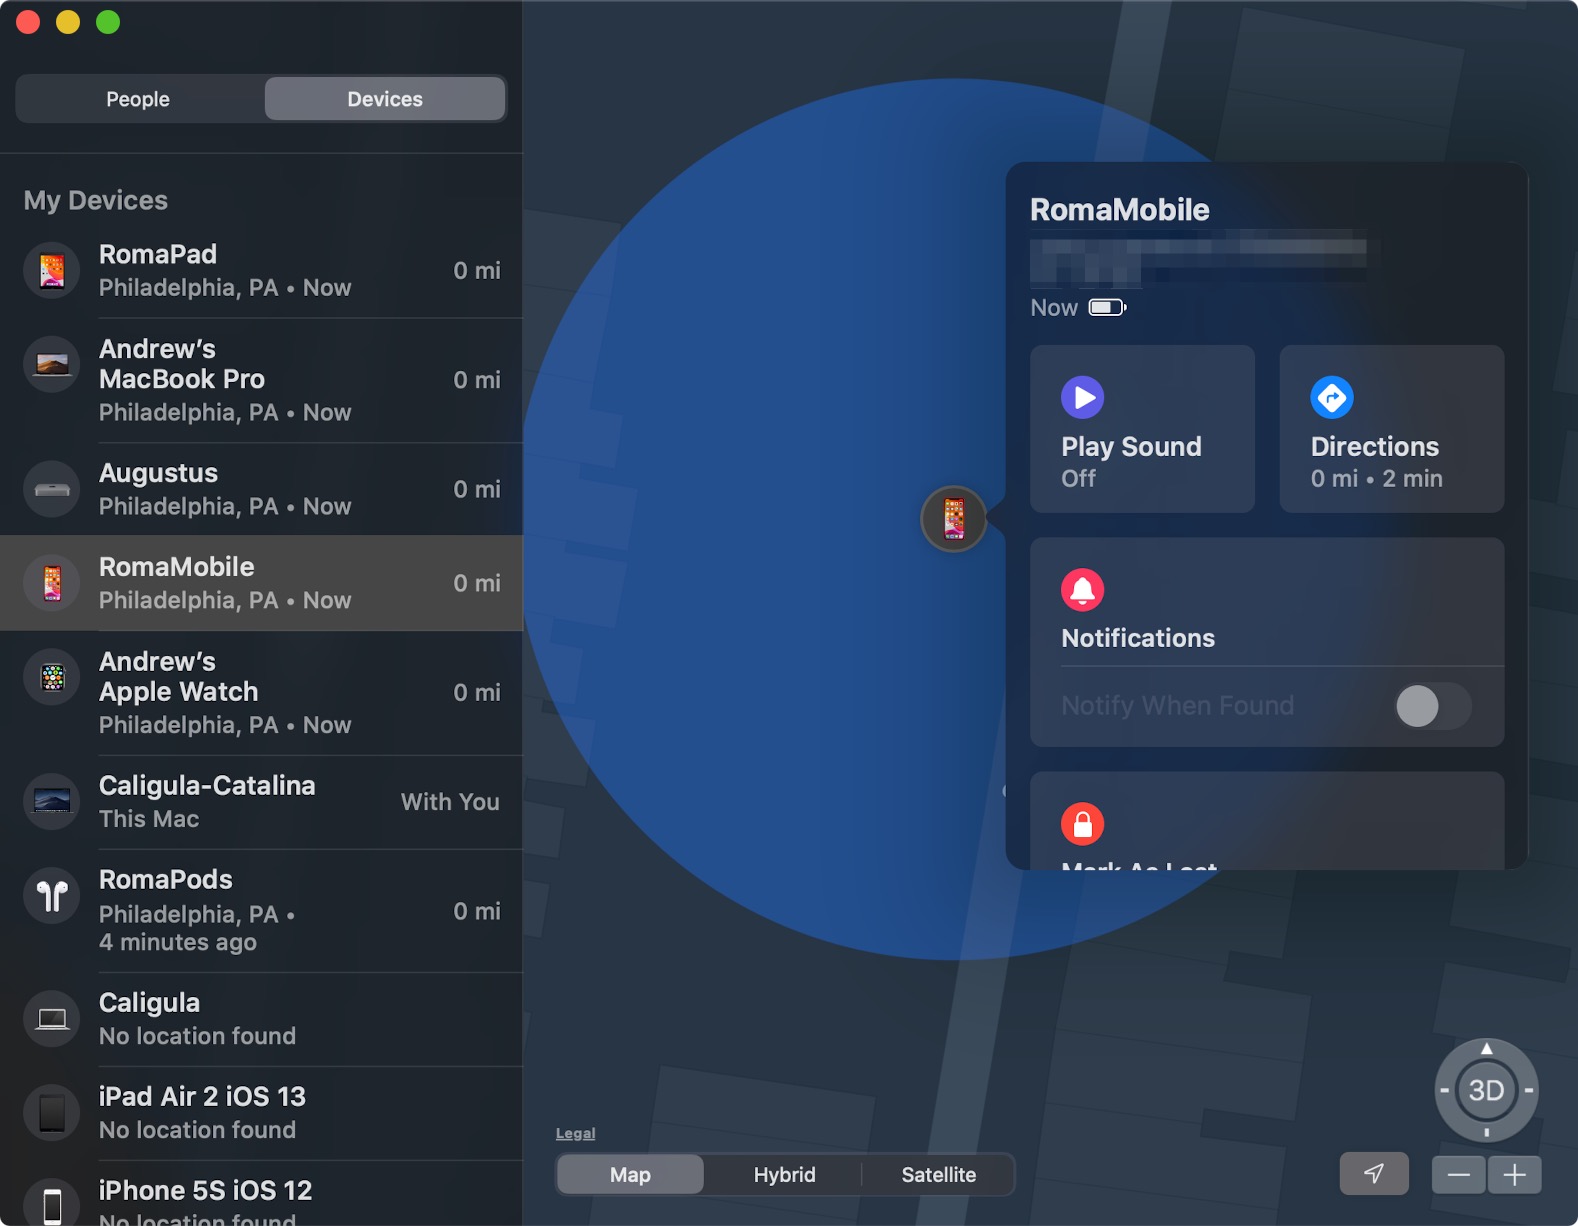
Find My is one of Catalina’s new first-party Catalyst apps. It combines the functionality of the old iOS Find My Friends app with the Find My iPhone app, with a more Mac-like sidebar and pop-over menus. Credit: Andrew Cunningham
Find My is one of the Mac’s new first-party Catalyst apps, and it’s a lot like the version of the same app that comes in iPadOS 13. Like its iPad and iPhone counterpart, the Mac Find My app combines the person-tracking features of the old Find My Friends app with the device-tracking features of the Find My iPhone app.
When you’re viewing your friends’ locations, Find My shows you where they (or the iDevice they share their location from) were and when their device was seen last. You can share your own location with other people, but unlike in the iPhone and iPad versions of the app, you can’t share your location from your Mac. Your position in Find My still needs to be determined by an iDevice, presumably because they’re designed to be connected to something all the time, and your Mac is more likely to be disconnected if you’re traveling with it.
Finding devices works exactly as it does in iOS or iPadOS—the Find My app will show you the last known location of any device you or one of your family members has signed into and what its last-known battery status was. You can play a sound to locate a lost device, get directions to a device’s location, enable notifications to let you know when a missing device comes back online, and mark devices as lost to lock and wipe them remotely if they ever come back online.
In both People and Devices modes, Find My uses Apple Maps to show you where everything is, so you see all the same locations labeled in the same ways. And you’ve got the same view options, too—the default Map view, the realistic Satellite view, and the in-between Hybrid view. The default top-down view can also be toggled to 3D mode to show a rough approximation of the landscape, in areas where that feature is available.
Aside from the inability to share your Mac’s location, the Find My app in macOS showcases some of the things Apple is doing to make Catalyst apps feel a bit more Mac-like. The Mac version of the app has a persistent sidebar that always spans the left edge of the window, where the iPad version has a floating menu that expands and contracts as you interact with it. And when you click on a person or device, extra information pops up in a separate pane without changing the information available in a sidebar, an acknowledgement that most Macs will have more screen space to work with than most iPads.
Reminders
The new Reminders app has a few smart lists that gather reminders from all your lists based on timing and priority. Andrew Cunningham
Reminders is the rare app to get a substantial redesign for Catalina instead of just being tweaked—the update is big enough that you even need to upgrade your reminders to be compatible with the new app. If you’ve installed iOS 13 and/or iPadOS 13 on your devices already, you may have unexpectedly upgraded your reminders, breaking compatibility with your Mac in the process (as well as any devices on older versions of iOS, iPadOS, or macOS).
The very first Mac version of the Reminders app was designed to resemble a notepad or day planner, and the version in Mojave was mostly a flattened version that removed the visual skeuomorphism without really rethinking the conceptual skeuomorphism (as was the case with many iOS 7 and Yosemite-era app redesigns). The Catalina version, like the iOS 13 version, includes a few automatically generated smart lists plus new buttons that make it easier to add dates, locations, and flags to all of your reminders. The old “individual lists full of items” format is still there, but the new format makes it easier to make common changes to reminders rather than hiding it all behind a right-click or the information button.
In addition to suggesting possible dates and locations as you’re typing a new reminder, the app will periodically make suggestions based on what you’re typing. Putting down “remind me at 9am,” for instance, prompts the app to ask you whether you mean 9am tomorrow and offers to set that date for you; type “remind me every week” and the app will offer to create a recurring reminder. Click the info button next to a reminder and you can associate it with a person in your contacts list so that the app shoots you a notification next time you’re communicating with that person in Messages—adding URLs and images to reminders is an option now, too.
Any iCloud lists of reminders can now be shared with other iCloud users using an interface similar to the one used for sharing Notes. The old app could share lists with other officially designated family members associated with your account, but that has been removed in the name of additional flexibility—sharing lists with your family members is now the same as sharing them with anyone else.
Reminders does still support lists from external accounts, even though the “Accounts” item in the menu is gone. External accounts benefit from the new styling and arrangement of buttons but otherwise don’t appear to be improved, downgraded, or otherwise impacted—all of the improvements above only apply to iCloud-based reminders, and reminders from third-party services are still pretty basic.
Photos
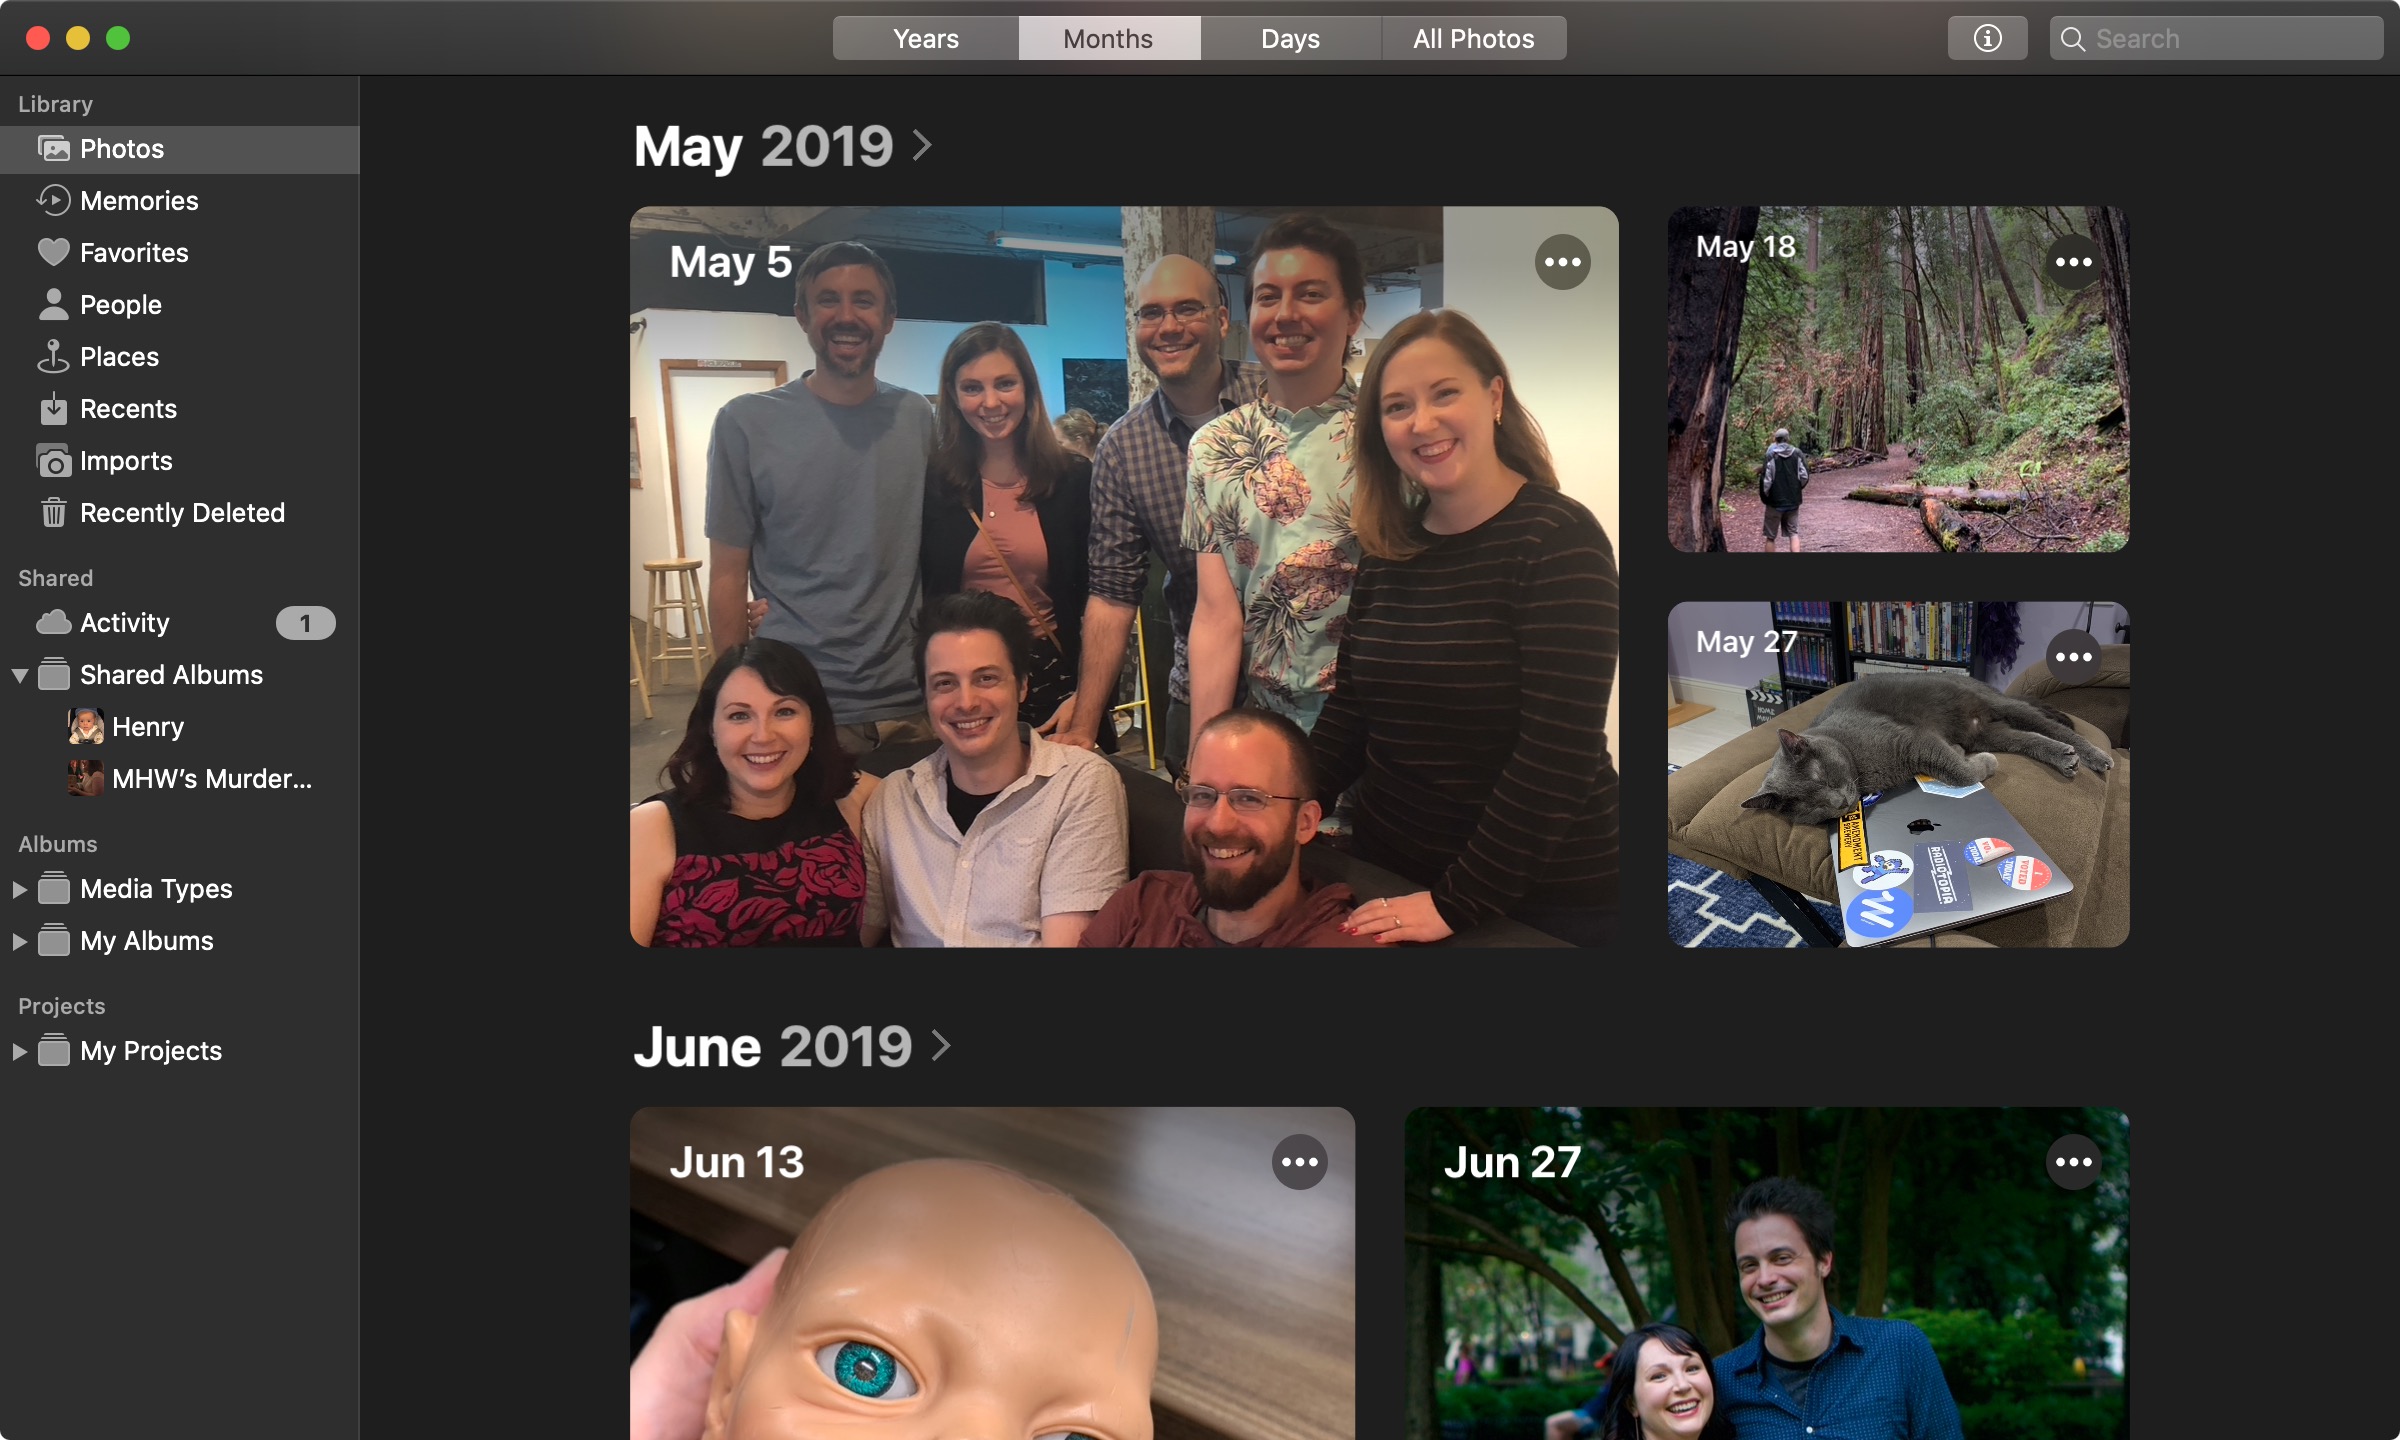
The Photos app gets less ambiguous time-based top-level sorting options, plus a new UI that tries to do a better job of showing your representative pictures. Credit: Andrew Cunningham
The tweaks to the macOS version of the Photos app are minor and mostly organizational. The default view of your Photos library has been re-labeled to make it less ambiguous. In Mojave, the Photos tab showed you all of your pictures and videos in reverse-chronological order, and the All Photos tab in Catalina does essentially the same thing.
The main changes are a better, more granular date display that tells you what dates the photos you’re actively viewing were taken, not just what month they were taken, and a button toggles whether the thumbnail zooms out to show you the whole image (the default) or zooms in to show more detail. The Years view also remains, though it now shows you a single image it has chosen to represent the year rather than a mosaic of infinitesimal thumbnails. Video and Live Photo thumbnails now auto-play, too, making them stick out from the still photos in your collection.
But the “Moments” and “Collections” views are both gone, replaced with more straightforward “Months” and “Days” views that display a bunch of representative images for each unit of time. The new views aren’t as info-dense as the old ones, since you can’t see all of the pictures you’ve taken in a given day or month, but that’s what the Photos tab is for. Since the Moments and Collections views were normally grouped together by date anyway, I don’t think they’re likely to be missed.
For people who do still want their Macs to give them automatically sorted collections of images, the Memories, People, and Places views still offer those collections—people and places are sorted using face-scanning and geographical location, obviously, while “Memories” still tend to be groups of photos and videos taken around the same time, in the same location, of similar-looking subjects (they’re good for vacation photos).
Notes
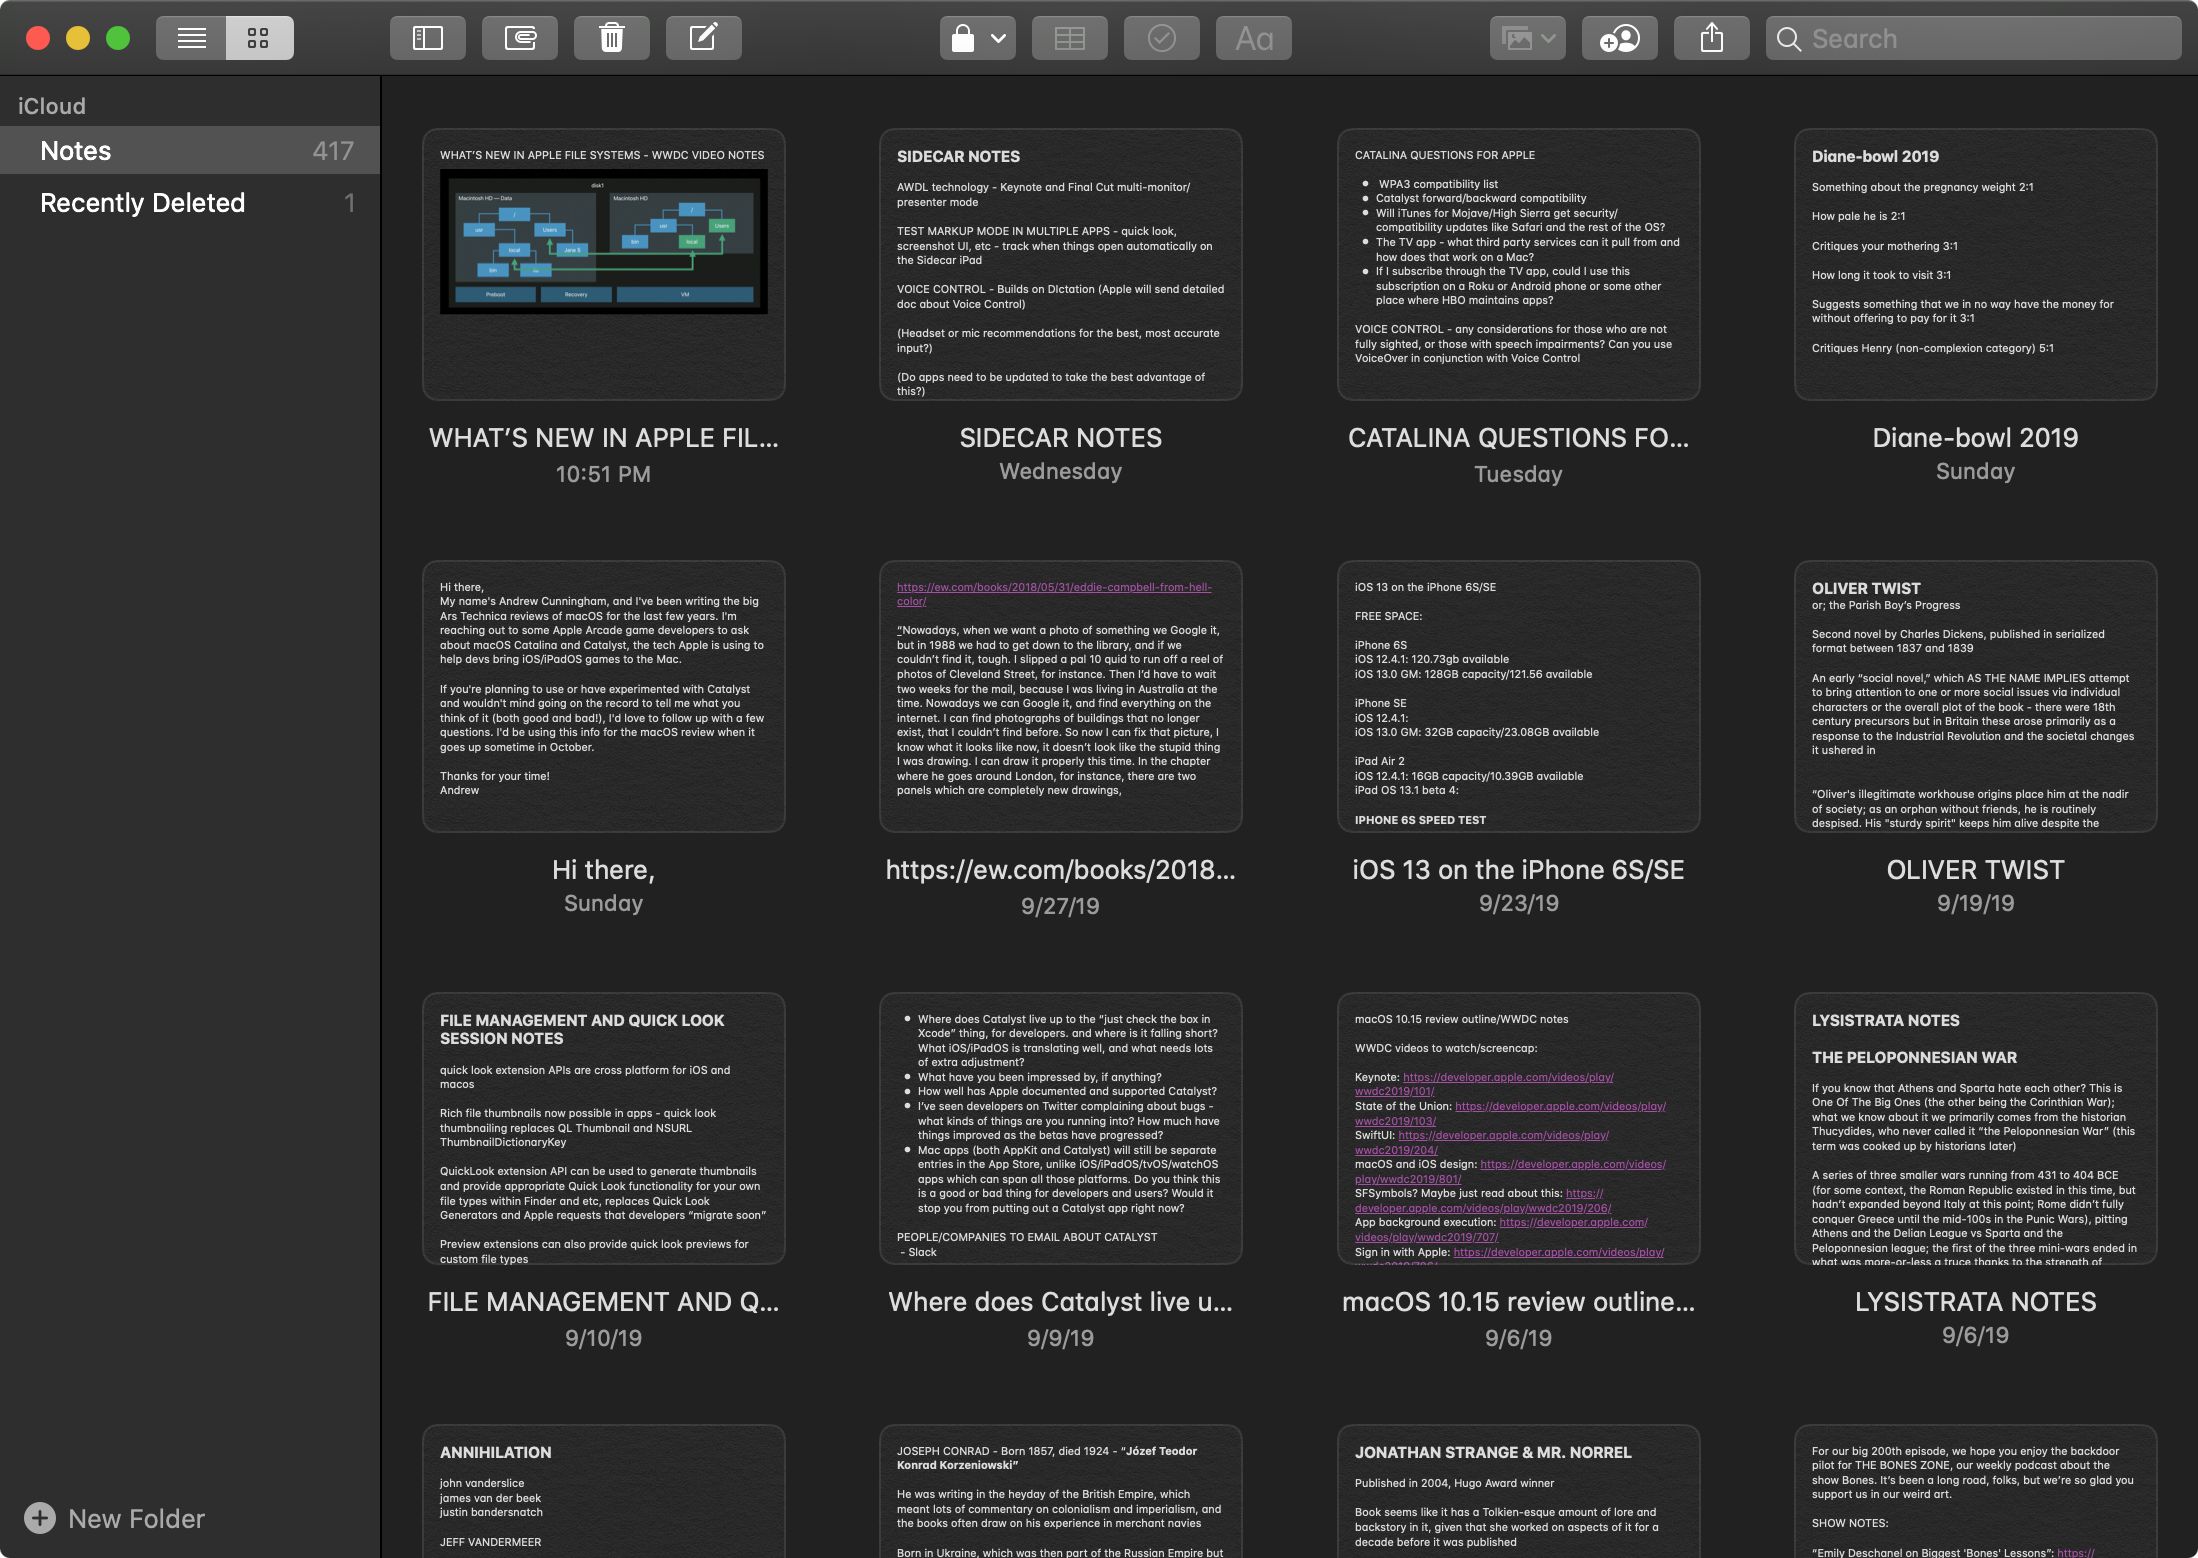
The Notes app’s new Gallery view is its main improvement. Credit: Andrew Cunningham
The biggest of the Notes app’s modest improvements is a new Gallery view. This is an alternative to the default list view that organizes your notes in a grid with preview thumbnails; an icon on the corner of the thumbnail indicates documents that have been shared with other people. I still prefer to use the search bar to find specific, not recently opened notes when I need them, and if your notes are mostly blocks of text or lists, the thumbnails might not help you tell them apart. But if you keep a lot of visually distinct notes, the gallery view might be a bit more browse-able than the list view.
The app’s search capabilities have been slightly improved; in addition to offering pre-filled suggested search items when you click the search box, Notes can now use OCR to search through text in documents you’ve scanned with your phone or tablet’s camera. And I found that Notes’ search was better at picking out words related to the one I was searching for. For instance, the word “drawing” in Mojave only brought up exact matches and notes with sketches attached, but the same search in Catalina caught one “redrawing” plus an old WWDC slide deck PDF about Metal that talked about “draw calls.”
As for sharing, Notes will never be a Google Docs replacement, but Apple has added the ability to share an entire folder of notes rather than sharing them one at a time. It also has a setting that gives others read-only access to notes. When sharing an individual note or a folder of notes, you set permissions on the same screen you use to choose how to invite people; you can change those permissions later via the menus you use to invite more people or remove access.
Other miscellany includes an automatic sorting option for checklists that moves items to the bottom of a list as they’re checked off and an “add sketch” option that uses an iPhone or iPad to make a quick drawing before sending it directly to the current note on your Mac when you’re finished (it’s the same menu you can already use to add photos or scan documents from your iDevices).
It’s now possible to block senders from the Mail app. Credit: Andrew Cunningham
Mail is very nearly unchanged in Catalina, and most of the changes are supposed to help you get less mail. You can now block a sender a la Messages by clicking their email address, and you can mute notifications from an email thread for those times when a large group of people misunderstands how Reply All works (or intentionally misuse it for evil purposes). An Unsubscribe link will appear above the header of some emails from mailing lists to automate the unsubscription process (though this was inconsistent for me—some emails triggered it and others didn’t, even when they had their own unsubscribe links inline).
The sole visual change only applies if you use the Classic layout, which normally condenses your list of messages and displays the current message below the list rather than to the right; you can now use the condensed message list view and keep the message pane on the right. Since you can’t update something called the “Classic layout” and keep calling it the “Classic layout,” the setting has moved from the Preferences screen to the View menu; check Use Column Layout to condense the message list, and uncheck Show Side Preview to get back to the classic-classic layout.
QuickTime Player
QuickTime’s biggest addition is picture-in-picture support, which uses the same UI currently used to pop streaming video out of your browser and let it float on top of your other windows. Like a typical picture-in-picture video on a Mac (or an iPad), videos are resizable within a limited range and will stick to one of the four corners of your screen without obscuring the dock. Meanwhile, moving it off the screen will briefly hide it without stopping playback. Clicking the picture-in-picture button again will send the video back into the regular QuickTime UI (which, yes, still supports a totally separate “float on top” view that keeps the QuickTime window on top of your other app windows without the niceties or limitations of picture-in-picture mode).
Other new QuickTime features are niche but situationally useful. The Movie Inspector window can now give you a little more information on your videos, including the color space, HDR information, aspect ratio, and scaling factor. Hitting “open image sequence” in the File menu can quickly make a movie out of a folder of sequentially numbered images. And if you’re making quick edits to a ProRes 4444 video, QuickTime can now preserve transparency information while exporting.
Messages

This icon’s design change is the only change of note in Messages, despite signs that bigger things were in the works. Credit: Andrew Cunningham
The only difference I can spot in the Messages app is that the small microphone icon used to record voice messages has been changed to a waveform icon. The feature still works the same way, though.
There’s some evidence that Apple is working on a Catalyst version of Messages. This would bring the Mac version of the app fully in line with the iOS version (including message effects and the iMessage store). But it’s either not intended for public consumption, only made for specific use cases, or not meant to be available until some future macOS release. There were signs that Apple was working to enable iMessage effects in the regular AppKit version of Messages, but they still don’t work in the shipping version of Catalina, and the Terminal command that enabled it in early beta builds doesn’t seem to work anymore either.
The original Catalyst apps: News, Stocks, Home, and Voice Memos
News and its new sidebar. Andrew Cunningham
An interview with Apple’s Craig Federighi over the summer gave some outlets the impression that the original Catalyst apps from Mojave—Apple News, Stocks, Home, and the Voice Memos app—would receive a substantial overhaul in the move to Catalina. But Federighi was talking mostly about underlying improvements to the technology; beyond a handful of tweaks, these are the same apps that shipped with Mojave, and any changes can be summed up quickly.
- The News app’s sidebar has been reformatted to look a bit more like the sidebars in the Music, Podcasts, and TV apps, with tweaked fonts and smaller icons.
- Rather than jumping into a separate menu to add and remove stocks from your watchlist, deleting stocks can now be done with a right-click or a two-finger trackpad swipe. To add stocks, search for the one you want to add, then either right-click it in the sidebar or click the big “add to watchlist” button in the main window.
- In the Home app, the styling of some screens has been tweaked, some fonts have changed, and other iOS 13-related features have been added (including a revamped UI for thermostats, grouping together of related sensors and accessories, and support for a few new kinds of hardware). But nothing unique to the macOS version of the app has changed dramatically.
- The sidebar in Voice Memos doesn’t put horizontal lines between each recording, the Search box’s styling has been tweaked, and the playback controls have been adjusted to make their size more consistent.
Safari 13
Most of the engineering effort for Safari 13 was dedicated to the iPad version and its newfound ability to render the desktop versions of websites. But what you’ll notice are a handful of improvements in the Mac version (which are available for Mojave and High Sierra, though occasionally new features are only partially backported or not backported at all).
Safari 13’s Start page has been redesigned, swapping the infinite rows of bookmarked sites for two rows of six bookmarks each. Below those, a few Siri Suggestions offer to open other pages—among other things, the suggestions are based on tabs you have currently or recently opened across all of your devices, links from Messages, and stuff from your Reading List. Clicking Show More at the top-right of the Start page shows all your rows of bookmarks again, just like in older versions of Safari. (The number of bookmarks per row is the same, but the bookmarks are packed a touch more closely together, and the text labels are a few characters shorter than they used to be.)
For tab monsters who routinely juggle multiple windows at once, opening the same page twice is a common mistake that eats up extra RAM and processor cycles for no good reason. A new Switch to Tab section now appears in Safari’s menu of suggested options when you start typing in the search bar, underneath the “top hit” and above the Google suggestions. Switch to Tab will bounce you to the open tab even if it’s open in another window, though Safari doesn’t proactively prevent you from opening duplicate tabs.
If you just type your URL and hit enter, Safari will still load up the page in the current tab rather than switching you to the one that’s already open. There’s no setting to change that behavior. This feature would be more useful if you didn’t need to go out of your way to use it, but as it is, there are plenty of Chrome and Firefox extensions you can use to accomplish the same thing with more flexibility.
Sign in with Apple
Apple’s new single-sign on (SSO) service isn’t exclusive to Catalina or macOS or even Safari. Instead, it works fine on other versions of the operating system, in other browsers, and in other operating systems entirely. It’s a bigger deal in iOS, where developers are generally required to implement it if they support any other SSO options in their apps.
The one feature that does appear to require Safari 13 running on macOS Catalina can use your Mac’s TouchID sensor to authenticate when you use Sign in with Apple. That means you don’t need to type in your password as you do on other browsers and platforms. This doesn’t work in older macOS versions running Safari 13, and it is not an option on Catalina Macs without a TouchID sensor (a connected Apple Watch can usually be used to authenticate anywhere in macOS where TouchID is supported, but that isn’t the case here).
Weak-password warnings
Safari’s password storage and generation features still fall short of a true password manager, especially if you need to be able to use these passwords on a non-Apple platform, but Apple keeps making smart additions that make Safari almost as good as a password manager for people who are all-in on Apple’s hardware and software.
Last year we got both Automatic Strong Passwords (which offers to generate and save strong randomly generated passwords when you create a new account or change a password somewhere) and Password Reuse Auditing (which alerted you when you were using the same password across multiple sites). This year, Apple has added warnings for weak passwords that are too short or too easy to guess. Those passwords will be flagged in Safari’s Password preferences, just like reused passwords already were in Safari 12.
Goodbye to standalone extensions
Last year, Apple disabled standalone Safari extensions distributed outside the old Safari Extensions Gallery; at the time, the company announced that Safari 12 would be the last version to support the standalone extensions at all, limiting extensions to Safari App Extensions distributed within standalone Mac apps. Apple totally shut down the Extensions Gallery earlier this month, and Safari 13 won’t install or run any extension that doesn’t come with an app.
When I wrote about this last year, I said that Safari App Extensions could only be distributed from within the Mac App Store—though it’s strongly implied by some of Apple’s documentation, that’s not right. They must be distributed within a Mac app, but that app can come from anywhere, not just the App Store.
In any case, the behavior is the same. When the app is installed, the disabled-by-default extension shows up in Safari’s settings. When the app is uninstalled, the extension disappears (an Uninstall button is still hanging around, but as of version 13 it just tells you to go to the Finder and delete the app). These apps don’t actually need to do much of anything—a few that I grabbed from the Mac App Store were just wrappers that checked to see whether the Safari extension was properly enabled. But you need the app regardless. No app, no extension.
What remains true even if you consider non-App Store apps is that not all of the functionality of legacy standalone extensions can be replicated by Safari App Extensions. And the restrictions and limitations are only going to make Safari’s extension deficit worse relative to Chrome and Firefox and, eventually, the new Chromium-based Microsoft Edge. Safari users have a few good options for password managers and ad blockers. But beyond that, there’s not exactly a circus going on.
Inspecting CPU usage
Safari 13’s Web Inspector (one of the many tools available if you enable the Develop menu in Safari’s Advanced settings) introduces CPU and energy-usage monitoring. Older versions, meanwhile, simply tracked network requests, rendering, and JavaScript execution. Open the Inspector and go to the Timelines tab, then load up any webpage to get a snapshot of how much and for how long the page slams your processor.
The CPU inspector shows detailed information about how much a page load impacts your CPU. Andrew Cunningham
The Inspector shows the maximum and average CPU usage for each page load. It breaks everything down between your main thread (the one actually doing most of the user-visible page rendering) and worker threads (which execute background tasks); your main thread’s activity is further broken down by activity, so you can see exactly how much of that effort went to running JavaScript vs. rendering the page’s layout and CSS.
And other additions
Most of the changes to Safari 13 are small enough (or affect small-enough groups of users) that they only bear mentioning in passing. This is only a list of highlights; more nitty-gritty details can be found in the beta release notes.
- Picture-in-picture videos can be popped out by right-clicking the audio button on whichever tab is playing the video and clicking Enter Picture-In-Picture.
- Intelligent Tracking Prevention 2.2 tries to limit cross-site tracking via “link decoration,” a process by which some sites can track which other sites you’re visiting by adding extra identifying tags to URLs.
- Safari adds support for FIDO2-compliant hardware security keys like Yubikey.
- Safari now supports screen sharing without the use of extra plug-ins.
- Support for the long-deprecated, abortive WebSQL standard has been removed.
Safari 13 in Mojave and High Sierra
Safari 13 offers broadly the same features in Mojave and High Sierra as it does in Catalina, with a couple of noteworthy exceptions. Safari 13’s Start page is condensed to two rows of icons on all platforms, but only Catalina offers Safari suggestions. High Sierra still misses out on all Intelligent Tracking Prevention 2.x features, though it continues to support ITP 1.1. And Sign in with Apple can only use your Mac’s TouchID sensor in Catalina, not in Mojave or High Sierra.
Under the hood: System Extensions and DriverKit
To understand System Extensions and DriverKit, you should know about the thing they’re designed to replace: the kernel extension, or kext.
The macOS kernel handles everything from CPU and memory allocation to networking to filesystem support to device drivers to I/O to power management, and kernel extensions provide a way for third parties to tap into and extend those capabilities. Adding support for new hardware is one common use for kexts, but they’re sometimes used to add support for other filesystems or in apps like VPN clients that redirect or filter network traffic.
But because the kernel is such important software, kexts can cause big problems. A bad kext can cause a kernel panic, bringing your whole system crashing down. The kernel has relatively unfettered access to your hardware and to other software running on your system, so a malicious or buggy one can open you up to security vulnerabilities. And from a development perspective, writing kexts can be difficult and time-consuming, since the whole system needs to be rebooted when you have a problem and there’s not much room for error.
Apple’s goal with both System Extensions and DriverKit is to retain the ability to extend macOS’ capabilities—a key point of differentiation between macOS and iOS—while bringing that software out of the kernel and into user space where it can cause fewer problems. A bug can crash the extension but not the whole system; the System Extensions will be subject to the same security policies as other applications; and System Extensions don’t have the same level of unprotected access to the kernel, your hardware, and your apps as kernel extensions do.
System Extensions explained
The most important thing to know about System Extensions is that, like other kinds of iOS and macOS extensions, they will only be allowed to be installed alongside an application—unlike kexts, they can’t be installed independently
Apple has defined three different kinds of System Extensions for Catalina: Network Extensions, Endpoint Security Extensions, and Driver Extensions (the latter of which splits out further based on the kind of hardware you’re writing a driver for).
Network Extensions are all about redirecting, examining, and filtering network traffic. Apple’s examples for these kinds of extensions include VPN clients, DNS proxies for rerouting traffic, and content filters for blocking certain websites or types of content.
Endpoint Security Extensions will be able to examine the creation of new processes, which means they can stop malicious code from running—the kinds of things you might expect antivirus software to do.
All of these capabilities suggest that System Extensions will be fairly powerful and flexible, with broad enough powers to reroute all of your computer’s network traffic and halt running processes and granular enough control to examine and block specific things. Hopefully, this means that insulating System Extensions from the kernel won’t involve compromising the capabilities of developers or the kinds of things that users can do.
DriverKit: Fairly limited, for now
Apple eventually wants DriverKit to be the only way anyone writes device drivers for the Mac, totally replacing the venerable I/O Kit. Apple describes DriverKit as an “updated and modernized” version of I/O Kit, but at least in Catalina, it’s considerably more limited. I/O Kit supports drivers for a huge variety of devices, including graphics cards, audio devices, and lots of legacy interfaces like ADB, SCSI, ATA, and FireWire. In Catalina, DriverKit will only support four of these categories:
- Network controllers (note that this covers networking hardware, while Network Extensions cover software).
- Serial devices.
- USB devices that aren’t already covered by the generic class drivers built into macOS (many webcams and audio interfaces, for example, work fine in macOS with no additional drivers).
- Human Interface Devices (HIDs), which includes keyboards, mice, trackpads, specialized game controllers, and other devices that let you control the OS or specific apps.
Apple refers to driver extensions built with DriverKit as “dexts,” and many of Apple’s own drivers for NICs, HIDs, and USB and serial devices in Catalina have already moved over to DriverKit to show developers how it’s done. Kexts will continue to work as-is for now, but Apple ultimately wants all macOS drivers to make the jump to DriverKit.
The future of kexts
Catalina will begin the process of deprecating kexts entirely, but as it did when it dropped support for 32-bit software, Apple is trying to give developers an off-ramp, and the deprecation timeline may look different for different kinds of kexts.
In Catalina, nothing actually changes, but it will be the last version of macOS to support kexts “without compromises.” Starting in “a future release,” types of kexts with analogous System Extension or DriverKit replacements will no longer work. Hopefully this means that kexts won’t be deprecated at all until there’s another way to add the same functionality to macOS some other way (though some loss of functionality may be inevitable, for kexts where having full access to the system kernel is the point).
The “without compromises” language is exactly the same thing Apple said about 32-bit support when it announced High Sierra, so I’d expect macOS 10.16 to throw up more hurdles to loading kexts and for macOS 10.17 to begin dropping support for them. But that’s just an educated guess.
The plight of the Hackintosh
One constituency that is likely to be affected by this is the Hackintosh community—these aren’t macOS users that Apple cares about, but they’re very active users of kernel extensions.
That’s because a big part of getting non-Apple hardware to run macOS is to (1) add support for non-supported hardware, like Ethernet ports or audio codecs, and to (2) trick macOS into thinking that it’s running on officially supported Mac hardware when it’s actually running on a close facsimile. Some of this is done with bootloader trickery, but much of it relies on independently developed kernel extensions from enthusiasts.
If, as many suspect, Apple switches to ARM processors in Macs any time soon, the writing will be on the wall for the Hackintosh community anyway. Even hardware like the T1 or T2 chips might one day make it more difficult to make generic PC hardware look like a Mac—imagine, for example, some future version of macOS that required their security features rather than supporting them optionally. And Apple continues to lock down macOS by requiring signed code and app reviews for software that can run on macOS without compromising or modifying the default settings in some way, something that will continue to make life more difficult for the independent developers writing the applications and kexts used for Hackintoshing (though, as I wrote a few years ago, it seems like Apple could be doing a lot more if killing Hackintoshes was its end goal and not a side effect of security features it wanted to implement for other reasons).
Catalina’s read-only system volume
APFS is still a young filesystem, and Apple is still adding new features (and new OS features that rely on underlying APFS features) at a steady clip. Mojave mostly brought minor updates to the filesystem but mostly focused on completing the transition, enabling APFS for Macs with Fusion Drives and improving performance on spinning hard drives. Now that the transition is all done, Catalina focuses on larger additions.
Longtime readers of these reviews will probably remember System Integrity Protection (SIP), a feature added in macOS 10.11 El Capitan that disables write access for the /System, /bin, /usr/ and /sbin system folders by default. Catalina takes this a step further, creating a separate read-only APFS volume exclusively for system files—including not just the SIP-protected folders, but all system files and most of the preinstalled apps. A new Catalina install with a single user account has around 10GB of data on its system volume and another 4 or 5GB in the user data volume.
If you’re the kind of person who prefers or needs to disable SIP to work with system files and folders, you can still do that, but Catalina throws up another barrier. While SIP’s protections could be disabled permanently from your Mac’s recovery partition, disabling read-only access to the Catalina system partition is reset every time you reboot. SIP and the read-only system volume are related features, but they’re not the same—to access system files, you need to disable SIP from the recovery partition, and then you can mount the system volume as read/write from within Catalina.
This volume split is permanent and mandatory, and much like the APFS conversion itself it happens transparently in the background when you update from High Sierra or Mojave to Catalina. As outlined in a WWDC presentation about this year’s APFS updates, your current system volume is marked as a data volume, and system files are deleted, leaving your data intact. From there, a new system volume is created in your APFS container, and the majority of the Catalina system files are written there instead. That new volume is marked as read-only as soon as the installation is complete.
Volume groups, firmlinks, and why most people won’t notice any of this stuff
To the typical Catalina user who doesn’t notice or care about filesystems or partition maps, they won’t notice a difference. Finder (and even the default “show only volumes” view in Disk Utility) still show a single unified disk with everything on it. It’s only once you go to “show all devices” that you can see the APFS container with the system and data volumes split apart.
Because of the way APFS works, you don’t give up any disk space by separating the system and data volumes. Splitting the volumes in a similar way using HFS+ would likely require at least some small amount of free space on your hard drive, since the system volume would need to claim a bit more space than strictly necessary to leave room for system updates and other temporary files. But because all volumes within an APFS container can lay claim to all the free space within that container, the Catalina system and data volumes can comfortably coexist without wasting drive space, just as they have always done when they lived in the same volume.
And many of Apple’s changes to APFS in Catalina are done in service of hiding this volume split. Your Catalina system and data volumes aren’t quite the same as two typical APFS volumes—they’re part of something new called a Volume Group, which helps the operating system treat the two volumes in some of the same ways that Mojave and previous versions of macOS treat the unified system and data volume. Not only do the two volumes appear as one in the Finder, but they share things like FileVault encryption keys—the two volumes are encrypted (or decrypted) simultaneously and the same key unlocks them both.
APFS in Catalina supports something called “firmlinks,” as a way to maintain macOS’ existing directory structure despite everything now being spread across two volumes. Think of an alias in macOS or a shortcut in Windows—these are forms of symbolic links (or symlinks), small files that can be stored anywhere and which point you toward another file on another volume, partition, or disk. But where symlinks only go one way, firmlinks are bidirectional. Folders can appear in multiple places, but from the Finder’s perspective and the user’s perspective, neither directory is the “real” one and neither is the “shortcut.”
You can easily see this in action on any Mac running Catalina if you navigate to the /System/Volumes folder, where you’ll spot what appears to be the same “Macintosh HD” icon that you normally see on your desktop. But this is actually a representation of your data volume, and there are a few ways to tell:
- The System folder in this volume is mostly empty, since those files are primarily stored in the read-only system volume
- Under “Name and Extension” in a Get Info window, the volume’s name is literally “Data”
- This folder’s path in Terminal is /System/Volumes/Data.
This is where firmlinks come in. Look at the contents of either /Applications or /System/Volumes/Data/Applications, and you’ll see that the only applications actually stored in that folder are the ones you’ve installed yourself, plus Safari (presumably to make the browser easier to update on its own without a major system update). But the Finder still shows the user their installed applications plus all of the regular macOS system apps in the same folder.
According to Apple, firmlinks only exist for directories, not individual files, and they only work within established volume groups like the one Catalina creates when you install it on your system. At least for now, all firmlinks that exist on a Catalina Mac are created by the system at install time and can’t be created manually by end users. For people who want to make shortcuts, one-way symlinks that can point to things on other volumes continues to be Apple’s recommended solution.
The new volume structure will create some extra work for the developers of third-party backup apps like Carbon Copy Cloner—that app has already made changes to support Catalina, though the downside is that Catalina Macs aren’t going to be able to back up to HFS+ volumes anymore. But the read-only system volume is a logical extension of the protections that SIP was already providing to most important system folders. It’s a thing that advanced users can turn off, albeit temporarily, and it will be completely invisible and irrelevant to the vast majority of Mac owners, just like separate system and data partitions are already invisible and irrelevant to iPhone and iPad owners.
FileProvider API
When Apple introduced the Files app in iOS 11, it added a new API called FileProvider that allowed third-party storage services like Dropbox, Google Drive, and OneDrive to show up in the Files app with most of the same privileges and features as iCloud. Catalina brings that same API to the Mac, giving cloud storage providers a more consistent, unified way to show up in the Finder alongside iCloud and the user’s local files. Also as with iCloud, third-party cloud services will be able to sync files on demand, showing them in the Finder but only actually downloading them (and taking up disk space) when they’re actually needed.
The difference between iOS and macOS in this regard, of course, is that these services already exist and have been syncing their files just fine for years now, and most of them offer some version of the files-on-demand feature (Dropbox calls it Smart Sync, OneDrive calls it Files On-Demand). Whether third parties switch to using the FileProvider API probably has more to do with Apple’s security restrictions than with the features of the API. And it’s not clear whether developers would be able to add features like dedicated menu bar icons or Finder context menu entries.
For example, Dropbox currently needs to request a dizzying level of permissions to do everything that it wants to do in macOS, and installing it with Smart Sync enabled requires multiple trips to System Preferences to override macOS’ default security settings. If users complain about that sort of thing enough, or if Apple just makes it easier to develop and maintain a FileProvider app than one that syncs using some other mechanism, then maybe we’ll begin to see developers adopt it.
New (and sometimes annoying) system security measures
Catalina includes a few new security restrictions for both users and developers, though they mostly represent a tightening of screws that were already present and not a dramatic escalation.
Like Mojave, Catalina introduces a few new access controls—capabilities or directories that apps need to clear with the system before they can access them. Apps must now ask you before they can use speech recognition features, monitor or record keyboard input, or record your screen. And apps need to ask for access to specific user folders or volumes—Documents, Desktop, and Downloads are all protected, as are folders from cloud storage providers and removable and networked drives. You’ll notice new permission requests from any app that can send notifications—there’s a toggle in the Notifications preference pane that lets you turn notifications on or off on an app-by-app basis, too.
App notarization is more onerous, both for users and for developers. This feature was introduced as an optional extra step in Mojave. Going all the way back to Mountain Lion, Mac developers offering apps outside of the Mac App Store could use their Apple-issued developer certificate to tell macOS that their app was from a registered Apple developer. In exchange, the app would run with minimal interference from Gatekeeper, the then-new feature that promised to keep Mac users safe from malware. Apps that didn’t use Developer ID could run, but you’d either need to turn Gatekeeper off or right-click the app and open it again to allow an exception.
The notarization process is a bit more involved. It requires developers who want to distribute outside the Mac App Store to submit apps to Apple for review by its Notary Service—this isn’t the same as the actual content review process used to allow apps into the Mac App Store but a shorter and more automated process that should only take a few minutes. The Notary Service checks to see whether the app contains malware; whether it uses the enhanced System Integrity Protection runtime from Mojave that protects running apps from being tampered with; and whether the apps and all their components are properly signed in the first place.
Notarization, like Developer ID, isn’t strictly necessary—non-notarized apps will still run on macOS, one crucial point on which macOS continues to differ from iOS and iPadOS. But to run (at least the first time) without triggering Gatekeeper and scary security warnings, all apps running on Catalina must be notarized. And starting in January of 2020, apps will need to meet new Catalina-specific notarization requirements (these were originally supposed to go into effect when the operating system was released, but Apple relaxed them just a bit to give devs more time). This Electric Light Company post on notarization covers the requirements and the difference between Mojave and Catalina in more detail.
The accumulation of these security features can make Catalina pretty annoying to use sometimes, especially if it’s a clean install of the operating system. Downloading, installing, and running an app becomes a multi-step process:
- Assuming you’re using Safari to download the file, you’ll need to grant the domain access to your Downloads folder, permission that every new domain you download from asks for individually.
- When running the app for the first time, let Gatekeeper know that, yes, you would like to run the application you just downloaded from the Internet. Apps that haven’t been notarized trigger extra prompts and may require a trip into System Preferences to allow the code to run.
- If the app supports notifications, it will request permission to show you notifications (via a notification).
- As apps need access to hardware like your webcam or microphone, or to various folders on your Mac, they will pop additional access request boxes up as needed.
Now imagine this series of steps, but multiplied across however many apps you use. Especially earlier in the Catalina beta when Apple was enforcing the stricter notarization requirement (but before most developers had bothered with it), setting up a new Catalina Mac prompted an avalanche of notifications just to get everything working properly. And that’s before you get into older apps that don’t know how to request access to things and get broken when the system won’t let them access what they need.
But notification fatigue is real. To someone who is paying attention to what all of these alerts and confirmation dialogs say and acting accordingly, it’s a good thing for your computer to be asking you explicitly about so many things. It reduces the likelihood that a rogue site or app will do something you don’t want it to. But for this many notifications across this many apps, I’ve got to imagine that more than a few people will either blindly click through these messages to get what they want, or they might refuse permission (on purpose or by accident), requiring a trip into the Security & Privacy preference pane to manually grant the app whatever permissions it was asking for. This is something that Apple actually mocked Microsoft for, back in the days when Windows Vista’s User Account Control was seen as annoying overkill rather than a normal fact of life.
The good news is that, once you’re up and running and you’ve gotten all of your apps to run at least once and given them all the permissions they need, Catalina works just about like all other Mac versions have. And the short reprieve for the stricter notarization requirements will hopefully give most major app developers some time to get their apps notarized to prevent some of these problems (seriously, this section of the review was considerably more irritated when the newer notarization was required to keep Gatekeeper quiet).
Grab bag
Apple Arcade
Apple’s $5-per-month-per-family game subscription service, already available in iOS and iPadOS and tvOS, is also available on the Mac, and the same subscription covers all the same platforms.
The Mac version of Apple Arcade will have a couple of unique challenges—first, macOS just isn’t as popular for games as iOS is, and this is reflected in the more limited selection of available games. Second, the difference between the slowest and fastest GPUs in different Macs is a lot wider than it is in iOS and iPadOS, spanning from old 2012 Macs with Intel’s HD 4000 integrated GPU all the way up to MacBook Pros and iMacs with Vega-based dedicated GPUs from AMD. The Apple Arcade app pages don’t list detailed system requirements, just whether a game works on your Mac or not, so there’s no way to know how well games will actually run on your system without downloading and trying them first. The games I tried (Punch Planet, Hot Lava, and The Enchanted Planet) ran tolerably if not exceptionally well, and some games do include graphics settings you can tweak to make things look or run better on different hardware. The graphical simplicity of most of the available games will probably ensure wide compatibility across different Mac hardware.
Activation Lock for Apple T2 Macs
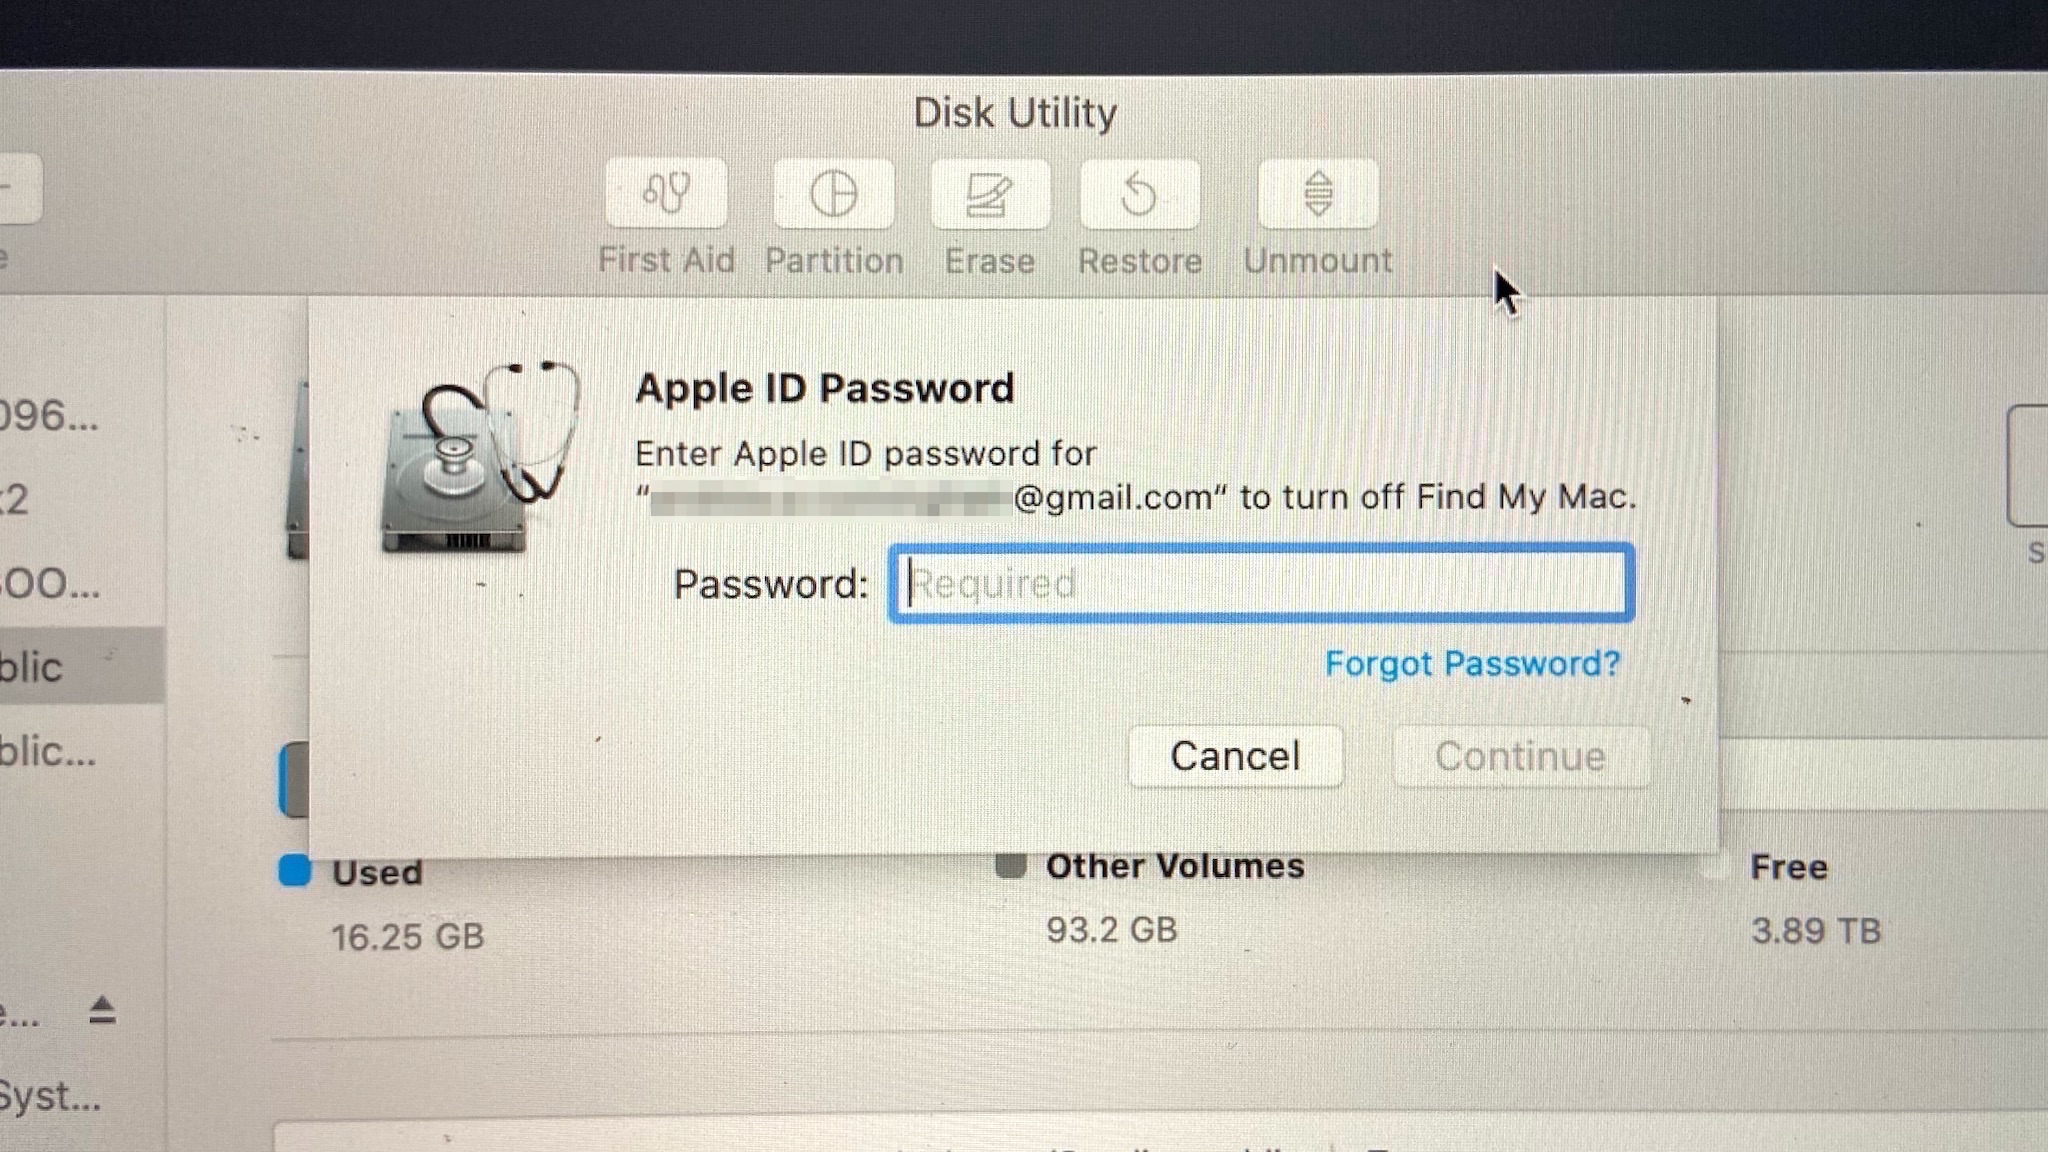
Activation Lock is now supported on Macs with an Apple T2 chip. Credit: Andrew Cunningham
On any Mac with an Apple T2 co-processor—Mac Minis, MacBook Airs, and MacBook Pros released in 2018 or later, plus the iMac Pro—signing in to iCloud and enabling Find My Mac enables a version of Activation Lock similar to what you get on iPhones and iPads. Anyone who tries to reinstall macOS on your device will need to connect to the Internet and sign in to your iCloud before doing it. This happens even if they try to downgrade to Mojave or erase your disk entirely using Disk Utility. The Hardware Overview section of the System Information app will report your system’s Activation Lock status, if your hardware is compatible.
Apple Watch unlocking for apps
Unlocking your Mac with your Apple Watch lets you unlock apps now, too. Andrew Cunningham
From macOS Sierra onward, anyone with an Apple Watch and an 802.11ac-compatible Mac (anything from 2013 onward) has been able to use their Apple Watches to unlock their Macs, as long as both devices were signed in to the same iCloud account and were within range of one another.
Catalina adds the ability to unlock apps and respond to other privilege elevation prompts like unlocking System Preferences, installing software, confirming purchases, or changing file permissions in the Finder. If you can use TouchID for it on a Mac with a fingerprint sensor, you can now use your Apple Watch for it, too. When you see a password prompt on your Mac, you’ll also get a double-tap on your wrist; double-click the side button on your watch and the prompt will go away. It’s a handy alternative to typing in a password for people who don’t already have TouchID on their Macs—there’s still no biometric authentication option for Mac desktops, though rumors about FaceID-equipped Macs persist. If you have a TouchID Mac and you enable Apple Watch unlocking, you won’t get that wrist double-tap, and the status message will only mention TouchID, but you can still use the Apple Watch instead if you like.
In addition to having a supported Mac, your Apple Watch needs to be running watchOS 6 for app unlocking to be available. Otherwise, it will only be able to unlock your Mac, the same as before. And there’s no way to enable app unlocking support without enabling Mac unlocking support, or vice versa—it’s all handled by a single checkbox in the Security & Privacy preference pane, and it’s an all-or-nothing proposition.
WPA3 support
Newer Macs running Catalina can connect to networks that use WPA3 encryption. Credit: Andrew Cunningham
Try to manually join a Wi-Fi network in Catalina on many Macs and you’ll see that WPA3, the new Wi-Fi encryption protocol, has joined the (still default WPA2) and the (old, insecure) WEP and WPA as a security option.
But unlike iOS 13 and iPadOS 13, which support WPA3 universally across all supported devices, not every Catalina Mac can use WPA3. Older 2012-era Macs with 802.11n adapters still top out at WPA2.
This is going to be common across all devices and operating systems as the industry transitions to the new encryption standard. For example, while Microsoft appears to have added support for WPA3 in Windows 10 version 1903, only Intel’s most recent 802.11ac and 802.11ax adapters can use the protocol. WPA3 upgrades for existing routers are likely to be relatively few and far between, as manufacturers attempt to incentivize upgrading to shiny new 802.11ax hardware.
This is all fine. Using WPA2 with a long, strong encryption key is still going to protect your network just fine for the time being, and routers that do support WPA3 right now usually offer a combo WPA2/WPA3 mode to maximize compatibility with current devices. But encouraging wider industry and consumer adoption of WPA3 begins with supporting it in the first place, so it’s good to see all iDevices and most Macs add support for it.
AirPrint by default: A long goodbye to printer drivers
Nothing is changing in Catalina, but Apple is moving to deprecate old-school printer drivers in future versions of macOS in favor of the AirPrint protocol (which is mostly built on top of the Internet Printing Protocol, or IPP). This comes from a note toward the end of the main page for the lpadmin tool:
CUPS printer drivers and backends are deprecated and will no longer be supported in a future feature release of CUPS. Printers that do not support IPP can be supported using applications such as ippeveprinter(1).
Where older versions of macOS would reach out to Apple’s servers and grab the appropriate printer drivers when you went to set one up, Catalina will default to AirPrint to install networked printers as long as the printer supports it. Most printers sold within the last few years should make this transition without a problem (my 2015-era Brother HL-L2340DW works fine).
It’s not the end of the road for old networked or USB printers that are still working fine—when you connect printers via USB, Catalina will continue to offer to download drivers directly from Apple just as before (again, as observed with my Brother HL-L2340DW). Your printer manufacturer’s support page may continue to offer drivers as well.
For pre-AirPrint/IPP networked printers, as implied by that deprecation message, intermediary tools can be used to bridge the gap. The ippeveprinter(1) tool can help you roll your own intermediary, but this presentation (PDF) on the CUPS printing system from May of 2018 outlines a more user-friendly approach called “Printer Applications” that can be distributed from the Mac App Store or elsewhere and serve as a replacement for old-style printer drivers while creating an IPP-compatible endpoint for newer iOS and macOS versions that can’t use printer drivers. IPP Everywhere endpoints should be able to do all of the most important extra stuff that printer drivers do, like checking ink and toner levels and printer configuration. These applications will presumably take the place of printer driver downloads for locally connected printers, eventually, though printer manufacturers probably won’t be enthusiastic about developing new software for years-old products.
Auto-Join Hotspot
Whenever your Mac is within range of an iPhone with Personal Hotspot enabled, and whenever it doesn’t have access to a Wi-Fi network and can’t see any open, public networks, Catalina will automatically generate a notification asking if you’d like to use your phone as a hotspot. You can enable this automatically, so your Mac is always connected to some kind of network even when you’re out and about.
Unfortunately, Catalina lacks a “low data mode” toggle like the ones in iOS 13 or Windows 10, which can let apps change their behavior to use less bandwidth when they know they’re on a network with a data cap. Hopefully that feature will be introduced to Macs soon, since otherwise I prefer to be in total control of when my laptop is using my phone’s hotspot.
If your phone’s battery is running low, Catalina will shoot you another notification letting you know and offering to disconnect from your hotspot. This works regardless of whether you’re using Auto-Join Hotspot or connecting to your phone’s hotspot manually.
Preview signatures on your iDevices
Preview has let you add a pre-rendered signature to PDFs and images for a few years now, but Catalina and iOS 13 lets you add new signatures using your iPhone or iPad’s touchscreen rather than your Mac’s trackpad (handy, but less-than-accurate) or a piece of paper held up to your Mac’s webcam (more accurate, but can be a pain). Just select the device you’d like to use to create a signature, and its screen will briefly be taken over by a signature UI. Signatures you’ve created still sync through iCloud, so you should only need to do this once.
Bye Bash, hello Z Shell
The message you get the first time you fire up Terminal after a Catalina upgrade install. Credit: Andrew Cunningham
Bash has been replaced by Z Shell, or zsh, as the default shell in the Terminal. Both shells have been included in macOS up until now, and both will continue to be—MacObserver has a handy guide on all the ways you can switch between the two. Zsh is just the default now, and this is true regardless of whether you perform an upgrade install or a fresh one.
Expansion Slot Utility
When running on the new Mac Pro, Catalina will include a revised version of the old Expansion Slot Utility that ran on the very earliest Intel Mac Pros. This tool can reallocate PCI Express bandwidth among multiple expansion slots if the system isn’t handling it to your liking, and it will make suggestions for how to move PCIe cards around in your system to maximize performance. This isn’t really an issue in typical desktop computers, but the new Mac Pro will have more electrical PCIe lanes than the total number of “logical” PCIe lanes that the processor and chipset can handle. Only a fraction of Mac users will even be able to see this tool, and only a fraction of those will actually need it for anything. Still, it’s here.
Dark Mode for Apple Remote Desktop
Users of the barely maintained Apple Remote Desktop app may notice that version 3.9.2, available alongside Catalina, now supports Dark Mode in both Catalina and Mojave. Don’t worry, though—the app’s icon still uses the default desktop wallpaper from macOS 10.4 Tiger!
No more cuts for macOS Server
The steady cuts to macOS Server have paused, at least for now. Version 5.9 supports configuration of new iOS/iPadOS 13 and macOS Catalina features via the Profile Manager device management service, but it’s otherwise the same app.
Upgrade now, or wait?
The betas and the GM build of Mojave felt pretty solid, and it was the rare macOS release where waiting for the 0.1 or 0.2 update didn’t feel super necessary. But although Catalina doesn’t feel as rough as High Sierra did when it came out, I do think you should probably wait for one or two major bugfix updates to come out before you install Catalina (unless there are Catalina-only apps that you absolutely need to run right now). Apple is typically pretty quick to release the first couple of bugfix updates for any new OS—High Sierra and Mojave both launched in late September, and both 10.13.2 and 10.14.2 were out in early December. You shouldn’t need to wait more than a couple of months for Apple to address the most serious problems.
There are a couple of reasons for this recommendation and overall situation. First, Apple’s software development teams all seem to be a bit overwhelmed this year. Across the board, the release schedule has been uncommonly disruptive and chaotic; iPadOS 13.0 went through eight developer betas alongside iOS 13.0, but it didn’t ship to the public until version 13.1 was ready. Version 13.1 itself was originally announced for September 30 before unexpectedly being moved up to September 24, and the release ended up being patched two times in less than a week. WatchOS 6.0 only launched on newer Series 3 and 4 Apple Watches, leaving Series 1 and 2 watches to receive the update at some as-yet-unspecified future date. Apple has released 11 developer betas of Catalina since WWDC, three of which have come out since the September iPhone event (and two of those came out just last week). It all paints a picture of a company that bit off a bit more than it could chew this year.
Second, while most apps from most major developers will run fine on Catalina, the total removal of 32-bit support plus the addition of extra security checks will inevitably leave some software broken and unable to run properly. Giving these developers a couple of months to catch up will result in a smoother Catalina upgrade experience for you.
Conclusions
You’d never know from the length of these reviews, but no individual macOS release since the yearly update cadence began really feels like a massive leap up from its predecessor. Instead, they’re more impressive when considered two or three years at a time. By itself, Catalina feels mostly like a Second Edition release for Mojave, which fine-tunes a few features and opens the doors to third-party iPad apps as promised. But I see Catalina more as the end of a three-year effort to modernize the Mac.
It started at the filesystem level with APFS in High Sierra, a foundational change without which many of Mojave and Catalina’s features wouldn’t work. Catalyst and SwiftUI both represent the next phase of Mac app development, where making apps that run on all of Apple’s platforms can rely on the same basic codebase. Both Mojave and Catalina have removed (or set the stage for the removal of) a ton of legacy features, most significantly 32-bit app support but also older graphics APIs and device drivers. And the security changes demonstrate that, even as the Mac becomes more controlled and locked down, Apple is doing a non-trivial amount of work to make sure that people who really want to run any code from anywhere on their computers still have a way to bypass those security mechanisms.
Future macOS releases will bring us more improvements to both Catalyst and SwiftUI, and a year from now we’ll be able to see whether an influx of UIKit apps has fundamentally changed what it’s like to work on (and develop for) Macs. The modernization work will continue. But Catalina is solid proof that Apple really isn’t seeking to make Macs as tightly controlled or as locked down as iDevices. No one knows what the future holds—and if, as some have predicted, Macs begin shipping with Apple’s own A-series ARM processors rather than x86 processors, Apple still could use the architecture switch to get rid of some of the Mac’s underlying flexibility. But it really does seem like the Mac is going to stay the Mac, distinct from the iPhone or the iPad.
The good
- Like most modern macOS updates, Catalina adds a bunch of small features that many people will appreciate, introduces new security measures that most people won’t be too bothered by, and removes legacy features that most people won’t miss.
- iPad apps on the Mac seem purely additive, for now. Developers with full-featured Mac apps will mostly keep offering them; most of the new iPad-style Mac apps will be things the platform didn’t have before.
- New first-party Catalyst apps are generally pretty good and an improvement over the samples we got in Mojave.
- The Great iTunes Breakup is beneficial for just about everyone, including people who want to keep managing local media libraries and syncing them to an iPod like it’s 2004.
- Sidecar is a cool and genuinely useful way to make Macs and iPads work better together (same goes for the related iPad-centric markup features).
- Catalina runs on (almost) all the same hardware as Mojave.
The bad
- Most people will not notice the absence of 32-bit app support most of the time. But especially if you use older or independently developed apps, you’re eventually bound to run into something that won’t work on Catalina even if it worked just fine in Mojave.
- New security checks can be annoying, especially on a fresh install. This may get worse for some apps when notarization becomes mandatory in early 2020.
The ugly
- Apple’s operating system releases have all seemed a bit rushed this year—go ahead and give the company a couple of months to patch Catalina before you install it, if you can.

Andrew is a Senior Technology Reporter at Ars Technica, with a focus on consumer tech including computer hardware and in-depth reviews of operating systems like Windows and macOS. Andrew lives in Philadelphia and co-hosts a weekly book podcast called Overdue.