Ars puts five home 3D scanning options to the ultimate test—scanning kids and clay cats.
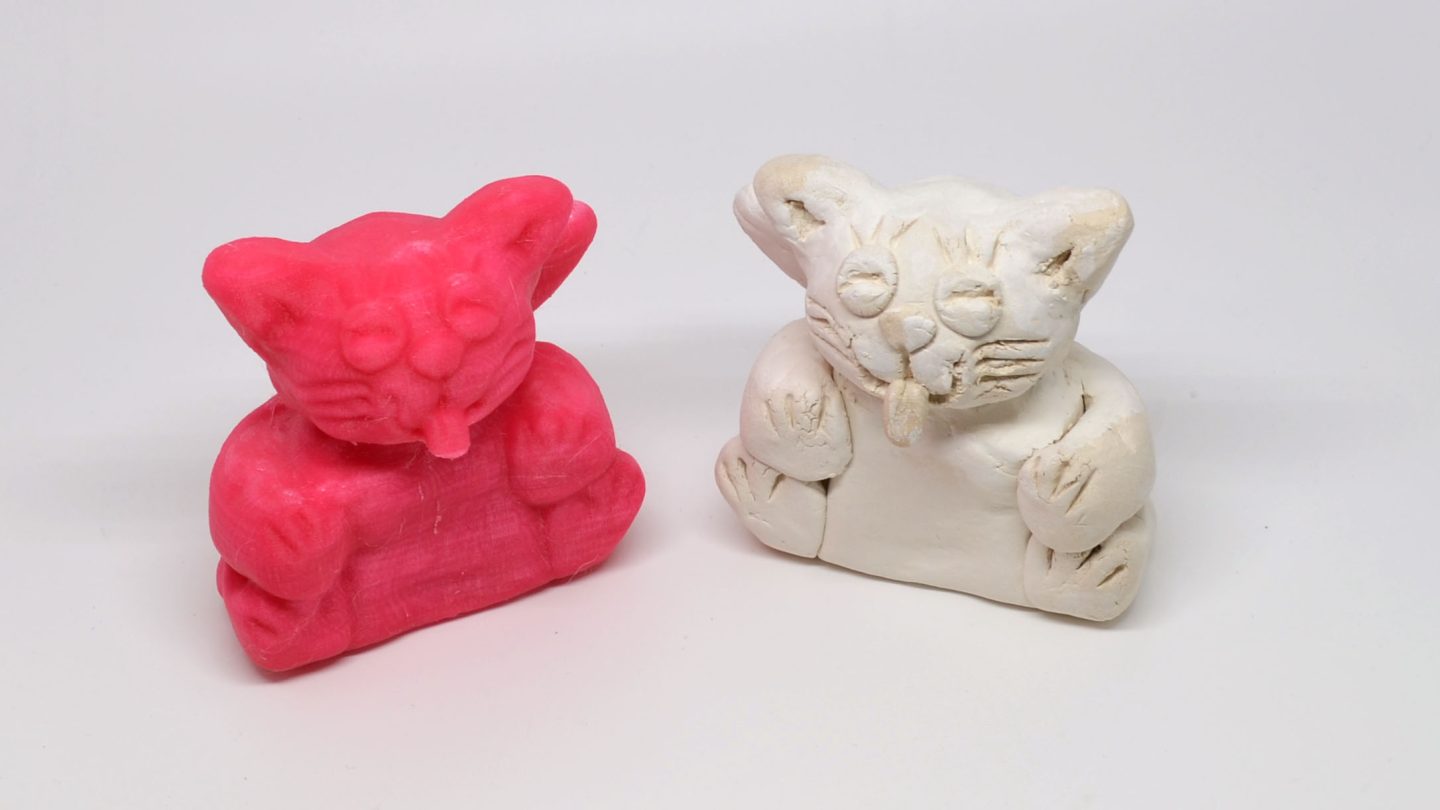
Although the basic shape was captured, the final output (right) lost a lot of the original clay model’s (left) details. While the printer would be able to replicate the model’s detail, the scanning process itself would require a lot of additional editing to provide suitable output. Credit: Bill Loguidice
The odd documentary, feature article, or typical marketing hype may make you think that today’s 3D scanning can perfectly capture the real world, but that’s only true with expensive, professional equipment (not to mention considerable editing and post-processing). Generally, current consumer versions of 3D scanners produce decidedly modest results.
Still, personal 3D scanning has made great strides in recent years. And though it continues to take a backseat (in market- and mind-share) to 3D printing, 3D scanning has grown into a technological revolution worth exploring all on its own. So let’s look closer at two of the main personal 3D scanning categories available: software- or hardware-based solutions that work with equipment you may already have and hardware-based solutions that are mostly self-contained. As a bonus, we’ll also look at services where you can view and store 3D models, as well as ways to turn your 3D models back into physical objects.
While it’s impossible to provide an exhaustive look at the ever-growing number of 3D scanning products, this selection of solutions should provide a solid overview of what’s currently possible and where this technology might be headed next.
The basics
3D scanning is broadly defined as using a combination of hardware and software to analyze a real-world object or environment, collect usable data on its shape and other attributes, and then convert it into a digital model. While professional 3D scanners can easily reach into the tens of thousands of dollars and beyond, the price for the hobbyist user generally ranges from free (if you already have a good smartphone, tablet, or other camera) to a few thousand dollars for more purpose-built solutions.
Whatever the price range, most 3D scanning solutions targeted at hobbyists are limited to capturing features no smaller than 2 to 10 millimeters, or about 0.08 to 0.4 inches. While this is good for capturing the general shape of an object, fine details get lost and either need to be manually recreated or done without. Of course, even if a virtual recreation is only approximate, there’s still an advantage in having a rough digital model. Once an object is digital, all kinds of possibilities for manipulation, usage, and 3D printing open up.
Most consumer-based 3D scanning solutions rely on one of five approaches: photogrammetry, structured light, laser triangulation, RGB-D, or Time-of-Flight (ToF) technology. Naturally, each type of technology has its own pluses and minuses. In general, photogrammetry is fastest with the lowest barrier to entry; structured light and laser triangulation often provide the highest resolution and detail; and RGB-D and ToF offer a good mix of high speed and low barrier to entry, albeit with limited resolution. For the solutions that require a computer, using a laptop is generally preferred over a desktop since it offers more mobility, which becomes important when looking for a good environment to scan within and needing to look at a screen to preview a capture.
We’ll stick with Commercial Off-The-Shelf (COTS) products here. This batch of products typically excludes the more do-it-yourself RGB-D (depth sensor and camera) and ToF (determines the distance to an object by measuring how long its infrared beam takes to reflect back) solutions since they require a user to piece together their own setups. For instance, the RGB-D-based Microsoft Xbox Kinect 360 hardware needs to be paired with a USB and power supply adapter to work on Windows 7 or later computers with the powerful ReconstructMe software. Similarly, the ToF-based Microsoft Kinect for Xbox One sensor needs to be paired with the Kinect Adapter for Windows, and it utilizes Microsoft 3D Scan for Windows 8.1 or later.
Regardless of technology used, 3D scanning solutions struggle with reflective, shiny, or translucent objects. Objects with gently contoured surfaces with soft curves, varying or light color (white rubber spray or powder can be used on very dark objects to help with scanning), and matte finishes or objects that are opaque tend to scan the best. Lighting is also critical. You need a well-lit environment, period. Harsh, direct lighting will cause issues, so ambient light is best. Because of relatively slow capture rates on even the fastest technology, any type of movement from the target object also results in a failed scan.
Typically, once a 3D scan is acquired, there’s more work to be done. Most initial scans have stray objects, holes, and other issues that need to be addressed. Once edited, the 3D scan can then be exported to a specific file format, including STL or OBJ for 3D printing. Once exported, further editing may be necessary. For this overview, we’ll primarily limit edits to only correcting the most significant flaws using included or recommended software as part of the initial scanning process.
Front view of the Fuel3D SCANIFY. Note the optional tripod mount on the bottom of the unit. Bill Loguidice
Photogrammetry solutions: Fuel3D Scanify
At its core, photogrammetry technology uses multiple photographs taken from different angles. The Fuel3D SCANIFY hardware, which works with its Fuel3D Studio software, represents this approach in our scanning survey.
The Fuel3D SCANIFY Handheld 3D Scanner System for Windows 7 or later, or Macintosh computers, is described as a handheld, point-and-shoot 3D scanner that captures objects in high-resolution shape and color in just a tenth of a second. Although the most expensive product in this roundup (priced at $1,490.00 when we tested it, now available on sale for $799), the SCANIFY has a distinctly premium feel with a high-tech look. Perhaps the best way to describe its design is that it’s reminiscent of the front of some futuristic race car concepts.
The package comes with the scanner, three tracking targets, USB data transfer cable, AC power adaptor, International AC adapter connectors, warranty card, quick start guide, and a Fuel3D lens cloth. I was also supplied with a Fuel3D padded carrying case and an extra pack of 10 SCANIFY scanner tracking targets.
The quick start guide directs you to first register and then download the required Fuel3D Studio software. The Starter edition of the software is free and provides basic scan processing and file export, as well as up to 15 cloud processing sessions a month. Advanced and Professional packages carry a monthly subscription fee and feature more cloud processing sessions, advanced scan processing and editing, and more file export options.
After installing the software, plug in the USB cable and AC adapter. If you have a Windows-powered tablet, you can alternately buy the SCANIFY Mobile Package Cables (for $12.99), a battery pack, and a 3D printable battery and tablet mount for a more portable solution. In testing, I used the standard configuration with the AC adapter.
A tracking target placed near or on the object you’re scanning is a requirement. Without that, the scanner doesn’t know what to focus on. Because of this requirement, you may need to place smaller objects on a box or platform where the scanner target can rest (or stick, since a target has adhesive). You can also 3D print either a handheld or free-standing target holder, which can be downloaded from Sketchfab, a popular free service to publish, share, and discover 3D content online and in VR.
Fuel3D indicates that the SCANIFY is best for scanning the human form, fabrics, stone and masonry, wood carvings, stone sculptures, and plants or trees. If you want to scan something larger than the product’s field of view—which is approximately 12″ high and 8.5″ across, or 14.5″ diagonal—you’ll need to take and stitch together multiple scans. I limited target acquisition to single scans when testing.
Overall operation is simple. Once the SCANIFY is connected to its AC adapter and to your computer with its USB cable, you open up the Fuel3D Studio software and launch the viewfinder. Once the scanner and software find the target and indicate a Green status (meaning the object is at a perfect distance from the target), press both buttons on the SCANIFY to take a photo. You then accept or reject the captured image. Once accepted, the software starts processing the scan.
Accepting a scan. Bill Loguidice
While scanning is as quick as taking a photo, it sometimes takes time for the hardware to find and lock onto the tracking target. You’ll sometimes need to move forward and back to get in just the right position.
SCANIFY did a great job of capturing faces, including details other solutions missed. Inanimate objects were a bit hit or miss. My white clay cat test creation was mostly unsatisfactory, while a fabric rose proved a bit better, if dark. Unlike many of the other solutions in this roundup, objects with varying, instead of monochromatic, color are definitely recommended for optimal results here.
Although the SCANIFY captured a good amount of detail, my clay cat creation would require additional scans and re-work to create a sufficient 360-degree model. Bill Loguidice
Although the speed and quality of the SCANIFY’s captures are high, particularly when it comes to capturing relatively fine detail, I would have liked to have seen a more automated stitching process for easier creation of 360-degree models. The Fuel3D Studio software’s Stitch Tool, which allows you to join multiple 3D scans to create a complete, 360-degree 3D model, can be challenging. As it is, SCANIFY is most efficient for capturing a single angle of an object and generating the largest, highest resolution files of any solution presented in this roundup.
If the Fuel3D SCANIFY is a bit out of your price range, lower-cost photogrammetry-based solutions to consider are Trnio, Agisoft’s PhotoScan, and AutoDesk’s ReMake. Trnio is a free app for Apple iOS-based devices (recent iPhones and iPads) and is arguably the best current alternative to AutoDesk 123D, which, much to the chagrin of its fans, was officially shut down on March 31, 2017. Agisoft PhotoScan has a free 30-day trial, starts at $179, and runs on Windows, Mac OS X, and Linux (Debian/Ubuntu) computers. AutoDesk ReMake has a limited free version or a paid version that starts at $30 per month, and it runs on Windows 7 or later computers (the Macintosh version was retired).
Structured light solutions: XYZprinting’s 3D scanner
Structured light technology relies on projected light patterns and a camera for its scans. Within this scanning category, we evaluated five options starting with the structured light-based XYZprinting 3D Scanner and Structure Sensor. At only $199.95, and usually retailing for much less, the XYZprinting 3D Scanner is by far the lowest-priced solution in this roundup. This handheld scanner requires a Windows 8.1 or later computer or Mac OS X 10 or later computer and a single USB 3.0 port.
Inside the box is the scanner and a 4GB microSD card in a full-size adapter. Oddly enough, there are no printed instructions of any kind in or on the box. Fortunately, on the microSD card is the required Driver (Intel RealSense Depth Camera Manager F200), SDK, and software (XYZscan Handy and scanner-specific drivers), as well as a PDF manual, which is also available from the Website. After plugging in the scanner, you have to install the three software components manually, in sequence (it would be better if it did this automatically, but alas).
Although the setup process is rather cumbersome, the scanning process is fairly quick and intuitive. Select the mode between Head, Object, or Body, and then press the button on the scanner. The scanner projects invisible laser light on the target, then analyzes the speckle patterns that are bounced back with its depth camera. The scanner next calculates the patterns and converts them to 3D cloud points for processing by the software.
Regardless of mode selected, start from the object’s most protruding feature and, using the preview on your computer screen as a guide, steadily move the scanner until a complete image is generated. The only real catch with this process is that the scanner’s six-foot USB cord often gets in the way, so you’ll need to practice your cord management skills. A USB extension cord might help alleviate some of the tension depending upon how far away from your computer you need to be. (Of course, with a laptop, you could potentially use the scanner in one hand and hold the computer in the other as you move around your target.)
Scanning the clay cat. Bill Loguidice
In testing, I found it easiest to capture heads—bodies and objects required more care to scan correctly. Because of my relatively cramped test environment and fidgety test subjects (aka, my two oldest daughters), I was not able to get a successful body scan. While I was able to scan my test clay cat as an object, the textured model proved more appealing and detailed than the raw model, which wouldn’t have been suitable for printing.
With an object captured and saved, you’re encouraged to download XYZmaker and use that for editing (any other software that can edit OBJ files will work as well). In that software, you can edit, combine, and add further designs to your 3D scans. Assuming you have a compatible XYZprinting 3D printer, you can next send your scanned object for printing. If not, you can save the final printing process for your own 3D printer or 3D printing service’s software after you generate or convert to a suitable STL file.
For my own convenience, instead of using the more limited XYZmaker, I chose Autodesk’s popular Meshmixer, which is also free. As aligns with my goals for this feature, I did minimal editing other than to do simple automatic repairs on the model. Something to note is that the actual models are much smaller in size than the original target, which means that the model will have to be scaled up for printing. For printing, I also converted the file to STL format and used a New Matter MOD-t.
Considering the price of the XYZprinting 3D Scanner, the head scanning results were impressive. The scanner captures quickly at reasonable quality levels and with minimal fuss. Unfortunately, body scanning takes a lot of effort, including subjects who are able to stay still for the longer capture process. Its object capture capabilities don’t easily create objects suitable for printing. Object models are better left to viewing on-screen with textures intact.
If you’re looking for an alternative to the XYZprinting 3D Scanner, you may want to look into the Sense 3D scanner, which is more advanced but also a bit larger and double the price at $399.00.
Structured light solutions, option two: Structure Sensor
The Structure Sensor, which starts at $379.00, comes in a choice of Ice Blue or Silver colors and works with the iPad mini (2 or later), iPad (4th Generation), iPad Air (1 or later), or iPad Pro (9.7-inch or larger). The primary difference between those options is the way the Structure Sensor mounts—I used the Ice Blue with an iPad Pro 9.7-inch, which is the recommended model both in terms of overall performance and ease of mounting.
In the base package is the Structure Sensor, matching iPad bracket, Lightning cable, and access to the Structure SDK in case you want to develop apps that work with the scanner. There’s also a Complete Bundle that adds a USB Hacker Cable (which allows the scanner to interface with devices other than iPads) and a license to Skanect Pro, which is 3D scanning software for Windows or Macintosh computers that works with the Structure Sensor (or, optionally, the Microsoft Kinect or Asus Xtion).
After charging the sensor with the included AC adapter, I attached it to my iPad Pro. Once attached, I connected the Lightning cable between the Structure Sensor and the iPad. While the attached sensor does add some weight to the iPad and throws off its balance, it’s still light enough and easy enough to handle without issue.
Since there are no physical buttons on the Structure Sensor, everything is controlled from apps. There are dozens of apps that will work with the Structure Sensor, but I tried just a handful. The first app was the Calibrator app, which helps to align depth and color sensing with the iPad’s camera. Although it has an advanced indoor calibration mode, calibration is recommended using natural outdoor lighting, so that’s precisely what I used.
The next app I tried was the Structure app, which includes visualizations to show the raw data being captured and streamed by the Structure Sensor to the iPad. These visualizations include infrared, depth, and depth plus color. While this shows off the sensor’s basic capabilities and that everything is working correctly, along with verifying that it’s running the latest firmware, there’s not much more you can do unless you’re running the Skanect app on a Windows or Macintosh computer. Once running, as long as both the iPad and computer are connected to the same network, you can use the Uplink option to start streaming data from the sensor to the computer so you can process Body, Object, Room, or Half Room 3D scans.
The third app I tried was itSeez3D, which lets you scan a Bust (head), Fullbody (whole person), Object, or Environment straight from the tablet. The actual scanning process is straightforward, as you walk around your target per the directions on the screen until you reach 100 percent. Once scanned, you can do a quick low-quality local preview or use longer cloud processing to create a high-quality image. This works well, although there are no editing options—you’ll need another program to make changes to the model after you export it, if needed. You can send the model to Sketchfab or (for $6.99 per unique model) via e-mail. You can also tap the Web option and download the model as a .PLY, .OBJ, or .WRL file, which starts at $7 per unique model.
As itSeez3D scans a target, it creates a neat effect where it looks like it’s building a marble sculpture. The software and hardware combination does a great job of isolating a target from the background. Bill Loguidice
Next up was the Structure Sensor Scanner app, which lets you capture models and e-mail them to yourself for free in .JPG, .MTL, and .OBJ formats (the latter of which is good for 3D printing). This is a simple and straightforward capture application, but it works well for head shots and objects. The fact that you can export the models for free is a big plus.
The Scanner app is open source and takes good advantage of the iPad’s touchscreen. Bill Loguidice
Overall, the Structure Sensor proved to be the most versatile package in our roundup, and it provided the best overall results. While it doesn’t have the fastest scan times, they are faster than many of the other solutions, and certainly the final models are of high quality. If you already have a recent iPad, the cost of entry is also extremely competitive. About the only deficiency is the lack of a unified software package that does everything, but even that deficiency is partially mitigated by the scanner’s ability to work with a staggering array of apps.
The Matter and Form 3D Scanner with an example of an ideal object to capture. There’s a removable plug in the center of the turntable bed that features a threaded socket for a tripod mount to help hold unstable objects in place. Bill Loguidice
Laser triangulation solutions: Matter and Form 3D Scanner
The premise of laser triangulation technology is to collect a series of profiles from a projected laser line, and the Matter and Form 3D Scanner exemplifies this. At $519.99, it works with Windows and Macintosh computers over a single USB 2.0 connection. Once unfolded, connected to AC power, and then connected to your computer, you calibrate the scanner per the software’s instructions using the included Calibration box. More so than any other solution in this roundup, proper lighting conditions are crucial for this scanner’s proper function.
Once properly calibrated, you place your object on the turntable and tell the software whether it’s a mostly single-colored object or a multi-colored object. The former can take minutes, while the latter can take hours. If you wish to tweak the settings, manual controls are available, but usually the automatic settings work just fine.
As the scan progresses, a laser line is focused on the object as the turntable slowly rotates and the scanning carriage (camera) moves vertically on its track. It’s quite noisy when it moves the scanning carriage up and down, but most of the rest of the time there’s just a gentle whirring.
A scan of the clay cat in progress. Bill Loguidice
It’s recommended that scans are taken from at least two different angles: the first with the object positioned normally and the second with the object facing down. This positioning allows for a more complete scan of a particular object, with the software doing a fantastic job of automatically merging the two captures.
Once satisfied with the scan results, it was time to combine the two scans and then clean the models. Through a combination of manual and automatic processing, I had what appeared to be a reasonably clean model, which I exported to STL. With the STL file created and looking good, I sent it to print. The end result was excellent.
The final model (left) printed in PLA on the MOD-t. The Matter and Form 3D Scanner produced the closest reproduction of the original clay cat model (right) out of any of the solutions in this roundup.
Credit: Bill Loguidice
The final model (left) printed in PLA on the MOD-t. The Matter and Form 3D Scanner produced the closest reproduction of the original clay cat model (right) out of any of the solutions in this roundup. Credit: Bill Loguidice
The most difficult part of working with the Matter and Form 3D Scanner was getting the lighting right. I found that going into the multi-color scan option allowed me to see what the scanner was seeing and adjust my lights accordingly. After that, I went back into the calibration process before beginning a new scan.
Another difficult part was figuring out whether to tell the scanner that the object was single-color or multi-color. The included frog toy, which you should use to get familiar with the scanner’s functionality, is mostly green, but it does have black and white eyes and a red tongue in a black mouth. After being dissatisfied with the single-color results, I went for multi-color. The digital manual does include a flowchart to help guide your decision, but it’s still a bit confusing. (Frankly, anything that requires a decision tree to figure it out is probably overly complicated.) In any case, as with the other aspects of 3D scanning in general, trial and error will lead you to the best results for your particular object. In the end, I was certainly satisfied with the reproduction of my clay cat model.
While this should have been one of the better scanning processes, the requirement to have near-perfect lighting conditions sours the experience a bit. When you are able to get good lighting and a good model, the resolution and detail is comparatively impressive and makes for nice 3D prints, particularly if you don’t mind doing further edits. The fact that the included software is mostly self-contained, with good ease-of-use and just the right feature-set, is also a nice bonus that some of the other solutions in this roundup should take note of.
If you’re looking for an alternative to the Matter and Form 3D Scanner, check out the Shining 3D EinScan-S 3D Scanner. It’s about double the price but also a bit more versatile.
Laser triangulation solutions, option two: XYZprinting da Vinci 1.0 AiO
The XYZprinting da Vinci 1.0 AiO is a mid-range 3D printer with a heated bed that makes use of XYZprinting’s proprietary printing filament. There’s also a built-in 3D scanner with software that works with Windows and Macintosh computers. Similar to the Matter and Form 3D Scanner, you start by placing the scanning target object on its turntable.
As with other scanning solutions, lighting is critical, but in this case you can simply turn off all direct sources of external light, plug the two side vents (which need to be open when 3D printing) with the included plates, close the printer door, and let the internal lighting system do its thing. Before starting your first scan, you also have to calibrate the scanner using the included chessboard calibration plate. But once calibrated, you’re ready to scan.
The maximum allowable weight on the turntable is 3 kgs (6.6 lbs), and the object’s dimensions (diameter x height) must be between 3×3 cm (1.18×1.18 in) and 15×15 cm (5.9×5.9 in).
After scanning, you have rudimentary editing options, including artifact removal and smoothing. For my test capture, I didn’t need to remove any artifacts and didn’t need to smooth. Once satisfied with the basic model, I sent it to XYZware for printing.

After confirming the edits and sending the object to print.
Credit: Bill Loguidice
After confirming the edits and sending the object to print. Credit: Bill Loguidice
Once loaded in XYZware, it asked to repair the model, which is referred to as making the model “water tight.” This necessary step for 3D printing ensures there are no holes in the model, which would cause the print process to fail. Once the model was successfully repaired and imported, I selected all of the default settings and did no further edits other than changing the print quality to maximum to help ensure the highest quality reproduction.
Because everything was self-contained, this was by far the easiest scanning process and the quickest way to print. Unfortunately, as you can see from the end result of the scan, this is still a long way from a copy machine. In fact, multi-colored and objects with a lot of black gave the da Vinci 1.0 AiO even more of a problem. As such, despite the promise of its workflow, the models it captures require more editing than many of the other solutions in this roundup to better match the quality of the printer.
For an alternative to the da Vinci 1.0 AiO, you may want to check out the Aio Robotics Zeus. It’s sleeker and more feature-packed, but it’s also more than double the price at $2,237.37.
Conclusion
As it stands, personal 3D scanning requires far more of a commitment than even 3D printing, which has itself made great strides in usability and overall ease-of-use in recent years. For now, 3D scanning is best left to those who can make a serious hobby out of what this potentially fascinating technology has to offer. As is evidenced by many of the products in this roundup, usability and ease-of-use have progressed a lot, and they should continue to make big strides much like 3D printing has.
Regardless of the specific model tested, the one issue I consistently ran into was one of lighting. I can’t stress enough the reliance of today’s technology on good lighting conditions. Perhaps even more so than learning how best to process your scans, learning how to light your subjects is vital to overcoming the peculiarities of your chosen scanner.
While I’ve touched on a lot of personal 3D scanning technology today, this quintet literally just scratches the surface of what’s out there. A good way to get an even better handle on the technology and some of its possibilities is to check out the models on Sketchfab. (You can also see many of the models that I captured for this piece there.)
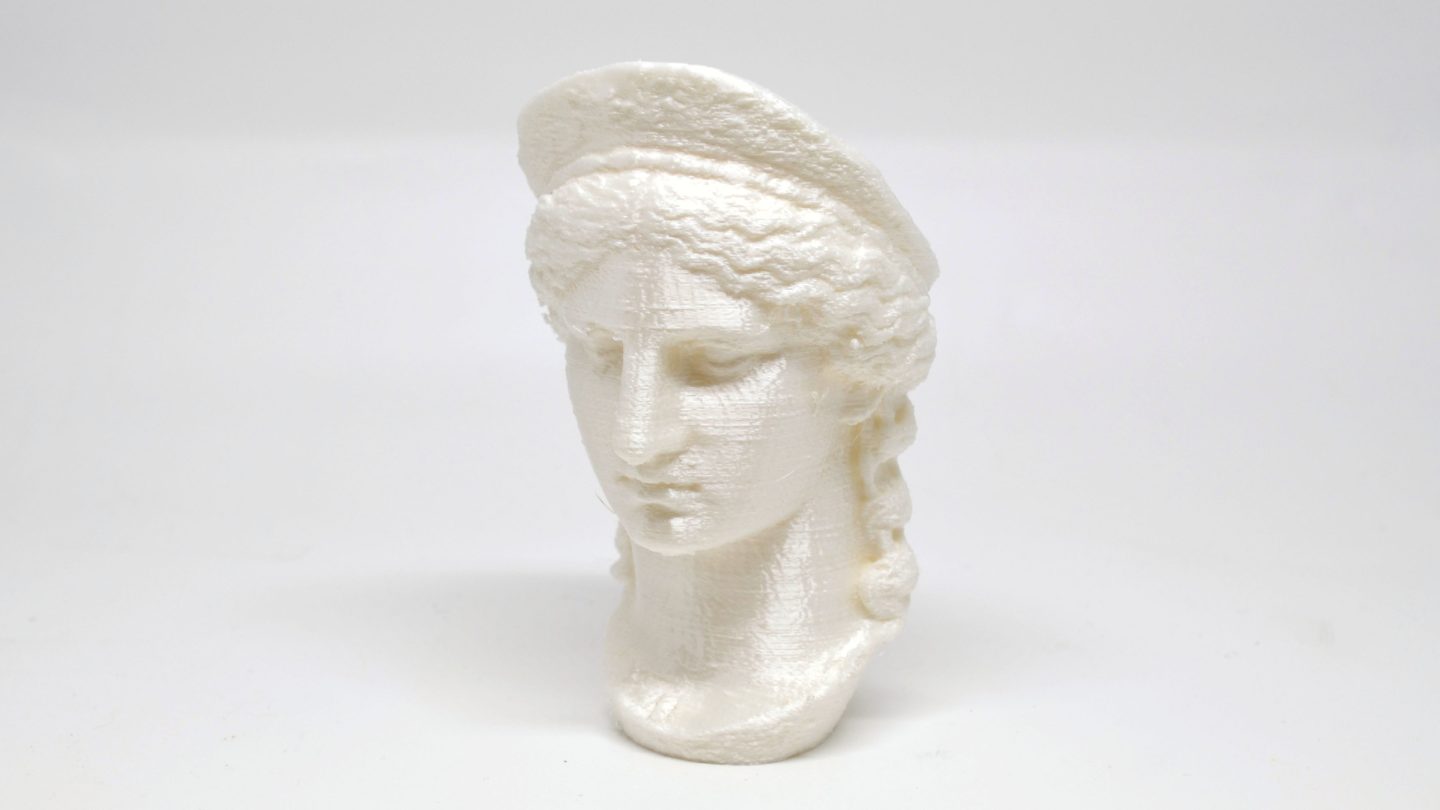
The Juno Ludovisi from the “Scan the world” project printed in PLA on a MOD-t.
Credit: Bill Loguidice
The Juno Ludovisi from the “Scan the world” project printed in PLA on a MOD-t. Credit: Bill Loguidice
If you really want more of a taste for 3D scanning, another interesting initiative to investigate is the “Scan the world” project, which gives 3D printer owners (or those who want to use a 3D printing service) access to famous and unique art pieces through 3D scanning technology. It provides a great example of what can be achieved with higher-end equipment and good editing skills. Hopefully, it’s also a glimpse of what will eventually become the reality for lower-priced, more consumer-friendly solutions.
Bill Loguidice is a long-time technology author and journalist who runs the online publication Armchair Arcade and creative services firm Armchair Creative Services. He tries—but often fails to—keep on top of a videogame and computer collection that exceeds 500 systems.