Would it surprise you to discover that there exists an automated method for backing up Apple Notes built right in to your Mac?
There has been a good amount of discussion in forums and across the web from Apple users bemoaning the lack of a built-in capability to create a backup of their work within iCloud Notes on the Mac and iPhone.
Would it surprise you to discover that there exists an automated method for backing up Apple Notes built right in to your Mac?
If you are regularly backing up your Mac to an external drive through Time Machine or the powerful Carbon Copy Cloner, then you are already backing up the complete content of your Notes database that includes both your written text content and attached documents.
The key folder that contains all your Notes data locally in an SQLite database for both On My Mac (if used) and iCloud is located in the directory: ~/Library/Group Containers/group.com.apple.notes/
The ‘group.com.apple.notes’ folder contains everything you need to properly restore the complete contents of each and every note in your Apple Notes database, including attachments, in case your data is somehow lost or corrupted.
The beautiful thing about this folder is that it gets automatically backed up with Time Machine or Carbon Copy Cloner (based on your configured schedule) when your backup drive is attached to your Mac.
Let’s take a look at using these two different backup and restore solutions and one bonus option at the end of this guide.
Time Machine makes hourly, daily, weekly and monthly incremental backups of the current state of your files and folders for each backup session. It also keeps local snapshots on your Startup Disk (should you lose your external backup drive). If any corruption or data loss occurs to your files which importantly includes Notes data in On My Mac or on iCloud servers (even if unlikely), you are covered with a version of your database that will not include any of these issues.
Time Machine is accessed from System Settings>General>Time Machine:

Connect your Backup Disk to your Mac (common wisdom recommends 1.5 x larger size than your Mac’s internal drive capacity)
Click ‘Add Backup Disk…’ and select your attached drive
Time Machine will start making a full backup of your Mac’s Data Volume. You can also now customize the frequency of backups and snapshots from within Time Machine’s settings if you find too many backup operations occurring while you are using your Mac. The key is to find the right balance between robust and redundant backup and your computer’s performance. You can also select the option to disable backups while on battery to preserve your MacBook’s power when unplugged.
Let’s look at restoring Notes from Time Machine.
Completely Quit (⌘-Q) Apple Notes
Navigate to the ~/Library/Group Containers/ directory (⇧Shift-⌘Command-Period(.) reveals the normally hidden ‘Library’ folder)
Click on the Time Machine icon in the menu bar (with backup drive attached) and choose ‘Browse Time Machine Backups’
Click the arrows to the right of the Finder window or the timeline on the right side of your display to select the Notes database version from the desired backup date
Select the ‘group.com.apple.notes’ folder in the Time Machine window
Choose ‘Restore’ from bottom of the Time Machine window
After completion of the operation, open Notes and allow your files to completely sync both locally and with iCloud
You have now restored your entire Notes database from a Time Machine backup!
Carbon Copy Cloner (CCC) is an outstanding backup application that allows you powerful options to configure your backups just the way you want them. It can be purchased directly from the developer for $49.99.
CCC gives you the capability to set up the exact schedule for when your backups take place. It’s generally a good idea to choose a run time when you are usually not actively using your Mac. And for frequency, daily is good for greater redundancy of your important files, like your Notes backup folder! Snapshots are also supported by Carbon Copy Cloner if you enable the feature, which you definitely should.
Once you have set up your backup schedule, you can then make sure that snapshots are enabled:
Open CCC and Right-click the Backup Destination Drive
Click Manage snapshots on ‘Backup Drive Name’…

At the bottom of the backup drive window, turn CCC Snapshots: On

In the bottom-right corner of snapshot options enter something like 200 or 250 GB to maintain reasonable balance between space available for regular backups and file redundancy (depending also on backup drive size):

If you’ve gone for the CCC backup route, you now have a reliable and redundant backup of not only your entire Mac, but more specifically your complete Apple Notes database. We’ll now explore this path further.
Important: When beginning the restore procedure, the first thing you must do is Quit Apple Notes, so that it is completely closed on your Mac.
Navigate to the special local mirror folder that contains your On My Mac and iCloud notes located in this directory: ~/Library/Group Containers/group.com.apple.notes/
You can find the ‘group.com.apple.notes’ folder in a Time Machine backup or snapshot of your latest previously known good version of the Notes database. Make sure your external drive is connected to your Mac for the greatest number of folder backup versions available to choose from. If by some fluke, you can’t access your external drive, you can use local snapshots stored on your system drive.
To expose the ‘Library’ directory in your ‘Users’ folder, you may need the keyboard shortcut: ⇧Shift-⌘Command-Period(.)
The Notes backup folder can also be found by navigating to your CCC external backup drive or a snapshot that can be opened directly in CCC and then locating the ‘group.com.apple.notes’ folder.
Click your backup task under CCC Tasks (upper-left corner)
From the Destination pane, Right-click your backup drive and choose Manage snapshots on ‘Drive Name’…
Right-click the desired snapshot listed by date and choose Browse in Finder
Open the ‘Users’ folder and then open your user account
Press the keyboard shortcut ⇧Shift-⌘Command-Period(.) to reveal the hidden ‘Library’ folder and open it
Open the ‘Group Containers’ folder
Locate the ‘group.com.apple.notes’ folder:

Press the shortcut ⇧Shift-⌘Command-G and paste ~/Library/Group Containers/ in the Go to Folder… window
You should now have your snapshot window open with the backup folder selected and your live system ‘Group Containers’ folder open in another window
BEFORE CONTINUING: Make sure you have Quit Apple Notes (⌘-Q) and that the application is completely closed on your Mac which you can verify by opening the App Switcher (⌘-Tab) and confirm Notes does not appear in the list.Drag the desired ‘group.com.apple.notes’ folder from the snapshot or backup drive directly into the ‘Group Containers’ window on your Mac’s system drive
A dialog box will appear asking if you want to replace the existing item with the one you’re moving: Click ‘Replace’
After the operation completes, you will now have replaced your problematic Apple Notes database with the most recent known good version!
If you used a snapshot in CCC rather than an external backup drive, make sure to Right-click on your snapshot in the CCC Snapshots list and choose ‘Unmount’
Open Apple Notes and allow everything to sync up locally and with iCloud properly before continuing with your work
There is an incredibly powerful application that allows complete management of your iPhone and iPad directly from your Mac called, iMazing. It is available for commercial purchase at $39.99 and they usually run special sales around the Holidays. Not only does it allow you to make complete encrypted backups (including archives) of your devices to an external drive, but it also has the capability to export data from specific apps on your device. Fortunately for us Notes users, this feature can export all the Notes data contained on your iPhone. Creating a full backup of your iPhone/iPad with iMazing gives you the ability to extract your complete database of notes in text format or PDF.
It is worth noting that attachments are saved separately to their own folder. And in my experience, PDF attachments are converted to .png files, so don’t rely on this method for multi-document PDF recovery. Also, restoring an entire Notes database from iMazing is not as convenient as the direct backup folder method detailed above, but it can restore your important work in a pinch if all else fails.
This method is best attempted by first testing the Text and PDF Export option on a few individual notes to see which one most accurately preserves the formatting of your files.
The following describes how to use the Notes Export feature of iMazing.
Plug your iPhone into your Mac with a USB cable (iMazing should launch automatically)
Click your device name in the upper-right corner of the iMazing window and choose from your Backups list the desired backup date
Click View from the options pane
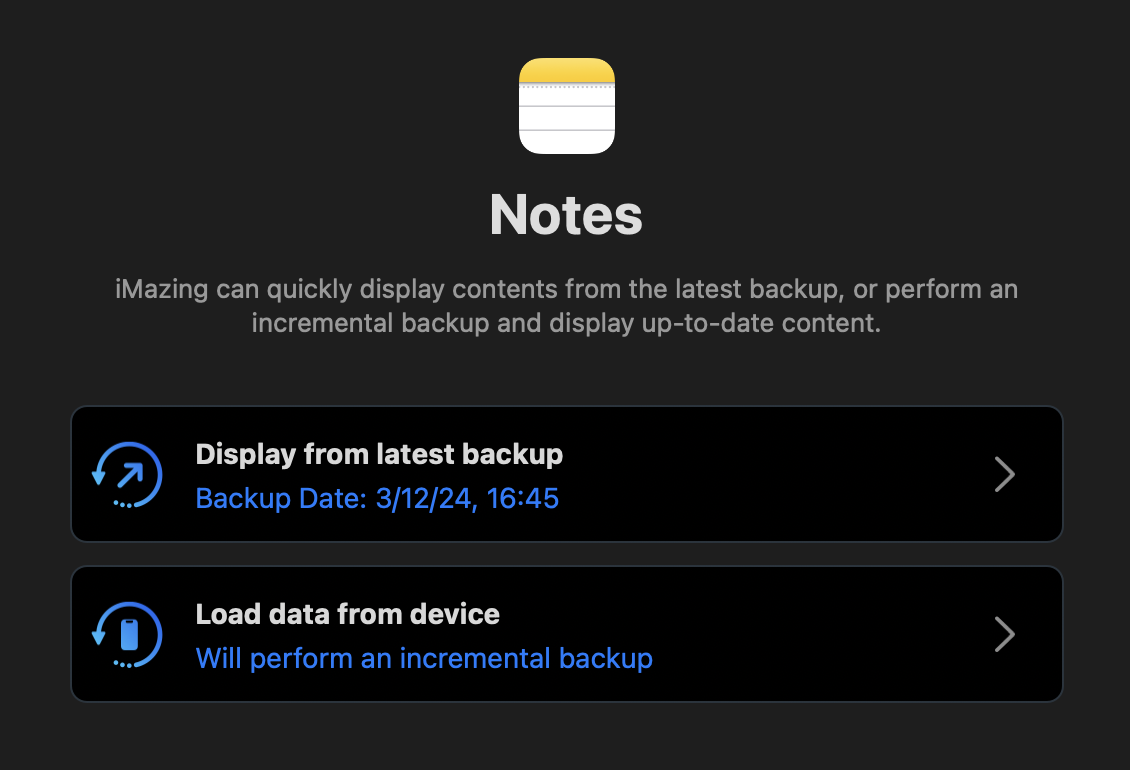
Click Notes in the top of the iMazing App Data window (if you selected a previous backup, Notes data will be displayed, otherwise you will see the screen below step 5)
Choose the Display from latest backup or Load data from device:
Click in your Notes list and press ⌘Command-A to Select All or select individual notes with ⌘Command-click or a series of notes by Date with ⇧Shift-click
Click Export to Text (or Export to PDF if preferred) and create a folder in the ‘Documents’ directory titled something like ‘iMazing Notes’ and click ‘Choose’
Attachments: Return to the iMazing Notes data list and press ⌘Command-A to Select All notes or select individual notes with documents you want exported and click Export Attachments
Create a folder in ‘Documents’ titled something like ‘iMazing Notes Attachments’ and click ‘Choose’
You now have exported copies of your important notes and attachments ready to recover into Apple Notes!
Now that you’ve learned the techniques in this guide, you no longer have to worry about losing valuable work from within Apple Notes. There is nothing stopping you from relying on Notes for those new important projects and resting easy that your hard work is safely backed up.
I hope you’ve enjoyed this edition in the Apple Notes Unleashed Series!
Use Time Machine to back up - Apple Support
https://support.apple.com/en-us/104984
About Time Machine local snapshots - Apple Support
https://support.apple.com/en-us/102154
3 Ways to Back Up Apple Notes on Your Mac
https://www.makeuseof.com/how-to-back-up-apple-notes-mac/
Backing up apple 'NOTES' - What is the best way?https://forums.macrumors.com/threads/backing-up-apple-notes-what-is-the-best-way.2305423/
Remember Time Machine? Here's how to use one of the best features of macOS
https://www.imore.com/apps/mac-apps/here-are-some-important-time-machine-tips-for-your-mac-to-keep-in-mind