
These are my thoughts on how to do backups at home for a couple of Linux servers and laptops, as well as automatically copying the data offsite. It's not exactly plug-and-play, but that's not how we do things around here anyway.
The strategy
There should be a central backup server. It launches the backup jobs. These backup jobs should be able to reach into surrounding servers and copy the changed files back to it.
The backup server should do this every day, automatically. And the backup server must have some sensible safeguards in place, so that if it's ever physically stolen (it is local storage after all) no backup data can be accessed, and no other remote system can be accessed using the backup server. So we're looking at:
- RAID redundancy
- Encrypted disks
- SSH with public key
- Passphrase protected key
- Cron jobs to automate the thing
- Monitoring for the backups
The hardware
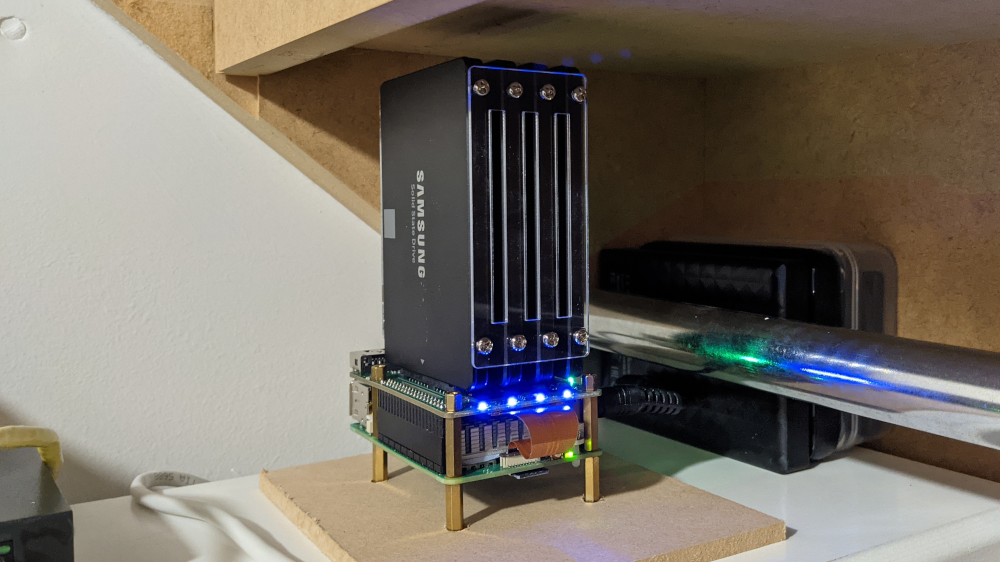
I wanted a low-power backup appliance that would likely not have any mischief on it. No subscription. No dialling out please. I dug around the NAS eco-system but realised I could get where I wanted to go with a Raspberry Pi and a magic hat.
A magic hat
Radxa make a little HAT for the Raspberry Pi 5 which allows you to stick four SSD disks onto a Pi. It's kind of a freaky little Frankenstein and I love it.
Jeff Geerling already made a fantastic post about the hardware side of things
over here.
I basically did exactly the same thing (including breaking some of the heatsink blades off - gah!).
Jeff installed Open Media Vault on it when setting up RAID, but I thought it might be
helpful to get under the hood a little.
RAID5
I decided to go with RAID5 in a four disk setup. It can withstand losing any one of the disks without losing any data. You only get the capacity total of three of the disks, so my 4TB worth of disks turns into 3TB max.
I also mirror this entire array offsite, juuust in case more than one disk stops working at a time (which would be a definite data loss scenario).
So for my little Raspberry Pi, the disk layout looks like four 1TB disks, represented
by the devices sda, sdb, sdc and sdd (and one operating system disk mmcblk0 that we won't
worry about). It should look like this if you list the block devices:
# Make the RAID array show up as the device /dev/md0 # Keep running this until the array appears to be complete (might take a while) # Save the configuration and update the kernel
$ lsblk
NAME        MAJ:MIN RM   SIZE RO TYPE  MOUNTPOINTS
sda           8:0    0 931.5G  0 disk
sdb           8:16   0 931.5G  0 disk
sdc           8:32   0 931.5G  0 disk
sdd           8:48   0 931.5G  0 disk
mmcblk0     179:0    0  29.7G  0 disk
├─mmcblk0p1 179:1    0   512M  0 part  /boot/firmware
└─mmcblk0p2 179:2    0  29.2G  0 part  /
Let's create the RAID array on those four disks.
Once that's done, reboot the machine a few times and make sure the array appears
assembled upon boot. Look for "UUUU" in /proc/mdstat and run mdadm --detail /dev/md0.
Encryption
Now we want to ensure that the entire RAID array is encrypted. This means that
should the device be unplugged (i.e. or stolen) that the disks revert to being
encrypted again and will require a password to be decrypted.
# Setup the raid array (represented by /dev/md0) as one big encrypted volume # A "decrypted view" of the RAID array will be exposed by the kernel, shown here # Make a filesystem on this decrypted pseudo-device # The -m0 is like, nah don't reserve 5% of the disk for emergency use # Mount the new device onto the filesystem, ready to use! # And check everything looks more like this now
It's pretty bonkers, but you now have the four disks (sda, sdb, sdc,
sdd) assembled in a RAID array (md0) which is encrypted and exposed as a
pseudo-device (/dev/mapper/disk) which can then be mounted like a normal disk
onto the filesystem.
Pfft, easy 😇
But I recommend practicing the decryption and mounting a few times.
Like:
cryptsetup open ...
mount /dev/mapper/disk ...
(use disk)
umount /dev/mapper/disk ...
cryptsetup close ...
and repeat. Until you're comfortable with it.
Automatic mount
Here's a handy script that I have to run when the machine first boots. It
ensures I have manually decrypted the RAID array, and unlocked the ssh key
that's used for backups (more on that later). Also it's idempotent, you can run
it again and again no problem. Note: "unlocking" the machine in this way is
intentionally a manual process.
# Run this script when machine first boots. # It decrypts the RAID array and unlocks root's ssh key # Check array # Reset things # Open encrypted raid array # Check passphrase ok # Mount array under /mnt/nas # user_xattr: extended filesystem attributes a feature that I love # Check everything looks ok (the set -e at the top will exit the script if problems) # Restart nfs (if exposing the array over nfs) # Unlock root's ssh key (which lives on the encrypted volume)
mount.sh
#!/bin/bash
set -euxo pipefail
Running backups
Here's a *sample* of the cron jobs. The first job backs up one particular server to the
RAID array, the second backs up the entire RAID array to an offsite server
(that also has an encrypted disk, albeit not RAID).
# Back up the server named rosie # Mirror the entire raid array to an offsite backup
crontab
0 4 * * * cd /mnt/nas && make backup-rosie >> /mnt/nas/backup-rosie.log 2>&1
0 5 * * * cd /mnt/nas && make sync-array-offsite >> /mnt/nas/backup-offsite.log 2>&1
The cron jobs invoke "make targets". The Makefile contains those targets. They look something
like this:
/mnt/nas/Makefile
.PHONY: init backup-rosie sync-array-offsite
.ONESHELL:
init:
set -e
date
test -d /mnt/nas/lost+found
The make targets use rsync; rsync uses ssh; ssh uses the persistent
authentication socket that we setup with the ssh-add command in mount.sh above.
I.e. we need a way for ssh to access/unlock its keys when we're not physically sitting in front of the terminal (i.e. via cron) so when the machine first boots we manually create a socket for the backup jobs to use.
Note: the ssh key file actually lives on the encrypted RAID device too, so no disk decryption? Then no ssh key.
The Makefile invokes rsync for the backup transfers, which means you'll need to setup the destination machines to permit ssh access. This typically means putting your public key (obtained with: ssh-keygen -y -f ~/.ssh/id_ed25519) into the remote host's ~/.ssh/authorized_keys file.
Btw if you want to see what the offsite backup appliance looks like - and you'd better get ready to mask the interplanetary level of surprise you're about to feel - it's also a Raspberry Pi. But with a single disk attached. It lives in a cupboard at another person's house, quietly siphoning their wifi. But don't worry they totally know about it.
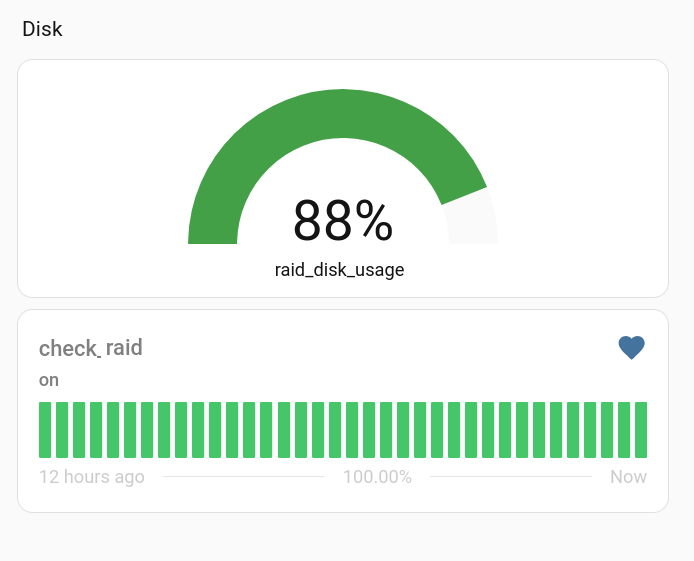
Monitoring
Y'all are gonna love this. So I run Home Assistant and I figured well, it's always on and doing stuff, why not get it to monitor my RAID server? And well, now it monitors all the other various home servers too!
There's a script being managed by systemd that runs a little webserver on port
8080 of the backup server. It publishes a couple of bits of information:
a) whether the RAID array is healthy, that is, are all four disks going ok, and
b) the total disk usage percent, have we filled up the array?
The relevant bits from the code basically serve the output of:
# Percentage of disk used on /mnt/nas # Healthy RAID if all disks are up (UUUU)
Then we've got a bit in our Home Assistant configuration that sets up
a couple of sensors:
raid-info.py
if path == "/raidusage":
Once those are firing, it's a simple matter to jump into Home Assistant and create whatever
sort of a Dashboard and alerts/automations you like...
configuration.yaml
sensor:
  - platform: rest
    resource: http://nas.lan/raidusage
    name: raid_disk_usage
    unit_of_measurement: "%"
    state_class: measurement

binary_sensor:
  - platform: rest
    resource: http://nas.lan/raidhealth
    name: check_raid
Toasties and Wolf Hearts
Well, thank you for coming along on another sordid journey with me. Hopefully there are enough breadcrumbs in this article to lead you to where you want to go. Maybe this blog should have been called "My Guilty Systems" or "Tales From De Crypt", but here we are.
There are probably a couple of improvements loitering in the distance, it might be nice to put a case on the Pi, and maybe do some more advanced server monitoring of it (temperature at least) but for now it seems to be working very well - much like a ham and cheese toastie at 9:00pm. It'll do.
Btw I don't actually have a server named Rosie, I do however have temporary possession of this little monster of the same name:

Do not be fooled by her calm demeanor, for in that tiny body lies the heart of a wolf.