This post is an introduction to topics in compute (or data-parallel) programming. It is designed to be read before its companion article, Fundamentals of Image Processing. In this article, we will cover the basics of setting up the compute pipeline and executing kernel functions on large sets of data in parallel. The companion article covers the basics of image processing and builds on the foundation laid here.
Kernel Functions
We have already seen the Metal shading language in action in previous posts. In this post, we introduce a new kind of shader function: the kernel function. Kernel functions allow us to build massively parallel programs that operate on many pieces of data at once. I will use the terms “kernel function”, “compute kernel”, and “compute shader” interchangeably.
A kernel function is identified in shader source by prefixing it with the kernel keyword, just as we prefix other types of functions with vertex or fragment. One difference between these types of functions is that kernel functions must return void.
The following snippet is an example of a kernel function signature. The new attributes introduced in this function signature will be discussed in detail later on.
kernel void kernel_function(texture2d<float, access::read> inTexture [[texture(0)]],
                            texture2d<float, access::write> outTexture [[texture(1)]],
                            uint2 gid [[thread_position_in_grid]]);
The Compute Pipeline
Building the compute pipeline is similar to building the render pipeline for our work with 3D rendering. Instead of a renderer class, we create a context object to hold onto various Metal objects.
The Context Class
The context wraps up the device, library, and command queue, since these are long-lived objects that will be referenced by every filter.
The context class has a very simple interface. Calling the +newContext factory method returns a context with the system default device.
@interface MBEContext : NSObject

@property (strong) id<MTLDevice> device;
@property (strong) id<MTLLibrary> library;
@property (strong) id<MTLCommandQueue> commandQueue;

+ (instancetype)newContext;

@end
There is one serial command queue per context. This allows us to serialize work items, such as image filters that may have data dependencies between them.
Creating a Pipeline State
Building a pipeline state for executing kernel functions is a little bit simpler than creating a rendering pipeline. There is no equivalent to the MTLRenderPipelineDescriptor for compute pipelines, because the only configurable part of the compute pipeline is its associated kernel function.
As with vertex and fragment functions, kernel functions are retrieved by name from a library:
id<MTLFunction> kernelFunction = [library newFunctionWithName:@"kernel_function"];
The compute pipeline is then created by asking for a compute pipeline from the device. If an error occurs when compiling the kernel function for the target hardware, the error will be returned in the error parameter, and nil will be returned.
id<MTLComputePipelineState> pipeline = [device newComputePipelineStateWithFunction:kernelFunction error:&error];
Creating a Command Buffer and Command Encoder
Just as we use a render command encoder to encode draw calls into a command buffer, we use a new type of command encoder to execute kernel functions: the MTLComputeCommandEncoder:
id<MTLCommandBuffer> commandBuffer = [self.context.commandQueue commandBuffer];
id<MTLComputeCommandEncoder> commandEncoder = [commandBuffer computeCommandEncoder];
Before sending work to the GPU, though, we need to understand how to configure the compute command encoder’s argument table and how to dispatch threadgroups.
The Argument Table
We’ve used the argument table in previous articles, but never referred to it by name. The argument table consists of all the state we configure on a command encoder, grouped by type. For example, the argument table holds the lists of textures, samplers, and buffers that eventually become parameters to our shader functions.
For example, we configured the arguments of our fragment shaders by calling the -setFragmentTexture:atIndex: method on a render command encoder. The index parameter matches up the entry in the argument table to the parameter with the corresponding attribute (e.g., [[texture(0)]]) in the signature of the fragment function.
There is a similar method for setting up the argument table for compute encoders: -setTexture:atIndex:. We will use this method to set up the argument table when preparing to execute kernel functions.
Threadgroups
Threadgroups are a central concept in Metal kernel function programming. In order to execute in parallel, each workload must be broken apart into chunks, called threadgroups, that can be further divided and assigned to a pool of threads on the GPU.
In order to operate efficiently, the GPU does not schedule individual threads. Instead, they are scheduled in sets (sometimes called “warps” or “wavefronts”, though the Metal documentation does not use these terms). The thread execution width represents the size of this unit of execution. This is the number of threads that are actually scheduled to run concurrently on the GPU. You can query this value from a command encoder using its threadExecutionWidth property. It is likely to be a small power of two, such as 32 or 64.
We can also determine the upper bound of our threadgroup size by quering the maxTotalThreadsPerThreadgroup. This number will always be a multiple of the thread execution width. For example, on iPhone 6 it is 512.
To make the most efficient use of the GPU, the total number of items in a threadgroup should be a multiple of the thread execution width, and must be lower than the maximum total threads per threadgroup. This informs how we choose to subdivide the input data for fastest and most convenient execution.
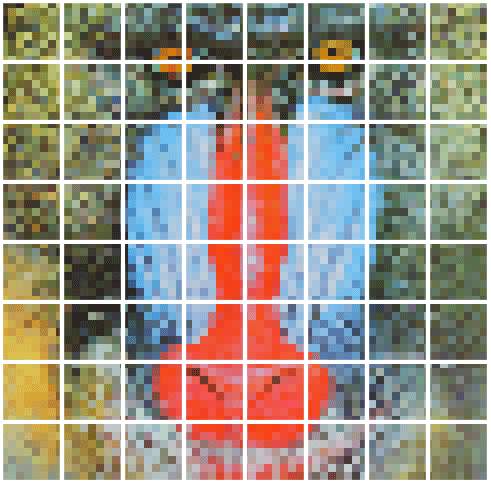
Threadgroups do not have to be one-dimensional. It is often convenient for the dimension of the threadgroup to match the dimension of the data being operated on. For example, when operating on a 2D image, each chunk will typically be a rectangular region of the source texture. The figure below shows how you might choose to subdivide a texture into threadgroups.
In order to tell Metal the dimensions of each threadgroup and how many threadgroups should be executed in a given compute call, we create a pair of MTLSize structs:
MTLSize threadgroupCounts = MTLSizeMake(8, 8, 1);
MTLSize threadgroups = MTLSizeMake([texture width] / threadgroupCounts.width,
                                   [texture height] / threadgroupCounts.height,
                                   1);
Here, we somewhat arbitrarily choose a threadgroup size of eight rows by eight columns, or a total of 64 items per threadgroup. We make the assumption that textures being processed by this code will have dimensions that are multiples of 8, which is often a safe bet. The total threadgroup size is an even multiple of the target hardware’s thread execution width, and is safely below the maximum total thread count.
Now that we have determined the size of our threadgroups and how many we need to execute, we are ready to dispatch a compute call and put the GPU to work.
Dispatching Threadgroups for Execution
Encoding a command to execute a kernel function on a set of data is called dispatching. Once we have a reference to a compute command encoder, we can call the -dispatchThreadgroups:threadsPerThreadgroup: method to encode the request for execution, passing the MTLSize structs we computed previously.
[commandEncoder dispatchThreadgroups:threadgroups threadsPerThreadgroup:threadgroupCounts];
Once we are done dispatching, we tell the command encoder to endEncoding, then commit the corresponding command buffer. We can then use the waitUntilCompleted method on the command buffer to block until the shader is done running on the GPU. The kernel function will be executed once per data item (e.g., once per texel in the source texture).
Conclusion
In this brief article, we have laid the groundwork for a discussion of high-performance image filtering in Metal, as well as other applications of data-parallel programming. You can read this article’s companion post, Fundamentals of Image Processing, for much greater detail on how to put these principles to work. That article also contains a sample project featuring all of the code from this post.